Table of Contents
Advertisement
Available languages
Available languages
Quick Links
Advertisement
Table of Contents

Related Manuals for Triton Blue TR C 1224


Summary of Contents for Triton Blue TR C 1224
- Page 1 Triton Blue USER MANUAL MANUAL DE USUARIO CONTROLLER 12/24 TR C 1224 COTROLADOR 12/24 TR C 1224 Read kindly this user manual before using the machine Lea atentamente este manual antes de utilizar el aparato...
- Page 2 Triton Blue USER MANUAL CONTROLLER TR C 1224 English...
-
Page 3: Product Descriptions
I. PRODUCT DESCRIPTIONS Thank you for using our company the TR-C-1224. To optimize the performance of this product, please read these operating instructions carefully to familiarize yourself with the basic operations of this unit. The TR-C-1224 is a unique 48 DMX channel. -
Page 4: Controls And Functions
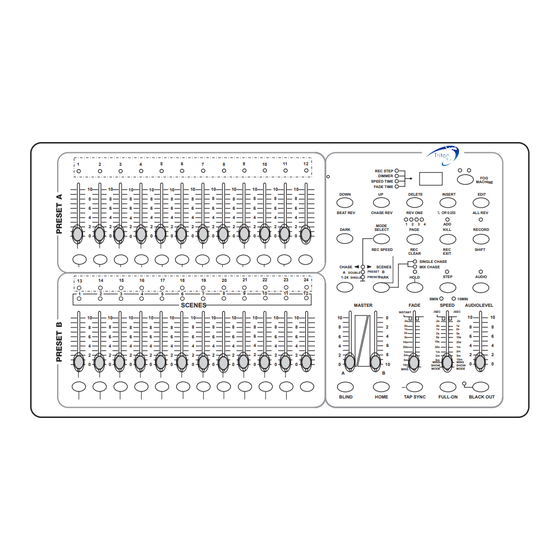
Do not attempt any repairs yourself, doing so will void your manufactures warranty. In the unlikely event your unit may require service please contact your nearest dealer. IV .- CONTROLS AND FUNCTIONS Front Panel: 10 11 12 13 14 SCENE SETTER-48 HEATING REC STEP READY... - Page 5 14. Segment Display: Shows the current activity or programming state. 15. Insert / % or 0-255: Insert is to add one step or steps into a scene. % or 0-255 is used to change display value cycle between % and 0-255. 16.
-
Page 6: Operation
DMX pack. 39. DMX Polarity Select: Used to select DMX polarity. 40. Audio Input: This jack accepts a line level audio input signal ranged from 100Mv to 1V pp. 41. Remote Input: Black Out and Full On may be controlled by a remote control using a standard 1/4”... - Page 7 Record Code. When you’ve entered a new Record Code the first time, and now you want to cancel the new Record Code, you may press and hold down the Record and Exit buttons at a time to exit. 1.3 Program Scenes Record Enable.
- Page 8 Press and hold down the Edit button. While holding down the Edit button, tap the Flash button that corresponds to program you wish to edit. Release the Edit button, the relevant scene LED should light indicating you are in the Edit mode. 2.2 Erase a Program Record enable.
- Page 9 Tap the Step button to scroll to the step which you wish to insert before. You may read the step from the Segment Display. Tap the Insert button to insert the step you’ve created before, all LEDs will flash, indicating the step is inserted. Exit Edit mode.
- Page 10 To return to normal mode, tap the Audio button a second time causing its LED goes out, the Audio mode is disengaged. 3.3 Running a Programs With the Speed Slider Be sure the Audio mode is disengaged, that is the Audio LED goes out. Select your program as described above.
-
Page 11: Note Number
16, the relevant channel LED lights indicating MIDI OUT channel is set. 5.3 Exit MIDI Setting Press and hold down the Record button. While holding down the Record button tap the Rec Exit button to exit MIDI setting. 5.4 Receiving MIDI File Dump Tap the Flash button 3 three time while holding down the Record button, the Segment Display reads “IN”... -
Page 12: Brief Of Main Functions
22-117 [16H-45H] channel light activate Channel 1-48 [76H] FULL-ON [77H] DARK [78H] HOLD [79H] Turn on or off AUDIO [7AH] CHNS SCENES [7BH] DOUBLE PRESET Mode [7CH] SINGLE PRESET Mode [7DH] Step [7EH] BLACK OUT VI.- BRIEF OF MAIN FUNCTIONS 1. -
Page 13: Dimmer Display
slider. 4. Master Slider Master Slider control provides proportion level control over all channels and scenes with the exception of the Flash Buttons. For example: Whenever the Master slider control is at minimum all stage outputs will be at zero except for any resulting from a Flash Button or FULL ON Button. -
Page 14: Technical Specifications
VII.- TECHNICAL SPECIFICATIONS Power Input DC 12~18V 500mA Min. DMX Out 3 pin male XLR socket x 1 MIDI In/Out/Thru 5 pin multiple socket Dimensions 710x266x90mm Weight 6.3 Kgs English TR-SRL-574 Pag. 14... - Page 15 Triton Blue MANUAL DE USUARIO CONTROLADOR TR C 1224 Español...
- Page 16 I.- Descripción: Para optimizar el funcionamiento de este producto, por favor lea atentamente estas instrucciones para familiarizarse con el funcionamiento básico de este aparato. El TR-C-1224 es un controlador de 24 canales de DMX. Esta unidad ha sido verificada en la fábrica antes de proceder a su venta, este aparato no incluye ningún montaje especial.
- Page 17 b. En lugares con excesivas vibraciones o en lugares donde pueda recibir golpes. c. En lugares con temperaturas que excedan de los 45ª C/113ª F o menos de 2º C / 35.6º F III.- Precauciones 1. En el interior del aparato no hay ninguna pieza necesaria para el usuario. 2.
- Page 18 10. Mode Select/ Rec Speed: Cada pulsación del botón activara un modo de operación en el siguiente orden: CHNS/SCENES, Double Preset y Single Preset. El Rec Speed fija la velocidad de cualquier programa en modo Mix Mode. 11. Up / Chase Rev: Up es usado para modificar una escena en modo “Edit”. “Chase Rev”...
- Page 19 30. Botón Back-Out: Este botón es usado para apagar todas las salidas con excepción de los que este activado mediante el botón flash y el Full On. 31. Potenciómetro Fade Time: Potenciómetro usado para ajustar el tiempo de mezcla. 32. Potenciómetro de Speed: Potenciómetro usado para ajustar la velocidad de los chases.
- Page 20 programas. b. Seguridad de sus programas: para proteger sus programas de cualquier cambio por parte de otro usuario, usted puede cambiar el código de grabación (Record Code). i. Introduzca el código de grabación por defecto (Botones flash 1, 6, 6 y 8). ii.
- Page 21 iv. Cuando termine de diseñar la escena pulse el botón de Record para grabar este paso de la escena en la memoria. v. Repetir los pasos 3 y 4 tantas veces sean necesarias para programar todos los pasos de la escena. Usted puede programar hasta 1000 paso por memoria.
- Page 22 iv. Pulse y mantenga el botón de Edit. v. Mientras mantiene pulsado el botón de Edit, pulse el botón de flash de la memoria que se quiere editar. vi. Suelte el botón de Edit, el led correspondiente se excederá indicándonos que estamos en modo de edición. b.
- Page 23 3) Pulse el botón de Page para seleccionar el la pagina 4) Pulse el botón de flash del canal 9 mientras tiene pulsado el botón de Edit, el led de Scene se encenderá. 5) Pulsa el botón de Step para desplazarse hasta el tercer paso de la memoria.
- Page 24 bajar la intensidad, pulsaremos el botón de Down. iv. Mientras mantenemos pulsado el botón de Up o el de Down, pulsaremos el botón de Flash del canal que queramos modificar, hasta que el valor de la intensidad sea la deseada, repita este paso tantas veces como canales quiera modificar.
- Page 25 en modo estándar. iv. Ahora puede mover el potenciómetro para seleccionar la velocidad deseada. Nota: El paso 3 no es necesario si el programa seleccionado no esta grabado con Standard Beat. d. Ejecutar un programa con el Standard Beat. i. Asegúrese de que el modo de activación mediante sonido esta desactivado.
- Page 26 Pulse y mantenga el botón de Record. Mientras tiene pulsado este botón pulse el botón Rec Ext., para salir del modo de configuración del sistema midi. d. Recibiendo datos de un sistema MIDI. Pulse el botón de flash 3, tres veces mientras tiene pulsado el botón de Record, en la pantalla se mostrara “IN”...
- Page 27 de los botones de Flash. Numero de Nota Velocidad Función Decimal Programa Enciendo los programas del 1 22-69 [16H-45H] principal al 48 22-117 [16H-45H] Canales de luz Activa los canales del 1 al 48 [76H] Full-On [77H] DARK [78H] HOLD Activa o desactiva el modo del [79H] funcionamiento mediante el...
- Page 28 Flash. Por ejemplo: Si el Master esta en el 50%, todas las salidas de los canales y las escenas se ajustaran al 50%, ha excepción de lo que se mande mediante el botón de Flash o a través del botón de Full On. Si el Master esta a full (100%), el nivel de salida será...
- Page 29 del chases. IX. Especificaciones técnicas. Potencia de entrada: DC 12 ~ 18V 500mA Min. Salida de DMX Conectar XLR macho de 3 pines. MIDI In/Out/Thru Conector múltiple de 5 pines. Dimensiones 710 x 266 x 90 mm. Peso 6.3 Kg. TR-C-2448 Español Pag.
- Page 30 Triton Blue Product lighting www.triton-blue.com info@triton-blue.com...
Need help?
Do you have a question about the TR C 1224 and is the answer not in the manual?
Questions and answers