Table of Contents
Advertisement
Operation Instructions
RETRO-M
Retrofit Intercom & Music Distribution System
Thank you for purchasing an Intrasonic Technology product. Our products are built
to provide you with years of high quality sound.
If you need assistance with the installation or operation of this product, please
contact our Customer Service Support team at 1-877-435-0670. You may also
get information on this and other Intrasonic Technology products on our website
at
www.intrasonictechnolgy.com
Intrasonic Technology, Inc. l 610 Presidential Dr. Suite 104 l Richardson, Texas 75081 l 877-435-0670
Doc 0001 Rev A
Advertisement
Table of Contents

Related Manuals for Intrasonic Technology RETRO-M


Summary of Contents for Intrasonic Technology RETRO-M
-
Page 1: Operation Instructions
Operation Instructions RETRO-M Retrofit Intercom & Music Distribution System Thank you for purchasing an Intrasonic Technology product. Our products are built to provide you with years of high quality sound. If you need assistance with the installation or operation of this product, please contact our Customer Service Support team at 1-877-435-0670. -
Page 2: Table Of Contents
Table of Contents Topic Page Cover Table of Contents Safety Introduction System Overview Operational Controls Master Settings Clock Intercom Volume Radio Settings Auto On/Off Firmware Auxiliary Input Setup Reset Unit Setup Monitor Radio Presets Selecting the Input Source Room Station Operation Patio Station Operation Door Station Operation Door Station Volume... -
Page 3: Safety
Safety Please read all instructions carefully before operating the RETRO-M music communication system. Read these instructions. Keep these instructions. Heed all warnings. Follow all instructions. Do not use this apparatus near water. Clean only with a dry cloth. Do not block any ventilation openings, and install in accordance with the manufacturers instructions. -
Page 4: Introduction
Listen to your home entertainment through the auxiliary input throughout your home. The RETRO-M not only allows you to use your portable hand held music players with the system, but also offers you the comfort and convenience of communication and room monitoring. -
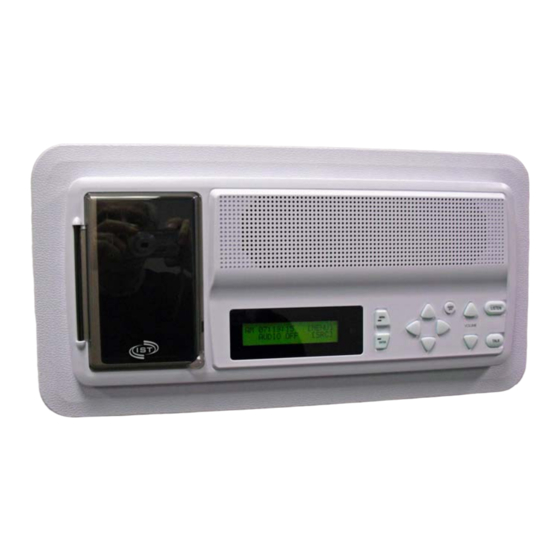
Page 5: System Overview
Auxiliary input wall plate (maximum one per system) Master Unit The RETRO-M master unit allows control of the music and intercom functions. It enables you to set the system music and intercom volume levels, bass and treble levels, clock settings, privacy settings and more. - Page 6 MENU/ENTER Buttons The EXIT/ENTER buttons located on the front of the master are multi-functional switches used in conjunction with the LCD display. These buttons allow programming of various functions and features of the system. Volume The volume control on the master controls the volume of the master. The volume control on the room and patio stations will control their individual volume settings.
- Page 7 Getting Started When you first turn the power on, the following screen will appear. AM 09:04:03 (MENU) MENU AUDIO OFF (SRC) ENTER In the upper left corner the screen the time is displayed. First will be either AM or PM, then the time will be displayed on hours, minutes and seconds.
-
Page 8: Master Settings
Master Settings MENU SYSTEM-SETUP CLOCK INTERCOM RADIO ENTER Clock From the main screen press MENU. Using the LEFT/RIGHT buttons, select SYSTEM by pressing the ENTER button Press the ENTER button while the cursor is on the word clock 12H PM (time) should appear on the second line Press the UP/DOWN buttons to select 12 or 24 hour clock Press the RIGHT button and then the UP/DOWN buttons to select AM or PM Press the RIGHT button to select the hours and the UP/DOWN buttons to set the hour... -
Page 9: Auto On/Off
MENU SYSTEM-SETUP FIRMWARE AUTO RESET ENTER Auto On / Auto Off From the main screen press MENU. Using the LEFT/RIGHT buttons go to SYSTEM and press ENTER Using the LEFT/RIGHT buttons scroll to the right until the screen above appears and select AUTO Press ENTER to setup mode, Auto-On Auto-Off should appear on the display With the cursor on Auto-On press ENTER, Enable PM 12:00 should appear on the display Use the UP/DOWN buttons to scroll between Enable &... -
Page 10: Reset
MENU SYSTEM-SETUP AUX1 AUX2 RESET ENTER System Reset From the main screen press MENU. Using the LEFT/RIGHT buttons move cursor to SYSTEM and press ENTER Using the LEFT/RIGHT buttons move the cursor to RESET With the cursor on Reset, press ENTER, Reset & Reset (ALL) will appear on the display With the cursor on reset press ENTER, and then press MENU (YES) to confirm reset or ENTER (NO) to cancel reset Using the LEFT/RIGHT buttons set the cursor on Reset (ALL) and press ENTER Press MENU (YES) to confirm reset or ENTER (NO) to cancel reset... -
Page 11: Radio Presets
Monitor Using the LEFT/RIGHT buttons place the cursor on Monitor and press ENTER On/Off Select & Type should appear on the display With the cursor on On/Off, press ENTER and then using the LEFT/RIGHT buttons select if you want the monitor function on or off and press ENTER to your selection Using the LEFT/RIGHT buttons move the cursor to Select and press ENTER, you can then use the UP/DOWN buttons to select each station one at a time and the LEFT/RIGHT buttons to select if you want a specific station to be... -
Page 12: Selecting The Input Source
MENU SOURCE-SELECT ENTER Selecting the Input Source From the main screen the ENTER button to get to the Source-Select screen Press the LEFT/RIGHT buttons to select the source (FM, AM or AUX) Press the ENTER button to activate the source selected Set the volume by pressing the VOLUME UP/DOWN buttons Note: The * located next to either the FM, AM or AUX indicates that this is the current source selected Note: There are two auxiliary inputs available. -
Page 13: Room Station Operation
Room Station Listen Button Source Button Volume Control Talk Button Set Button Privacy Button The SOURCE button is used to select the music source. One selection is the AM/FM radio. The second and third choices are Aux 1 and Aux 2. This input depends on which Auxiliary input is selected at the master. If the Personal Music player docking station is selected at the master, then this source will play through the room station. -
Page 14: Door Station Volume
Answering the Door Once someone has pressed the door bell button on the door unit, the system will mute the music at the master and rooms stations and the chime will be heard. To answer the door station simply press the TALK button on the master or any room station. - Page 15 Intrasonic Technology 2 Year Limited Warranty Intrasonic Technology warrants its products to be free of manufacturing defects for two years from the date of closing or actual installation. This warranty only applies to products purchased from authorized dealers and distributors. If proof of installation cannot be supplied, the manufacturing date code may be substituted.
Need help?
Do you have a question about the RETRO-M and is the answer not in the manual?
Questions and answers