Table of Contents
Advertisement
Owner
'
s manual:
Owner
'
s manual:
1-800-328-8251
Wagner Technical Service
Visit us on the world wide web!
http://www.wagnerspraytech.com
1770 Fernbrook Lane, Plymouth, MN 55447
Technical service hours: Monday through Friday, 8:00 am to 4:30 pm Central Time
Form No. 0518803F
1006 •
Read this manual for complete instructions
Read this manual for complete instructions
Need Help? Call us first for answers
fast.
have any comments or problems with this product.
4-Speed
4-Speed
Table of Contents
Safety Information . . . . . . . . . . . . . . . . . . . . . . . . . . . .2-3
Parts and Components . . . . . . . . . . . . . . . . . . . . . . . . . .3
Before You Begin . . . . . . . . . . . . . . . . . . . . . . . . . . . . . .4
Fluid Container Setup . . . . . . . . . . . . . . . . . . . . . . . . . . .5
Suction Extension Setup . . . . . . . . . . . . . . . . . . . . . . . . .6
Backpack Kit Setup . . . . . . . . . . . . . . . . . . . . . . . . . . . . .7
Speed Control . . . . . . . . . . . . . . . . . . . . . . . . . . . . . . . . .8
Flow Control Knob . . . . . . . . . . . . . . . . . . . . . . . . . . . . .8
Testing the Spray Pattern . . . . . . . . . . . . . . . . . . . . . . . .9
Priming with the Suction Extension . . . . . . . . . . . . . . .10
Overspray . . . . . . . . . . . . . . . . . . . . . . . . . . . . . . . . . . .10
How to Spray . . . . . . . . . . . . . . . . . . . . . . . . . . . . . . . .11
Using the quick-clean feature (fluid container) . . . . . . . . .12
Using the quick-clean feature (suction extension) . . . . . .13
Cleanup for oil-based materials (fluid container) . . . . . . .14
Cleaning the Components / Reassembly . . . . . . . . . . .16
Maintenance . . . . . . . . . . . . . . . . . . . . . . . . . . . . . . . . .17
Replacement Parts . . . . . . . . . . . . . . . . . . . . . . . . . . . .17
Troubleshooting . . . . . . . . . . . . . . . . . . . . . . . . . . . . . .18
Français . . . . . . . . . . . . . . . . . . . . . . . . . . . . . . . . . . . .19
Español . . . . . . . . . . . . . . . . . . . . . . . . . . . . . . . . . . . .37
Parts List . . . . . . . . . . . . . . . . . . . . . . . . . . . . . . . . . . . .55
Warranty . . . . . . . . . . . . . . . . . . . . . . . . . . . . . . . . . . . .56
Call Wagner Spray Tech toll-free if you
English
Advertisement
Table of Contents

Related Manuals for WAGNER WideShot


Summary of Contents for WAGNER WideShot
-
Page 1: Table Of Contents
1-800-328-8251 Need Help? Call us first for answers Wagner Technical Service fast. Call Wagner Spray Tech toll-free if you Visit us on the world wide web! http://www.wagnerspraytech.com have any comments or problems with this product. 1770 Fernbrook Lane, Plymouth, MN 55447 Technical service hours: Monday through Friday, 8:00 am to 4:30 pm Central Time Form No. -
Page 2: Important Safety Information
• Know the contents of the paints and solvents being sprayed. Read all Wagner Spray Tech accessory extension cords recommended: Material Safety Data Sheets (MSDS) and container labels provided P/N 0090241 20 foot extension cord with the paints and solvents. -
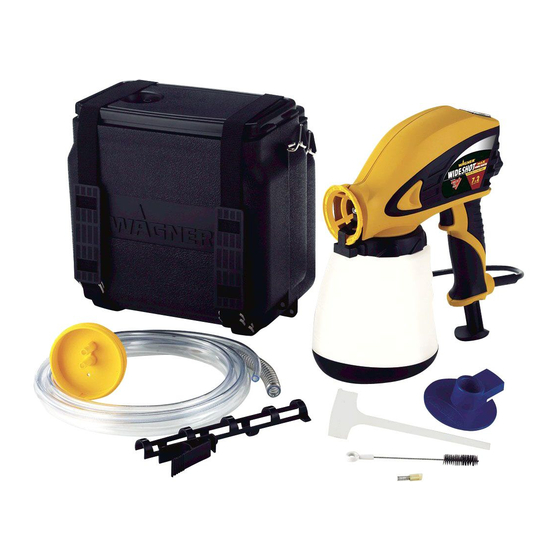
Page 3: Parts And Components
Important Safety Information • Read all safety information before operating the equipment. Save these instructions Grounding Instructions This product must be grounded. In the event of an electrical short Check with a qualified electrician or serviceman if the grounding circuit, grounding reduces the risk of electric shock by providing an instructions are not completely understood, or if you are in doubt as escape wire for the electric current. -
Page 4: Selecting The Proper Tip
Important - Before You Begin Selecting the Proper Tip: It is important that you use the proper spray tip based on your type of spraying job and the type of material you plan to spray.. Read below for details. Wide Angle Tip (Wide Shot™) Round Tip The round tip produces a round pattern. -
Page 5: Fluid Container Setup
Fluid Container Setup 1. Press the Lock-N-Go™ buttons on both sides of the 2. Remove the material container from the pump housing by turning the pump housing locking ring counterclockwise. sprayer with one hand, grab the cup with your other hand, and slide the spray cartridge out. -
Page 6: Suction Extension Setup
Suction Extension Setup (optional) 1. Unplug the sprayer. Press the Lock-N-Go™ buttons on 2. Remove the material container from the pump housing by turning the pump housing locking ring counterclockwise. both sides of the sprayer with one hand, grab the pump with your other hand, and slide the cartridge out. -
Page 7: Backpack Kit Setup
Backpack Kit Setup (optional) 1. Lay cord seal (a) in backpack lid groove (b). Overlap the 2. Snap suction tube (c) through hole in ends of the cord seal by approximately 1/2 inch. Cut off bottom of backpack lid. Assemble remaining seal. -
Page 8: Speed Control
Speed Control / Flow Control Knob Speed Control: Your sprayer offers you four speed levels (1 being lowest, 4 being highest). The lower the speed level, the closer you can get to your work and the less overspray you will have. SPEED CONTROL Lower speed levels give you greater control but require... -
Page 9: Testing The Spray Pattern
Testing the Spray Pattern The instructions below will tell you how to achieve the optimum spray pattern by using each of the features illustrated on the previous page. 2. Point the sprayer at a scrap piece of wood or cardboard, 1. -
Page 10: Priming With The Suction Extension
Priming with the Suction Extension • The time needed to prime will vary from 30 seconds to 3 minutes depending upon the thickness of the material you are spraying. • If your sprayer is properly cleaned and oiled and it takes longer than three minutes to prime, your piston and/or pump housing may be worn and will need to be replaced before using your suction set. -
Page 11: How To Spray
How To Spray Keep stroke Aproximately even 10 to 14 inches 1. Keep your arm moving at constant speed and keep the sprayer at a constant distance from the surface. The sprayer should be triggered at the beginning of the stroke and released at the end of the stroke. -
Page 12: Using The Quick-Clean Feature (Fluid Container)
Using the Quick-clean feature (latex materials only) Cleaning the Fluid Container You will need a garden hose to complete the steps below. If you do not have a garden hose available, or if you used oil- based materials, follow the Cleanup for Oil-Based Materials instructions on pages 14-15. -
Page 13: Using The Quick-Clean Feature (Suction Extension)
Using the Quick-clean feature (latex materials only) Cleaning the Suction Extension You will need a garden hose to complete the steps below. If you do not have a garden hose available, or if you used oil- based materials, follow the Cleanup for Oil-Based Materials instructions on pages 14-15. -
Page 14: Cleanup For Oil-Based Materials (Fluid Container)
Title Cleanup for oil-based materials (fluid container) 1. Unplug the sprayer. Pour the remaining material back 2. Fill the container half full of the cleaning solution into the original container. appropriate to the type of material you sprayed (warm, soapy water for latex materials, mineral spirits for oil- based materials). -
Page 15: Cleanup For Oil-Based Materials (Suction Extension)
Title Cleanup for oil-based materials (suction extension) 1. Make sure the sprayer is unplugged. 2. Remove the suction set from the material container and submerge into a container of the solvent appropriate to the type of material you sprayed. 3. Plug in the sprayer, and squeeze the trigger and spray 4. -
Page 16: Cleaning The Components / Reassembly
Title Cleaning the components (oil-based materials) 1. Remove all parts from the pump housing assembly. 3. Clean all parts thoroughly with the brush provided using a solution appropriate to the type of material you sprayed. 3. NOTE - Make sure to completely remove all material 4. -
Page 17: Maintenance
Title Maintenance Lubricating your sprayer prior to storage is important to prolong the life of the pump housing components. 1. Turn the sprayer upside-down while the fluid container is 2. Plug in the sprayer. Aim at piece of scrap wood or removed. -
Page 18: Troubleshooting
If you have any problems that are not solved by the Send in your product registration card or register online at troubleshooting section of this manual, please call Wagner www.wagnerspraytech.com. Proper registration will serve as Technical Service at 1-800-328-8251 Monday through Friday proof of purchase in the event your original receipt becomes between 8:00 AM and 4:30 PM Central time. -
Page 19: Français
Parts list • Liste de pièces • Lista de piezas Title *see Optional Accessories for cartridge kits *voir les Accessoires Optionnels pour des ensemble de cartouche. *vea los Accesorios Opcionales para los kits del cartucho. Item Part No. Quantity English - Français - Español - Article... -
Page 20: Warranty
GARANTíA LIMITADA POR UN AÑO - Manténgala archivada Este producto, fabricado por Wagner Spray Tech Corporation (Wagner), está garantizado contra defectos de materiales y de mano de obra por un año a partir de la fecha de compra, si se utiliza de acuerdo con las instrucciones y recomendaciones especificadas por Wagner. Esta garantía no cubre daños producidos por uso indebido, accidentes, negligencia del usuario o desgaste normal del producto.
Need help?
Do you have a question about the WideShot and is the answer not in the manual?
Questions and answers