Advertisement
Table of Contents
- 1 Safety Instructions
- 2 Unpacking Instructions
- 3 Electrical Requirements
- 4 How to Put Your Ceiling Fan Together
- 5 How to Hang Your Ceiling Fan
- 6 How to Wire Your Ceiling Fan
- 7 Wall Control Procedures
- 8 Wall Control Installation
- 9 High Speed Conditioning of Fan Control
- 10 Using Your Ceiling Fan
- 11 Maintenance
- 12 Energy Efficient Use of Ceiling Fans
- 13 Control Trouble Shooting
- 14 Troubleshooting
- 15 Repair Parts
- Download this manual
READ AND SAVE THESE INSTRUCTIONS
CARRERA GRANDE ECO
Ceiling Fan Owner's Manual
CF788AP00
CF788CK00
CF788GBZ00
CF788ORB00
Net Weight:
Part No. F40BP74270002
Damp Location
Model Numbers
- Antique Pewter
- Chalk
17.2
Lbs.
- Gilded Bronze
- Oil Rubbed Bronze
54", 60" or 72" Fan Blades
Not Included
Form No. BP7427-2
ETL Model No.: CF788
™
Advertisement
Table of Contents
Troubleshooting

Related Manuals for Emerson CF788AP00


Summary of Contents for Emerson CF788AP00
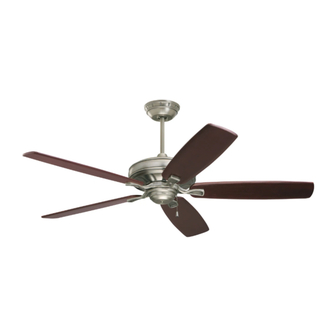
- Page 1 READ AND SAVE THESE INSTRUCTIONS ™ CARRERA GRANDE ECO Damp Location Ceiling Fan Owner's Manual Model Numbers CF788AP00 - Antique Pewter CF788CK00 - Chalk CF788GBZ00 - Gilded Bronze CF788ORB00 - Oil Rubbed Bronze 54”, 60” or 72” Fan Blades 17.2 Net Weight: Lbs.
-
Page 2: Safety Instructions
WARNING: To reduce the risk of fire or electric shock, this fan should only be used with fan speed control, Model No. FR-7861LMB manufactured by Rhine Electric Co., Ltd. WARNING: To avoid fire, shock or injury, do not use an Emerson or any other brand of control not specifically approved for this fan. - Page 3 EMERSON QUICK START GUIDE The Quick Start Guide covers the installation WARNING instructions common for ceiling fan operations. If additional assistance with wiring, alternate hanging To reduce the risk of fire, electric shock, or personal systems, or lighting options, proceed to the complete injury, mount fan to outlet box marked “Acceptable for Fan...
- Page 4 WIRE (NEUTRAL) CONNECTOR (3) NOTE: If you are using an Emerson Light Fixture with your fan, see Light Fixture Owner’s Manual for wiring. 2. Securely connect the fan motor white wire to the supply white (neutral) wire using wire connector supplied. Securely connect...
-
Page 5: Unpacking Instructions
Emerson Electric Co. Substitution of parts or accessories not designated for use with this product 2. Remove the fan assembly from the protective by Emerson Electric Co. could result in personal plastic bag. Place the fan assembly into the upper injury or property damage. -
Page 6: Electrical Requirements
Electrical Requirements Your new ceiling fan will require a grounded electrical WARNING supply line of 120 volts AC, 60 Hz, 15 amp circuit. The outlet box must be securely anchored and Turning off wall switch is not sufficient. To avoid capable of withstanding a load of at least 50 pounds. - Page 7 How to Put Your Ceiling Fan Together (continued) NOTE: Take care not to scratch fan housing when installing blades. MOTOR HUB 3. Loosely attach one blade/flange assembly to the motor hub by securing the two 1/4-20 x 14mm captive pan head screws. Make sure the screws BLADE/FLANGE are NOT tightened (Figure 3).
- Page 8 How to Put Your Ceiling Fan Together (continued) 7. Carefully turn partially assembled fan upside down and place in styrofoam form carton, in preparation HANGER for final installation. BALL 8. Remove the hanger ball by loosening the setscrew in the hanger ball until the ball falls freely down the downrod (Figure 6).
- Page 9 How to Put Your Ceiling Fan Together (continued) 12. Reinstall the hanger ball (Figure 9) on the downrod as follows. Route the two 80” motor leads through the hanger ball. Position the pin through the two holes in the downrod and align HANGER BALL the hanger ball so the pin is captured in the CEILING...
-
Page 10: How To Hang Your Ceiling Fan
How to Hang Your Ceiling Fan WARNING CEILING The fan must be hung with at least 7' of clearance from floor to blades (Figure 10). WARNING AT LEAST The outlet box and joist must be securely mounted and capable of supporting at least 50 lbs. Use only a U.L. outlet box listed as “Acceptable for Fan Support of 22.7 kg. -
Page 11: How To Wire Your Ceiling Fan
Figure 13 insulation). Securely connect wires with wire connectors supplied. NOTE: If you are using an Emerson Light Fixture with your fan, see Light Fixture Owner’s Manual for wiring. 2. Securely connect the fan motor white wire to the supply white (neutral) wire using wire connector supplied (Figure 13). -
Page 12: Wall Control Procedures
General Preset Memory Feature Your Emerson Ceiling Fan/Light Control consists of Your Emerson receiver is equipped with a preset wall mounted transmitter and a receiver which is memory feature. If the AC supply to the receiver is mounted under the fan ceiling cover. The remote... - Page 13 Wall Control Installation (continued) NOTE: Make all wiring connections using wire connectors (supplied). Make sure that all SCREWS (2) connections are tight, including ground, and that no bare wire is visible at the wire connectors, except for the ground wire. 1.
-
Page 14: High Speed Conditioning Of Fan Control
8. Next, install the other wall control into the wall box LIGHT LIGHT containing the load wire. Connect the black wire of FAN OFF FAN OFF EMERSON ® the wall control to the traveler wire(s) already EMERSON ® connected to the black wire (in the other wall box). -
Page 15: Using Your Ceiling Fan
4. Ceiling Fan Blades (see store or catalog). Emerson Electric Co. Substitution of parts or accessories not designated for use with this product by Emerson Electric Co. could result in personal WARNING injury or property damage. The use of any other control not specifically approved for this fan could result in fire, shock and personal injury. -
Page 16: Energy Efficient Use Of Ceiling Fans
8 - 9 feet above the floor for optimal into the occupied space. Remember to adjust your airflow. Consult your Emerson Retailer for optional thermostat when using your ceiling fan - additional mounting accessories. energy and dollar savings could be realized with this simple step! Turn Off When Not in the Room. -
Page 17: Troubleshooting
Trouble Shooting WARNING: For your own safety, turn off power at fuse box or circuit breaker before trouble shooting your fan. TROUBLE PROBABLE CAUSE SUGGESTED REMEDY 1. Fuse or circuit breaker blown. 1. Check main and branch circuit fuses or circuit 1. -
Page 18: Repair Parts
Repair Parts BLADES SOLD SEPARATELY ETL Model No.: CF788... - Page 19 Repair Parts Listing Model Numbers Description CF788AP00 CF788CK00 CF788GBZ00 CF788ORB00 Hanger Ball Assembly, 761655-34 761655-23 761655-77 761655-32 Consisting of: Hanger Bracket — — — — Hanger Ball — — — — Downrod (4.5”) — — — — Parts Bag Containing:...
- Page 20 You will be responsible for all insurance, freight or other transportation charges to our factory or authorized service center. Your Emerson Air Comfort Ceiling Fan should be properly packed to avoid damage in transit since we will not be responsible for any such damage.
Need help?
Do you have a question about the CF788AP00 and is the answer not in the manual?
Questions and answers