
Related Manuals for Concertone DVD STEREO RADIO SYSTEM


Summary of Contents for Concertone DVD STEREO RADIO SYSTEM
- Page 1 TUNER CD PLAYBACK VIEWER OPERATING INSTRUCTIONS DVD STEREO RADIO SYSTEM...
-
Page 2: Safety Precautions & Warranty
WARRANTY ONE (1) YEAR LIMITED WARRANTY CONCERTONE warrants to the original retail purchaser of this radio that it or any part therein, under normal use and conditions, be proven defective in material or workmanship within 1 year from the date of original purchase, such defect/s will be repaired or replaced at CONCERTONE’S option without charge for parts and repair labor. -
Page 3: Table Of Contents
TABLE OF CONTENTS Safety Precautions & Warranty ....1 Playing MP3 and Picture File Disc ..20-21 Disc Formats ..........3 Playing a MP3 file disc ......... 20 Before You Start ........4 Playing a Picture file disc ......21 Using the remote control ....... -
Page 4: Disc Formats
DISC FORMATS The unit can playback. DVDs Audio CDs [8cm/12cm disc] [8cm/12cm disc] CD PLAYBACK VIEWER Region Management Information Region Management Information: This unit is designed and manufactured to respond to the Region Management Information that is encoded on DVD discs. If the Region number printed on the DVD disc does not correspond to the Region number of this unit, this unit cannot play that disc. -
Page 5: Before You Start
BEFORE YOU START USING THE REMOTE CONTROL CORRECTLY • Point the Remote Control at the REMOTE SENSOR located on the unit. • When there is a strong ambient light source, the performance of the infrared REMOTE SENSOR may be degraded, causing unreliable operation. •... -
Page 6: Control Reference Guide
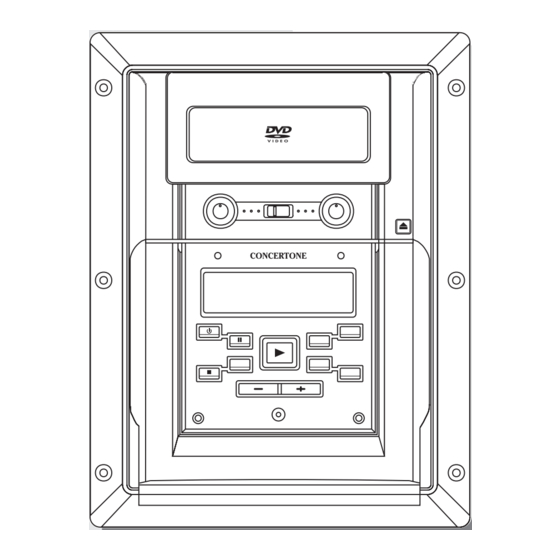
CONTROL REFERENCE GUIDE NAMES OF CONTROL - REMOTE CONTROL STANDBY button Turn back to standby mode and turn on the unit. RETURN button OPEN/ STANDBY CLOSE Return to the normal operation after using the SETUP menu of RETURN FUNCTION a DVD. Number (0 - 9) and (+10) buttons GOTO Use when creating Tuner stations preset programs and select the... - Page 7 CONTROL REFERENCE GUIDE NAMES OF CONTROL - REMOTE CONTROL OPEN / CLOSE button Use to open or close the disc door. OPEN/ 21) FUNCTION button STANDBY CLOSE Select the source. RETURN FUNCTION 22) GOTO button GOTO Skip directly to a specific location on a DVD disc. 23) FM MODE button Set FM MODE to FM STEREO for FM stereo sound or to FM MONO for mono sound.
- Page 8 CONTROL REFERENCE GUIDE NAMES OF UNIT 1. Mounting hole 11. TREBLE control knob 2. BASS control knob 12. CD DOOR OPEN/CLOSE button 3. POWER indicator PRO LOGIC indicator 4. DISPLAY window PLAY button 5. PAUSE button 15. NEXT/CH+ button 6. POWER ON/OFF button 16.
-
Page 9: Display Information
DISPLAY INFORMATION Display CHAPTER / TRACK indicator STEREO indicator ANGLE MEMORY When a DVD is loaded in the Unit, this Tune into a station. "STEREO" indicator indicator indicator appears along with the chapter w i l l a p p e a r w h e n a n F M Appears when Displayed number. -
Page 10: Installation
INSTALLATION Turning on the Unit and TV 1. Press the POWER ON/OFF button, the POWER indicator will turn off, or 2. Press the STANDBY button on the remote control. 3. Turn on the TV by pressing its POWER button. 4. Select the channel on your TV corresponding to the VIDEO IN jack that the Unit is connected. 5. -
Page 11: Adjusting The Sound
ADJUSTING THE SOUND To adjust the surround sound balance while Dolby Digital and Dolby Pro Logic II decoding is in effect Use the remote control to make the following changes to speaker balance: Front Speaker A (left) • Press the SOUND button repeatedly to display LEFT, then press the CURSOR button to adjust the sound level. -
Page 12: Adjusting The Sound
ADJUSTING THE SOUND Pro Logic Emulation Mode (EMU) The Pro Logic emulation mode offers users the same robust surround processing as original Pro Logic, in case the source content is not of optimum quality, or if there is a desire to hear the program more “as it used to be”. When this mode is used, it is called Pro Logic, as before. -
Page 13: Playing A Disc
PLAYING A DISC Basic playback This owner’s manual explains the basic instructions of this DVD Unit. Some DVD discs are produced in a manner that allows specific or limited operation during playback. As such, the DVD Unit may not respond to all operating commands. This is not a defect in the DVD Unit. -
Page 14: Fast Foward/Fast Reverse
PLAYING A DISC Fast Forward/Fast Reverse 1. Press the TUNING TUNING button when a disc is playing. • The disc begins fast scan at x2 speed. • Four speeds are available. Each time TUNING TUNING button is pressed, the speed of fast scan changes in the following sequence: x 20 x 20... -
Page 15: Angle Selection
PLAYING A DISC Angle selection Some DVDs contain scenes which have been shot from a number of different angles. For these discs, the same scene can be viewed from each of these different angles. 1. While you are playing a DVD with different angles recorded, press the ANGLE button to view the number of the current angle. -
Page 16: Special Functions
SPECIAL FUNCTIONS Basic playback DISPLAY function Using DISPLAY, you can check and change the current settings of the following items: ANGLE, AUDIO and SUBTITLE. • While the disc is playing, press the DISPLAY button to display the screen shown below. Elapsed time: Elapsed time from the beginning of the chapter which is currently playing. -
Page 17: Locating A Specific Title
SPECIAL FUNCTIONS Basic playback Locating a specific title If a DVD disc contains title numbers, you can locate a specific title by directly selecting a title number. 1. In stop mode, press the GOTO button. 2. Press button to highlight a specific field and press the corresponding number button(s) for the title you want. -
Page 18: Locating A Specific Time
SPECIAL FUNCTIONS Basic playback Locating a specific time You can move to a specific location by entering its corresponding time (hours, minutes, seconds) 1. Press the GOTO button. 2. Press button to highlight time. 3. Press the corresponding number buttons for the setting point you want. •... -
Page 19: Cd / Dvd Programmable Memory
Advanced CD / DVD PROGRAMMABLE MEMORY playback Programmable memory The two types of programmed playback provided by this Unit are title programmed playback and chapter programmed playback. Title / Chapter programmed playback 1. Press the MEMORY button while the disc is stopped. 2. -
Page 20: Repeat Playback
Advanced REPEAT PLAYBACK playback You can play a specific title or chapter repeatedly. (Title repeat, chapter repeat, A-B repeat) Repeating a title You can play the same title repeatedly. 1. While the disc is playing, press the REPEAT DISC button until the Repeat Title “... -
Page 21: Playing Mp3 And Picture File Disc
PLAYING MP3 AND PICTURE FILE DISC This Unit will play MP3 and Picture files recorded on CD-R discs. Playing a MP3 file disc 1. Press the OPEN /CLOSE button, the disc tray opens. 2. Insert a MP3 file disc on the disc tray with the label side up. 3. -
Page 22: Playing A Picture File Disc
PLAYING MP3 AND PICTURE FILE DISC Playing a Picture file disc 1. Press the OPEN /CLOSE button, the disc tray opens. 2. Insert a Picture CD on the disc tray with the label side up. 3. Press the OPEN/CLOSE button, the disc tray closes. 4. -
Page 23: Radio Operation
RADIO OPERATION Tuning into a station manually 1. Press the FUNCTION button until the frequency band appears on the display. 2. Press the BAND button to select the desired band. 3. Press the TUNING button to tune in the desired station. -
Page 24: Tv Setup
TV SETUP • Connecting a antenna or CATV cable to the TV RF IN terminal before TV SETUP. • Use the remote control to access and adjust features as desired. 1. Press the FUNCTION button until TV appears on the display. 2. -
Page 25: Add Tv Channel Or Delete Tv Channel
TV SETUP Add TV Channel or Delete TV Channel 1. Press number button on the remote control, you want to add or delete channel . 2. Press the TV SETUP button to open the TV SETUP menu. 3. Press the TV CH+ or TV CH- button to select NTSC CATV or NTSC AIR, then press the SET button to enter the sub-menu. -
Page 26: Customizing The Function Settings
CUSTOMIZING THE FUNCTION SETTINGS LANGUAGE setting 1. Press the FUNCTION button until DVD appears on the display. 2. Press the STOP button so that no disc is playing. 3. Press the SETUP button. 4. Use button to select the Language, then press the ENTER button. 5. -
Page 27: Video Output
CUSTOMIZING THE FUNCTION SETTINGS Cut off when a wide-screen 4:3 Pan Scan video image is played. • When wide-screen video material is played, this mode clips the right and left sides of the image so that it can be viewed on a conventional screen. -
Page 28: Brightness
CUSTOMIZING THE FUNCTION SETTINGS Brightness 1. Press the SETUP button. 2. Use button to select Video, then press the ENTER button. 3. Use button to select Brightness, and then press the ENTER button. 4. Use button to shift and select the Off/On, then press the ENTER button. 5. -
Page 29: Audio Setting
CUSTOMIZING THE FUNCTION SETTINGS AUDIO setting Digital Out 1. Press the SETUP button. 2. Use button to select Audio, press the ENTER button. 3. Press the ENTER button repeatedly to select Digital Out type. 4. To exit the FUNCTION SETUP MENU and return to the normal screen, press the RETURN button. -
Page 30: Password/Parental Lock
CUSTOMIZING THE FUNCTION SETTINGS Password/Parental lock DVD discs equipped with the password function are rated according to their content. The contents allowed by a parental lock level and the way a DVD disc can be controlled may vary from disc to disc. For example, if the disc allowed, you could edit out violent scenes unsuitable for children and replace them with more suitable scenes, or you could lock out playback of the disc altogether. -
Page 31: Language Code List For Disc Language
LANGUAGE CODE LIST FOR DISC LANGUAGE Code Language Name Language Name Language Name Code Language Name Code Code Page 30... -
Page 32: Maintenance
MAINTENANCE CLEAN DISC If the DISC skips or will not play, the disc may need cleaning. Before playing, wipe the disc fromthe centre out with a cleaning cloth. After playing, store the disc in its case. CLEANING THE UNIT Do not use volatile chemicals on the unit. Clean by lightly wiping with a soft cloth. IMPORTANT NOTICE: •... -
Page 33: Specifications
SPECIFICATIONS TUNER SECTION Frequency range FM 87.5 -108 MHz AM 530 - 1,710 kHz (USA and Canada) Antenna External 75 ohm automotive type antenna AMPLIFIER SECTION Power output 10% T.H.D. (A) 20W x 2 (Subwoofer) + 10W x 4 (B) 10W x 2 Power requirements 10/16 Volts DC COMPACT DISC PLAYER SECTION... -
Page 34: System Connections
SYSTEM CONNECTIONS CONNECTION DIAGRAM Make correct connections as illustrated in the connection diagram. From TV Antenna To TV From Radio Antenna Antenna From Video Out From Video Out From Other AUX input From Remote input SPEAKER CONNECTIONS Be sure to connect stripe to stripe (-) and plain to plain (+) when hooking up speaker wires.
Need help?
Do you have a question about the DVD STEREO RADIO SYSTEM and is the answer not in the manual?
Questions and answers