Table of Contents
Advertisement
Advertisement
Table of Contents

Related Manuals for Logik L160STB11


Summary of Contents for Logik L160STB11
- Page 1 160GB / 250GB Freeview TV Recorder Instruction Manual L160STB11 / L250STB11...
-
Page 3: Table Of Contents
Contents Unpacking ..........................5 Product Overview ........................6 Front Panel ................................6 Rear Panel................................6 Remote Control ..............................7 Battery Replacement of the Remote Control ................... 9 – Handling the Batteries ......................... 9 – Handling the Remote Control ......................9 Remote Control Operation Range........................ 9 First Time Installation ......................11 Standby Modes ........................12 Active Standby Mode .............................12... - Page 4 Recording ..........................18 Single Recording ..............................18 Dual Recording ..............................19 Stop Recording in Planner TV ........................19 Stop Recording in Channel List ........................19 Event Recording ..............................20 Time Shift Recording ............................21 Play Recorded Programme .....................22 Channel Zero ..........................23 Channels Menu ........................26 Organise ................................26 Groups ..................................27 Install Menu ..........................28 Automatic Tune ..............................28 Manual Scan ...............................29...
-
Page 5: Unpacking
Thank you for purchasing your new Logik Freeview TV Recorder. We recommend that you spend some time reading this instruction manual in order that you fully understand all the operational features it offers. You will also find some hints and tips to help you resolve any issues. -
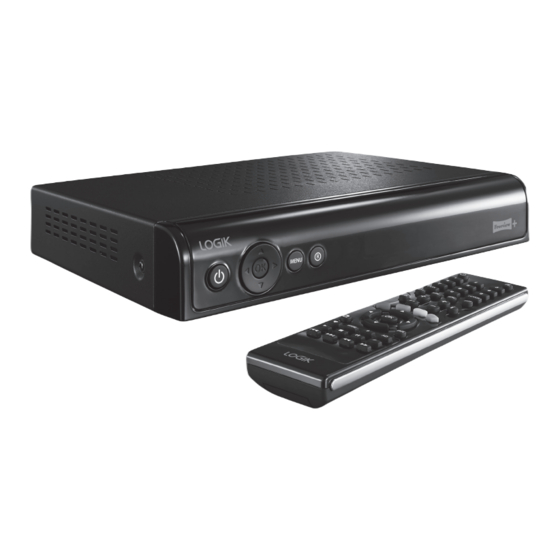
Page 6: Product Overview
Product Overview Front Panel Button Button • Switch the unit between on and standby To record the current programme. mode. Remote Control Sensor • Press and hold this button for three Power indicator seconds to display the passive standby • Illuminates red in standby mode. menu. -
Page 7: Remote Control
Remote Control Button • Switch the unit between on and standby mode. • Press and hold this button for three seconds to display the passive standby menu. Button To mute and restore the sound output. 0-9 Buttons • To select a programme. • To select the number item in a menu. - Page 8 Buttons To navigate in the OSD menu setup OK Button To confirm a selection in OSD menu/display TV channel list. Channel Zero Button To select the interactive services of the Channel Zero. 17. BACK Button To return to the previous menu. Button To display the favourite menu.
-
Page 9: Battery Replacement Of The Remote Control
Battery Replacement of the Remote Control Remove the battery compartment cover. Load 2 x AAA (UM-4 or R03) batteries into the battery compartment. Close the battery compartment cover. Install the batteries correctly by following the polarity (+ and -) indications in the battery compartment. -
Page 10: System Connection
System Connection Audio System Aerial To SPDIF socket RF coaxial Cable (not included) Coaxial cable (not included) To aerial wall socket Mains cable To Mains socket SERVICES ONLY AC 230V~ 50Hz 12W RF IN RF IN RS232 RF OUT RF OUT SPDIF SCART To SCART... -
Page 11: First Time Installation
Connecting to the Mains Socket Plug in the mains plug into the mains socket after you have completed all the connections. The unit will take awhile for loading. The power indicator on the front panel will illuminate red and “Stby“ will be displayed on the LED display. Press the button to switch the unit on, the power indicator will illuminate green. -
Page 12: Standby Modes
Standby Modes This unit contains 2 standby modes. Active Standby Mode When the unit is in On mode, press the button once, the unit will enter the active standby mode and the power indicator will illuminate red. To turn the unit on again, press the button again. -
Page 13: Basic Features
Basic Features Information Bar Press the button to display information about the current programme. BBC TWO 20:00 (0:30) MASTERCHEF The contestants who’ve shown the most potential have to survive the heat of a professional kitchen. Today, they are cooking at The Living Room. Can they stand the pace of this frantic kitchen?[S] 20:18 H.O.H... -
Page 14: Volume Adjustment
Volume Adjustment Press the V+ / – buttons on the remote control to adjust the volume. Press the button on the remote control to switch the sound off. Press the button again or press the V+ / – buttons to cancel this function. Channel Selection Press the P+ / –... -
Page 15: Audio Selection
Audio Selection Press the AUDIO button on the remote control to AUDIO CHANNEL Sat, 12 Sep 19:42 display the Audio Channel menu. Press the buttons to select L (Left), S (Stereo), R (Right). Press the buttons to select the desired language (only applicable when the TV programme supports this feature). -
Page 16: Tv Guide
TV Guide This unit has a TV Guide to help you navigate through all the possible viewing options. The TV Guide supplies information such as programme listings, start and end times for all available services (the availability and amount of programme information will vary, depending on the particular broadcaster). -
Page 17: Planner Tv
Planner TV This unit has a Planner TV to help you list out the status of all your recordings. You can see detailed information in the record column. Switch On/Off Planner TV • Press the BLUE button on the TV Guide or directly press the TV/PVR button on the remote control to enter the Planner TV menu. -
Page 18: Recording
Recording Use this function to record the DTV When you are single recording the programme you are watching on the main power indicator will flash red on the screen and save them for future viewing. front panel. When you are dual recording the Make sure that the unit’s built-in HDD has power indicator will flash alternatively enough available memory space. -
Page 19: Dual Recording
Dual Recording This unit can record two different channels simultaneously from either 1 multiplex or 2 different multiplex’s. For more information on the channels available from different multiplex’s, please visit the DTG website: http://www.dtg.org.uk/industry/dtt_channels.html. Press the button on the unit or press the button on the remote control to record the currently viewing programme, the power indicator will flash red and “rECO“... -
Page 20: Event Recording
Event Recording This allows you to preset some programmes to be recorded in standby mode or on mode. Press the GUIDE button on the remote control to switch on TV Guide. Press the buttons to TV GUIDE Sat, 12 Sep 19:22 select the desired programme you want to preset SOUTH TODAY 18:30 - 19:00 (0:30) -
Page 21: Time Shift Recording
Time Shift Recording This function allows the unit to virtually record the live viewing broadcast programme. • Time shift and recording functions may not work if the signal strength is weak. • Recording will stop automatically when the disk is full. • During time shift, changing channels will cause time shift to terminate. -
Page 22: Play Recorded Programme
Play Recorded Programme You can play a recorded programme from the recorded programme list on the Planner TV. Press the TV/PVR button on the remote control PLANNER TV Fri, 4 Jun 09:33 to enter the Planner TV. EBB AND FLO Press the buttons to select your recorded 09:05 - 09:15 (0:10) -
Page 23: Channel Zero
Channel Zero Channel Zero messages are used to provide the information to you like Channel Zero service Your interactive content is not available. Have you unplugged your receiver or recently had a power cut? availability or not, you can perform the Channel To receiver content, leave your receiver in standby and switched Zero scan to search for Channel Zero series. -
Page 26: Channels Menu
Channels Menu Organise Press the MENU button and then press the MENU Sat, 12 Sep 19:21 buttons to select Channels. Press the button or Organise the OK button to confirm. Channels Groups buttons to select Organise and Press the Install then press the OK button to confirm. -
Page 27: Groups
Groups Press the MENU button and then press the MENU Sat, 12 Sep 19:23 buttons to select Channels. Press the button or Organise the OK button to confirm. Channels Groups buttons to select Groups and then Press the Install press the OK button to confirm. The Group Settings Channels menu will displayed. -
Page 28: Install Menu
Install Menu Automatic Tune Press the MENU button and then press the MENU Thu, 3 Jun 20:21 buttons to select Install. Press the button or Automatic Tune the OK button to confirm. Channels Manual Scan buttons to select Automatic Tune Press the Restore Factory Default Install... -
Page 29: Manual Scan
Manual Scan MENU Thu, 3 Jun 20:21 Press the MENU button and then press the Automatic Tune Channels Manual Scan buttons to select Install. Press the button or Restore Factory Default Install the OK button to confirm. Version Format hard drive Settings buttons to select Manual Scan and Press the... -
Page 30: Restore Factory Default
Restore Factory Default MENU Thu, 3 Jun 20:21 Press the MENU button and then press the Automatic Tune Channels Manual Scan buttons to select Install. Press the button or Restore Factory Default Install the OK button to confirm. Version Format hard drive Settings buttons to select Restore Factory Press the... -
Page 31: Version
Version Press the MENU button and then press the MENU Thu, 3 Jun 20:21 buttons to select Install. Press the button or Automatic Tune the OK button to confirm. Channels Manual Scan Restore Factory Default buttons to select Version and then Press the Install Version... -
Page 32: Settings Menu
Settings Menu Language Press the MENU button and then press the MENU Sat, 12 Sep 19:23 buttons to select Settings. Press the button or Language the OK button to confirm. Channels buttons to select Language and Press the Time Install then press the OK button to confirm. - Page 33 Press the MENU button and then press the MENU Sat, 12 Sep 19:21 buttons to select Settings. Press the button or Language the OK button to confirm. Channels buttons to select TV and then press Press the Time Install the OK button to confirm. Parental Lock Settings Updates...
-
Page 34: Time
Time Press the MENU button and then press the MENU Sat, 12 Sep 19:21 buttons to select Settings. Press the button or Language the OK button to confirm. Channels buttons to select Time and then Press the Time Install Parental Lock press the OK button to confirm. -
Page 35: Parental Lock
Parental Lock MENU Sat, 12 Sep 18:24 Press the MENU button and then press the Language Channels buttons to select Settings. Press the button or Time Install the OK button to confirm. Parental Lock Settings buttons to select Parental Lock and Press the Updates then press the OK button to confirm. -
Page 36: Updates
Updates Press the MENU button and then press the MENU Sat, 12 Sep 18:23 buttons to select Settings. Press the button or Language the OK button to confirm. Channels buttons to select Updates and then Press the Time Install press the OK button to confirm. Parental Lock Settings Updates... -
Page 37: Hints And Tips
Hints and Tips In some regions, the digital terrestrial signal may be weak. Please ensure that your antenna is suitable for your location. Problem Possible cause What to do No signal found • Aerial is disconnected. • Check aerial connection. • Aerial is damaged/ • Check aerial. -
Page 38: Specification
Specification Model L160STB11 L250STB11 160 GB 250 GB Tuner and Channel RF input connector (IEC-TYPE, IEC 169-2, female) RF output connector (IEC-TYPE, IEC169-2, male) Frequency range : 470MHz ~ 862 MHz (UHF) Decoder Transport Stream MPEG-2 ISO/IEC13818-1 Profile Level MPEG-2 Main Profile @Main Level Input Rate Max. -
Page 39: Safety Warnings
Safety Warnings Ventilation • Read all the instructions carefully before using the unit and keep them for future • To prevent the risk of electric shock or fire reference. hazard due to overheating, ensure that • Retain the manual. If you pass the unit curtains and other materials do not obstruct onto a third party make sure to include this the ventilation vents. - Page 40 Batteries Maintenance • Batteries used in the remote control for this • Ensure to unplug the unit from the mains unit are easily swallowed by young children socket before cleaning. and this is dangerous. • Do not use any type of abrasive pad or • Keep loose batteries away from young abrasive cleaning solutions as these may children and make sure that the battery...
- Page 41 How the digital switchover may affect you: Television in the UK is going digital, bringing us all more choice and new services. Starting in late 2007 and ending in 2012, television services in the UK will go completely digital, TV region by TV region. The map shows when your area will switchover to digital.
- Page 42 NOTE: If you require a replacement for any of the items listed below, please quote their corresponding part numbers: Replacement Part Part Number Remote Control 880-LH4711-TO AAA Battery X 2 890-CZ4157-00 Loop Through Cable 341-321012-70 Visit Partmaster.co.uk today for the easiest way to buy electrical spares and accessories.
Need help?
Do you have a question about the L160STB11 and is the answer not in the manual?
Questions and answers