Table of Contents
Advertisement
Quick Links
Advertisement
Table of Contents

Related Manuals for Peak Performance PKC0BU7

Summary of Contents for Peak Performance PKC0BU7
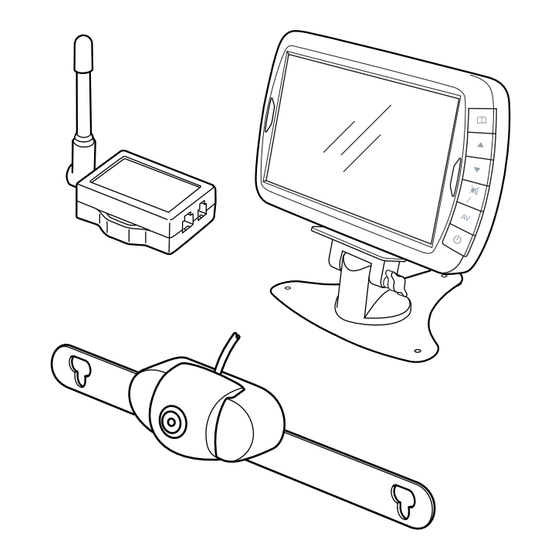
- Page 2 INTRODUCTION The Back-Up Camera displays images behind the vehicle, and is used when backing up a vehicle. When the vehicle is driven in reverse, the camera is activated, which sends a signal to the transmitter. The transmitter sends a video signal to the monitor, which then displays the view captured by the camera. FEATURES x Color monitor displays view from the rear of the vehicle x Wireless monitor can be suction-mounted to windshield or dash for easy visibility...
-
Page 3: Installation
INSTALLATION Some states or local governments may have regulations or laws that restrict the use of anything that might impair the clear view of a license plate. Check local laws for compliance. For the Back-Up Camera to be properly installed, it must be wired into the vehicle’s taillight harness. - Page 4 Install the license plate screws to secure the camera to the vehicle. Determine which are the positive (+) and negative (–) wires for the reverse lights on the vehicle. You can use either the right- or left-side reverse light wires. For help locating the vehicle’s reverse light circuit, contact your vehicle’s manufacturer for vehicle-specifi...
- Page 5 Legend Wire from Vehicle Wire from Transmitter 12. Crimp the metal clamp using a pliers to ensure a good connection and then close the lock of the wire connector. Do this for both the positive (+) and negative (-) wires from the reverse light. 13.
- Page 6 Legend Wire from Vehicle Wire from Transmitter 12. Crimp the metal clamp using a pliers to ensure a good connection and then close the lock of the wire connector. Do this for both the positive (+) and negative (-) wires from the reverse light. 13.
-
Page 7: Care And Maintenance
Press the menu button to bring up the settings screen. Press the menu button to scroll through the different adjustments. Press the UP button to increase or the DOWN button to decrease settings. The monitor can be mounted in any position. To change the view on the screen, scroll to direction. -
Page 8: Fcc Information
FCC INFORMATION Changes or modi cations to this equipment not expressly approved by the party responsible for compliance could void the user’s authority to operate the equipment. This equipment has been tested and found to comply with the limits for a Class B digital device, pursuant to Part 15 of the FCC Rules.
Need help?
Do you have a question about the PKC0BU7 and is the answer not in the manual?
Questions and answers