Table of Contents
Advertisement
Advertisement
Table of Contents

Related Manuals for Novation Impulse


Summary of Contents for Novation Impulse
- Page 2 Disclaimer Novation has taken all possible steps to ensure that the information given here is both correct and complete. In no event can Novation accept any liability or responsibility for any loss or damage to the owner of the equipment, any third party, or any equipment which may result from use of this manual or the equipment which it describes.
-
Page 3: Important Safety Instructions
English IMPORTANT SAFETY INSTRUCTIONS Read these instructions. Keep these instructions. Heed all warnings. Follow all instructions. Clean only with dry cloth. Do not install near any heat sources such as radiators, heat registers, stoves, or other apparatus (including amplifiers) that produce heat. Protect the power cord from being walked on or pinched particularly at plugs, convenience receptacles, and the point where they exit from the apparatus. -
Page 4: Environmental Declaration
1. Do not modify this unit! This product, when installed as indicated in the instructions contained in this manual, meets FCC requirements. Modifications not expressly approved by Novation may void your authority, granted by the FCC, to use this product. 2. Important: This product satisfies FCC regulations when high quality shielded USB cables with integral ferrite are used to connect with other equipment. -
Page 5: For Canada
USB cable. Normal operation should return. COPYRIGHT AND LEGAL NOTICES Novation and Automap are registered trade marks of Focusrite Audio Engineering Limited. Impulse is a trade mark of Focusrite Audio Engineering Limited. VST is a trade mark of Steinberg Media Technologies GmbH. -
Page 6: Table Of Contents
Configuring Impulse Controls ........ - Page 7 Updating Impulse’s firmware ........
-
Page 8: Introduction
Impulse’s design team. This guide will introduce you to Impulse and explain the various ways you can use Impulse with your music software, either with or without other MIDI hardware, in your recording set-up. -
Page 9: What's In The Box
What’s In The Box The Impulse has been carefully packed in the factory and the packaging was designed to withstand rough handling. Should the unit appear to have been damaged in transit, do not discard any of the packing material and notify your music dealer. -
Page 10: Power Requirements
Impulse is connected through a standard USB cable. We recommend that you connect Impulse directly to a computer’s native USB port, and not via a USB hub. Correct operation cannot be guaranteed if a hub is in use. - Page 11 ‘factory’ templates which configure it for use with particular DAWs and/or Things. Thing A Thing is anything that can be controlled by Impulse and/or Automap. A Thing may be hardware or software. Examples of Things are the plug-ins you use in your DAW, your DAW’s track mixer and external, MIDI-controllable synths or FX processors.
-
Page 12: Hardware Overview
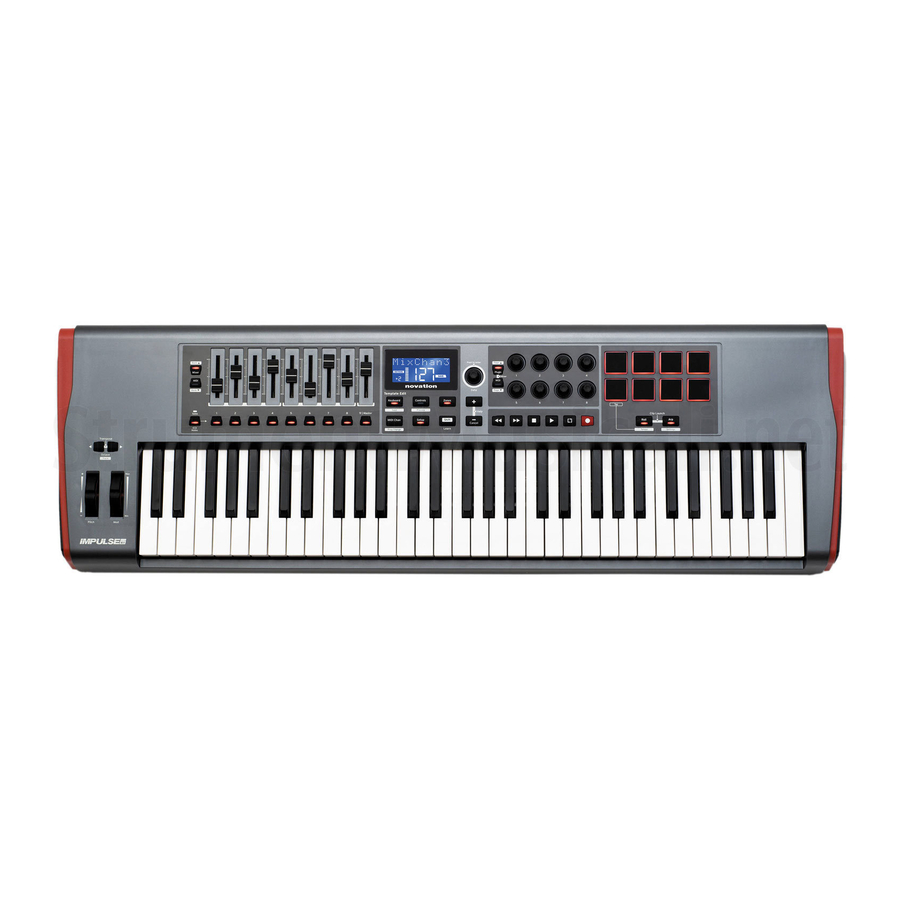
Hardware Overview Top View – assignable and non-assignable controls Each of Impulse’s controls is either assignable or non-assignable. Assignable controls are ‘free’ – their function will vary according to which plug-in, DAW mixer or additional piece of MIDI hardware is being controlled. Their assignment to a particular parameter of the Thing being controlled will either be made automatically by Automap, or manually by you. - Page 13 The number of octaves over which the keyboard can be shifted varies with Impulse model; the smaller models have a greater shift range. MIDI/Mixer button (Impulse 25 only) – sets Impulse 25’s single fader to be either a control for a DAW mixer level, or an additional assignable MIDI control.
-
Page 14: Rear View - Connections
1 USB port – USB Type B connector compatible with USB 1.1, 2.0 or 3.0. Connect the Impulse to a USB port on your computer using the USB cable supplied. Alternatively you can connect a USB AC-to-DC adaptor here if using Impulse away from a computer. -
Page 15: Impulse Setup Examples
(applicable to Impulse 49 and 61 only). By default, Automap will assign the faders in channel order to the per-track levels in the DAW’s mixer, but they can also be reassigned. -
Page 16: Interfacing To Midi Hardware
You can also use Impulse to directly control other MIDI-compatible hardware, such as sound modules, FX processors, and so on. To do so, use the standard MIDI ports on the Impulse rear panel and standard 5-pin DIN MIDI cables. As there is no computer to supply Impulse with DC power, you will need to use a separate AC-to-DC adapter designed for USB-powered devices. -
Page 17: Menu Overview
English MENU OVERVIEW Most of the configuration and setting up of Impulse is carried out through the menu system and the LCD screen. The menu system is also used to modify templates. LCD features and Menu Navigation Whilst the menus themselves vary with function, there are a number of basic principles which always apply. -
Page 18: Exploring Impulse
However, any of these may be modified for your own use if you wish. Note that in general, when using Impulse with Automap software, these templates are not used. Impulse operates in a somewhat different manner when used with Automap and this is described later in the manual. -
Page 19: Help Mode
Note that if you make changes to a template but do not save those changes, when you try to load a different template, Impulse will display a message: Discard? Use the Data knob to select either No or Yes, and press Enter to confirm. If you select Yes, your changes will be lost Help Mode Pressing + and –... -
Page 20: Preview
English Preview Preview mode is provided to confirm how a control is currently configured without actually transmitting any MIDI data to your computer or elsewhere. Enter Preview mode by holding down Shift and pressing the Controls button. The LED in the Controls button blinks to confirm the mode. - Page 21 Impulse. Note – There is no need to enter any specific ‘mode’ to import SysEx data. Impulse is always in ‘read’ mode; it is only necessary to transmit the SysEx data (either from another Impulse or from a computer using a MIDI SysEx utility).
-
Page 22: Keyboard Settings
127. Page 3: Aftertouch (Aftertch) Impulse’s keyboard is equipped with Channel Aftertouch, which sends an additional set of MIDI data when further pressure is applied to a key while it is being pressed. The options are On or Off. -
Page 23: Midi Channel
Template” on page 18). Zones Normally Impulse’s keyboard uses the same MIDI channel for all its notes. Using Zones, it can be split into 2, 3 or even 4 separate or overlapping regions. Each Zone can have its own MIDI channel, port, and keyboard range. -
Page 24: Program Change
The remaining pages in the Zones menu repeat the settings available for Zone 1 in Pages 2 to 6. Program Change You can manually transmit a MIDI Program Change message from Impulse. Press Shift + MIDI Chan to enable Prog Change mode. Select the Program Change number with the Data knob and the MIDI data will be transmitted. -
Page 25: Transport Controls
Mode” on page 20) Arpeggiator Impulse has a powerful Arpeggiator feature which allows arpeggios of varying complexity and rhythm to be played and manipulated in real-time. If a single key is pressed, the note will be retriggered by the Arpeggiator. If you play a chord, the Arpeggiator identifies its notes and plays them individually in sequence (this is termed an arpeggio pattern or ‘arp sequence’);... -
Page 26: Arpeggiator Settings Menu
English Arpeggiator Settings menu Various parameters controlling the Arpeggiator’s operation can be set in the Arpeggiator Settings menu, which is entered by holding down the Shift button and pressing Arp; the LED in the Arp button flashes in this mode. Page 1: Sync (Sync 1/x) This parameter effectively determines the beat of the arp sequence, based on the tempo rate (see “Tempo”... -
Page 27: Setting The Arp/Roll Tempo
English Page 4: Arp Mode (Arp Mode) The Arpeggiator will play all notes held down in a sequence which is determined by the Arp Mode setting. The options are: • Up (uP) - sequence begins with the lowest note played • Down (dn) - sequence begins with the highest note played • Up/Down 2 (ud2) – sequence alternates in direction and repeats the highest and lowest notes Chord (crd) – all keys held are played simultaneously •... -
Page 28: Roll Mode
Boot Menu The boot menu will not be required in normal operation, but is there to let you update Impulse’s firmware, check firmware version numbers and also to reset all the settings to the original factory values. -
Page 29: Using Impulse With Automap 4
When installing Automap 4 for the first time, or installing a subsequent update of Automap, the Installation Wizard will check if the firmware in your connected Impulse is up to date. If not, the Installation Wizard will guide you through the process of updating Impulse’s firmware. -
Page 30: Configuring Your Daw For Automap 4 Control
Impulse. Secondly, you need to configure your DAW so that its audio mixer can be controlled by Impulse. Automap 4 includes a simple setup procedure to allow you to do this. -
Page 31: The Plugin, Mixer And Midi Buttons
MIDI – when the MIDI LED is lit, the encoders will output normal MIDI data, as defined in • the current Impulse template. This is the mode you will use if you are not using Automap 4 (e.g., with no computer connected). -
Page 32: Automap Mode
Impulse to your computer, before you launch your music software, you will see that the LED in the MIDI button [11] is lit. This means that Impulse is in ‘manual’ mode, and ready for use as a general-purpose MIDI controller. When you launch your music software, Automap 4 will also auto-launch, the MIDI LED will go out, and the Plugin and Mixer LEDs will illuminate. - Page 33 2. Faders – Impulse 25 only Clicking the fader area of the Impulse image in the Mapping Editor window will cause the display to change to a set of nine faders (initially Tracks 1 – 8 plus the Master fader). As Impulse 25 has just one physical fader, it will initially be assigned to Track 1.
-
Page 34: Track Up/Down
. They allow you to ‘step’ the fader(s) up or down one track or instrument within your DAW at a time. In the case of Impulse 49 and 61, the currently active DAW track will step one track in this manner while the eight faders remain assigned to the current bank of eight (see Bank Up/Down below). -
Page 35: Learn Mode
1. On the plug-in itself, click on the control for the parameter you wish to assign, and alter its value slightly. This is now the last used control. 2. On Impulse, press Learn, and move the Impulse control you wish to assign the parameter to. 3. The parameter’s name and value are now mapped to the control. - Page 36 Records • Impulse can be placed in Clip Launch mode by pressing Roll and Arp buttons simultaneously. This redefines the function of the drum pads, which now trigger the Clips in the currently selected Scene. The pads will illuminate according to the Clip status: •...
-
Page 37: Troubleshooting
When a USB connection is used to power the Impulse from a laptop computer the Impulse may not power up successfully. This is due to the Impulse not being able to draw enough power from the laptop computer. When powering Impulse from a laptop’s USB port, it is recommended that the laptop is powered from AC mains rather than its internal battery. -
Page 38: Factory Templates
Bass Station Keyboard Bass Station Rack Super Bass Station Bass Station VST Novation Ultranova UltrNova Novation Nova, Nova II, Supernova, Supernova II SupaNova Native Instruments - Kontakt Kontakt Native Instruments - FM 8 FM 8 (requires mapping file on DVD) -
Page 39: Assignable Controls
English ASSIGNABLE CONTROLS – PARAMETERS AND RANGES Faders, encoders and Mod Wheel: Subsequent presses of the + button will offer the following parameter setting pages: Type: CC (Continuous Controller) CC#:(Controller number, 0 to 127) Max: (Maximum parameter value, 0 to 127) Min: (Minimum parameter value, 0 to 127) Channel: MIDI Channel to be used (1 to 16, or tPL) ;... - Page 40 English within the template Ports: MIDI port to be used (tPL, USb, MId, ALL) Btn. Type: Mty Press: (0 to 127) Release: (0 to 127) Channel: MIDI Channel to be used (1 to 16, or tPL) ; tPL is as defined within the template Ports: MIDI port to be used (tPL, USb, MId, ALL) Btn.
- Page 41 English Channel: MIDI Channel to be used (1 to 16, or tPL) ; tPL is as defined within the template Ports: MIDI port to be used (tPL, USb, MId, ALL) Type: nrP (Non-registered Parameter Number) MSB: (Most Significant Byte, 0 to 127) LSB: (Least Significant Byte, 0 to 127) Btn.
- Page 42 English Btn. Type: Tgl On: (0 to 127) Off: (0 to 127) Channel: MIDI Channel to be used (1 to 16, or tPL) ; tPL is as defined within the template Ports: MIDI port to be used (tPL, USb, MId, ALL) Btn.
-
Page 43: Midi Implementation Table
Key’s Touch Channel Pitch Bend Control 0-127 Change Program 0-127 Change True # *Send / recv firmware update (Novation) System Exclusive Send / recv template data (Novation) System Song Position Pointer Common Song Sel Tune Request System Clock Real Time...
Need help?
Do you have a question about the Impulse and is the answer not in the manual?
Questions and answers