Parrot ASTEROID Mini Quick Start Manual
Audio system with amplifier
Hide thumbs
Also See for ASTEROID Mini:
- User manual (34 pages) ,
- Quick start manual (196 pages) ,
- Quick start manual (160 pages)

Related Manuals for Parrot ASTEROID Mini


Summary of Contents for Parrot ASTEROID Mini
- Page 1 Quick start guide Guide d'utilisation rapide Guía de utilización rápida Bedienungsanleitung Guida all'uso Gebruikershandleiding Manual do utilizador...
- Page 3 Parrot ASTEROID Mini English ..................................13 Français ..................................33 Español ..................................55 Deutsch ..................................75 Italiano ..................................97 Dutch ..................................117 Português ..................................137 www.parrot.com...
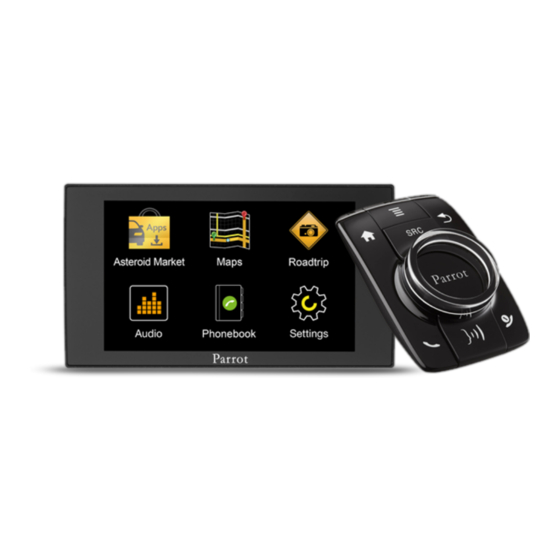
- Page 5 Boîtier électronique / Electronic box / Caja electrónica / Elektronikgehäuse / Centralina elettronica / Caixa electrónica / Elektronicakastje Ecran / Screen / Pantalla / Display / Display / Ecrã / Scherm Télécommande (pile 3 V - CR2032) / Remote control (3 V - CR2032 battery) / Mando a distancia (pila 3 V - CR2032) / Fernbedienung (Batterie 3 V - CR2032) / Telecomando (Pila 3V –...
- Page 6 ISO installation...
- Page 7 Audio system with amplifier...
-
Page 13: Table Of Contents
Phone p.21 print them out. This simplified guide to Music p.22 the Parrot ASTEROID Mini is therefore Internet p.25 limited to providing you with the main Troubleshooting p.27 instructions that will make it easy for you General information p.28... -
Page 14: Before You Begin
Parrot denies any liability Software updates Note: We advise our customers to have the should you choose not to respect this Parrot ASTEROID Mini fitted by a certified Download the latest update for free (and warning. Parrot installer. consult the update procedure) on the... - Page 15 Connecting the audio cable 2. Connect the ISO male connectors of Join the vehicle audio cable to the Refer to your car stereo’s wiring diagram. the Parrot ASTEROID Mini to the car connector of the Parrot ASTEROID Mini stereo (Connection 3). Before...
- Page 16 To perform the installation check, turn the some vehicles, there system’s corresponding mute-in jack ignition on then off once the Parrot ignition +12V on the vehicle’s connectors. (connection 5). ASTEROID Mini is installed: the message You must therefore connect the orange “Goodbye!” must be displayed.
- Page 17 The GPS antenna is located on Warning: Do not run the microphone cable side where "Parrot in such a way as to obstruct or interfere Installing the microphone ASTEROID GPS" is written and with the vehicles operation or cause injury where the star-shaped logo is.
- Page 18 (or any other open area). connect all audio cables to the Parrot To make sure the adhesive tape adheres ASTEROID Mini even if you do not plan on Installing the screen well : using them. Route the audio cables to a...
- Page 19 well : 2. Insert a 3V CR2032 battery into the clean the area with an appropriate remote control. Make sure the cleaning product before sticking the clean the area with an appropriate battery is correctly positioned. support ; cleaning product before sticking the support ;...
-
Page 20: Getting Started
“0000”. www.parrot.com/uk/compatibility. menu corresponding to the current If you are using the Parrot ASTEROID Mini application. The pop-up menu allows you If the Parrot ASTEROID Mini with your phone for the very first time, you... -
Page 21: Phone
Parrot Synchronising the phonebook the call. ASTEROID Mini. Refer to the user guide of With most of the phones supporting To refuse the call, press the your phone for more information. -
Page 22: Music
This function is only available if you are using the Parrot 1. Press the button to launch the ASTEROID Mini with a USB / SD / iPod voice recognition feature. peripheral. > The Parrot ASTEROID Mini asks you the name of the contact you want 1. - Page 23 4. Select the track and press the iPod USB storage device jogwheel. The Parrot ASTEROID Mini is compatible 1. Connect your iPod to the Parrot Note: To browse more easily through the with the majority of USB keys / MP3 audio...
- Page 24 Parrot Audio Distribution Profile). jogwheel. ASTEROID Mini : SD, micro SD , mini SD, If you are using a B luetooth audio player SDHC, mini SDHC, micro SDHC. The SD Note: To browse more easily through the for the first time, you have to pair both card capacity must not exceed 32Gb.
-
Page 25: Internet
You Note: Refer to the compatibility section of each time you turn on the Parrot can also press the button and the Parrot ASTEROID Mini on our website to ASTEROID Mini. browse menus while get the list of 3G / 4G keys compatible with connection is being established. -
Page 26: Sharing Phone 3G Connection Via Usb
B luetooth connecting your phone to the according to your phone model. phone’s battery. Parrot ASTEROID Mini will allow for 3. Select your APN (Access Point Sharing a phone 3G connection via USB sharing of the phone's 3G connection. -
Page 27: Troubleshooting
Make sure your phone is compatible with Make sure the “Goodbye” message is multitasking device: several applications the Parrot ASTEROID Mini. To do so, displayed on the Parrot ASTEROID Mini can run simultaneously. For example, you refer to the compatibility page on our screen when you turn the ignition off. -
Page 28: General Information
/ USB device is already connected to Problems while using the music function contractually warrants during 12 months the Parrot ASTEROID Mini before you Reboot your iPod / iPhone before from the date of initial purchase by the turn on the ignition. Connect the iPod / SD... - Page 29 After inspection of the product, Parrot will be invoiced to him. design or user guide without proceed, at its option, to the replacement restrictions and without any obligation to Modifications notify users. As part of our ongoing or the issue a credit note to the exclusion The explanations and specifications in this of any other remedy.
- Page 30 Bluetooth SIG, Inc. and any use of such Gracenote, the Gracenote logo and material resources. marks by Parrot S.A. is under license. logotype and "Powered by Gracenote" are Household users should contact either Bluetooth QDID : B013841, B013839, [-]...
- Page 31 licence-exempt standard(s). Operation is subject to the following two conditions: (1) this device may not cause interference, and (2) this device must accept interference, including interference that may cause undesired operation of the device. This equipment complies with FCC’s and IC’s RF radiation exposure limits set forth for an uncontrolled environment..
- Page 32 Technical support If you have any questions regarding your Parrot product, contact our hotline by phone or using our technical contact form available on our website (support section). China : [+86] 755 8203 3307 Europe : [+33] 1 48 03 60 69 (Spoken languages : French, English and Spanish)
- Page 34 User guide...
- Page 35 Contents Before you begin ................................5 Software updates ...........................................5 Warnings ...........................................5 Steering wheel control interface ...........................................5 Installation ................................6 Before you begin ...........................................6 Installation diagram ...........................................7 Connecting the audio cable ...........................................7 Connecting the power cable ...........................................7 Connecting the mute cable ...........................................8 Installing the electronic box ...........................................8 Checking the wiring ...........................................8...
- Page 36 Music ................................21 Using vocal music search ...........................................21 iPod ...........................................21 USB storage device ...........................................21 SD card ...........................................22 Audio player connected via Bluetooth ...........................................22 Analogue audio player ...........................................22 Car stereo ...........................................23 Internet ................................24 Connecting a 3G / 4G key ...........................................24 Sharing a phone 3G connection via Bluetooth ...........................................24 Sharing a phone 3G connection via USB ...........................................25...
-
Page 38: Before You Begin
Parrot denies any liability should you choose not to respect this warning. Use the Parrot ASTEROID Mini with a reasonable volume level so that you can hear all external noises while driving. Steering wheel control interface A steering wheel control interface can be used to connect your vehicle’s steering wheel... -
Page 39: Installation
Note: If your car stereo is not fitted with ISO connectors, you need to purchase an ISO adapter cable to simplify the wiring procedure. Refer to the Vehicle compatibility section on the Parrot ASTEROID Mini support page to check whether an ISO adapter is necessary on your vehicle. -
Page 40: Installation Diagram
Always check all connections first with appropriate test equipment before connecting any cable to the vehicle. 1. Connect the ISO male connectors of the Parrot ASTEROID Mini to the car stereo (Connection 3). 2. Join the vehicle’s power supply cable to the ISO female connector of the Parrot ASTEROID Mini (Connection 4). -
Page 41: Connecting The Mute Cable
Parrot wiring (connection 7). Installation with external amplifier If your vehicle is equipped with an amplifier : Install the Parrot ASTEROID Mini using the Front and Rear Line Out outputs on the Installation... -
Page 42: Installing The Microphone
Use one or two jack cable(s) to connect the Parrot ASTEROID Mini Line out outputs to your vehicle audio system (Connection 1B). Deactivate the Mute on streaming option on the Parrot ASTEROID Mini. To do so, select Settings >... -
Page 43: Installing The Gps Receiver
Athermic windshields and windows with a built-in antenna can interfere with GPS reception and reduce the reliability of information from navigation applications. The GPS antenna is located on the side where "Parrot ASTEROID GPS" is written and where the star-shaped logo is. This logo must always be directed towards the sky. -
Page 44: Installing The Usb Cables
Connect the USB cables to the Parrot ASTEROID Mini. We recommend you connect all audio cables to the Parrot ASTEROID Mini even if you do not plan on using them. Route the audio cables to a suitable location in your vehicle such as the glove box or arm rest compartment. -
Page 45: Installing The Remote Control
stream from air vents. Stick the support on the dashboard. To make sure the adhesive tape adheres well : select the support location carefully : once stuck, it will be difficult to change it without affecting the fixation quality ; clean the area with an appropriate cleaning product before sticking the support ;... - Page 46 Note : To check the remote control battery level, select Settings > Advanced settings > Remote. Note : The Parrot ASTEROID Mini remote control can be updated when connected via the remote control cable. Refer to the Parrot ASTEROID Mini software update procedure for more information..
-
Page 47: Getting Started
Getting started Navigating through the menus Press the button to access the main menu. Turn the jog wheel to browse through the menus. Press the jog wheel to confirm. Press the button to get back to previous menu. Press the button to access the pop-up menu corresponding to the current application. -
Page 48: Connecting A Phone Via Bluetooth
Parrot ASTEROID Mini and to consult the specific pairing procedures for the most common phones : www.parrot.com/uk/compatibility. If you are using the Parrot ASTEROID Mini with your phone for the very first time, you must initially pair both devices. Once your telephone is paired with the Parrot ASTEROID Mini, the 2 devices will automatically connect when they are turned on (as well as Bluetooth®... -
Page 49: Disconnecting A Phone
SIM card memory, transfer them onto your phone memory. Note: Depending on the model of your phone, you may need to authorize the access to your contacts to the Parrot ASTEROID Mini. Refer to the user guide of your phone for more information. -
Page 50: Phone
1. Press the button to launch the voice recognition feature. > The Parrot ASTEROID Mini asks you the name of the contact you want to call. 2. Say the name of the contact and the type of number («WORK», «MOBILE»...) if there are several numbers associated to your contact. - Page 51 Home Work Mobile Other At home At work Cellular General Office Cell Default At office On mobile Preferred At the office On cellular On cell On mobile phone On cellular phone On cell phone Mobile phone Cellular phone Cell phone You can combine several words from the list above to make a call.
-
Page 52: Viewing The Call History
If you want to switch back to the Parrot ASTEROID Mini, press the button. Muting a call If you want to deactivate the Parrot ASTEROID Mini microphone during a call, press button : you will still hear your caller but your caller will not be able to hear you. Press the button to reactivate it. - Page 53 Press the button to switch from a call to another. Phone...
-
Page 54: Music
Note: Check the albums and artists names in the metadatas of your music files. These names may be different from the ones displayed on your music files titles. iPod 1. Connect your iPod to the Parrot ASTEROID Mini USB cable with the USB / iPod extension lead. 2. Press the SRC button until the iPod source is selected. -
Page 55: Sd Card
SD card You can use the following SD cards (with adapter if necessary) with the Parrot ASTEROID Mini : SD, micro SD , mini SD, SDHC, mini SDHC, micro SDHC. The SD card capacity must not exceed 32Gb. MP3 (Mpeg 1 Layer3), AAC, WAV, OGG and WMA formats are supported. -
Page 56: Car Stereo
2. Press the SRC button until the Line in source is selected. 3. Start playing a track on the audio player. Note : To hide the Line in source from the audio sources list, select Settings > Audio and uncheck the Activate Line-in option. Car stereo To get back to your car radio audio output, press the SRC button on the remote control and select... -
Page 57: Internet
Internet Connecting a 3G / 4G key Note: Refer to the compatibility section of the Parrot ASTEROID Mini on our website to get the list of 3G / 4G keys compatible with the Parrot ASTEROID Mini. Note : To guarantee an optimal reception quality we recommend you do not connect your internet USB key 3G on the Parrot ASTEROID directly : use the USB cable to install your device on the dashboard (or any other open area). -
Page 58: Sharing A Phone 3G Connection Via Usb
Activate. 2. Make sure that your phone’s keypad is unlocked and connect the phone to the Parrot ASTEROID Mini using a USB cable/micro-USB and the USB extension cable provided with the Parrot ASTEROID Mini. Note : This connection also enables you to recharge your phone’s battery. - Page 59 Before starting, you must create your account on ASTEROID Market and link this account with your Parrot ASTEROID Mini (see previous sections). You can download an application from your Parrot ASTEROID Mini on the Asteroidmarket site. NB: To reduce data consumption, we recommend you download your applications from the site https://www.parrotasteroid.com/asteroidmarket.
- Page 60 2. Select an application and then press Download. 3. Select the application and then press Install. Exiting an application Exiting from an application on Parrot ASTEROID Mini without closing it does not necessarily stop your consumption of 3D data: Certain applications can operate in background mode.
-
Page 61: Settings
Caller announce When you receive an incoming call,the contact name is announced if the number for this contact is stored in the telephone directory connected to the Parrot ASTEROID Mini. To activate / deactivate announcing of contact name: 1. Select Settings >... -
Page 62: Bluetooth
Mute on Streaming option is activated by default. Deactivate it if your vehicle is equipped with an amplifier and if your Parrot ASTEROID Mini is connected to your vehicle audio system using the Line out outputs. To do so, select Settings >... -
Page 63: Audio
This information is required when you use geolocation or driving assistance applications. You can enable/disable this option when your Parrot ASTEROID Mini connects to the Internet. You can also activate this option by selecting Settings > Advanced settings >... - Page 64 The setting Cutoff frequency allows you to select the bass cutoff frequency for the speakers (the lowest frequency that the speakers can generate naturally). The Virtual Super Bass will reproduce the frequencies that are lower than this cutoff frequency. The setting Effect intensity allows you to adjust the level of bass frequencies generated by the Virtual Super Bass effect.
-
Page 65: Display
Using the Loudness function The Loudness function is a dynamic adjustment of bass and treble based on listening volume. This function compensates for the human ear's loss of sensitivity to bass and treble frequencies when the volume is low. To use the Loudness function, select AudioFX >... -
Page 66: General Information
Parrot is not responsible for storage, loss or damaged to data during transit or repair. Any product wrongfully declared to be defective will be returned to sender and inspection, process and carriage costs will be invoiced to him. - Page 67 Parrot and the Parrot logo are registered trademarks of PARROT SA. The Bluetooth word mark and logos are registered trademarks owned by Bluetooth SIG, Inc. and any use of such marks by Parrot S.A. is under license. Bluetooth QDID : B013841, B013839, [-] "Made for iPod / iPhone"...
- Page 68 persons and must not be collocated or operating in conjunction with. General information...
- Page 69 Registration guide Guía de registro Guida alla registrazione Guia de registo WARNING AVVERTENZA Creating an account on ASTEROID Market is an essential step in La creazione di un account sull’ASTEROID Market rappresenta getting the best from your product. Ensure that you register once una tappa fondamentale per potere utilizzare appieno il proprio installation is complete.
- Page 70 Para uma melhor legibilidade, os telemóveis ou tablets compatíveis serão designados pelo termo «Smartphone». As capturas de ecrã neste documento são as do Parrot ASTEROID Tablet e Parrot ASTEROID Smart. O princípio permanece o mesmo para o ASTEROID Classic e ASTEROID Mini.
-
Page 71: Before Getting Started
Before getting started Antes de comenzar - Prima di iniziare - Antes de começar Create an ASTEROID Market account Crear una cuenta en ASTEROID Market - Creazione di un account sull’ASTEROID Market - Criar uma conta no ASTEROID Market Connecting the ASTEROID to the Internet Conectar el ASTEROID a Internet - Connessione dell’ASTEROID a internet - Conectar o ASTEROID à... - Page 72 To access ASTEROID Market, the ASTEROID’s date and time must be set to local time. If you have a Parrot ASTEROID tablet, the time is adjusted automati- cally via the GPS signal. Otherwise, select Settings >...
- Page 73 Per accedere all’ASTEROID Market, l’ora e la data dell’ASTEROID devono essere obbligatoriamente impostate all’ora locale. Nel caso del Parrot ASTEROID Tablet, l’ora si imposta automaticamente tra- mite il segnale GPS. Se così non fosse, selezionare Impostazioni >...
- Page 74 Create an ASTEROID Market account Crear una cuenta en ASTEROID Market - Creazione di un account sull’ASTEROID Market - Criar uma conta no ASTEROID Market To create an account via your computer or smartphone: 1. Connect to https://www.parrotasteroid.com/asteroidmarket. 2. Click on Create an account.
- Page 75 Para crear una cuenta desde su ordenador o su smartphone: 1. Conéctese a https://www.parrotasteroid.com/asteroidmarket. 2. Haga clic en Crear una cuenta. 3. Siga las instrucciones de la pantalla. Una vez creada la cuenta, no será posible modificar los campos Identificación y País.
- Page 76 For more information on ASTEROID’s compatibility with your smartphone and to consult specific connection procedures: http://www.parrot.com/uk/compatibility To view the list of 3G /4G keys compatible with ASTEROID: http://www.parrot.com/uk/compatibility/3G Existen distintos modos para conectar el ASTEROID a Internet: Compartir la conexión a Internet de su smartphone por USB o Bluetooth®...
- Page 77 Il metodo migliore dipende dal modello dello smartphone e dalla sua compatibilità con l’ASTEROID. Le proce- dure di connessione sono riportate nel manuale d’uso dell’ASTEROID. Per ulteriori informazioni in merito alla compatibilità dell’ASTEROID con lo smartphone e per consultare le specifiche procedure di connessione: http://www.parrot.com/it/compatibility Per consultare l’elenco delle chiavette 3G/4G compatibili con l’ASTEROID: http://www.parrot.com/it/compatibility/3G Existem diferentes métodos para conectar o seu ASTEROID à...
- Page 78 Linking an ASTEROID to an ASTEROID Market account Asociar el ASTEROID a la cuenta ASTEROID Market - Associazione dell’ASTEROID all’account ASTEROID Market - Associar o ASTEROID à conta ASTEROID Market On your ASTEROID: 1. Launch the ASTEROID Market application 2. Enter the identifiers defined in step 2 and then press Connect. En ASTEROID: 1.
- Page 80 Installing an application Instalar una aplicación - Installazione di un’applicazione - Instalar uma aplicação To install an application on your ASTEROID: 1. Start the ASTEROID Market application and then select the class type. 2. Select the application and then press Download. 3.
- Page 81 Per installare un’applicazione sull’ASTEROID: 1. Avviare l’applicazione ASTEROID Market e quindi sele- zionare il tipo di classificazione. 2. Selezionare un’applicazione e quindi premere Scarica. 3. Premere Installa. È anche possibile scaricare le applicazioni da https://www.parro- tasteroid.com/asteroidmarket e quindi utilizzare una scheda SD per installarle sull’ASTEROID.
- Page 82 Preguntas frecuentes - FAQ - Perguntas frequentes I cannot find the application I am looking for on the ASTEROID Market. Available applications differ from country to country. If the application does not appear when you select Applications, the reason is that it is not available in your country. What can I do if an application is too big to be downloaded via my smartphone Internet connection ? The download time is dependent on the size of the application and the quality of your connection.
- Page 83 SD para instalar estas aplicações no seu ASTEROID. Não consigo descarregar uma aplicação para o meu ASTEROID Certifique-se de que o seu produto está correctamente associado à sua conta ASTEROID Market (passo 4). http://www.parrot.com/help...
- Page 84 Parrot e i loghi Parrot sono marchi registrati di PARROT SA in Francia e in altri paesi. Il nome e il logo Bluetooth sono marchi depositati di Bluetooth® SIG, Inc. e il loro utilizzo da parte di Parrot S.A. avviene in condizioni di licenza. Wi-Fi è un marchio depositato di Wi-Fi Alliance. Tutti i diritti riservati. Le immagini, descrizioni e specifiche qui riportate non sono contrattualmente vincolanti.
Need help?
Do you have a question about the ASTEROID Mini and is the answer not in the manual?
Questions and answers