Table of Contents
Advertisement
T E C H N O L O G I E S
User Guide
NAS 3.0 Adapter
(NAS30U2)
www.addonics.com
v5.1.11
Technical Support
If you need any assistance to get your unit functioning properly, please have your
product information ready and contact Addonics Technical Support at:
Hours: 8:30 am - 6:00 pm PST
Phone: 408-453-6212
Email: http://www.addonics.com/support/query/
Advertisement
Table of Contents

Related Manuals for Addonics Technologies NAS 3.0


Summary of Contents for Addonics Technologies NAS 3.0
-
Page 1: User Guide
T E C H N O L O G I E S User Guide NAS 3.0 Adapter (NAS30U2) www.addonics.com v5.1.11 Technical Support If you need any assistance to get your unit functioning properly, please have your product information ready and contact Addonics Technical Support at:... -
Page 2: Table Of Contents
Table of Contents About the NAS 3.0......................1 NAS 3.0 Hardware Installation..................2 Open NAS30U2 Web GUI by Using Web Browser............3 Status..........................3 Administration........................4 Date/Time........................4 LAN Configuration......................5 PPPoE Setting....................5 DDNS Setting.....................6 Maintenance.......................7 To Reset the NAS Adapter.................8 How to Create a User..................9 To Access the PUBLIC Folder of the File Server..........10 How to Modify SAMBA Account Password..............11... -
Page 3: About The Nas 3.0
Any external USB storage device that you connect to the NAS 3.0 adapter is required to be pre-formatted with either NTFS, FAT32 or FAT64. When the external USB storage device is connected to the NAS 3.0 adapter, it creates a configuration file and a default Public folder. -
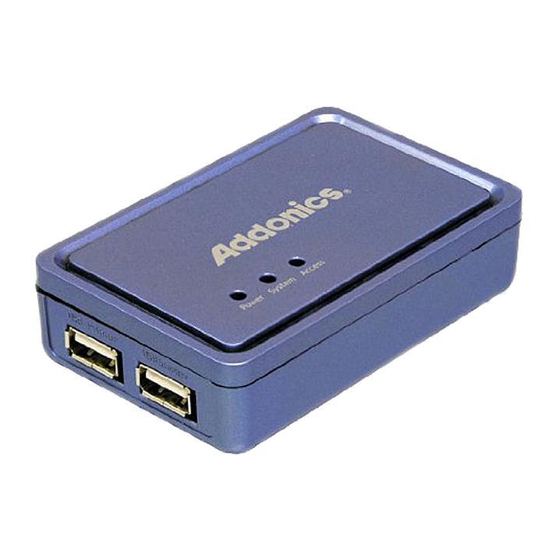
Page 4: Nas 3.0 Hardware Installation
NAS30U2 Hardware Installation Access LED System LED USB Mass Storage Device Power LED (Full read/write function) 5V Power Jack Reset Button RJ45 Socket Additional USB Mass Storage (read-only) or USB Printer Connect external USB Storage device into USB port of the NAS Adapter. -
Page 5: Open Nas30U2 Web Gui By Using Web Browser
When NAS30U2 has been found, click “Connect” to enter web GUI utility. Open NAS30U2 web GUI by using web browser. Open web browser and type default host name “storage” in the search bar. Default login is “admin” for both User name and password. Click “OK”... -
Page 6: Administration
Administration You can change and modify your host, group name and password from this page. Click “Apply” to save the setting. Host name: This is used to identify your device on the network. If you prefer a different name, type in the new name and click “Apply” to save setting. Group Name: This should be the same as your workgroup. -
Page 7: Lan Configuration
LAN Configuration By default, “LAN Config” is set to “Automatic IP”. This will allow the NAS30U2 to obtain its IP address automatically. If you prefer setting it manually, select the static IP option, enter your own value and click “Apply” to confirm the new setting. PPPoE Setting PPPoE (Point-to-Point Protocol over Ethernet) is an internet connection protocol allowing users to connect to the internet without a router. -
Page 8: Ddns Setting
Status: Display PPPoE connection status. Service Name: It’s an optional field. Place any name you want that will help you remember the configuration. Account Name: Enter your user name provided by your ISP. Password: Enter your password provided by your ISP. Service on Demand: The router will ONLY connect itself to your ISP when there’s internet request demanded by any LAN user and disconnect itself when the transaction is done. -
Page 9: Maintenance
If you do not have register a domain name, you may apply for a free Domain name from the free DNS site http://www.dyndns.com or http://www.2mydns.com and input the host name and password and click apply to complete the setup. Maintenance This page allows you to update the NAS30U2 firmware, to go back to factory default settings or reboot NAS system. -
Page 10: To Reset The Nas Adapter
To reset the NAS adapter. While the NAS adapter is powered on, press the reset button with a paper clip and keep that position. Disconnect the power cable and reconnect the power after 5 seconds. After 30 seconds release the reset button. System reboot: This can be used to restart the network drive after a firmware update. -
Page 11: How To Create A User
How to create a user Click on the “Add” button and type new account name and password. Click “OK”. The NAS will also create a SAMBA folder named “User1”. Click “Modify” to share a folder. Select “User1” from Folder List and click the “right arrow” to add user on “Sharing List”. -
Page 12: To Access The Public Folder Of The File Server
To access the PUBLIC folder of the File Server Click on the Windows icon located on the bottom left corner of the screen, on the “Search programs and files” \\ followed by the IP address. Eg:\\192.168.1.121 and press Enter key to continue. Type “Guest”... -
Page 13: How To Modify Samba Account Password
How to modify SAMBA account password Select “User1” and then click “Modify”. Enter new password then click “Apply” to save setting. How to delete a File Server account Select an account you wish to delete. Click “Delete” to proceed. Please note that all the data inside the folder will be lost after the delete. -
Page 14: Webdav Server Setup
WebDAV Server setup WebDAV is a set of extensions of the HTTP(s) protocol that allows a web server to appear as a standard network drive. With WebDAV support, the NAS user will be able to access the shared folders via HTTP/HTTPs protocol remotely. -
Page 15: How To Modify Webdav Account Password
How to modify WebDAV account password Select “Test” and then click “Modify”. Enter new password then click “Apply” to save setting. Select “Test” from Folder List and click the “right arrow” to add folder on “Sharing List”. www.addonics.com Technical Support (M-F 8:30am - 6:00pm PST) Phone: 408-453-6212 Email: www.addonics.com/support/query/... -
Page 16: Webdav Client Setup
WebDAV client setup Accessing WebDAV via Windows XP The step-by-step guide below demonstrates how to connect to your NAS via WebDAV on Windows XP. 1. Right click “May computer” and select “Map Network Drive”. 2. Click “Sign up for the online storage or connect to a network server”. - Page 17 Note: NAS IP:80 = for example 192.168.1.121:80 Test = The folder you would like to share. 5. Enter the user's name and its password which has the WebDAV privilege to access this shared folder. 6. Name the network place. 7. The network place has been created and ready to use.
-
Page 18: Xbox 360 Media Server
8. Now you can access this share folder anytime through WebDAV. A shortcut has also been created in “My Network Places”. Note: Windows default capacity for WebDAV is 500MB only. You may also download a third party WebDAV client software. For Windows OS, you may use NETDRIVE. - Page 19 Same procedure applies for the Music and Video folders. On your Xbox 360, go to “Media” tab, select either Music or Pictures and press A button of the Xbox console to continue. Press X button of the Xbox console to change the source and select your network drive.
-
Page 20: Print Server
Print Server Install printer driver, (for example. if Epson PL-6200L Printer is connected to the NAS30U2, you must install PL-6200L driver into the computer first.) After driver installation, click “Start” → “Setting” → “Printer and Faxes” → “Add a printer”→ “Next”. www.addonics.com Technical Support (M-F 8:30am - 6:00pm PST) Phone: 408-453-6212... - Page 21 Connect USB printer to NAS30U2. Your network environment should be similar with diagram below: Select “Local printer” and click “Next” to continue. Select “Create a new port type of port:” then choose “Standard TCP/IP Port” then click “Next” to continue. www.addonics.com Technical Support (M-F 8:30am - 6:00pm PST) Phone: 408-453-6212...
- Page 22 Enter the NAS30U2 IP address then click “Next” to continue. Select “Custom” and go to “Setting”. www.addonics.com Technical Support (M-F 8:30am - 6:00pm PST) Phone: 408-453-6212 Email: www.addonics.com/support/query/...
- Page 23 Select “LPR” under protocol, and give a queue name eg:LRxxx; select LPR Byte Counting Enabled then click “OK” to finish the port setting. Click “Finish” to complete TCP/IP printer setup. Note: The NAS30U2 printer server does not support GDI/Host-based printers. For some Multi Function Printers (MFP);...
-
Page 24: P2P Server
P2P Server The NAS30U2 supports Bit Torrent download without using PC resource. A maximum of 4 bit torrent downloads can be running at the same time. Select “Bit Torrent” and select the “Download Path” you wish to use. Then click “Apply” to save setting. (DO NOT change path setting while performing BT download, otherwise downloading jobs will disappear) Server Port range can be from 6881 to 65535. -
Page 25: Mac Installations (Mac 10.5.4 Or Above)
Mac installations (Mac 10.5.4 or above) Open the Mac browser “Safari” and key-in the host name of the NAS30U2 (for example, “Storage-0000”). It will detect the NAS30U2 automatically. How to setup SAMBA in Mac OS X 10.5.4 Click “Go” on the toolbar, and select ”Network” as the screenshot shown below. - Page 26 Click on the Storage-xxxx (or the correct name of the NAS30U2). Select the folder you wish to share, and click “OK” to share the folder. Click “OK” to show the folder in the Desktop. www.addonics.com Technical Support (M-F 8:30am - 6:00pm PST) Phone: 408-453-6212 Email: www.addonics.com/support/query/...
-
Page 27: How To Map Your Nas30U2 To Your System
How to Map your NAS30U2 to your system. Showing NAS Disk Drive in network Press “Start” button on Windows desktop Press “Search” Select Folders Select Computer or people Select a computer on the network and a new window will appear. Key in the host name, (For example “storage-xxxx”) in the “Computer name”... - Page 28 Map Network Window appears Note: For faster connection and usability, we recommend that you map a drive. This creates a direct access to the shared drive from My Computer (for more information about drive mapping, refer to your Windows manual). Access SMB folder of NAS30U2 in Ubuntu 8.04 First, using the console get the prerequisites for the samba file system: $ sudo aptitude install samba smbfs...
-
Page 29: Frequently Asked Questions
Frequently Asked Questions: Q: What is NAS 3.0 default IP? A: The default IP address for NAS 3.0 is 169.254.0.1 or enter “storage” in IE browser bar to search for it. Q: What is NAS 3.0 default login name and password? A: The NAS 3.0 default Login name: “admin”, default password: “admin”. - Page 30 Q: Why can't I store 4GB data in WebDAV? Microsoft Windows WebDAV support is still as little as 4GB, if you are demanding larger data transferring over than 4GB, it would likely to fail. Therefore, install a WebDAV client software is another alternative, software like BitKinex or Netdrive can be downloaded from the website below: www.bitkinex.com/download www.netdrive.net/download.html...
Need help?
Do you have a question about the NAS 3.0 and is the answer not in the manual?
Questions and answers