
Related Manuals for Husqvarna AR19


Summary of Contents for Husqvarna AR19
- Page 1 Operators manual Please read these instructions carefully and make sure you understand them before using the machine. MANUAL NO. 540200239 REV. 12/11/00 Models: AR19 AR25 TA36...
-
Page 2: Table Of Contents
Rear Wheel Adjustment ... 13 Turning and Maneuvering... 13 Operating on Hills ... 13 Section 3 · Maintenance and Service Instructions Transporting the Husqvarna Aerator ... 14 Cleaning and Washing ... 14 Two-Minute Warning ... 14 Storage ... 14 Preventative Maintenance Schedule Inspection Schedule ... -
Page 3: Specifications
SPECIFICATIONS A) POWER UNIT AR19 Engine 3.5HP Briggs I/C (2.6kw) 4HP Honda (3kw) Clutch Belt tensioner Primary drive One V-belt (A-44”) Secondary drive Permalube Chain Gear reduction B) WHEELS Bearings FRONT – ¾” (1.9 cm) sealed ball bearings with stamping kit REAR - ¾”... -
Page 4: Features And Controls
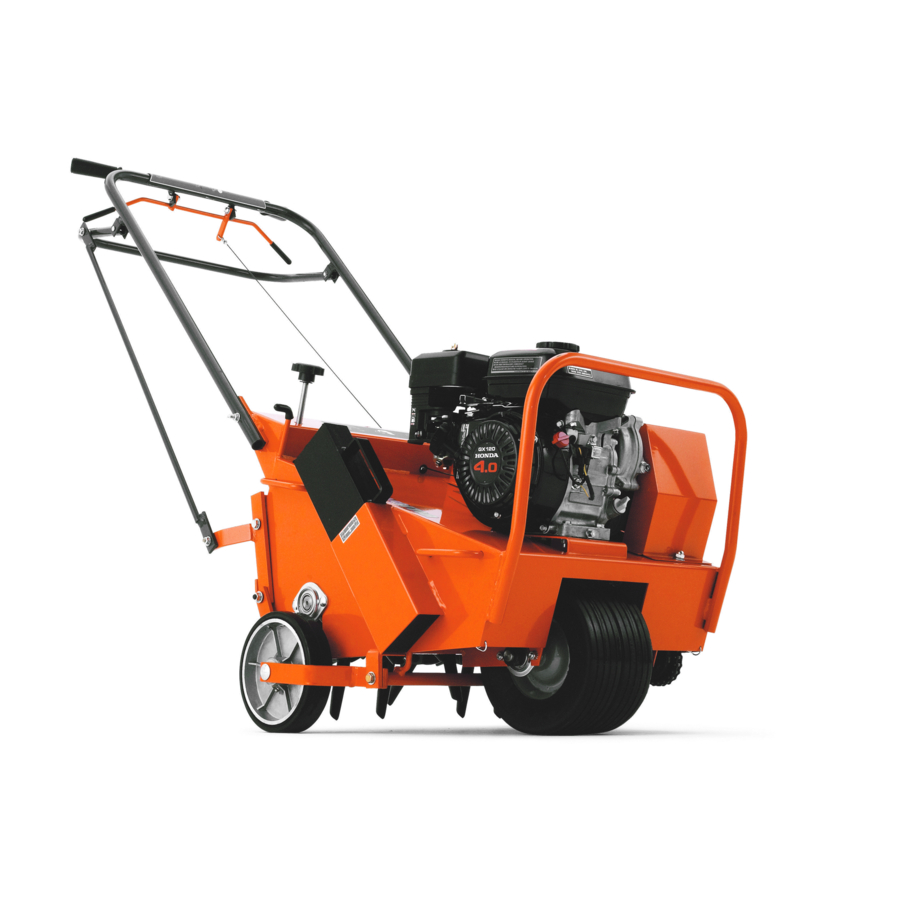
Operator’s Guide MODEL AR19 - FEATURES AND CONTROLS Figure 1... - Page 5 Operator’s Guide MODEL AR25 - FEATURES AND CONTROLS Figure 2...
- Page 6 Operator’s Guide MODEL TA36 - FEATURES AND CONTROLS...
-
Page 7: General Information
Operator’s Guide GENERAL INFORMATION This manual will assist you in the safe operation and proper maintenance of your Husqvarna equipment. Read it thoroughly before attempting to operate the machine. Call your dealer or Husqvarna if additional information is required. The following safety symbols are used throughout the manual to alert you to information about unsafe actions or situations: DANGER indicates immediate hazards that may result in severe injury or death. -
Page 8: Safety And Instruction Decals
SAFETY AND INSTRUCTION DECALS The following decals are found on Model AR19 and AR25 or TA36 aerators. If any are missing or not legible, replace them before operating aerator. A - Model AR19 only (1 ea) B - Model AR19 & AR25 only (2 ea) E - Model AR19 &... -
Page 9: Decal Placement
DECAL PLACEMENT - MODELS AR19 AND AR25 E (on deck behind engine Throttle Cable Model AR25 with Honda Only J (For Model AR25) A (For Model AR19) Figure 3 I (On back of housing over tine rotor) C (For Model AR25) -
Page 10: Assembly Instructions
1. Wear eye protection. Remove wooden blocks. NOTE: Watch for nails and wood splinters. 2. Carefully cut open side of carton. 3. Lawn Aerator is shipped with handle folded. Lock handle in position using the cam lock lever. Model AR25 1. -
Page 11: Aeration Tips
2. With the folding handle in its operating position, lock the handle cam lock (Model AR19 only). 3. Rear wheel control handle must be pulled up so rear wheels are all the way down. -
Page 12: Operating Instructions
Operating Instructions THROTTLE CABLE ADJUSTMENT. Model AR25 (Honda Engine Only) 1. Start engine and allow it to reach operating temperature. 2. Adjust the throttle cable at the adjuster bracket by turning the adjuster nut. Tightening will increase engine speed, loosening will reduce engine speed. NOTE: A properly adjusted throttle will slightly increase engine speed as the clutch engages. -
Page 13: Rear Wheel Adjustment
Operating Instructions REAR WHEEL ADJUSTMENT The rear wheel depth/stability control knob (see Figure 6) allows adjustment for better stability and maneuverability by turning knob clockwise. Adjusting for depth by turning knob counter clockwise determines the length of the cores pulled in the following ways: (A)The rear wheels can be adjusted to the level you desire so you can control the penetration of the tines to within a fraction of an inch. -
Page 14: Transporting The Husqvarna Aerator
WARNING: NEVER DISENGAGE TINES FROM GROUND WHEN TRAVELLING UP OR DOWN HILL. ONLY DISENGAGE ON FLAT SURFACE. TRANSPORTING THE HUSQVARNA AERATOR MODEL AR19 and AR25 The removable weights are for side hill stability and tine penetration as applicable. CAUTION: DO NOT LIFT AERATORS. -
Page 15: Preventative Maintenance Schedule
• Linkage 30W oil (*) after each pressure wash or steam cleaning TINE WEAR After your Husqvarna Aerator has been used for sometime, the tines will wear. When this happens their aerating performance will diminish. Inspect tines using the drawing, replace when at minimum length or before. -
Page 16: Engine Removal And Replacement
7. Check that the V-belt clears the top belt keeper arm when idler is pulled tight. Check that the aerator rolls freely (with handle folded on Model AR19), with the belt slack. Adjust the keeper, or clutch cable length if necessary. -
Page 17: Wheels Drive Wheel Shaft Removal And Replacement
4. Tip the front end up to let the aerator rest on its handle. The front wheel will be approximately 1 foot off the ground. WARNING: SECURE HANDLE TO PREVENT AERATOR FROM TIPPING. 5. Remove the wheel shaft bearing bolts (4 on the AR19 and 6 on the AR25). 6. Remove the wheel axle assembly. -
Page 18: Rear Wheel Removal And Replacement
8. Install bearings and sprocket loosely onto the shaft. Model AR19: hub side away from wheels. Model AR25 has 3 bearings. Wheel bearings should have hubs facing away from wheel. Wheel shaft bearing should have hub facing away from sprocket. -
Page 19: Tine Andtine Shaft Tine Replacement
1. Turn off engine and remove weights. 2. Remove drive guard cover. 3. Fold handle for better access to tines (on Model AR19 only). 4. Elevate approximately 4", block and chock rear wheels. 5. Manually cycle the drive chain for acess to master link. -
Page 20: Section 4 · Operating Instructions For Model Ta36
Operating Instructions for Model TA36 What is Aeration? For healthy growth, grass roots need air space in the soil to absorb oxygen, water, and nutrients. Air space in turf soils is reduced when soils are compacted by foot traffic, rainfall, irrigation, during building construction and landscaping. -
Page 21: Tools Required
Operating Instructions for Model TA36 TOOLS REQUIRED: 2 each 3/4” wrenches 1 each 9/16” deep-well socket 1 each 9/16” wrench PARTS INCLUDED: Bolts: 1 each 3/8 x 1 hex w/nut 4 each 3/8 x 1 hex head w/nuts 3 each 1/2 x 3 hex head w/1 each 1/2" nut Bushing: 5/8”... - Page 22 Operating Instructions for Model TA36 5. Tighten the 1/2” bolt and 3/8” bolt securely. The 3/8” bolt will require the use of a 9/16” deep- well socket wrench to tighten. 7. Insert four 3/8” X 1” bolts with four washers placed on outside of frame, and tighten securely with 3/8”...
- Page 23 AR19 AR19 AR25 AR25...
- Page 24 Technical assistance: For technical assistance please contact your Local Dealer.
Need help?
Do you have a question about the AR19 and is the answer not in the manual?
Questions and answers