Table of Contents
Advertisement
Operating Guide
Manuel d'utilisation
Gebruiksaanwijzing
Manual de funcionamiento
Guida all'uso
Gebrauchsanweisung
Brugervejledning
PRF-3004W-20
In-Ground Fence
System
™
Système de clôture anti-fugue avec fi l
Omheiningssysteem met draad
Limitador de zona con cable
Sistema antifuga con fi lo
Rückhaltesysteme mit Draht
Nedgravet hegnsystem
Advertisement
Table of Contents

Related Manuals for Petsafe PRF-3004W-20


Summary of Contents for Petsafe PRF-3004W-20
- Page 1 Operating Guide Manuel d’utilisation Gebruiksaanwijzing Manual de funcionamiento Guida all’uso Gebrauchsanweisung Brugervejledning PRF-3004W-20 In-Ground Fence System ™ Système de clôture anti-fugue avec fi l Omheiningssysteem met draad Limitador de zona con cable Sistema antifuga con fi lo Rückhaltesysteme mit Draht...
- Page 2 IMPORTANT SAFETY INFORMATION Explanation of Attention Words and Symbols used in this guide This is the safety alert symbol. It is used to alert you to potential personal injury hazards. Obey all safety messages that follow this symbol to avoid possible injury or death. WARNING WARNING indicates a hazardous situation which, if not avoided, could result in death or serious injury.
- Page 3 CAUTION • Please read and follow the instructions in this manual. Proper fit of the collar is important. A collar worn for too long or made too tight on the pet’s neck may cause skin damage. This is called bed sores;...
-
Page 4: Table Of Contents
Thank you for choosing PetSafe . Through consistent use of our products, you can have a better ® behaved dog in less time than with other training tools. If you have any questions, please contact the Customer Care Centre. For a listing of Customer Care Centre telephone numbers, visit our website at www.petsafe.net. -
Page 5: Components
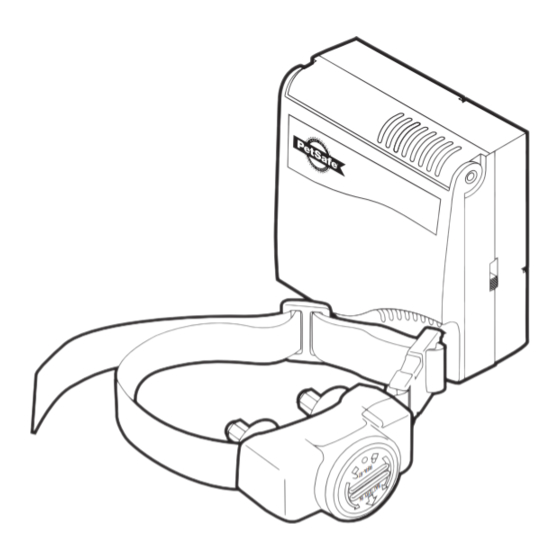
Components Fence Boundary Wire - 500 ft. Transmitter Universal Adapter Wire Nuts Long Boundary Flags - 50 Contact Points Receiver Collar Gel-filled Capsules Battery Test Light ® (PetSafe RFA-67D-11) Operating and Tool Training Guide Other Items You May Need • Additional wire and flags (Part #PRFA-500) •... -
Page 6: How The System Works
How the System Works A radio signal travels from the Fence Transmitter through a buried wire, marking the boundaries you wish to set for your dog.Your dog wears a Receiver Collar that detects the signal at the boundary. As your dog approaches the boundary, the receiver issues a warning tone. -
Page 7: Operating Guide
Operating Guide Step Install the Fence Transmitter Place the Fence Transmitter: • In a dr y, well ventilated, protected area (1A, 1B). • In an area where tempera tures do not f all below freezing (e.g., garage, basement, shed). • Secured to a sta tionary surface using appropriate mounting hardware (not included). A mounting template is included in the back of this guide. -
Page 8: Sample Layouts
• Always use gradual turns at the corners with a minimum 1 m (3 ft) radius, to produce a more consistent boundary (2B). Do not use sharp turns, as this will cause gaps in your boundary. • Avoid making passageways too narrow for your pet to move about freely (e.g., along the sides of a house). •... -
Page 9: Position The Boundary Wire
Sample 6 (2J): Wire Loop Attached to Existing Fence (Double Loop) This layout allows you to include your existing fence as part of your layout and 1.5 m keep your pet from jumping out or digging under your existing fence. It reduces (5 ft) the amount of wire which will need to be buried. -
Page 10: Connect The Wires To The Fence Transmitter
1 cm 1 cm Additional Boundary Wire Area to be enclosed Approximate wire length required Extra direct burial Boundary Wire can be purchased in 150 m (500 feet) spools at the store where you purchased the kit or through the Customer 0.10 Care Centre. -
Page 11: Prepare The Receiver Collar
Prepare the Receiver Collar (PIG19-10761) Step There are two sets of Contact Points that can be used on y our receiver. Your Receiver Collar comes with the shor t Contact Points installed. The longer Contact Points should be used on dogs with long hair. Tighten the Contact Points using Test Light Tool (5A) one-half turn beyond finger tight. - Page 12 Pet Area too much. We recommend a 3.7 m - 6 m (12 ft - 20 ft) Boundary Width. Note: The Boundary Width Control knob does not change the Static Correction Level. CAUTION To prevent an unintended correction: - The receiver collar should not be on your Test Light Contacts dog when the system is tested.
-
Page 13: Install The Boundary Wire
Install the Boundary Wire Step WARNING Underground cables can carry high voltage. Have all underground cables marked before you dig to bury your wire. In most areas, this is a free service. NOTICE Avoid damage to the insulation of the loop wire during the install. Damage may cause areas of weak signal and lead to early failure of the loop (wire breaks). -
Page 14: Place The Boundary Flags
To Cross Hard Surfaces (driveways, sidewalks, etc.) WARNING Follow all safety instructions for your power tools. Be sure to always wear your safety goggles. • Concrete Driveway or Sidewalk (7C): Place the Boundary Wire in a convenient expansion joint or create a groove using a circular saw and masonry blade. - Page 15 To assure a proper fit, please follow these steps: 1. Make sure that the battery is not installed in the Receiv er Collar. 2. Start with your pet standing comfor tably (9A). 3. Place the Receiver Collar on your pet so that the “PetSafe ”...
-
Page 16: Training Guide
Training Guide Be Patient With Your Pet CAUTION Proper training of your pet is essential to the success of the PetSafe In-Ground Fence . During the fi rst 2 ® ™ weeks of training, do not use the training device on your pet without direct supervision. Read this section completely before beginning to train your pet. -
Page 17: Days 3 And 4 - Continue Boundary Flag Awareness
Days 3 and 4 - Continue Boundary Flag Awareness Phase Perform three training sessions per day, each lasting 10-15 minutes. Goal: To introduce your pet to the Static Correction and teach where it happens. Setup: • Place the Receiver Collar on your pet’s neck. •... -
Page 18: Days 9 Thru 14 - Off-Lead Supervision
Days 9 thru 14 - Off-Lead Supervision Phase Training sessions should start at 10-15 minutes, gradually increasing to over an hour. Your pet is ready for this step only when he clearly avoids the entire Boundary Flag line, regardless of any distractions or temptations. -
Page 19: Accessories
Accessories To purchase additional accessor ies for your PetSafe In-Ground Fence , visit our website at www.petsafe.net to locate a ® ™ retailer near you and for a listing of Customer Care Centre telephone number s in your area. Component Part Number Replacement Receiver Collar Battery - two pack RFA-67D-11... -
Page 20: Function And Response Table
Function and Response Table Indicator Light Response Static Correction Level Receiver Collar Function Temperament of Pet 1 Flash No Static Correction, Tone Only Initial Training Mode 2 Flashes Low Static Correction Timid 3 Flashes Medium Static Correction Timid or Average 4 Flashes Medium High Static Correction Average or High Energy... -
Page 21: Frequently Asked Questions
Function and Response Table Indicator Light Response Correction Level Collar Receiver Function Temperament of Pet 1 Flash Tone and Vibrate (No Static Correction) Initial Training Mode 2 Flashes Low Static Correction Timid 3 Flashes Medium Static Correction Timid or Average 4 Flashes Medium High Static Correction Average or High Energy... -
Page 22: Troubleshooting
Troubleshooting • Check battery to make sure it is installed properly. Receiver Collar is not beeping • Check that both lights are lit on the Fence Transmitter. If not, perform the “Short or correcting. Loop T est”. • Test the Receiver Collar with the Test Light walking toward the Boundary Wire. The Receiver Collar is •... -
Page 23: Short Loop Test
Additional Information • The system should only be used with healthy pets who are over 6 months of age. Contact your veterinarian if you have concerns about the medical condition of your pet (medication, pregnant, heart conditions, etc.). • The PetSafe In-Ground Fence is for residential use only. -
Page 24: Terms Of Use And Limitation Of Liability
Corporation may violate EU R&TTE regulations, could void the user’s authority to operate the equipment, and will ® void the warranty. Hereby, Radio Systems Corporation, declares that this PRF-3004W-20 In-Ground Fence In-Ground Fence is in compliance with the ® ™... - Page 25 Layout Grid / Schéma d’installation / Ontwerpraster Cuadrícula de distribución / Plantilla de montaje / Mounting Template Plantilla de montaje / Udlægningsnet Modèle de montage Montagesjabloon Plantilla de montaje Plantilla de montaje Befestigungsplan Monteringsskabelon 7.62 cm 7,62 cm (3 in) Radio Systems Corporation ®...
Need help?
Do you have a question about the PRF-3004W-20 and is the answer not in the manual?
Questions and answers