Table of Contents
Advertisement
Advertisement
Table of Contents

Related Manuals for Secure Pipit 500


Summary of Contents for Secure Pipit 500
- Page 1 Pipit 500 In-Home-Display User Manual BGX501-811-R01...
- Page 2 Pipit 500 ® is a registered trade name of Secure Meters Ltd. Other product names are trademarks or registered trade names of their respective owners. As part of Secure Meter’s continuous endeavour to improve product design, specifications mentioned are liable to change. Page 2 of 32...
-
Page 3: Table Of Contents
Functional features of Pipit 500 ....................8 Setting up Pipit 500 ........................9 Powering the unit ............................9 Pairing Pipit 500 with Smart Meter ........................ 9 Wall mounting Pipit 500 ..........................11 5.3.1 Releasing Pipit from the stand ...................... 12 5.3.2... -
Page 4: Introduction
1 Introduction 1.1 Target audience This document is intended for users of the Pipit 500 in-home display unit, which is a component of the Secure Meters AMI (advanced metering infrastructure) system. 1.2 About this user manual The manual describes functions and features of Pipit 500 and provides information on how to commission and use the device. -
Page 5: Product Overview And Operating Principle
2 Product overview and operating principle Product overview: Pipit 500 is an easy to use in-home display (IHD) unit with touch-sensitive LCD screen. It is a component of ® Secure Meter’s smart metering solution and is fitted with a ZigBee module that aids communication with the installed advanced electricity meter to provide near real-time energy usage and other useful information. - Page 6 HAN devices and mesh radio / WiMAX for WAN communication through the HES. Information sent from HES is communicated to the electricity meter and the IHD via the AMI communication module. Page 6 of 32 Pipit 500 User Manual BGX501-811-R01...
-
Page 7: About Pipit 500
3 About Pipit 500 Pipit 500 is intended for use inside the consumer’s home. It operates primarily on mains power via a DC adapter and typically consumes less than 0.6 watt. The touch-screen display shows power usage and electricity consumption in near real-time. When operating on battery power the display will automatically turn off after approximately 90 seconds. -
Page 8: Battery Switch
A ‘low battery’ icon is displayed at the top of the screen to indicate when the batteries need to be replaced. 4 Functional features of Pipit 500 Pipit can display the following information from the installed Smart Electricity Meter:... -
Page 9: Setting Up Pipit 500
‘B’ facing outwards, as shown in the following figure. Push the cable firmly into the groove of the cable grip to secure the connector in place. -
Page 10: Pairing Process
PIN to be entered; refer to the Advanced Settings section in this manual for PIN entry details. Make sure that the unit is on mains power before attempting to join the network. Page 10 of 32 Pipit 500 User Manual BGX501-811-R01... -
Page 11: Wall Mounting Pipit 500
5.3 Wall mounting Pipit 500 Pipit 500 and wall mounting bracket dimensions: Fixing Pipit 500 on the wall: 1. Select a suitable position for mounting Pipit. 2. Hold the wall mounting bracket upright against the wall, leaving at least 50 mm space above, 20 mm space below, and 40 mm space on either side so that the unit can be fitted on to the bracket. -
Page 12: Releasing Pipit From The Stand
5.3.1 Releasing Pipit from the stand To release Pipit from the bracket, push the clip downwards from the front and at the same time hold and lift the unit up and away from the bracket. Page 12 of 32 Pipit 500 User Manual BGX501-811-R01... -
Page 13: Replacing Battery In Pipit
Step 1: Remove the battery cover. Step 2: Insert a pair of non-rechargeable AAA batteries, making sure the polarity is correct. Step 3: Put the battery cover back on to the Pipit. BGX501-811-R01 Pipit 500 User Manual Page 13 of 32... -
Page 14: Getting Started
MAC (Media Access Control) address, the installation code, the manufacturer’s name and the year of product release is displayed. The splash screen is not displayed if the unit is decommissioned from the HAN. Page 14 of 32 Pipit 500 User Manual BGX501-811-R01... -
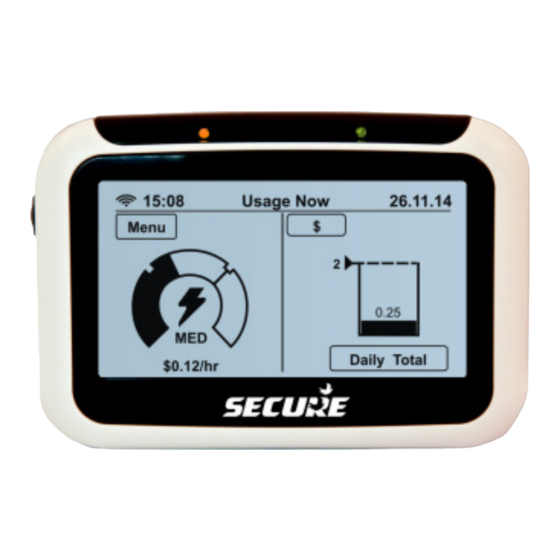
Page 15: Home Screen
($) target per day and the tariff price read from the meter. In case the tariff price is not received from the meter, the preconfigured value in the Pipit will be used. The $ values shown are calculations based on the default factory-set tariff values in the Pipit 500. BGX501-811-R01... -
Page 16: Sticky Screen Display
It can also show the currently active tariff and the next applicable tariff, along with its activation time. The various displays accessible with the View Page 16 of 32 Pipit 500 User Manual BGX501-811-R01... -
Page 17: Main Menu
If there is no user interaction for approximately one minute the display will revert to the default home screen (i.e. ‘$ Daily Total’ sticky screen). 6.4 Main menu Press the Menu button to access the main menu, as shown below: BGX501-811-R01 Pipit 500 User Manual Page 17 of 32... -
Page 18: Messages
Receipt of non-critical messages, which do not require user acknowledgement, is indicated by the message icon on the home screen. Messages can be accessed by pressing the message icon on either the home screen or the menu screen. Page 18 of 32 Pipit 500 User Manual BGX501-811-R01... - Page 19 The supplier can also send messages with an expiry that will be automatically deleted from Pipit’s memory upon expiry. BGX501-811-R01 Pipit 500 User Manual Page 19 of 32...
-
Page 20: Viewing Historical Data
8 weeks and 13 months respectively. Table 3 Press the appropriate icon to see the desired information screen, or press Menu to return to the main menu. Page 20 of 32 Pipit 500 User Manual BGX501-811-R01... -
Page 21: Button Function
The Unit selection buttons access energy usage, cost or CO information for the selected View option. The label on the button shows the units of the information being displayed. Table 4 BGX501-811-R01 Pipit 500 User Manual Page 21 of 32... - Page 22 - Compare energy usage history (kWh, $ and CO Touch the Compare icon to compare the energy consumption value by day, week, month or year. View button [Day, Week, Month and Year] Usage data Page 22 of 32 Pipit 500 User Manual BGX501-811-R01...
- Page 23 The start date for each week is displayed. Monthly consumption data table Monthly energy consumption values for the current month and the preceding 12 months. Note: In this section, the term ‘consumption’ also refers to ‘generation’. BGX501-811-R01 Pipit 500 User Manual Page 23 of 32...
-
Page 24: Changing Default Settings
Sound (a short series of beeps). Flash (backlight flashes on and off five times rapidly. Light (left-hand LED flashes on and off five Message Alarm: times rapidly). Off (no alarm). The alarm is triggered when a critical message is received. Page 24 of 32 Pipit 500 User Manual BGX501-811-R01... - Page 25 Note that the current value is displayed on the right-hand side of the keypad. Enter the new value and then press OK to set the new target, or press Cancel to retain the old value and return to the previous screen. BGX501-811-R01 Pipit 500 User Manual Page 25 of 32...
-
Page 26: Advanced Settings
If a Flexible tariff is configured, the consumption cost for any missing period is derived from the current applicable price for that period. Page 26 of 32 Pipit 500 User Manual BGX501-811-R01... - Page 27 PIN code to be displayed. The new setting is saved only if the correct PIN is entered. Press Cancel to return to the advance Settings menu without making any changes. BGX501-811-R01 Pipit 500 User Manual Page 27 of 32...
- Page 28 Press Confirm to delete all the data, or press Cancel to return to the advance Settings menu without erasing the data. Note: Pipit will not collect erased historical energy data. Page 28 of 32 Pipit 500 User Manual BGX501-811-R01...
-
Page 29: Manually Joining/Leaving The Network
OK. Entering the correct PIN will enable the requested change to be made. An incorrectly entered PIN will cause the following warning message to be displayed: Wrong PIN warning: Press OK to re-enter the PIN code. BGX501-811-R01 Pipit 500 User Manual Page 29 of 32... -
Page 30: Supplier And Ihd Information Screen
The Info icon from the main menu displays the Info screen, which is similar to the splash screen. It shows the supplier’s URL and an ‘i’ button. Pressing the ‘i’ button causes information on signal strength to be displayed, together with the application version and radio firmware version as shown below: Page 30 of 32 Pipit 500 User Manual BGX501-811-R01... -
Page 31: Annexe-I: Pipit 500 Technical Specification
CISPR 22 Compliance Pipit 500 conforms to all the essential requirements of EU Directive 1999/5/EC, WEEE 2002/96/EC and complies with RoHS. Follow the local safety norms to dispose off the batteries and the product safely at the end of their life. - Page 32 Secure Australasia Pty Ltd 258 Darebin Rd, Fairfield, Victoria 3078 Australia : +61 3 9485 6000 +61 3 9485 6099 Website: www.freedomtosave.com.au...
Need help?
Do you have a question about the Pipit 500 and is the answer not in the manual?
Questions and answers
Where do I find my pin
The PIN for the Secure Pipit 500 is ‘1793’. It can be entered using the keypad on the screen and then pressing OK.
This answer is automatically generated
Forgotten pin. It is not the original one. We have moved into a new house and it was left by previous owners