
Related Manuals for BCI WW1020


Summary of Contents for BCI WW1020
- Page 1 WW1020/WW1000 Operation Manual - English Catalog Number WW1922en Version 0, April 2009 © 2009 Smiths Medical family of companies. All rights reserved.
-
Page 3: Table Of Contents
Cautions ..................................1-7 Notes ................................... 1-8 Chapter 2: Intended Use and Monitor Features ..........2-1 Intended Use for the WW1020 Oximeter ....................... 2-1 Intended Use for the WW1000 Oximeter ....................... 2-1 Monitor Features ..............................2-1 Theory of Operation .............................. 2-2 Pulse Amplitude Index ............................ - Page 4 Table of Contents Nellcor® Sensor (WW1020 Only) ......................4-11 Cleaning or Disinfecting the Sensors ......................4-11 Checking the Sensor and Oximetry Cable....................4-11 Pulse Amplitude Index ............................4-12 Storing the Sensor ..............................4-14 Home Use ................................4-15 Equipment and Supplies Checklist for Home Use ................4-15 Training the Home Use Caregiver ......................4-16 Chapter 5: Patient Record Number and Trend Data........
- Page 5 Electromagnetic Immunity - Immunity Test ....................A-2 Recommended Separation Distances ......................A-4 The serial autocorrelation technology (SAC) in the WW1020 oximeter is covered by U.S. Patent No. 5,558,096. BCI, Comfort Clip and the Smiths design mark are trademarks of the Smiths Medical family of ®...
- Page 6 Table of Contents This page is intentionally left blank. Clinician’s Operation Manual...
-
Page 7: Warranty And Service Information
Information contained in this document is copyrighted by Smiths Medical PM, Inc. and may not be duplicated in full or part by any person without prior written approval of Smiths Medical PM, Inc. Its purpose is to provide the user with adequately detailed documentation to efficiently install, operate, maintain, and order spare parts for the device supplied. -
Page 8: Warranty Procedure
Phone: (44) 1923 246434 Colonial Way, Watford, Hertfordshire, Fax: (44) 1923 240273 WD24 4LG, UK Australian Representative: Smiths Medical Australasia Pty. Ltd. Tel: +61 (0) 7 3340 1300 61 Brandl Street, Eight Mile Plains, QLD 4113, Australia Clinician’s Operation Manual... -
Page 9: Chapter 1: Introduction
Printer Key - Start / Stop Print Docking Station LED - AC Power Docking Station LED - USB Power Docking Station LED - Charging Spare Battery Printer icon: Small Pulse (WW1020 only) Printer icon: Check Sensor Printer icon: Searching too Long Printer icon: Lost Pulse... - Page 10 If purchased before that date, they may also be sent for recycling if being Separately replaced on a one-for-one, like-for-like basis (this varies depending on the country). Recycling instructions to customers using Smiths Medical products are published on the internet at: http://www.smiths-medical.com/recycle...
-
Page 11: Warnings
Chapter 1: Introduction kEYWORD DEFINITION WARNING Something that could hurt the patient or hurt the operator. CAUTION Something that could damage the monitor. NOTE Other important information. Warnings WARNING! This device is not intended for continuous patient monitoring. This device is intended to measure the patient’s %SpO and pulse rate values. - Page 12 Chapter 1: Introduction WARNING! Incorrectly applied sensors may give inaccurate readings. Refer to the sensor insert for proper application instructions. WARNING! Do not autoclave, ethylene oxide sterilize, or immerse the sensors in liquid. This may cause damage to the sensor which may cause inaccurate readings. WARNING! Unplug the sensor from the oximeter before cleaning or disinfecting to prevent damaging the sensor or monitor, and to prevent user safety hazards.
- Page 13 Chapter 1: Introduction WARNING! IEC 60950 approved equipment must be placed outside the “patient environment.” The patient environment is defined as an area 1.5 m (4.92 feet) from the patient. Figure 1-1: Patient Environment WARNING! The oximeter will not operate without batteries installed. Properly charged batteries provide a reserve source of power in case of external power failure.
- Page 14 The monitor’s AC rating is shown on the external power supply. If the rating is not correct, do not use the monitor. Contact the Smiths Medical PM, Inc. service department, or your authorized service representative, for help.
-
Page 15: Cautions
Chapter 1: Introduction Cautions CAUTION! Federal (U.S.A.) law restricts this device to sale by or on the order of a physician. CAUTION! Do not disassemble unit, not user serviceable. Refer to qualified service personnel. CAUTION! Failure to charge the monitor while the monitor is in long term storage may shorten the battery life. -
Page 16: Notes
Chapter 1: Introduction Notes NOTE: The WW1090 rechargeable battery pack utilizes circuitry that optimizes the charging of the batteries. New packs will require multiple charge / discharge learning cycles before optimum performance is obtained. NOTE: “SpO averaging” means the number of pulse beats over which the SpO value is averaged;... -
Page 17: Chapter 2: Intended Use And Monitor Features
• Provides fast, reliable SpO , pulse rate, and pulse signal strength measurements on any patient, from neonate to adult for the WW1020 or from small infant to adult for the WW1000. • Maintains accurate readings during periods of patient motion (WW1020 only) and when monitoring patients with low perfusion. -
Page 18: Theory Of Operation
Chapter 2: Intended Use and Monitor Features Theory of Operation The pulse oximeter determines %SpO and pulse rate by passing two wavelengths of low intensity light, one red and one infrared, through body tissue to a photodetector. Information about wavelength range can be especially useful to clinicians. Wavelength information for this device can be found in the SpO Specifications section of this manual. -
Page 19: Pulse Amplitude Index
Pulse Amplitude Index in Chapter 4: Operating Instructions. NOTE! The PI value is a relative value that varies from patient to patient. Patented Technology (WW1020 only) This oximeter incorporates patented technology and noise reducing hardware to enhance the oximeter’s ability to detect pulse amplitude in patients with poor peripheral perfusion. Blood Pulse Detection Method Using Serial Autocorrelation (SAC), patent number 5,558,096, analyzes a digitized signal, in real time, and compares it with previous pulse data. - Page 20 Chapter 2: Intended Use and Monitor Features This page is intentionally left blank. Clinician’s Operation Manual...
-
Page 21: Chapter 3: Controls And Features
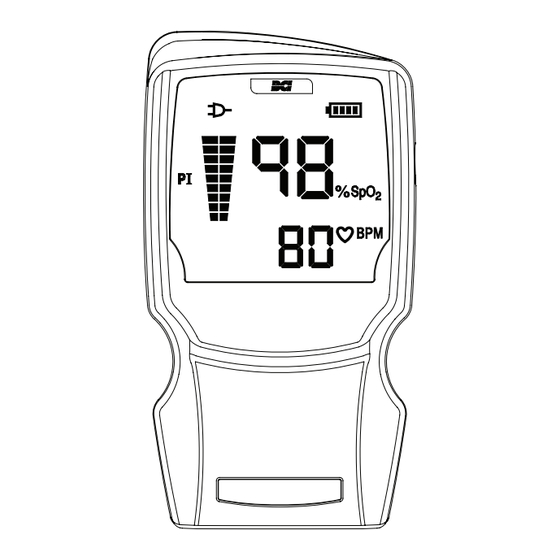
Chapter 3: Controls and Features Chapter 3: Controls and Features Front Display The display shows the measurements for SpO and Pulse Rate. It also shows a pulse strength indicator, a pulse amplitude indicator and indicators for AC power and battery charge level. Figure 3-1: Front Display Pulse Amplitude Index Bar Graph - green / yellow The pulse amplitude index bar graph is used to assist the operator in locating the oximetry... -
Page 22: Monitor Operating Key
Chapter 3: Controls and Features Monitor Operating key Figure 3-2: Monitor Operating Key ON/OFF key Momentarily press this key when the device is OFF to turn the monitor ON. Press this key when the device is ON to turn the monitor OFF. Press and hold this key when the device is OFF to clear the patient trend data. -
Page 23: Monitor Back And Bottom Panels
Chapter 3: Controls and Features Monitor Back and Bottom Panels Figure 3-3: Monitor Back and Bottom Panels Sensor / RS232 Connector The sensor or an extension cable attaches here. With the sensor removed, trend data can be downloaded from this connector using an RS232 serial interface cable. See Chapter 7: Connecting to a PC for details. - Page 24 Chapter 3: Controls and Features This page is intentionally left blank. Clinician’s Operation Manual...
-
Page 25: Chapter 4: Operating Instructions
AC power supply is required when utilizing the docking station to ensure the proper operation of the docking station with all accessories, including auxiliary battery charger and optional printer. WARNING! The WW1020/WW1000 will not operate without batteries installed. Properly charged batteries provide a reserve source of power in case of external power failure. - Page 26 Chapter 4: Operating Instructions After connecting to power, verify that the green External Power Indicator is lit. External Power Battery Charge Indicator Indicator Figure 4-1: External Power/Charge Indicators If an AC source is present, the oximeter will draw power from it first. While the oximeter is operating from an AC source, the External Power Indicator ( ) will illuminate.
-
Page 27: Installing The Batteries
2b. If using WW1090 Li-Ion (Li+) rechargeable battery pack: Align the battery pack so that the metal connectors line up with the connectors in the WW1020/WW1000 battery compartment. Push the WW1090 Lithium-Ion (Li+) rechargeable battery pack straight in to place. -
Page 28: External Power
WARNING! Patient safety can be compromised by the use of a power supply not supplied by Smiths Medical PM, Inc. Use only the power supply included with your monitor, or one approved by Smiths Medical PM, Inc. WARNING! Ensure the device’s AC rating is correct for the AC voltage at your installation site before using this monitor. -
Page 29: Ac Power
Chapter 4: Operating Instructions AC Power The AC power supply can plug into the oximeter (Figure 4-3) or into the WW1089 USB interface cable (Figure 4-4). Power Input Connector AC Power Supply Figure 4-3: AC Power Supply AC Power Supply (Optional) Connect AC Power Power Input... -
Page 30: Usb Power (Universal Serial Bus)
Chapter 4: Operating Instructions USB Power (Universal Serial Bus) AC Power Supply (Optional) Connect AC Power Power Input Here (Optional) Connector USB Interface Cable to PC USB Interface Cable Connect USB Cable to Monitor Figure 4-5: USB Power to Oximeter The oximeter may be powered from an external USB source such as a laptop computer or powered USB hub. -
Page 31: Turning On The Monitor
Chapter 4: Operating Instructions Turning On the Monitor Press this key to turn the monitor on and off. Figure 4-6: Turning On the Monitor To turn on the monitor, press the key. Before using the monitor, check the following at power- •... -
Page 32: Checking The Monitor's Configuration
Pulse oximeters do not require user calibration. If checking the function of the device is desired, an Oximetry Patient Simulator (Smiths Medical PM, Inc. catalog number 1606) is available as an accessory. The simulator attaches to the oximeter in place of the sensor. It provides a known SpO and pulse rate signal to the oximeter. -
Page 33: Attaching The Sensor To The Patient
Chapter 4: Operating Instructions Attaching the Sensor to the Patient To attach the sensor to the patient: Choose the appropriate sensor. See sensor table for additional information. If using a reusable sensor, clean or disinfect the sensor per Cleaning or Disinfecting the Sensors section in this chapter. -
Page 34: Choosing The Sensor
3025: Sensor, Reusable, Wrap, Infant Finger or Toe 1303: Sensor, Disposable, Infant Extension Cable 3311: Cable, Oximetry 1.5 meters (5 feet) NEONATE SENSORS FOR THE WW1020 ONLY Neonate Hand or Foot 1302: Sensor, Disposable, Neonate/Small Infant under 3 kg Foot... -
Page 35: Nellcor® Sensor (Ww1020 Only)
Chapter 4: Operating Instructions Nellcor® Sensor (WW1020 Only) PATIENT SITE DESCRIPTION Adult Finger DS100A finger sensor (reusable) over 45 kg Cleaning or Disinfecting the Sensors Clean or disinfect reusable sensors before attaching to a new patient. WARNING! Unplug the sensor from the monitor before cleaning or disinfecting. -
Page 36: Pulse Amplitude Index
0.16 - 0.31 >0.2 - 0.4 0.08 - 0.15 >0 - 0.2 0.00 - 0.07 0.00 For the WW1020 Oximeter For the WW1000 Oximeter NOTE! The PI value is a relative value that varies from patient to patient. 4-12 Clinician’s Operation Manual... - Page 37 Chapter 4: Operating Instructions When placing the sensor on the patient, allow the cable to lay across the top of the hand and parallel to the arm of the patient as shown in Figure 4-8. Figure 4-8: Positioning the Cable of the Finger Sensor Sensor (finger sensor shown for illustration only) Cable Clinician’s Operation Manual...
-
Page 38: Storing The Sensor
Chapter 4: Operating Instructions Storing the Sensor Upon completion of patient monitoring, detach the sensor and loosely coil the finger sensor cable. Store the sensor in the Sensor Storage cradle or other safe place when not in use. Use the proper cradle. -
Page 39: Home Use
Oximetry Sensor Attachments 31169B88 WW1020 / WW1000 Home Use Guide * Note: The doctor will prescribe the type and quantity of the sensors needed for home- use. Be sure that the proper type and quantity of sensor attachments are also prescribed. -
Page 40: Training The Home Use Caregiver
Chapter 4: Operating Instructions Training the Home Use Caregiver The home use caregiver must be trained in CPR. Inform the caregiver that the oximeter is not to be used as an apnea monitor and should only be used for spot checking applications (non- continuous use). -
Page 41: Chapter 5: Patient Record Number And Trend Data
Chapter 5: Patient Record Number and Trend Data Description Whenever the WW1020/WW1000 is monitoring a patient, it stores an SpO , a pulse rate, and PI reading along with any applicable condition flags and a time stamp every four (4) seconds. The stored readings are called trend data. - Page 42 Chapter 5: Patient Record Number and Trend Data This page is intentionally left blank. Clinician’s Operation Manual...
-
Page 43: Chapter 6: Optional Docking Station And Printer
Chapter 6: Optional Docking Station and Printer Chapter 6: Optional Docking Station and Printer Description Figure 6-1: Docking Station with Printer Attached The WW1025 Docking Station serves many purposes depending on individual needs and selection of optional equipment. The Docking Station is powered by the WW1095 AC Power Supply, which can power the oximeter and operate the printer while charging the internal and spare battery packs. -
Page 44: Docking Station
Chapter 6: Optional Docking Station and Printer Docking Station Figure 6-2: Indicators on Docking Station Front Panel AC Power Indicator This indicator will light when AC power is connected to the Docking Station. USB Power Indicator This indicator will light when a USB cable is connected to the Docking Station, but AC power is not. -
Page 45: Ww1090 Lithium-Ion (Li+) Rechargeable Battery Pack
Station, the spare battery will not automatically provide power. Installing the Oximeter to the Dock The WW1020/WW1000 is placed bottom first into the Docking Station facing out as shown in figure 6-3. Confirm that good connection is made by observing that the oximeter’s external power indicator ( ) is lit. -
Page 46: Printer
Chapter 6: Optional Docking Station and Printer Printer Figure 6-4: Printer Keys and Indicators Print Mode Indicators These indicators light according to what print mode is selected. See Choosing the Print Mode section later in this Chapter. The Print Mode Indicator will blink green when printing is pending or in progress. Start/Stop Print key Press this key to start or stop printing. -
Page 47: Attaching The Printer
Chapter 6: Optional Docking Station and Printer Attaching the Printer The optional WW1026 thermal printer attaches to the Docking Station with a single screw as shown in Figure 6-5C. Follow the steps below. WARNING! The Docking Station must have a Printer or Printer Port Cover installed. Failure to do so may cause a risk of electrical shock to the patient or operator or risk damage to the equipment. -
Page 48: Loading Paper
Chapter 6: Optional Docking Station and Printer Loading Paper The printer uses 58mm wide thermal paper. See Chapter 10: Optional Supplies & Accessories for part number and ordering information. To load the paper, follow the steps illustrated below. Release printer door by lifting clear cover. Lift here Figure 6-6A: Release Printer Door Swing open paper holder by... -
Page 49: Choosing The Print Mode
Chapter 6: Optional Docking Station and Printer Choosing the Print Mode Data can be printed in real time, numeric trend or graphic trend modes. In either trend mode, 6 days of previously stored data (depending on trend interval) collected from 1 to 99 patients can be printed. -
Page 50: Trend Data Condition Flags
Artifact indicator informs user of excess motion, noise or other signal information that the algorithm Artifact interprets as potentially non-physiological. (WW1020 only) This flag is an indicator that pulse rate data has changed and now may be invalid. Small Pulse Indicates the signal strength is ≤... -
Page 51: Chapter 7: Pc Communication Setup
Chapter 7: PC Communication Setup Chapter 7: PC Communication Setup Description Real Time and Trend Data may be sent to a PC from the oximeter in the following ways: • The Data/Power Connector of the oximeter or of the Docking Station may be connected to a PC using the USB Interface Cable ( <... -
Page 52: Power Input And Data Connector Port
Chapter 7: PC Communication Setup Power Input and Data Connector Port Data can be transferred to a computer running software that is compatible with the specialized data format BCICP1030 by using the USB Interface Cable. The following items will be needed: •... -
Page 53: How To Set Up Equipment
Chapter 7: PC Communication Setup How to Set Up Equipment Refer to Figure 7-2 for the cable connections. AC Power Supply (Optional) Connect AC Power Here (Optional) Power Input Connector USB Interface Cable to PC USB Interface Cable Connect USB Cable to Monitor Figure 7-2: Connecting to a PC using USB Interface Cable Connect the USB interface cable to the I / O or Power Input Connector on the oximeter or... -
Page 54: Sensor / Rs232 Port
Chapter 7: PC Communication Setup Sensor / RS232 Port Trend data may be downloaded in a comma-separated value (.CSV) format to a computer’s serial (RS232) port. The following items will be needed: • Oximeter • HyperTerminal or other PC communication software •... -
Page 55: Output Format
Chapter 7: PC Communication Setup Output Format Trend data is transmitted in the format shown in Figure 7-4. TREND DATA ID:009__________________ hh:mm:ss SpO2 Rate (bpm) 00:55:08 00:55:04 83 bpm 1.6% 00:54:56 84 bpm 2.8% 00:54:52 83 bpm 2.6% 00:54:48 84 bpm 3.2% 00:54:44 84 bpm 3.6% 00:54:40... - Page 56 Chapter 7: PC Communication Setup This page is intentionally left blank. Clinician’s Operation Manual...
-
Page 57: Chapter 8: Maintenance
Chapter 8: Maintenance Chapter 8: Maintenance Smiths Medical PM, Inc. products have been designed to operate continuously. However, in order to ensure a continued high level of performance and safety of operation, routine maintenance must be performed daily. < The Oximeter Service Manual ( WW1923) also contains the circuit diagrams, parts lists, and descriptions required for carrying out repairs. -
Page 58: Cleaning And Disinfecting
Chapter 8: Maintenance Cleaning and Disinfecting WARNING! Do not autoclave, ethylene oxide sterilize, or immerse the monitor in liquid. Clean the surfaces of the monitor with a soft cloth moistened in water or a mild soap solution. If disinfecting is necessary, wipe the surfaces of the monitor with a 70% isopropyl alcohol solution. If there is contamination with blood borne pathogens or other potentially infectious materials, then the use of an approved disinfectant of appropriate spectrum for the suspected organisms is appropriate. -
Page 59: Chapter 9: Troubleshooting
Chapter 9: Troubleshooting Chapter 9: Troubleshooting WARNING! If the accuracy of any measurement is in question, check the patient’s vital signs by an alternative method, and then check the monitor for proper functioning. Power PROBLEM POSSIBLE CAUSE CORRECTIVE ACTION The oximeter doesn’t Batteries weak and/ or no AC Replace or recharge the batteries. -
Page 60: Sensor
Chapter 9: Troubleshooting PROBLEM POSSIBLE CAUSE CORRECTIVE ACTION The monitor displays The battery is defective. Disconnect the AC power cord and then reconnect it. If the error message when persists, the battery is defective. powered up. Contact your authorized service representative. -
Page 61: Other
Check the user-connected auxiliary not correct. equipment and software. Display shows Remote alarm cable attached to This is proper operation. The WW1020 the oximeter. and WW1000 are not intended for use with the remote alarm cable. Display shows No sensor attached to the Attach a sensor to the oximeter. - Page 62 Chapter 9: Troubleshooting This page is intentionally left blank. Clinician’s Operation Manual...
-
Page 63: Chapter 10: Optional Supplies And Accessories
WW1018Y each Protective glove - yellow WW1018G each Protective glove - green WW1018B each Protective glove - blue WW1020 Pulse Oximeter (with Serial Autocorrelation) each WW1025 each Docking Station WW1026 each Printer (Must be used with Docking Station WW1025) WW1027... -
Page 64: Ordering Information
Ordering Information Outside the USA, for ordering information, contact your local distributor. In the USA, for ordering information, contact the customer service department at the address or phone number below: Smiths Medical PM, Inc. Phone: (262) 542-3100 N7W22025 Johnson Drive... -
Page 65: Chapter 11: Specifications
Chapter 11: Specifications Chapter 11: Specifications Displays 2-digit LED display, 19 mm high. Pulse Rate: 3-digit LED display, 12.7 mm high. 9-segment LED bar graph. Pulse Signal Strength: Logarithmically scaled 9-segment LED bar graph. Display update rate and Pulse rate: 2Hz All other data: 10Hz Display Refresh: 50 Hz... -
Page 66: Spo For The Ww1020 Oximeter
± A of the value measured by the CO-oximeter. The WW1020 has been validated on 10 adult volunteers that did not have health problems and were non-smokers. The study was conducted at oxygen concentrations evenly distributed over an SpO range of 70-100%. -
Page 67: Pulse Rate For The Ww1020 Oximeter
Chapter 11: Specifications Pulse Rate for the WW1020 Oximeter Pulse Rate Range: 20-300 bpm Pulse Rate Resolution: 1 BPM Pulse Rate Averaging: 8 seconds Pulse Rate Accuracy: Pulse Rate Accuracy Pulse Rate Accuracy in Pulse Rate Accuracy in Normal Conditions... -
Page 68: Spo For The Ww1000 Oximeter
Chapter 11: Specifications for the WW1000 Oximeter Range: 0-99% Functional Saturation Resolution: 1 count (%SpO Averaging: 8 beats Calibration: Factory calibrated over range 70% to 99% SpO using human blood samples to functional saturation. Test methods are available upon request. No in- service calibration is required. -
Page 69: Pulse Rate For The Ww1000 Oximeter
Chapter 11: Specifications Pulse Rate for the WW1000 Oximeter Pulse Rate Range: 30-254 bpm Pulse Rate Resolution: 1 bpm Pulse Rate Averaging: 8 seconds Pulse Rate Accuracy: Pulse Rate Accuracy Pulse Rate Accuracy BCI® Sensor in Normal Conditions in Low Perfusion Conditions 30-254bpm 30-250bpm 1300... -
Page 70: Pulse Amplitude Index For The Ww1020 Oximeter
Chapter 11: Specifications Pulse Amplitude Index for the WW1020 Oximeter Range: 0.03% to 20.00% (0.01% increments) Pulse Amplitude Index is defined as PI = (100 * AC)/DC where AC is the alternating current (pulsatile component of the signal) and DC is direct current (non-pulsatile component of the signal). -
Page 71: Serial Data Output
AA (LR6) disposable: WW1020 - Approximately 26 hours continuous use WW1000 - Approximately 32 hours continuous use Custom rechargeable: WW1020 - Approximately 31 hours continuous use (new) WW1000 - Approximately 54 hours continuous use (new) Charge Time: AA (LR6) disposable: Not rechargeable. -
Page 72: Dock Dimensions
Chapter 11: Specifications Dock Dimensions DIMENSION WITHOUT PRINTER WITH PRINTER Width: 107 mm (4.2 inches) 160 mm (6.3 inches) Height: 84 mm (3.3 inches) 84 mm (3.3 inches) Depth: 109 mm (4.3 inches) 109 mm (4.3 inches) Weight: 570 grams (20 ounces) 850 grams (30 ounces) Auxiliary Inputs/Outputs Sensor:... -
Page 73: Equipment Classification
Chapter 11: Specifications Equipment Classification Type of Protection Against Electric shock: Class II or Internally Powered Mode of operation: Spot Check (non-continuous) Degree of Protection Against ingress of Liquids: IPX2, drip proof Degree of Mobility: Portable Degree of Protection Against Electric Shock: Type BF Electromagnetic classification:... - Page 74 Chapter 11: Specifications This page is intentionally left blank. 11-10 Clinician’s Operation Manual...
-
Page 75: Appendix A: Guidance And Manufacturer's Declaration
The WW1020/WW1000 pulse oximeter is intended for use in the electromagnetic environment specified in the tables within this appendix. NOTE! The WW1020/WW1000 pulse oximeter system must be put into service according to the provided EMC information to ensure proper operation. -
Page 76: Electromagnetic Immunity - Immunity Test
GUIDANCE AND MANUFACTURER’S DECLARATION – ELECTROMAGNETIC IMMUNITY The WW1020/WW1000 pulse oximeter is intended for use in the electromagnetic environment specified below. The customer or end user of the WW1020/WW1000 pulse oximeter should ensure that it is used in such an environment. - Page 77 WW1020/WW1000 pulse oximeter is used exceeds the applicable RF transmitter compliance level above, the WW1020/WW1000 pulse oximeter should be observed to verify normal operation. If abnormal performance is observed, additional measures may be necessary, such as reorienting or relocating the WW1020/WW1000 pulse oximeter.
-
Page 78: Recommended Separation Distances
RF COMMUNICATIONS EQUIPMENT AND THE WW1020/WW1000 PULSE OXIMETER The WW1020/WW1000 pulse oximeter is intended for use in the electromagnetic environment in which radiated RF disturbances are controlled. The customer or the user of the WW1020/ WW1000 pulse oximeter can help prevent electromagnetic interference by maintaining a... - Page 79 Appendix A: Guidance and Manufacturer’s Declaration The following is a list of cables, transducers and accessories used with the WW1020/WW1000 pulse oximeter. WARNING! Use of accessories, transducers and cables other than those specified below may result in increased emissions or decreased immunity of the systems.
- Page 80 Appendix A: Guidance and Manufacturer’s Declaration This page is intentionally left blank. Clinician’s Operation Manual...
- Page 82 Phone: (44) 1923 246434 Colonial Way, Watford, Hertfordshire, Fax: (44) 1923 240273 WD24 4LG, UK Australian Representative: Smiths Medical Australasia Pty. Ltd. Tel: +61 (0) 7 3340 1300 61 Brandl Street, Eight Mile Plains, QLD 4113, Australia MEDICAL EQUIPMENT Manufactured By...
Need help?
Do you have a question about the WW1020 and is the answer not in the manual?
Questions and answers