Advertisement
Operating Guide:
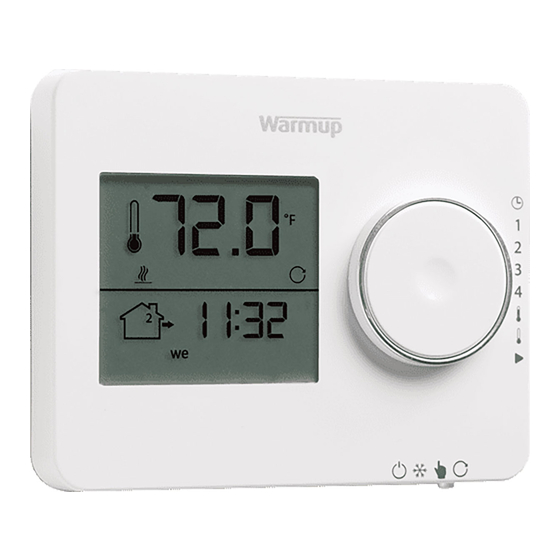
for the Warmup tempo Digital Programmable Thermostat
Part of the Element Series
Introduction
The tempo has been designed with simplicity in mind and is highly intuitive in its programming. The sliders and simple rotary control
make the setting of the thermostat quick and easy.
(1)
Rotary Control (Turn clockwise to increase and anti clockwise to decrease.)
(2)
Main Button
(3)
Program Slide control (only used during programming)
(4)
Mode Slide control
(5)
Reset Button
(6)
Replaceable CR2032 battery
Normally shows the current temperature in the room. This can be either the floor temperature or the air temperature. (See icon
4). When you are setting a program or manual temperature this icon will temporarily show the set temperature.
1.
During programmed operation this thermometer will show whether the thermostat is at "Comfort"
2.
The
icon will be displayed when "Comfort -1/ -2 is the target temperature. (Only used with the Fil Pilote)
3.
This icon
is displayed when the heating is on.
4.
These icons show the type of temperature regulation being used.
Floor Sensor
Air Sensor
Regulator
(This mode should only be used in special situations, please contact Warmup for additional information).
1
2
3
4
8
tempo
element
TM
series
exclusively from
or "Setback"
ELT-01-XX-01 - Operating guide V1.0 © Warmup plc - 2013
temperature.
Advertisement
Table of Contents

Related Manuals for Warmup tempo


Summary of Contents for Warmup tempo
-
Page 1: General Operation
Warmup tempo Digital Programmable Thermostat Part of the Element Series Introduction The tempo has been designed with simplicity in mind and is highly intuitive in its programming. The sliders and simple rotary control make the setting of the thermostat quick and easy. tempo... -
Page 2: Getting Started
Battery is low Getting started In order to program the tempo thermostat all you need to do is slide the Program Slide control from the top position to the bottom position, customising the program along the way. If you make a mistake, return the Program Slide control to the previous position and start again. In order to change a setting value, turn the Rotary Control. -
Page 3: Programming The Thermostat
If you would like to temporarily adjust the temperature, just turn the Rotary Control. At the start of the next heating period, your thermostat will automatically resume your programming schedule. ELT-01-XX-01 - Operating guide V1.0 © Warmup plc - 2013... -
Page 4: Installer Settings
Note: Warmup can only validate the thermostats performance when used with a Warmup probe supplied with the tempo. Decide whether the thermostat uses Adaptive Learning to pre heat the room for your schedule. ELT-01-XX-01 - Operating guide V1.0 © Warmup plc - 2013... -
Page 5: Error Messages/Troubleshooting
Please contact Warmup for additional details. (France only) The thermostat will display “HI” if the ambient temperature exceeds 50°C (122°F) HI or LO is displayed and “LO” when the ambient temperature falls below 0°C (32°F). ELT-01-XX-01 - Operating guide V1.0 © Warmup plc - 2013... -
Page 6: Warranty
(ii) contact Warmup. Warmup will determine whether the product should be returned, or replaced. This warranty does not cover removal or reinstallation costs, and shall not apply if it is shown by Warmup that the defect or malfunction was caused by damage which occurred while the product was in the possession of the end user. -
Page 7: Installation Guide
Part of the Element Series Introduction The tempo thermostat is designed to aid in the comfort of your home by providing timed regulation of your Warmup underfloor heating system. The thermostat is designed to receive temperature input signals from the following sensors: 1. -
Page 8: Patent Pending
2. Connect to Power Supply (Live – MAX 240V) 3. Connect to Power Supply (Neutral – MAX 240V) 4. Connect to Warmup heater(s) (Neutral – MAX 3600W/ 16 Amps) 5. Connect to Warmup heater(s) (Live – MAX 3600W/ 16 Amps) 6.
Need help?
Do you have a question about the tempo and is the answer not in the manual?
Questions and answers