
Related Manuals for HTC Evo 4G LTE


Summary of Contents for HTC Evo 4G LTE
-
Page 1: User Guide
User Guide ©2012 Sprint. Sprint and the logo are trademarks of Sprint. Other marks are the property of their respective owners. -
Page 2: Table Of Contents
Customize the Home Screen .....................21 Launch Bar, Apps, and Folders ..................22 Status and Notifications ......................24 Status Bar ..........................24 Notifications Panel ......................27 Notification LED .........................27 Enter Text ..........................28 HTC Sense Input Keyboard ....................28 Enter Text by Speaking ......................31 Table of Contents... - Page 3 Swype Keyboard ........................31 Tips for Editing Text ......................33 Phone Calls ..........................36 Make Phone Calls .........................36 Call Using the Phone Dialer ....................36 Call From Call History ......................37 Call From People .......................38 Call Using a Speed Dial Number ..................38 Call a Number in a Text Message or Email Message ............38 Call Emergency Numbers ....................38 Receive Phone Calls ......................39 Visual Voicemail ........................40...
- Page 4 Erase Call History ......................49 Settings .............................50 Wireless & Networks Settings ....................50 Airplane Mode ........................51 Wi-Fi ..........................51 Bluetooth..........................51 Mobile Network ........................51 More Wireless & Network Settings ..................51 Personalization Settings ......................52 Scene ..........................52 Change the Home Screen Wallpaper .................53 Change the Default Ringtone .....................53 Sound Set ..........................53 Application Tabs ........................55 Change the Lock Screen Style ...................55...
- Page 5 Incoming Calls ........................63 Notifications ........................64 System ..........................64 Call Settings ..........................64 Voicemail Settings ......................65 Other Call Settings ......................65 Internet Call Settings ......................66 Applications Settings ......................66 Allow Installation of Third-Party Programs ................66 Clear Application Cache and Data ..................66 Select the App to Open Data Items ..................67 Stop Applications Using Task Manager ................67 Storage Settings ........................67 Where Applications, Data, and Files are Stored ..............67...
- Page 6 Set Up Your Profile ......................76 Your Profile ........................77 Add Entries to People App .....................77 Add a New People Entry ....................77 Find People You Know on Social Networks ...............78 Import or Copy Contacts ....................78 Merge Entries in People ......................79 Accept Contact Link Suggestions ..................79 Manually Merge Entries .....................80 Break the Link ........................80 Contact Information and Conversations .................81...
- Page 7 Text and Multimedia Message Options ................109 Add the Messages Widget ....................112 Social Networking Accounts ....................112 Facebook ......................... 112 Twitter for HTC Sense...................... 112 Friend Stream ........................112 Google+ ........................... 116 YouTube .......................... 116 Google Talk ........................118 Applications and Entertainment ....................
- Page 8 Sprint TV & Movies ......................136 NASCAR Sprint Cup Mobile ....................137 HTC Watch .......................... 138 Create or Sign In to Your HTC Watch Account ..............139 Rent or Buy a Video with HTC Watch ................139 Manage Your HTC Watch Downloads ................139 Change the HTC Watch Settings ..................
- Page 9 Your User Name ......................142 Launch a Web Connection ....................142 Data Connection Status and Indicators ................142 Turn the Data Connection On or Off ................. 143 Switch to CDMA Mode to Save Battery Power ..............143 Enable Data Roaming ...................... 143 Data Services FAQs ......................
- Page 10 Connect Your Phone to the Internet Through a Computer (Internet Pass-through) ..159 Camera and Video ........................160 Using the Camera ....................... 160 Launch the Camera ......................160 Take a Photo ........................162 Record a Video ........................ 162 Camera Scenes ....................... 163 Change Camera and Video Settings ................
- Page 11 Create a Playlist in HTC Sync Manager ................202 View Photos and Videos in HTC Sync Manager............... 202 Set Up HTC Sync Manager to Recognize Your Phone............. 203 Set Up Your Phone to Sync with your Computer .............. 204 Syncing Your Phone and Your Computer................. 206...
- Page 12 Ripping Music from a CD with HTC Sync Manager ............206 Voice Recorder ........................207 Record Your Voice ......................207 Set a Voice Clip as a Ringtone ..................207 Bluetooth and NFC ......................208 Turn Bluetooth On or Off ....................208 Change the Phone Name ....................
-
Page 13: Get Started
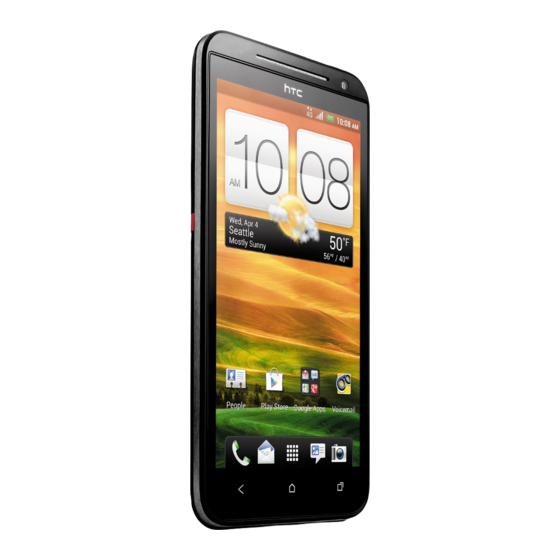
Get Started This section gives you all the information you need to set up your phone and Sprint service the first time. Your Phone at a Glance Charge Your Phone Activate Your Phone Complete the Setup Application Set Up Voicemail Sprint Account Information and Help Your Phone at a Glance The following illustrations outline your phone’s primary external features, keys, and buttons. - Page 14 Front panel Get Started...
-
Page 15: Charge Your Phone
Back panel FCC ID Remove the back cover to check the phone’s FCC ID. Charge Your Phone Your phone comes with a non-removable battery. You must first charge the battery to begin setting up your phone. 1. Plug one end of the USB cable to the AC adapter. Get Started... -
Page 16: Activate Your Phone
2. Plug the other end of the USB cable into the charger/accessory jack on the upper right side of your phone. 3. Plug the AC adapter into an electrical outlet. Fully charging a battery may take up to three hours. Note: Your phone’s battery should have enough charge for the phone to turn on and find a signal, run the setup application, set up voicemail, and make a call. -
Page 17: Complete The Setup Application
● Set up Wi-Fi network. Connect to a Wi-Fi network. For more information, see Wi-Fi. ● Get an HTC Account. Create a new or sign in to your existing HTC Account. Sign in with your HTC Account to easily access HTC features, services, and content. -
Page 18: Set Up Voicemail
Note: You do not need to sign up for a Google Account to use your phone. However, to download applications from Google Play or chat in Google Talk, you must link your phone to a Google Account. Set Up Voicemail Your phone automatically transfers all unanswered calls to your voicemail, even if your phone is in use or turned off. -
Page 19: Manage Your Account
are not the account owner (if someone else receives the bill for your Sprint service), you can get a sub-account password at sprint.com. Voicemail Password You’ll create your voicemail password when you set up your voicemail. See Set Up Voicemail for more information on your voicemail password. -
Page 20: Sprint Support Services
From Any Other Phone ● Sprint Customer Service: 1-888-211-4727. ● Business Customer Service: 1-888-788-4727. Sprint Support Services Sprint 411 and Sprint Operator Services let you easily access information and calling assistance from your Sprint phone. Sprint 411 Sprint 411 gives you access to a variety of services and information, including residential, business, and government listings;... -
Page 21: Phone Basics
Phone Basics Your phone is packed with features that simplify your life and expand your ability to stay connected to the people and information that are important to you. The topics in this section will introduce the basic functions and features of your phone. Your Phone’s Layout Turn Your Phone On and Off Turn Your Screen On and Off... -
Page 22: Your Phone's Layout
Your Phone’s Layout The illustrations below outline your phone’s basic layout. Front panel ● Power Button lets you turn the phone on or off, turn the screen on or off, restart the phone, or switch your phone to airplane mode. ●... - Page 23 ● Home Key lets you display the main Home screen. When in standby mode, touch and hold to open the recently used applications window. ● Recent Apps Key lets you select and return to recently opened apps. ● Camera Key opens the Camera app. ●...
- Page 24 ● Speaker lets you hear the different ringers and sounds. The speaker also lets you hear the caller’s voice in speakerphone mode. ● Charger/Accessory Jack allows you to connect the phone charger or the USB cable (included). CAUTION! Inserting an accessory into the incorrect jack may damage the phone. ●...
-
Page 25: Turn Your Phone On And Off
Turn Your Phone On and Off The instructions below explain how to turn your phone on and off, or how to restart the phone. Turn Your Phone On ► Press and hold Turn Your Phone Off 1. Press and hold to open the Power options menu. -
Page 26: Your Phone's Lock Screen
Turn the Screen On and Unlock It Below are steps for how to unlock your phone’s screen. 1. To turn the screen on, press 2. Flick the ring up to unlock the screen. Your Phone’s Lock Screen Aside from protecting the phone’s screen from unwanted touches and presses, the lock screen also displays important information, updates, and messages at a glance, and provides shortcut icons to your favorite applications. -
Page 27: Customize The Lock Screen
Note: If you have set up a screen lock, you will be prompted to draw the pattern or enter the password or PIN. See Security-Screen Lock. Customize the Lock Screen You can customize the lock screen style and change the shortcuts that appear on the lock screen. - Page 28 Touch When you want to type using the onscreen keyboard, select items onscreen such as application and settings icons, or press onscreen buttons, simply touch them with your finger. Touch and Hold To open the available options for an item (for example, a contact or link in a Web page), touch and hold the item.
- Page 29 For most screens, you can automatically change the screen orientation from portrait to landscape by turning the phone sideways. When entering text, you can turn the phone sideways to bring up a bigger keyboard. See HTC Sense Input Keyboard for more details. Note: The Auto-rotate screen option in (Settings) >...
-
Page 30: Your Home Screen
want. Press and Flick On the Home screen, you can easily move a widget or icon from one screen to another. Press and hold the widget or icon with one finger, and flick the screen to the new location with another finger. -
Page 31: Home Screen Basics
Home Screen Basics Extended Screens Customize the Home Screen Launch Bar, Apps, and Folders Home Screen Basics Your phone allows you to rearrange the order of your home screens and even remove extended screens at any time. Rearrange the Home Screen Reorder your extended screens in any way that fits how you use them. -
Page 32: Extended Screens
Remove a Home Screen Panel Remove any unwanted screens to make your phone less cluttered. 1. Pinch the Home screen to display thumbnail images of all the screens. 2. Touch and hold the thumbnail of the screen you want to remove. Your phone vibrates. Don’t lift your finger just yet. -
Page 33: Customize The Home Screen
Customize the Home Screen Learn how to add, move, or remove items from the Home screen. Add Widgets on Your Home Screen Widgets put at-a-glance important information and media content up front on your Home screen. Some widgets are already added to your Home screen for your convenience. You can add more from the available selections of widgets. -
Page 34: Launch Bar, Apps, And Folders
Move, Remove, or Edit Items on Your Home Screen or Extended Screens 1. Touch and hold the item you want to move, remove, or edit. 2. Do one of the following: To move the item, drag it to a new area and then release it. ... - Page 35 1. Touch and hold the app you want to replace, and then drag it out of the launch bar. 2. Touch to go to the All apps screen. 3. Touch and hold an app, and then drag it to the empty slot on the launch bar. You can also place shortcuts to settings or information on the launch bar.
-
Page 36: Status And Notifications
1. Touch 2. Slide your finger left or right to see recently-opened apps. 3. Touch an app to open it. Status and Notifications The status bar and notification panel make it easy to see your phone’s connection, alert you of new messages, and much more. - Page 37 No service Phone is “roaming” off the Nationwide Sprint Network Connected to a Wi-Fi network Sprint 4G LTE Network is available Sprint 4G LTE Network available and active (with icon animation) Sprint 3G Network is available Sprint 3G Network available and active (with icon animation) Sprint 3G Network is currently unavailable Phone’s location feature is on and available for location-based services such as GPS navigation...
- Page 38 Upcoming event Music is playing General notification (for example, sync error) Wi-Fi is on and wireless networks are available Sprint Hotspot is on Data synchronizing – connected to HTC Sync New location detected More (undisplayed) notifications Missed call Call in progress...
-
Page 39: Notifications Panel
Notifications Panel When you get a new notification, you can open the Notifications panel to see the message, reminder, or event notification. The Notifications panel lets you quickly switch between recently opened apps, and also lets you easily turn on settings such as 4G, Wi-Fi, and Bluetooth. Open the Notifications Panel To open the Notifications panel, touch and hold the status bar, and then slide your finger downward. -
Page 40: Enter Text
Tips for Editing Text HTC Sense Input Keyboard When you start a program or select a box that requires entry of text or numbers, the HTC Sense input keyboard becomes available. You can choose from three keyboard layouts: Standard, Phone, and Compact. - Page 41 Note: The landscape keyboard is not supported in all applications. Adjust the Touch Input Settings 1. Open the Notifications panel, and then touch > Language & keyboard > HTC Sense Input. 2. Change the following settings: ...
- Page 42 • Pinyin: Choose Traditional Chinese or Simplified Chinese in Output characters. In Simplified Chinese, you can enable Fuzzy Pinyin Pairs. • Stroke: Choose Traditional Chinese or Simplified Chinese in Output characters. • Handwriting: Write Chinese characters directly on the screen. You can set the output character, pen color, and more.
-
Page 43: Enter Text By Speaking
Enter Text by Speaking Try speaking the words to enter them in most text fields that let you use the touch input keyboard. Important: First make sure to select the language you’ll be using in the Language & keyboard settings. Since your phone uses Google’s speech-recognition service, you need to be connected to the Internet to enter text by speaking. - Page 44 and e. Note: If you’ve entered a word that Swype doesn’t recognize, word suggestions appear at the top of the keyboard. Touch a word to enter it to your text. Enter Text by Typing on the Swype Keyboard Instead of using Swype, you can enter text by touching these keys on the Swype keyboard: Description Press and hold keys with characters at the top to enter numbers, symbols, or accented letters.
-
Page 45: Tips For Editing Text
To manually add a word to the predictive text dictionary: 1. Open the Notifications panel, and then touch > Language & keyboard > HTC Sense Input > Personal dictionary. 2. Touch Edit personal dictionary, and then touch... - Page 46 Edit or Delete a Word in Your Personal Dictionary You can edit or remove words that you previously added to the predictive text dictionary. 1. Open the Notifications panel, and then touch > Language & keyboard > HTC Sense Input > Personal dictionary. 2. Touch Edit personal dictionary.
- Page 47 2. Drag the text markers to the start and end of the text that you want to select. Or touch Select all to select everything in the text field. Copy and Paste Text 1. After you have selected the text you want to copy, touch Copy or Cut. The selected text is then copied to the clipboard.
-
Page 48: Phone Calls
Phone Calls With the Nationwide Sprint Network and your phone’s phone, you can enjoy clear calling across the country. Make Phone Calls Receive Phone Calls Visual Voicemail Voicemail (Traditional) Phone Call Options Internet Calls Set Up Speed Dialing Call History Make Phone Calls There are several convenient ways to place calls from your phone. -
Page 49: Call From Call History
2. Touch the number keys on the Phone keypad to enter the phone number. 3. As you enter digits, Smart Dial searches for contacts that match. If you see the number you want to dial, touch it to place the call immediately without entering the rest of the number. -
Page 50: Call From People
Call From People Call your contacts from the People application. 1. Touch > > People. 2. Touch the contact you want to call to open the Contact details screen. 3. Touch Call [number type] to place a call. For additional information, see People. Call Using a Speed Dial Number Speed dial numbers let you dial numbers by touching and holding a single number on the Phone keypad. -
Page 51: Receive Phone Calls
Enhanced 911 (E911) Information This phone features an embedded Global Positioning System (GPS) chip necessary for utilizing E911 emergency location services where available. When you place an emergency 911 call, the GPS feature of your phone seeks information to calculate your approximate location. Depending on several variables, including availability and access to satellite signals, it may take up to 30 seconds or more to determine and report your approximate location. -
Page 52: Visual Voicemail
2. Make sure to select the Quiet ring on pickup option. 3. Touch Reject an Incoming Call ● If the display is locked when you get a call, drag the Decline button to the Lock screen ring. Then drag to the ring the Remind me icon to create a task or the Send message icon to send a text message to the caller. -
Page 53: Review Visual Voicemail
Voicemail Password – Sprint strongly recommends that you create a password Important: when setting up your voicemail to protect against unauthorized access. Without a password, anyone who has access to your phone is able to access your voicemail messages. 7. Once you have completed the setup process, return to the voicemail page (see step 1). 8. -
Page 54: Learn More About Visual Voicemail
● Touch to reply to the message. You can then record a reply and tag the reply message for both Urgency and Privacy. Touch Send to deliver the new message. ● Touch to turn the speakerphone on or off during playback. If the speakerphone feature was enabled within the Voicemail Settings menu, the speakerphone will always be automatically enabled during voicemail playback. -
Page 55: Voicemail Notification
Voicemail Notification There are several ways your phone alerts you to a new message. ● By sounding the assigned ringer type. ● By displaying within the Notifications area of the Status bar when a single new unheard voicemail message is received. ●... -
Page 56: Phone Call Options
Phone Call Options Your phone provides many useful features and options to help you make the most of your calling experience. Caller ID Call Waiting 3-way Calling Call Forwarding In-call Options Caller ID Caller ID identifies a caller before you answer the phone by displaying the number of the incoming call. -
Page 57: 3-Way Calling
3-way Calling With 3-Way Calling, you can talk to two people at the same time. When using this feature, the normal airtime rates will be charged for each of the two calls. 1. Touch > 2. Dial a number and touch 3. -
Page 58: Internet Calls
● Flash to accept another incoming call and put the first caller on hold. Touch Flash again to talk to the first caller. ● People to display your contacts list. ● Contact card to display the caller’s contact information. Note: When the phone is completing a call, only the People and Flash are available. You can also touch to mute the microphone. -
Page 59: Set Up Speed Dialing
In People, touch a contact who has an Internet calling account, and then touch Internet call. In Call History, touch an Internet call log. ● Phone number. First, enable Internet calling for your outgoing calls. Open the Notifications panel, and then touch >... -
Page 60: Save A Number From Call History
1. Touch > > Call History tab. Each entry contains the phone number (if it is available) and the contact name (if the number is in People). 2. Do any of the following on the Call History tab: Touch a name or number in the list to call. See Call From Call History. -
Page 61: Prepend A Number From Call History
Tip: To store the number as another type (for example, home number), touch the Mobile button. 4. Touch Save. After you have saved the number, your phone displays the new contact. (See Your People List.) Note: You cannot save phone numbers already in People or from calls identified as No ID or Restricted. -
Page 62: Settings
Settings This section provides an overview of items you can change using your phone's Settings menu. Wireless & Networks Settings Personalization Settings Accounts & Sync Location & Security Settings Display Settings Sound Settings Call Settings Applications Settings Storage Settings Power & Data Management Settings Language &... -
Page 63: Airplane Mode
Airplane Mode Airplane Mode allows you to use many of your phone’s features, such as Gallery, Camera, and Music, when you are on an airplane or in any other area where making or receiving calls or data is prohibited. When you set your phone to Airplane Mode, it cannot send or receive any calls or access online information. -
Page 64: Personalization Settings
● NFC. Share information wirelessly with other NFC-enabled device. See Bluetooth and NFC. ● Internet pass-through. When you’re travelling and don’t have data connection on your phone, connect your phone to your computer and use this option to use your computer’s data connection. -
Page 65: Change The Home Screen Wallpaper
3. Touch > New. Slide your finger on the screen from right to left to select the scene you want. 4. Enter a new scene name, and then touch Done. 5. Personalize the scene by adding widgets and apps, changing the wallpaper, and more. All of your changes will be automatically saved to this scene. - Page 66 1. Open the Notifications panel, and then touch > Personalize. 2. On the Sound tab, touch Sound set. 3. Touch a sound set name you want to use. 4. You can touch to hear samples of the ringtone, notification sounds, and alarm for that sound set.
-
Page 67: Application Tabs
4. Select one or more sound sets you want to delete, and then touch Delete. Application Tabs You can rearrange the tabs at the bottom of some apps to prioritize the types of information you frequently use. You can also add or remove tabs. 1. -
Page 68: Add Your Social Networks, Email Accounts, And More
2. Touch 3. Touch an account type. You can set up these accounts on your phone: Dropbox, Evernote for HTC Sense, Exchange ActiveSync, Facebook, Flickr, Google, HTC Account, Mail, Microsoft Hotmail, Skydrive for HTC Sense, and Watch. 4. Enter your account information and follow screen instructions to proceed. -
Page 69: Location & Security Settings
Remove an Account You can remove an account to delete all information associated with it from your phone. Removing an account does not delete information from the online service itself. 1. Open the Notifications panel, and then touch > Accounts & sync. 2. -
Page 70: Security-Screen Lock
Note: Turning on Location setting will allow the network to detect your position using GPS technology, making some Sprint applications and services easier to use. Turning off Location setting will disable the GPS location function for all purposes except 911, but will not hide your general location based on the cell site serving your call. - Page 71 3. Draw the screen unlock pattern by connecting at least four dots in a vertical, horizontal, or diagonal direction. Lift your finger from the screen when finished. 4. The phone records the pattern. Touch Continue. 5. When prompted, draw the screen unlock pattern again, and then touch Confirm. If you fail to draw the correct unlock pattern on the screen after five attempts, you will be prompted to wait for 30 seconds before you can try again.
-
Page 72: Display Settings
Display Settings Adjusting your phone’s display settings not only helps you see what you want, it can also help increase battery life. Auto-rotate Screen Animation Text Size Brightness Screen Timeout Keep the Screen On While Charging Change the Wallpaper Calibrate the Screen Auto-rotate Screen By default, the screen orientation automatically changes when the phone is rotated. -
Page 73: Brightness
You can also change to an animated wallpaper. 1. Open the Notifications panel, and then touch > Personalize > Wallpaper. 2. Select from the following: HTC wallpapers to use a preset image. Live wallpapers to choose from preset animated wallpapers. Settings... -
Page 74: Calibrate The Screen
Gallery to use a picture that you have captured using the camera or copied to your phone as wallpaper. You can crop the picture before setting it as wallpaper. 3. Touch Save or Apply. Calibrate the Screen Recalibrate the screen if you feel that the screen orientation does not respond properly to the way you hold the phone. -
Page 75: Incoming Calls
Vibrate To set your phone to vibrate instead of making any sounds, follow the steps below. ► Press the volume down button in standby mode until you see the image below on the screen. The phone vibrates and the vibrate mode icon ( ) appears on the status bar. -
Page 76: Notifications
Note: You can use *.wav, *.mid, *.mp3, *.wma, or other types of sound files that you have downloaded from the Internet or copied from your computer as ringtones. Other Incoming Call Options You can choose to enable or disable the following incoming call features: ●... -
Page 77: Voicemail Settings
Internet Call Settings Voicemail Settings Set Up Voicemail. Other Call Settings Use these options to adjust several call settings, such as teletypewriter and DDTM. TTY Mode A TTY (teletypewriter, also known as a TDD or Text Telephone) is a telecommunications phone that allows people who are deaf, hard of hearing, or who have speech or language disabilities, to communicate by telephone. -
Page 78: Internet Call Settings
Internet Call Settings Internet Calls. Applications Settings This menu lets you control your application settings, including allowing installation of non- Google Play applications and removing applications. Allow Installation of Third-Party Programs Clear Application Cache and Data Select the App to Open Data Items Stop Applications Using Task Manager Allow Installation of Third-Party Programs By default, you can install only programs and games downloaded from Google Play. -
Page 79: Select The App To Open Data Items
Select the App to Open Data Items You can set which app opens when you tap an item such as a phone number or email address while reading a message, viewing a Web page, and more. 1. Open the Notifications panel, and then touch >... -
Page 80: Encrypt Data On Your Phone
computer, this storage is accessible and you can copy files between them. See microSD Card for more information. Note: The default storage for your files, whether it’s the Phone storage or your storage card, may vary from app to app. Some apps allow you to set the default storage. Encrypt Data on Your Phone You can encrypt data such as your online accounts, settings, music files and other media. -
Page 81: Power & Data Management Settings
Important: Make sure to back up important data you have on the phone or your microSD card before you perform a reset. Reset Your Phone via Settings 1. Open the Notifications panel, and then touch > Storage > Factory data reset. 2. -
Page 82: Manage Your Phone's Wireless Functions
● Open the Notifications panel, and then touch > Display & gestures > Brightness, and then modify the backlight setting as desired. See Brightness. ● Add the Power Dashboard widget to the home screen to easily adjust the screen brightness. Touch and hold a blank space on a Home screen and on the Widgets tab, touch All Widgets >... -
Page 83: Close Applications Not In Use
Close Applications Not In Use You can also close applications that are not in use to conserve battery power. 1. Open the Notifications panel, and then touch > Apps. 2. Touch the Running tab, and then touch the application you would like to close. 3. -
Page 84: Connect To Pc Settings
6. Select the Use 24-hour format check box to toggle between using a 12-hour or 24-hour time format. 7. Touch Select date format, and then select how you want dates to display on your phone. The selected date format also applies to the date displayed in the Alarm Clock. Connect to PC Settings Connect to a Computer for more information. -
Page 85: People
There are several ways you can add contacts to your phone. ● HTC Sync Manager. Sync the contacts from your old phone to your computer, and then use HTC Sync Manager to sync your phone with your computer’s Microsoft® Outlook®, Outlook Express or Windows®... -
Page 86: Transfer Contacts From Your Old Phone
● Microsoft Exchange ActiveSync®. Your phone syncs your work contacts from the Microsoft Exchange ActiveSync Server in your workplace. For more information, see Email. Transfer Contacts from Your Old Phone Easily transfer contacts from your old phone to your new phone through Bluetooth. Depending on your old phone’s model, you may also transfer other types of data such as calendar events and text messages to your new phone. -
Page 87: Your People List
Your People List The People app lists all contacts stored on your phone and from the online accounts you’re logged in to. Touch > > People. You can: ● View your profile and edit your contact information. ● Create, edit, or find contacts. ●... -
Page 88: Your People App Profile
Tip: To set your contact sorting options, touch > Settings. Set Contact Search Options In addition to searching contacts by name, you can also search by other criteria such as by their group name or company. 1. On the People tab, touch >... -
Page 89: Your Profile
Your Profile When you touch My profile, you’ll see the following tabs. ● Details. Shows your contact details. You’ll also see your most recent posts in social networks (if you’re signed in to social networks.) You can also edit your profile or share it with others. -
Page 90: Find People You Know On Social Networks
3. Touch Name field, and then enter the contact name. Note: Touch if you want to separately enter the contact’s first, middle, and last name. Depending on the contact type, you may also be able to add a name prefix (such as Dr.) or a name suffix (such as Ph.D). -
Page 91: Merge Entries In People
4. Touch to save the contact to your Exchange ActiveSync account. Copy Contacts from One Account to Another 1. On the People tab, touch > Manage contacts. 2. Touch Copy contacts, and then choose a contact type or online account to copy from. Note: Contacts from your social network accounts may not be copied. -
Page 92: Manually Merge Entries
2. Select the contacts you want to merge. Note: If you don’t want to receive contact link suggestions, on the People tab, touch > Settings. Clear the Suggest contact link option. Manually Merge Entries You can merge your entries manually and choose the accounts to link the contact. 1. -
Page 93: Contact Information And Conversations
Contact Information and Conversations When you touch a contact on the People tab, the Contact details screen opens. The Contact details screen has the following tabs: ● Details. Shows the information you’ve stored for the contact. Get in touch with the contact by touching an option. -
Page 94: Delete Multiple Entries
Delete Multiple Entries Clean up your contacts list by deleting entries that you no longer need. 1. On the People tab, touch > Delete contacts. 2. Select the entries you want to delete, and then touch Delete. 3. Touch OK to confirm. Contact Groups Assign contacts to groups so you can easily send a message or email to a whole group. -
Page 95: Send A Message Or Email To A Group
1. Touch > > People. 2. On the Groups tab, touch and hold the group, and then touch Edit group. 3. You can: Touch the group name to change the name. You can only change the name for groups that you have created. ... -
Page 96: Use People Widgets
● Touch and hold a group you want to delete, and then touch Delete group. ● Touch > Edit groups to choose several contact groups to remove. Use People Widgets Stay close with the people that matter by adding a people widget for each of your groups and setting the default communication method when you touch the contact from the widget. -
Page 97: Send Contact Information
Send Contact Information Quickly share your contact card or People entries on your phone. 1. Touch > > People. 2. Do any of the following: To send someone’s contact information, touch and hold the name of the contact (not the icon or photo), and then touch Send contact as vCard. - Page 98 2. Touch > Manage contacts. 3. Touch Import/Export contacts > Export to phone storage. 4. Select an account or type of contacts to export, and then touch OK. Restore Contacts Note: You can only restore contacts that were backed up using the Export to phone storage feature.
-
Page 99: Accounts And Messaging
Accounts and Messaging With Sprint service and your phone’s messaging capabilities, you have the opportunity to share information through many different channels and accounts. Gmail Email Text Messaging and MMS Social Networking Accounts Gmail You will need a Google Account to access several phone features such as Gmail, Google Maps, Google Talk, and Google Play. -
Page 100: Sign In To Your Google Account
4. Look for an email from Google in the email box you provided, and respond to the email to confirm and activate your new account. Create a Google Account Using Your Phone 1. Open the Notifications panel, and then touch >... -
Page 101: View Your Gmail Inbox
View Your Gmail Inbox All your received emails are delivered to your Inbox. 1. Touch > > Gmail. Your Gmail inbox then opens. 2. You can do the following on your Gmail Inbox: Archive, delete or label multiple conversations. Touch the check box before the email or conversation. -
Page 102: Reply To Or Forward An Email Message
Note: If you want to send a carbon copy (Cc) or a blind carbon copy (Bcc) of the email to other recipients, touch > Add Cc/Bcc. 1. Enter the email subject, and then compose your email. 2. If you want to attach a photo or video, touch >... -
Page 103: Add A Pop3 Or Imap Email Account
Send an Email Message Save an Email Message in Tasks Print Your Email Messages Search Email Messages Work with Exchange ActiveSync Email Manage Email Messages Sync Email Less Frequently Change the Email Account Settings Delete an Email Account Add the Mail Widget Add a POP3 or IMAP Email Account You can add a POP3 or IMAP email account on your phone and access it using the Mail app. -
Page 104: Check Your Mail Inbox
2. Do one of the following: If this is your first time to add an email account in Mail, touch Microsoft Exchange ActiveSync on the Choose a mail provider screen. If you have already added an email account in Mail, touch >... -
Page 105: Send An Email Message
2. Touch the bar that shows the current email account, and then touch All accounts. Email messages are color coded so you can easily distinguish which email accounts they belong to. Note: Up to 15 email accounts can be shown in the unified inbox. Refresh an Email Account Whatever your automatic synchronization settings are, you can also synchronize your sent and received email messages manually at any time. - Page 106 Set the priority for an important message. Touch > Set priority. 7. Touch Send, or to send it later, touch Save as draft. Note: If there’s no Wi-Fi or data connection available or Airplane mode is on when you send your email, the email is saved to the Outbox folder.
-
Page 107: Save An Email Message In Tasks
5. Touch and touch the Unread tab. Save an Email Message in Tasks Save an email message in your Tasks list so you can remind yourself when to reply. 1. Touch > > Mail. 2. In an email account inbox, touch and hold the email message, and then touch Save as task. -
Page 108: Work With Exchange Activesync Email
1. Touch > > Mail. 2. Touch 3. If you want to refine or filter your search, touch , check the search options, and then touch OK. For example, you can focus the search on a part of an email or filter email messages that have attachments or tagged as high priority. -
Page 109: Manage Email Messages
2. Switch to your Exchange ActiveSync email account. 3. Touch > Out of the office. 4. Touch your current office status, and then select Out of the office. 5. Set the dates and times for the period when you will be out of the office. 6. -
Page 110: Sync Email Less Frequently
3. Select the email messages you want to move. Tip: To select all, select one email message first, and then touch > Select all. 4. Touch Move to, and then select a folder. Delete Email Messages 1. Touch > > Mail. 2. -
Page 111: Change The Email Account Settings
Change the Email Account Settings Change your email account settings such as the email account name and password, signature, sync schedule, and more. 1. Touch > > Mail. 2. Switch to the email account that you want to change. 3. Touch >... -
Page 112: Delete An Email Account
• Mail size limit: Set the maximum email file size for incoming messages. • Message format: Set email messages to display in HTML or plain text format. • Include file attachment: Set the size of email attachments that will be automatically downloaded with email messages. -
Page 113: Send A Text Message (Sms)
are neatly grouped into conversations, by contact name or phone number. See your service plan for applicable charges for messaging. Send a Text Message (SMS) Send a Multimedia Message (MMS) Save and Resume Composing a Draft Message Check Your Messages Manage Message Conversations Back Up and Restore Your Text Messages Text and Multimedia Message Options... - Page 114 4. Touch the “Add text” box and then start composing your message. Note: A counter appears at the top of the Send button to tell you how many characters you have entered and how many characters are left. Once you go over the 160-character limit, a new message is created but automatically joined into one when received.
-
Page 115: Send A Multimedia Message (Mms)
Send a Multimedia Message (MMS) When you need to add a little more to a text message, you can send a multimedia message (MMS) with pictures, voice recordings, audio or video files, contact cards (vCard), or appointments (vCalendar). 1. Touch >... -
Page 116: Save And Resume Composing A Draft Message
Create a Slideshow You can create an MMS message with multiple slides, each containing a photo, video, or audio, and text. 1. Touch > > Messages. 2. Touch 3. Enter a contact name or mobile number in the To field. Tip: Sending the message to a group of friends? Touch , and then select the contacts to... -
Page 117: Check Your Messages
4. Touch Send. Check Your Messages Depending on your notification settings, the phone plays a ringtone, vibrates, or displays the message briefly in the status bar when you receive a new text or multimedia message. To change the notification for new text and multimedia messages, see Text and Multimedia Message Options. - Page 118 View and Save an Attachment from a Multimedia Message If you are concerned about the size of your data downloads, check the multimedia message size first before you download it. Note: When Auto-retrieve in MMS settings is disabled, only the message header is downloaded.
-
Page 119: Manage Message Conversations
3. Touch , and then select another phone number of this contact. 4. Touch the “Add text” box, and then enter your reply message. 5. Touch Send. Manage Message Conversations Text and multimedia messages that are sent to and received from a contact (or a number) are grouped into conversations or message threads in the All messages screen. -
Page 120: Back Up And Restore Your Text Messages
Delete Several Messages Within a Conversation 1. Touch > > Messages. 2. On the All messages screen, touch a contact (or phone number) to display the exchange of messages with that contact. 3. Touch > Delete > Delete by selection. Note: You can also touch Delete by phone number if the contact used multiple phone numbers throughout the conversation and you want to delete the messages sent from a particular number. -
Page 121: Text And Multimedia Message Options
3. Enter a name for your backup file, and then touch OK. Back Up Text Messages Using Mail Important: You need to set up your email account in Mail. 1. Touch > > Messages. 2. On the All messages screen, touch >... - Page 122 • Vibrate: Select this option if you want the phone to vibrate when a new text or multimedia message arrives. • Notification preview: Select to display the sender and message preview on the lock screen and status bar. Notifications: Sent messages •...
- Page 123 • Connection settings: View various connection settings such as the connection name and server address. General: Recipient list settings • Show sent message history: Include the sent message history when searching for a message recipient. • Show call history: Include the Call history when searching for a message recipient.
-
Page 124: Add The Messages Widget
Note: If you have the Twitter app (preinstalled or downloaded from Google Play), signing in to Twitter for HTC Sense does not sign you in to the Twitter app and vice versa. If you want to use the same Twitter account for both, you’ll have to sign in to both using the same login info. - Page 125 Add the Friend Stream Widget 1. Touch and hold on an empty space on your Home screen. 2. On the Widgets tab, touch All Widgets > Friend Stream. 3. Touch the Friend Stream widget style you like and it gets added to the Home screen you’ve selected.
- Page 126 5. Add your status message and even tag the friends you’re with. 6. Touch Check in. Tweet in Friend Stream 1. From the Home screen, navigate to the Friend Stream widget and touch 2. Touch > Twitter for HTC Sense. 3. Touch Accounts and Messaging...
- Page 127 Search for Twitter Users to Follow 1. From the Home screen, navigate to the Friend Stream widget and touch 2. Touch > Twitter for HTC Sense. 3. On any of the tabs, touch 4. Enter a Twitter name in the search box.
-
Page 128: Google
1. From the Home screen, navigate to the Friend Stream widget and touch 2. Touch > Twitter for HTC Sense. 3. On the All tweets tab, touch and hold the tweet you want to reply to or retweet. 4. Touch Reply or Retweet. - Page 129 Touch a tab to learn more about the video, see related videos, or check out what other viewers think. You can also slide your finger across the tabs to see if there are more items available. 4. Touch the YouTube icon to return to the main screen. Search for Videos 1.
-
Page 130: Google Talk
3. Touch 4. Choose how you want to share the video link from the available options. Capture and Share Videos on YouTube 1. Touch > > YouTube. 2. On the YouTube main screen, touch 3. Touch to start capturing video. 4. -
Page 131: Applications And Entertainment
Music Sprint TV & Movies NASCAR Sprint Cup Mobile HTC Watch Google Play Google Play is the place to go to find new apps for your phone. Choose from a wide variety of free and paid apps ranging from productivity apps, entertainment, to games. When you find an app you want, you can easily download and install it on your phone. -
Page 132: Uninstall An Application
2. When you open Google Play for the first time, the Terms of Service window will appear. Touch Accept to continue. 3. Browse or search for an app. 4. When you find the app that you like, touch it and read its description and user reviews. 5. -
Page 133: Navigation
Get easy access to music, maps, navigation, and phone calls with HTC Car. HTC Car instantly launches when you mount your phone in the HTC Car Kit or connect to your specified Bluetooth phone. - Page 134 Find Your Location with HTC Car HTC Car helps you to find your way to where you want to go. Easily access maps and find out your current location. Find nearby attractions on your weekends. HTC Car gives you the information you need so you won’t get lost.
- Page 135 Close HTC Car ● When your phone detects that the HTC Car Kit or the specified Bluetooth phone is no longer connected, HTC Car will automatically exit. ● From the HTC Car main panel, touch and then touch OK.
-
Page 136: Google Maps
Google Maps Google Maps lets you track your current location, view real-time traffic situations, and receive detailed directions to your destination. It also provides a search tool where you can locate places of interest or an address on a map, or view locations at street level. Note: To find your location with Google Maps, you need to enable location sources. - Page 137 Touch Results list, and then touch the location. Details about the selected location display on the screen. 6. Touch the onscreen buttons to view the location on a map, get directions, view the location in Street View (if available), and more. Scroll down the screen to view more options.
- Page 138 When one or two places of interest are found, the search results are displayed as markers on the map. You can touch the marker, and then touch the balloon to view more information about the place. When several places are found, the search results display in a list. Touch a place to view more information about the place.
-
Page 139: Google Latitude
5. Touch Get directions. 6. Touch Directions list to view the directions. You can also touch the arrow buttons on the map to follow the directions. When you’re finished viewing or following the directions, touch to reset the map. Your destination is automatically saved in the Google Maps history. -
Page 140: Telenav Gps Navigation
Open and Join Latitude 1. Touch > > Maps. 2. While viewing a map, touch > Join Latitude. 3. After you’ve joined Latitude and closed the application, do one of the following to open it: Touch > > Latitude. ... -
Page 141: Music
Maps lets you view maps and get traffic information for your current location or for any other location (same categories as Drive To). Places provides a categorized list of locations such as Gas Stations, Grocery Stores, and Hospitals to help find local businesses and services. ... - Page 142 2. Touch the onscreen icons to control music playback, repeat songs and more. Touch and drag your finger across the progress bar to jump to any part of the song. Touch to show options for adding the song to a playlist, sharing the song, and more.
-
Page 143: Make Your Music Sound Better
If you don’t see the playback controls on the Lock screen, swipe your finger from left to right on the screen. Note: You can also pause music playback right from the Notifications panel. Make Your Music Sound Better When you plug in your headset, you can choose to enjoy your music with a variety of enhanced sound profiles. -
Page 144: Playlists
Playlists Personalize your music experience by creating music playlists. Make a playlist containing just your favorite songs or create one to match your mood for the day. Create Playlists You can make as many playlists as you like on your phone. 1. -
Page 145: Music And Ringtones
playlist and then touch Add. Touch and hold at the end of the song title you want to move. Rearrange songs When the row is highlighted, drag it to its new position, and then release. Select the check buttons next to the songs you want to remove from Delete songs the playlist. -
Page 146: Share Music Using Bluetooth
where you are on the song. 4. After you’ve finished trimming, touch Set as. 5. Select whether to set the trimmed song as your Phone ringtone or Contact ringtone. Tip: To check if the song was added as a ringtone, open the Notifications panel and then touch >... - Page 147 Note: You need to connect a wired headset to the audio jack of your phone to use FM Radio. FM Radio uses the stereo headset as the FM radio antenna. The wired headset is not included with your phone. It must be purchased separately. ►...
-
Page 148: Sprint Tv & Movies
Close or Turn Off FM Radio You can choose to continue listening to the radio while using your phone or turn off FM Radio completely. ► Touch to continue listening to the radio while using other apps. ► To turn off the FM Radio app completely, touch Sprint TV &... -
Page 149: Nascar Sprint Cup Mobile
Touch Shop to view available channel packages and to order subscriptions. Note: The first time you access a channel, the system will prompt you to purchase access (unless the channel doesn’t have a monthly fee). Select Subscribe to purchase access, or select Preview to view a preview of the selected channel. -
Page 150: Htc Watch
You can also customize alerts for new information such as ALL NASCAR News, Sprint Cup News, etc. HTC Watch With our HTC Watch online video service, shop for your favorite movies or TV series and enjoy watching them. You can: ●... -
Page 151: Create Or Sign In To Your Htc Watch Account
HTC Watch FAQs Create or Sign In to Your HTC Watch Account Create an HTC Watch account or sign in if you have an existing one so you can start renting or buying movies and shows from the HTC Watch store. -
Page 152: Change The Htc Watch Settings
HTC Watch account. If you own more than one HTC phone that has access to HTC Watch, you can download and watch videos on up to five phones. You can check what HTC phones are linked to your HTC Watch account. -
Page 153: Web And Data
Web and Data This section addresses your phone’s data connections, the built-in Web browser, and connections to your computer. Additional data-related features can be found in Accounts and Messaging, Applications and Entertainment, and Tools and Calendar. Data Services – Sprint 4G LTE and Sprint 3G Networks Wi-Fi Virtual Private Networks (VPN) Browse the Web... -
Page 154: Your User Name
Your User Name When you buy your phone and sign up for service, you’re automatically assigned a user name, which is typically based on your name and a number, followed by “@sprintpcs.com.” (For example, the third John Smith to sign up for Sprint data services might have jsmith003@sprintpcs.com as his user name.) When you use data services, your user name is submitted to identify you to the Nationwide Sprint Network. -
Page 155: Turn The Data Connection On Or Off
If you do not see an indicator, your phone does not have a current data connection. To launch a connection, see Launch a Web Connection. Turn the Data Connection On or Off Turn your data connection off to optimize the phone’s battery life. It can also save money on data charges. -
Page 156: Data Services Faqs
Data Services FAQs How will I know when my phone is ready for data service? Your user name (for example, bsmith01@sprintpcs.com) will be displayed when you access (Settings) > About > Phone identity > Current username. How do I sign in for the first time? You are automatically signed in to access data services when you turn on your phone. -
Page 157: Wi-Fi
Can I sign out of data services? You can sign out without turning off your phone; however, you will not be able to browse the Web or use other data services (unless you establish a Wi-Fi connection.) While signed out, you can still place or receive phone calls, check voicemail, and use other voice services. -
Page 158: Check The Wireless Network Status
If Network notification in Wi-Fi settings is enabled, this icon ( ) appears in the status bar whenever the phone detects an available wireless network within range. Check the Wireless Network Status Check your phone’s connection to the wireless network, the signal strength, security type, and more. -
Page 159: Virtual Private Networks (Vpn)
Virtual Private Networks (VPN) Add virtual private networks (VPNs) so you can connect and access resources inside a secured local network, such as your corporate network. Depending on the type of VPN you’re using at work, you may be asked to enter your login credentials and install security certificates before you can connect to your company’s local network. -
Page 160: Disconnect From A Vpn
You can then open the Web browser to access resources such as intranet sites on your corporate network. For more information, see Browse the Web. Disconnect From a VPN Disconnect from the VPN when you’re done accessing your intranet sites. 1. -
Page 161: Private Browsing
Switch to Reading Mode Want to read an article or blog without distractions? Reading mode removes menus, banners, and backgrounds from a Web page. ► While viewing an article, touch (when it’s available) to switch reading mode on or off. View the Full Version of a Website ►... -
Page 162: Add And Manage Your Bookmarks
2. Touch New incognito tab. Add and Manage Your Bookmarks You can store as many bookmarks as you want on your phone. You can also access a convenient list of the sites you have visited, or quickly view the pages that you access most often. -
Page 163: Save Web Content For Later
Syncing Your Bookmarks with Google Chrome Create bookmarks from your computer’s Google Chrome browser and sync them on your phone. For more information about Google Chrome, visit support.google.com/chrome. Important: Using your Google Chrome desktop browser, you need to sign in to your Google Account and set up Google Chrome sync. -
Page 164: Download File And Apps From The Web
View Your Browsing History 1. Touch > > Internet. 2. While viewing a Web page, touch > History. You can also touch and hold 3. On the History tab, touch a time period to see a list of Web pages you’ve visited. Clear Your Browsing History 1. -
Page 165: Set Browser Options
Note: Before you can install the downloaded app, you need to set your phone to allow installation of third-party apps in (Settings) > Security > Unknown sources. View Your Downloads 1. Touch > > Downloads. 2. Touch the file to open it. Set Browser Options Customize the web browser to suit your browsing style. - Page 166 ● Search for it on the Web. ● Share the text in a new email, text, or multimedia message or in your status update on a social network. Select Text 1. Touch > > Internet. 2. While viewing a Web page, touch and hold a word. Tip: To select text in a link, touch and hold the link, and then touch Select text.
-
Page 167: Sprint Hotspot
Copy and Paste Text 1. Touch > > Internet. 2. While viewing a Web page, touch and hold a word. 3. Drag the start and end markers to highlight the surrounding text you want to copy. You can drag to increase or decrease the text selection area. 4. -
Page 168: Set Up Sprint Hotspot
Note: To connect to your phone’s Wi-Fi network, you need a computer with built in Wi-Fi or a Wi-Fi adapter. Set Up Sprint Hotspot Connect Your Computer to Sprint Hotspot Manage Sprint Hotspot Turn Off Sprint Hotspot Add the Sprint Hotspot Widget Set Up Sprint Hotspot You must first set up Sprint Hotspot before you can connect other devices to your phone. -
Page 169: Manage Sprint Hotspot
Windows XP Computer 1. Click Start > Connect To > Wireless Network Connection. 2. In the Choose a Wireless Network dialog box, select the Sprint Hotspot name (or SSID), and then click Connect. Note: Your phone’s wireless network may not show up in the list of available networks immediately. -
Page 170: Add The Sprint Hotspot Widget
● Charge only. Select this option if you only want to charge the battery while connected to your computer. ● HTC Sync Manager. Select this option to sync media and your data such as contacts, calendar, bookmarks, and other information between your computer and your phone. -
Page 171: Connect Your Phone To The Internet Through A Computer (Internet Pass-Through)
If you don’t have a data plan for your phone or you don’t have access to a Wi-Fi network, you can still go online on your phone by using your computer’s Internet connection. 1. Install HTC Sync Manager on your computer. To learn how, see HTC Sync Manager. -
Page 172: Camera And Video
Camera and Video You can use the camera or camcorder to take and share pictures and videos. Your phone comes with a 8.0 megapixel camera with an autofocus feature that lets you capture sharp pictures and videos. Using the Camera Access Photos and Videos Wireless Display Movie Editor... - Page 173 Use the controls on the Viewfinder screen to add effects, zoom in or out, and more. Note: After using Camera (or if you temporarily leave the Viewfinder screen), you still need to unlock the phone if you have a screen lock. Zooming ●...
-
Page 174: Take A Photo
Set the Resolution 1. On the Viewfinder screen, touch 2. Touch Image resolution or Video quality, and then choose a resolution. Select a Flash Mode ► On the Viewfinder screen, touch the flash icon to choose a flash mode. When using Flash on or Auto flash mode, the camera intelligently sets the best flash brightness for your photo. -
Page 175: Camera Scenes
Touch the flash icon to turn the flash on or off. 4. To stop recording, touch Taking a Photo While Recording a Video While you’re recording video using the main camera, touch to capture a still shot of your subject. - Page 176 1. On the Viewfinder screen, touch 2. Touch Group portrait. 3. When you’re ready to take the photo, touch . The camera takes several shots and merges them into the best possible group photo. Take a Panoramic Photo Whether it’s the Golden Gate Bridge or the Eiffel Tower, you can capture anything wide or tall in a single photo.
-
Page 177: Change Camera And Video Settings
6. Touch Low light. Note: Flash is disabled when you’re in this mode. 7. When you’re ready to take the photo, touch To avoid getting blurry photos, maintain a steady grip on your phone. You can also improve your photo after taking the shot by applying special effects like auto enhance and high contrast. Change Camera and Video Settings Change basic settings or an additional advanced settings menu is available for camera and video. -
Page 178: View Photos And Videos
Edit Your Photos and Videos View Photos in Your Social Networks Print Your Photos Share Your Photos and Videos View Photos and Videos Enjoy photos and videos you’ve captured on your phone using the Gallery app. 1. Touch > > Gallery. 2. -
Page 179: Edit Your Photos And Videos
3. Touch the onscreen controls to control the video playback, adjust the volume, capture an image during playback, and more. Tip: Touch More > Select player to share the video on your home network. Take a Photo While Watching a Video ►... - Page 180 3. Touch and hold a photo, and then touch Edit > Crop. You’ll see a crop box around the photo. 4. You can: Drag the crop box over the part of the photo you want to crop. Touch and hold the edge of the crop box. When directional arrows appear, drag your finger inward or outward to resize the crop box.
- Page 181 1. Touch > > Gallery. 2. Touch a photo album and touch the photo you want to add effects to. 3. Touch Edit > Effects > > . If you do not see any buttons on the screen, touch the screen once to show the buttons.
-
Page 182: View Photos In Your Social Networks
5. Touch to preview your video. 6. Touch Done. The trimmed video is saved as a new file. The original video remains unedited. View Photos in Your Social Networks Right in the Gallery application, check what you and your friends have uploaded to your social networks or photo sharing sites. -
Page 183: Share Your Photos And Videos
You can check the printing progress by opening the Notifications panel and then touching the item you’re printing. Share Your Photos and Videos Send photos and videos to your computer or to another phone via email, MMS or Bluetooth. You can also use the Gallery application to share photos and videos straight to your social networks, or post videos on YouTube. - Page 184 > Gallery. 2. Touch the album that contains the photos or videos you want to share. 3. Touch Share > Facebook for HTC Sense. 4. Select the photos you want to share, and then touch Next. 5. Select which album to upload to and set privacy settings for the uploaded photos or videos.
-
Page 185: Wireless Display
Tip: Touch Add tag and description to enter a caption on each photo or video or tag friends on your photos. If you’re sharing several photos or videos, slide to the left to go to the next one. Remember to touch Save after you’re done. 12. - Page 186 DLNA® compliant phones. Tip: Don’t have a DLNA setup at home? You can purchase HTC Media Link HD and hook it up to an HDMI display. Refer to the documentation that comes with HTC Media Link HD to find out how to set it up and use it with your phone.
-
Page 187: Movie Editor
Movie Editor Want a novel way to share your photos and videos? Movie Editor lets you make short theme- based slideshow movies complete with transitions and background music. Create a Slideshow with Movie Editor Change the Soundtrack Share Your Slideshow From Gallery Create a Slideshow with Movie Editor Create a slideshow movie from photos and videos stored on your phone. -
Page 188: Share Your Slideshow From Gallery
1. While you preview the slideshow, touch 2. Touch Choose music track to choose a song stored on your phone. If you have videos in your slideshow, you can balance the volume levels of the audio in the videos with the soundtrack. Simply drag the volume slider to the level you want. Share Your Slideshow From Gallery When your slideshow is ready, you can use the Gallery app to start sharing. -
Page 189: Tools And Calendar
Calendar Calculator Clock & Alarm Stocks Weather Tasks Online Storage HTC Sync Manager Voice Recorder Bluetooth and NFC microSD Card Update Your Phone Calendar Never miss an important date again. Use the Calendar app to schedule your events, meetings, and appointments. -
Page 190: Create An Event
Event Alerts Show or Hide Calendars and Tasks Change Calendar Settings About the Calendar Widget Create an Event You can create events that sync with your Google or Exchange ActiveSync calendars, as well as events that appear on your phone. 1. -
Page 191: Manage Calendar Events
● Touch and hold a day to open an options menu from which you can also choose to create an event or switch to either day or agenda view. ● Slide your finger up or down the screen to view earlier or later months. Day and Agenda Views Day view shows your events per day, whereas agenda view displays all your events in chronological order. -
Page 192: Accept Or Decline A Meeting Invitation
Note: If you’re editing an event that repeats, you’ll be asked whether you want to edit just that occurrence or all occurrences of that event. 3. Make your changes to the event. 4. Touch Save. Or touch Send update if you’ve invited people to the event. Erase Events 1. -
Page 193: Set Reminders For Your Events
Tip: Touch to choose from more options, such as moving the invitation to a folder. Set Reminders for Your Events Calendar makes it easy to remind yourself of important events. 1. While viewing a calendar event, touch Reminder. 2. Choose how far in advance you want to be reminded of the event. Tip: You can set the default reminder time or choose an event reminder tone in the Calendar settings. -
Page 194: About The Calendar Widget
Open the Clock Application World Clock Alarm Clock HTC Clock Widget Use the HTC Clock widget to see your current date, time, and location. You can also use the Clock to show the time in another city. Tools and Calendar... -
Page 195: Open The Clock Application
Change the Location on the Clock Widget By default, the Clock widget displays your current weather. You can customize the Clock widget on your Home screen to show the weather of another location. 1. Touch and hold the Clock widget and then drag it to the Edit button. 2. -
Page 196: Alarm Clock
2. Touch 3. Enter the city name you want to add. 4. Scroll through the list and touch the city that you want to add. Delete or Rearrange Cities on the World Clock List 1. Touch > > Clock > World Clock tab. 2. -
Page 197: Stocks
1. Touch > > Clock > Alarms tab. 2. Touch > Settings, and then change any of the following: Alarm in silent mode (this is selected by default): Allows the alarm to sound even when your phone is in silent mode. Clear this option if you want to silence the alarm when the volume is in silent mode. -
Page 198: Weather
4. Touch the stock quote or stock market index you want to add. Tip: To delete an item, touch > Edit while on the Stocks main screen. Select the items you want to delete, and then touch Delete. Weather Use the Weather app and widget to check the current weather and weather forecasts for the next few days. -
Page 199: Tasks
Delete Cities from the Weather Screen 1. Touch > > Weather. 2. Touch > Edit. 3. Select the cities you want to remove, and then touch Done. Tasks Use the Tasks application to organize and track to do and task lists. You can save tasks on your phone or sync them with your Microsoft Exchange ActiveSync and Google Accounts. -
Page 200: Link A Task To A Contact
Link a Task to a Contact Helping friends out on a project or event? Link a task to a contact in the People application so that when your friend calls, the task will appear on the screen. You can also filter tasks to show what tasks are associated to a specific contact. -
Page 201: Manage Tasks
Manage Tasks The Tasks app comes with tools that let you mark delete, edit, and sort your tasks. 1. Touch > > Tasks. 2. Go to the list that contains the task. 3. In the list of tasks, you can: ... -
Page 202: Manage Task Lists
1. Touch > > Tasks. 2. Touch > Lists. 3. Touch , and then choose an account for the list. 4. Enter a name for the list, and then touch OK. Manage Task Lists Organize your tasks better by managing your task lists. 1. -
Page 203: Online Storage
Dropbox When you use Dropbox, you’ll always have access to your photos, videos, and documents — on your HTC EVO™ 4G LTE, your computer, and your other mobile phones where you have Dropbox access. On your HTC EVO™ 4G LTE, sign in to your Dropbox account so you can: ●... - Page 204 ● You won’t be able to use this offer again if you create or sign in to Dropbox with a different account. Set Up Your Dropbox Account Follow these steps if you have not set up your Dropbox account when you first turn on your phone.
- Page 205 > Gallery. 2. Touch > Dropbox. 3. When you see a message that shows HTC Sense wants to access Dropbox, make sure you touch Allow. Note: This message only appears the first time you access your Dropbox photos and videos from Gallery.
- Page 206 5. Touch Dropbox. 6. Open the folder that contains the files that you want, and then select the files you want to share. 7. Touch Done. You’ll then see the links to your selected files added to your email message. 8.
-
Page 207: Skydrive
> Storage. 2. Under Online storage, you’ll see your available Dropbox storage. Unlink Your Phone from Dropbox If you lose your HTC phone, you can remotely unlink from your Dropbox account. 1. On your computer’s Web browser, go to dropbox.com and log in. - Page 208 > Gallery > Albums. 2. Touch the album that contains the photos that you want. 3. Touch Share > SkyDrive for HTC Sense. 4. Select one or more photos you want to upload, and then touch Next. 5. Select a folder in SkyDrive, and then touch Done.
-
Page 209: Htc Sync Manager
SkyDrive folder. HTC Sync Manager With HTC Sync Manager, enjoy the same rich media whether you’re at your computer or on the move. Use it also to store your same contacts, important documents, and other data on both your phone and your computer. -
Page 210: Install Htc Sync Manager
Syncing Your Phone and Your Computer Ripping Music from a CD with HTC Sync Manager Install HTC Sync Manager Before you install, please visit our HTC website to check the system requirements for HTC Sync Manager. Important: For trouble-free installation, first quit all running programs and temporarily exit from your anti-virus program before you start installing HTC Sync Manager. -
Page 211: Get Started With Htc Sync Manager
Trash, or right-click the icon and click Eject. Don’t delete the dmg image file. Save it to a folder in case you need to reinstall HTC Sync Manager. Get Started with HTC Sync Manager The first time you open HTC Sync Manager, the Getting Started window opens, allowing you to add media to your library. -
Page 212: Import More Media To The Library
If you inserted a music CD, click the disc drive on the menu to rip music from the CD. Import More Media to the Library To import more media to your HTC Sync Manager library, there are several easy ways you can do this. -
Page 213: Check For New Software Updates
Click Import playlist to get playlists from other media applications. 3. Click Gallery library > Add to choose folders that you want HTC Sync Manager to check for new photos or videos. 4. Click Apply to save your settings. -
Page 214: Play Music In Htc Sync Manager
Are you a music junkie with a big collection of digital music on your computer? Manage your music library and enjoy listening to your favorite songs from HTC Sync Manager. 1. In HTC Sync Manager, click Music. By default, you’ll see the RECENT screen where recently added or played songs and albums are displayed. -
Page 215: Set Up Htc Sync Manager To Recognize Your Phone
1. Connect your phone to your computer using the USB cable that comes in the box. 2. When your phone prompts you to choose a type of USB connection, touch HTC Sync Manager, and then touch Done. Wait for HTC Sync Manager to recognize and connect to your phone. -
Page 216: Set Up Your Phone To Sync With Your Computer
2. On the Synchronize Settings screen, set up how you want to sync your media and data between your phone and your computer. Sync Music You can set up HTC Sync Manager to sync music files and playlists between your phone and your computer. 1. On the Synchronize Settings screen, click next to the Music item. - Page 217 5. Click Done to save your sync settings. Sync Your Contacts Set up HTC Sync Manager to sync your phone with your Outlook, Outlook Express, or Windows Contacts. You can sync your phone with the following Outlook versions: Outlook XP, Outlook 2003, Outlook 2007, and Outlook 2010.
-
Page 218: Syncing Your Phone And Your Computer
HTC Sync Manager keeps the information from your computer. After you’ve finished setting up all the items you want to sync in HTC Sync Manager, click the Sync button on the Synchronize Settings screen to start syncing your phone and your computer. -
Page 219: Voice Recorder
2. From the list of music tracks available, click a music track that you want to rip. To select multiple files, hold down the CTRL key while clicking one or more music tracks. 3. Click Import to start ripping the audio files. ... -
Page 220: Bluetooth And Nfc
3. Touch and hold the voice clip you want to set as a ringtone, and then touch Set as ringtone. Bluetooth and NFC Bluetooth is a short-range communications technology that allows you to connect wirelessly to a number of Bluetooth devices, such as headsets and hands-free car kits, and Bluetooth-enabled handhelds, computers, printers, and wireless phones. -
Page 221: Connect A Bluetooth Headset Or Car Kit
2. If Bluetooth is off, touch the Bluetooth On/Off switch to turn it on 3. Touch Bluetooth. The Bluetooth screen opens. 4. Touch , and then touch Rename phone. 5. Enter the new name for your phone, and then touch Rename. Connect a Bluetooth Headset or Car Kit You can listen to music over a Bluetooth stereo headset, or have hands-free conversations using a compatible Bluetooth headset or car kit. -
Page 222: Disconnect Or Unpair From A Bluetooth Device
4. Touch the headset’s name in the Paired phones section. 5. If prompted to enter a passcode, try 0000 or 1234, or consult the headset/car kit documentation to find the passcode. If you still cannot reconnect to the headset or car kit, follow the instructions in Disconnect or Unpair From a Bluetooth Device, and then follow the steps in... -
Page 223: Where Sent Information Is Saved
1. On your phone, open the application that contains the information or file you want to send. 2. Follow the steps for the type of item you want to send: Item Type Steps to Send 1. In the People application, touch a contact to view the contact’s details. -
Page 224: Receive Information Using Bluetooth
● On Windows 7, the path may be: C:\Users\[your username]\My Documents\Bluetooth Exchange Folder If you send a file to another phone, the saved location may depend on the file type. For example, if you send an image file to another wireless phone, it may be saved in a folder named “Images.” Receive Information Using Bluetooth Your phone lets you receive various files with Bluetooth, including photos, music tracks, contact info, calendar events, and documents such as PDFs. -
Page 225: Use Bluetooth Ftp Server
Use Bluetooth FTP Server Bluetooth FTP Server allows other phones with Bluetooth FTP profiles to view, access, copy, and delete files from your phone’s storage. To use Bluetooth FTP Server, you need to have a microSD card installed in your phone. 1. -
Page 226: Microsd Card
Turn NFC and Android Beam On 1. Open the Notifications panel, and then touch 2. Under Wireless & Networks, touch More. 3. Select the NFC option, and then touch Android Beam. 4. Touch the Android Beam On/Off switch. Beam Content Make sure that both phones are unlocked and have NFC and Android Beam turned on. -
Page 227: Remove The Microsd Card
2. Lift the back cover from the notch at the top of the phone. 3. Insert the microSD card fully into the slot. 4. Replace the back cover. 5. Turn on the phone. Remove the microSD Card Here are the steps for removing the microSD card. 1. -
Page 228: Check The Microsd Card Memory
Check the microSD Card Memory Determine how much space you have left on your microSD card by checking its memory. ► Open the Notifications panel, and then touch > Storage. The total and available memory space will be displayed. Erase the microSD Card Erasing the microSD card permanently removes all files stored on it. -
Page 229: Update Your Phone
5. After copying the files, unmount the removable disk drive (that is, your connected phone) as required by your computer’s operating system to safely remove your phone. 6. Do one of the following: Disconnect your phone from the computer. ... -
Page 230: Update The Operating System
2. Do either of the following: Turn on the Auto-sync option. When Auto-sync is on, your Exchange ActiveSync email, contacts, and calendar automatically synchronize whenever a change is made. Touch Exchange ActiveSync, select the items you want to synchronize, and then touch Sync now. -
Page 231: Update Your Profile
1. Open the Notifications panel, and then touch > System updates. 2. Touch HTC software update > Check now. 3. Follow onscreen instructions to download and install any available updates. Update Your Profile This option allows you to automatically update your online user profile information. If you choose to change your user name and select a new one online, you must then update the user name on your phone. -
Page 232: Index
Index 3G, 141 3-way Calling, 45 4G LTE, 141 Accessory Jack, 12 Accounts, 87 Settings, 55 Activation, 4 Airplane Mode, 51 Alarm, 182 Alarm Clock, 184 Android Beam, 208, 213 Android Market. See Google Play Answer a Call, 39 Application Tabs Edit, 55 Applications, 119 App Association, 67... - Page 233 Bluetooth, 208 Car Kit, 209 FTP Server, 213 Headset, 209 Phone Name, 208 Receive Information, 212 Reconnect Phone, 209 Send Information, 210 Send Music, 134 Settings, 51 Turn On or Off, 208 Unpair Device, 210 Brightness, 61 Calculator, 182 Calendar, 177 Accept or decline a meeting invitation, 180 Add the Widget, 182 Create Event, 178...
- Page 234 Take a Photo, 162 Zooming, 161 Camera Key, 11 Car Kit, 209 Charger/Accessory Jack, 12 Charging your phone, 3 Clock, 182, 183 HTC Widget, 182 Cloud Services, 195, See Online Storage Connect to a computer, 158 Contacts Import, 78 Transfer, 74 Data Connection...
- Page 235 Password, 7 Date & Time, 71 DDTM Mode, 65 Drag, 16 Dropbox, 191, 192, 193, 194 Earpiece, 10 Email Account Settings, 99 Compose and Send, 93 Delete Accounts, 100 Delete Messages, 98 Manage Email Messages, 97 Move Messages, 97 Print, 95 Read and Reply, 94 Refresh the Inbox, 93 Sort Messages, 93...
- Page 236 Facebook, 112 Factory Data Reset, 68 Flash, 12 Flick, 16 FM Radio, 134 Minimizing or Turning Off, 136 Friend Stream, 112 Gallery Print Photos, 170 View Pictures and Videos, 165 Gestures, 15 Gmail Create Account, 87 Help, 90 Inbox, 89 New Message, 89 Reply to or forward, 90 Sign In, 88...
- Page 237 Erase, 49 Home Key, 11 Home Screen, 18 Customize, 21 Extended, 20 Move or Remove Items, 22 HTC Sync Manager, 197 Add Media Automatically, 200 Check for Updates, 201 Create Playlist, 202 Get Started, 199 Import Media, 200 Install, 198...
- Page 238 Reject, 40 Incoming Calls Ringtones, 63 Internet Calls, 46 Add Account, 46 Make an Internet Call, 46 Internet Pass-through, 159 Keyboard Touchscreen, 28 Kickstand, 11 Language, 71 Location Settings, 57 Lock Screen, 14 Change, 55 Unlock, 14, 15 Mail Mail Widget, 100 Sort Email Messages, 93 Messaging, 87 microSD Card, 214...
- Page 239 Manage playlists, 132 Playlists, 132 YouTube, 131 NASCAR Sprint Cup Mobile, 137 Navigation, 121 Google Latitude, 127 Google Maps, 124 HTC Car, 121 Telenav GPS Navigation, 128 NFC, 213 Notification Icons, 25 Notifications Ringtone, 64 Notifications Panel, 27 Online Storage, 191...
- Page 240 Set Up My Profile, 76 Phone, 36 Dialer, 36 Phone Calls, 36 Emergency Numbers, 38 From Call History, 37 From Email Messages, 38 From People, 38 From Text Messages, 38 Make Calls, 36 Phone Dialpad, 36 Receive, 39 Use Speed Dial, 38 Phone Illustrations, 1 Phone Layout (illustration), 10 Phone Settings...
- Page 241 Power Saving Email Synchronization, 70, 71 Predictive Text, 33 Add to Dictionary, 33 Edit or Delete, 34 Preset Messages, 102 Press and Flick, 18 Print Email, 95 Printing Photos, 170 Proximity Sensor, 10 Quiet Ring on Pickup, 39 Recent Apps Key, 11 Reject Incoming Call, 40 Reset Phone, 68 Restart, 13...
- Page 242 Password, 59 Pattern, 58 PIN, 59 Security Settings, 58 Settings, 50 Setup Application, 5 SkyDrive, 195 Send links by email, 196 Sign in, 196 Upload photos, 196 Sleep Mode, 14 Slide, 16 SMS, 100 Back Up Messages, 108 Check Messages, 105 Delete a conversation, 108 Delete several, 108 Delete several conversations, 108...
- Page 243 Silent Mode, 62 Vibrate, 63 Volume, 63 Speaker, 12 Speed Dialing, 47 Spread, 17 Sprint 411, 8 Sprint Account Manage, 7 Sprint Account Passwords, 6 Sprint Hotspot, 155 Connect To, 156 Set Up, 156 Settings, 157 Turn off, 157 Sprint Operator Services, 8 Sprint TV &...
- Page 244 Manage Task List, 190 Manage Tasks, 189 Unified Task List, 189 Tethering, 158 Text Copy, Paste, 35 Select, 34 Text Edit, 33 Text Entry, 28 Text Message Make Call From, 38 Text Messages, 100 Tools, 177 Top Panel Cover, 11 Touch, 16 Touch and Hold, 16 Touchscreen, 11...
- Page 245 Update Operating System, 218 Update Roaming List, 219 Update Your Profile, 219 Upgrade, 217 USB Drive, 216 USB Tethering, 158 User Name, 142 Video, 162 Videos, 160 Send, 171 Share, 171 Virtual Private Networks (VPN), 147 Visual Voicemail, 40 Review, 41 Set Up, 40 Voice Input, 31 Voice Memos, 207...
- Page 246 Wallpaper, 61 Weather, 186 Web, 141 Web Broswer Options, 153 Web Browser, 148 Add Bookmarks, 150 Copy and paste text, 155 Download Apps, 152 Find Text, 153 History, 151 Open, 148 Private Browsing, 149 Read or Watch Later, 151 Search text, 155 Show Flash Content, 153 Web Connection, 142 Wi-Fi...
Need help?
Do you have a question about the Evo 4G LTE and is the answer not in the manual?
Questions and answers