Datasat AP20 Installation And Operating Manual
Audio processor
Hide thumbs
Also See for AP20:
- Installation and operating manual (162 pages) ,
- Installation and operating manual (144 pages)
Advertisement
Table of Contents
Advertisement
Table of Contents

Related Manuals for Datasat AP20


Summary of Contents for Datasat AP20
- Page 1 AP20 Audio Processor Installation and Operating Guide Version 1.1 Effective Date: June 2010 Document # 9301H39200 Datasat Digital Entertainment 9631 Topanga Canyon Place Chatsworth, CA 91311...
-
Page 2: Ap20 Installation And Operating Guide
The content of this publication is subject to change without notice. Datasat Digital Entertainment assumes no obligation to notify you of any changes or updates. While Datasat Digital Entertainment believes this publication is accurate, due to ongoing improvements and revisions, Datasat Digital Entertainment cannot guarantee the accuracy of printed material, nor can it accept responsibility for errors or omissions. - Page 3 AP20 Installation and Operating Guide Page 3 Record of Changes Manual Version / Description Date 1.0 April, 2010 Preliminary version 1.1 June 2010 Version 1.1 release Regulatory Notices EMI NOTICE This equipment has been tested and found to comply with the limits for a Class A digital device, pursuant to Part 15 of the FCC Rules.
-
Page 4: Table Of Contents
AP20 Installation and Operating Guide Page 4 TABLE OF CONTENTS INTRODUCTION PART 1: OPERATION OPERATING AP20 1.1 H – O ROCEDURES PERATIONS 1.2 F RONT ANEL ONTROLS AND NDICATORS 1.3 P AP20 P OWERING ROCESSOR 1.3.1 N AVIGATING THROUGH THE ENUS 1.4 T... - Page 5 RROR ESSAGES 5.3.1 S OFTWARE NSTALLATION 5.3.2 E AP20 RROR OOTING THE PART 3. APPENDICES A. Connector Pin-outs B. Interface Wiring Diagrams C. AP20 Wiring and Block Diagrams D. Specifications AP20 Installation & Operating Guide Document # 9301H39200 Ver. 1.1...
- Page 6 Page 6 Introduction This manual explains the AP20 Audio Processor setup and operation. It contains full instructions for installing hardware and software, setting up audio playback, configuring the system, performing maintenance and troubleshooting, and setting up and operating optional functions.
-
Page 7: Contact Information
Entertainment hereby grants you a non-exclusive, non-transferable, revocable, limited license to use the Software solely for your internal business purposes and solely in connection with the AP20 Audio processor. All rights not expressly granted to you are reserved by Datasat Digital Entertainment. - Page 8 INCLUDING, WITHOUT LIMITATION, DAMAGES FOR LOSS OF PROFITS, LOSS OF DATA, BUSINESS INTERRUPTION OR ANY OTHER COMMERCIAL DAMAGES OR LOSSES, ARISING OUT OF OR RELATED TO YOUR USE OF THE DATASAT DIGITAL ENTERTAINMENT SOFTWARE OR HARDWARE, HOWEVER CAUSED, REGARDLESS OF THE THEORY OF LIABILITY AND EVEN IF DATASAT DIGITAL ENTERTAINMENT HAS BEEN ADVISED OF THE POSSIBILITY OF SUCH DAMAGES.
-
Page 9: Ndicators
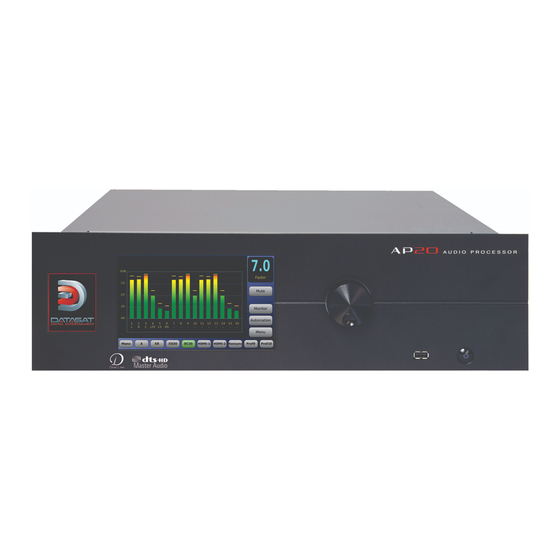
USB port Power button Figure 1: Front Panel Controls and Indicators The front panel contains the following controls and indicators for operating AP20. Power button: Turns the unit on and off LCD/Touch Screen: Displays theater system configuration and status and allows ... -
Page 10: Enus
Is the front panel power switch lighted? Navigating through the Menus Since the AP20 is equipped with a touch screen display, you can navigate easily through the menus by touching any button with your finger. A non-abrasive stylus that won’t scratch the screen can also be used if you prefer. - Page 11 The button label and fader display will turn red. The button label will also change to “Muted”. Unmute the AP20 by touching the mute button again, changing format level, or changing formats. Touch it again to un-mute the fader.
- Page 12 Figure 7. Fader Muted 1.4.2 Booth Monitor Volume When an external powered speaker is connected to the AP20, the level can be controlled using the monitor volume. To adjust the booth monitor volume, touch the Monitor button. The screen shown in Figure 7 will appear.
- Page 13 AP20 Installation and Operating Guide Page 20 Touch the small button to select a channel for monitoring Figure 9. Monitor Mix Select channel(s), then touch the + or – button to adjust volume from 0 to 10. Touch the small button next to a channel to select it for monitoring.
- Page 14 See Powering ON the AP20 Processor, page 16. If the AP20 is mounted in a rack and a breaker is used for the rack, make sure the breaker is ON. Verify the surge protector is powered and is working.
-
Page 15: Onnections C
AP20 Installation and Operating Guide Page 22 Part 2: Installation and Setup This part of this manual contains information the theater technician needs to set up and configure the AP20 Audio Processor. INSTALLATION AND SET UP 2.1 I NSTALLATION HECKLIST 2.2 U... - Page 16 AP20 Installation and Operating Guide Page 23 4.2.7 V ERSION ERIAL UMBER ADDRESS 4.2.8 S YSTEM ONITOR 4.3 F ORMATS 4.3.1 C URRENT UDIO ORMAT 4.3.2 S TARTUP ORMAT 4.3.3 E ORMATS 4.3.4 A SSIGN ORMAT UTTONS 4.3.5 I NPUT OURCE 4.3.6 F...
-
Page 17: Onnection
AP20 Installation and Operating Guide Page 24 Installation and Set Up 2.1 Installation Checklist This checklist summarizes the installation and setup procedures for the AP20. Table 3: AP20 Installation and Setup Completed Task Description Refer to: Install AP20 in Equipment Rack Chassis Rack Mounting and Connection, ... - Page 18 AP20 Installation and Operating Guide Page 26 14 15 16 17 Figure 11. AP20 Rear Panel Table 4. AP20 Rear Panel Connections ITEM DESCRIPTION ITEM DESCRIPTION Power Entry Module/Power Switch Digital Audio In (CH 1 – 8) – DB25F Option Card Slots (3) Digital Audio In (CH 9 –...
-
Page 19: Power Supply
3. Connect the supplied power cable between the AP20 unit and the AC mains source. 2.5.1 Rack Mount Recommendations Follow these recommendations if the AP20 unit will be installed in a closed or multi-unit rack assembly. Determine the maximum and ambient temperatures within the rack, since they may be greater ... -
Page 20: C Hannel P Rofiles
The buttons along the bottom of the AP20 Home screen are the default formats or formats that have been created by the installation technician for a particular application. Each format consists of a set of discrete settings: an Input Source, Format Options, EQ settings, and Channel Profile, as illustrated below (Figure 12). - Page 21 AP20 Installation and Operating Guide Page 29 Figure 13. Audio Format Setup Screen 2.6.1 Creating an Audio Format This is an overall summary of the procedure for creating an audio format. Under Audio Format Setup screen: assign the format to a button.
-
Page 22: A Djusting A Udio O Utput L Evels
The laptop computer uses a Virtual Network Connection (VNC) to communicate with the AP20. The front panel touch-screen display of the AP20 will appear on the laptop screen, but will not function as a touch-screen. Use the laptop’s cursor and arrow keys to make selections. -
Page 23: Ap20
85 dB * Subwoofer should be set to 10 dB of in-band gain (see SMPTE RP-200), which equates to approximately 91 dBC (slow). If not possible to achieve the baseline, use the AP20 (Analog Output Levels) to make minor adjustments. -
Page 24: Octave Eq
four mics feeding into a multiplexer. Use the RTA on the AP20 (Third Octave EQ screen) with the mic or multiplexer plugged into the AP20 rear panel, or use a separate RTA (in the auditorium) with the mic or multiplexer plugged into the RTA, which plugs into your laptop. - Page 25 AP20 Installation and Operating Guide Page 39 4. Examine the response on the RTA (whichever RTA the microphone is attached to). 5. Turn on XCurve Display. Try to tune the frequency pattern to the XCurve. If the pattern does not conform – there is a hole or a peak or other variance – then select the frequency that needs adjusting, and push it down or pull it up.
-
Page 26: Heck
AP20 Installation and Operating Guide Page 43 2.16 AP20 Playback Sound Check After installing and setting up the unit—or doing a maintenance check—it is a good idea to play content and stand in the theater while listening to the first few minutes of the movie. - Page 27 View AP20 System information See 4.2.6 System Info, page 58. Update AP20 software See 4.2.2 Updating Your AP20 Software, page 52. 3.1 Example: Creating a Format Prior to creating a format, it is necessary to identify the following: Input source ...
-
Page 28: Setup Menus
Touch the Formats button to return to the Audio Format Setup screen. Setup Menus On the next three pages, you will find a menu diagram for the AP20. This chapter contains a detailed of all the screens under the "Menu" selection of the home page. Refer to section 1.4 for all operations under the "Home"... - Page 29 USB Device USB Save/ Save/Load AP20 Restore Configuration NetCmd Password Access Control Setup Password View Log file AP20 software version, circuit board temps, System Info board ID info, board voltage levels AP20 Installation & Operating Guide Document # 9301H39200 Ver. 1.1...
-
Page 30: Ap20 Installation And Operating Guide
AP20 Installation and Operating Guide Page 47 Home (Main) Menu Current audio format Current Audio Format (select) Copy Format Formats Copy Preset to Format Edit Formats Rename Delete Assign Buttons Format Button Assignment Startup Format Modify parameters for current format... - Page 31 AP20 Installation and Operating Guide Page 48 Home (Main) Menu Network Automation Formats Network Mode Macros, Macro Edit, Current IP Address Events, Buttons, Serial Other IP addresses Output Channel Profile Current Audio Profile Select Copy Profile Copy Default to Profile...
- Page 32 Figure 23. The Setup Menu Bar This menu bar will always be available near the bottom of every screen in the AP20, with the exception of the Home screen. The active screen button is displayed in a different color from the others.
Need help?
Do you have a question about the AP20 and is the answer not in the manual?
Questions and answers