
Related Manuals for Synology DiskStation DS111


Summary of Contents for Synology DiskStation DS111
- Page 1 Synology DiskStation User's Guide Based on DSM 3.1 110302DSMUGENU Document ID Applied Models DS111 DS110+ DS110j DS211+ DS211 DS211j DS710+ DS411+II DS411j DS411slim DS410 DS1511+ RS411 RS810+ RS810RP+ RS2211+ RS2211RP+...
-
Page 2: Table Of Contents
1-Bay & 2-Bay Models ................................7 4-Bay Models ..................................10 5-Bay Models ..................................13 10-Bay Models ..................................14 Chapter 2: Get Started with Synology DiskStation Manager Install Synology DiskStation ..............................15 Log in to Synology DiskStation Manager ........................... 15 DiskStation Manager Appearance ............................19 Manage DSM with the Main Menu ............................. - Page 3 Access Files via File Station .............................. 105 Chapter 9: Back Up Data Back Up Computer Data ..............................106 Back Up Data on Synology DiskStation ........................... 108 Sync Shared Folder Contents between DiskStations ....................111 Backup DiskStation Data with Time Backup ........................113 Use USBCopy to Back Up Data on USB Device ......................
- Page 4 Update DSM ..................................210 Manage Packages ................................211 Receive Event Notification ..............................212 Reset admin's Password ..............................214 Restore Synology DiskStation to Factory Defaults......................214 Reinstall Synology DiskStation ............................215 Enable SNMP Service ................................ 215 Enable Terminal Services ..............................216 Chapter 17: Communicate with Mobile Devices Use iOS and Android Apps ..............................
- Page 5 Share Storage Capacity as iSCSI Target You can designate portion of your Synology DiskStation volume space to be an iSCSI Target, which will allow the iSCSI initiator to access the space like a local disk. Back Up Files on Computer and Server...
-
Page 6: Usb Print Server
Enjoy Music Anytime and Anywhere Audio Station allows you to listen to music stored on the Synology DiskStation, from a connected iPod, or even stream Internet Radio stations. In addition, you can stream music from the Synology DiskStation with a web browser over the Internet. -
Page 7: Chapter 1: Synology Diskstation At A Glance
Back Panel will start automatically when the server starts. If the fan is malfunctioning, system will beep every 1 second. --------- eSATA Port is supported on specific models only. See "Appendix A: Synology DiskStation Specifications" on Page 219 for more information. - Page 8 To turn off Synology DiskStation, press the Power Button and hold it until you hear a beep sound and the Power LED starts blinking. The fan is built to exhaust waste heat out of Synology DiskStation. It will start automatically when the server starts. If the fan is malfunctioning, system will Back Panel beep every 1 second.
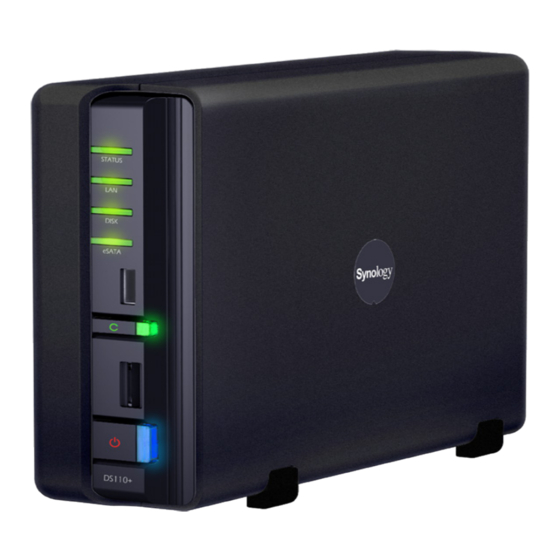
- Page 9 Power Button Front Panel To turn off Synology DiskStation, press the Power Button and hold it until you hear a beep sound and the Power LED starts blinking. The LED indicator is used to display the status of the internal disk and the...
-
Page 10: 4-Bay Models
The power port is where you connect the AC adapter to Synology DiskStation. Power Port Back Panel --------- eSATA Port is supported on specific models only. See "Appendix A: Synology DiskStation Specifications" on Page 219 for more information. 10 Chapter 1: Synology DiskStation at a Glance... - Page 11 USB Port Back Panel external hard drives, USB printers, or other USB devices. The fan is built to exhaust waste heat out of Synology RackStation. It will start automatically when the server starts. If the fan is Back Panel malfunctioning, system will beep every 1 second.
- Page 12 DS411slim Name Location Description The Power Button is used to turn Synology DiskStation on or off. Power Button Front Panel To turn off Synology DiskStation, press the Power Button and hold it until you hear a beep sound and the Power LED starts blinking.
-
Page 13: 5-Bay Models
USB Port Back Panel hard drives, USB printers, or other USB devices. The fan is built to exhaust waste heat out of Synology DiskStation. It will start automatically when the server starts. If the fan is malfunctioning, Back Panel system will beep every 1 second. -
Page 14: 10-Bay Models
2U RackStation Article Name Location Description The Power Button is used to turn Synology RackStation on or off. Power Button Front Panel To turn off Synology RackStation, press the Power Button and hold it until you hear a beep sound and the Power LED starts blinking. -
Page 15: Chapter 2: Get Started With Synology Diskstation Manager
Main Menu access DSM settings and applications. Install Synology DiskStation For more information setting up Synology DiskStation and installing DSM, see the Quick Installation Guide that came with your installation disc. Log in to Synology DiskStation Manager You can log in to DSM with Synology Assistant or with a web browser. - Page 16 4 Double-click the Synology Assistant icon to run setup wizard. 5 Choose the server you want to manage. Click Connect or double-click the selected server to go to DSM's login screen. 16 Chapter 2: Get Started with Synology DiskStation Manager...
- Page 17 Linux folder, and then double-click Synology Assistant-3.1-[number].tar.gz. 3.1-1566 3.1-1566 3 Click Extract, and then extract the SynologyAssistant directory to the path /usr/local or any other path. 17 Chapter 2: Get Started with Synology DiskStation Manager...
- Page 18 2 In the address field, enter any of the following: http://Synology_Server_IP:5000 http://Synology_Server_Name:5000/ (or http://Synology_Server_Name.local:5000/ on a Mac) Synology_Server_Name should be replaced with the name you set up for Synology DiskStation during the setup process. If you choose One-step Setup during the setup process, the Synology_Server_Name will be DiskStation, CubeStation, USBStation, or RackStation.
-
Page 19: Diskstation Manager Appearance
Internet Explorer: 7.0 or later DiskStation Manager Appearance When you log in to Synology DiskStation Manager (DSM), you can see the desktop and the taskbar. Desktop and Shortcuts The desktop is where your application windows are displayed. You can also create desktop shortcuts to frequently used applications. -
Page 20: Manage Dsm With The Main Menu
Manage DSM with the Main Menu Main Menu is where you can find all the applications and settings provided by Synology DiskStation Manager. Logout, Restart, and Shutdown Click Logout, Restart, or... - Page 21 Settings: Enable the services of built-in applications. Note: Control Panel is accessible only to admin or users belonging to the administrators group. See "Create and Edit Groups" on Page 77 for more information. 21 Chapter 2: Get Started with Synology DiskStation Manager...
-
Page 22: Manage Personal Options
Volume Usage Under Volume Usage, you can view your quota on all DiskStation volumes set by admin, as well as the amount of capacity you have used on each volume. 22 Chapter 2: Get Started with Synology DiskStation Manager... - Page 23 3 If you want to repeat your desktop wallpaper horizontally or vertically, tick Horizontal repeat Vertical repeat. 4 If you want to adjust the alignment of your desktop wallpaper, choose the options from the Background alignment drop-down menu. 5 Click OK. 23 Chapter 2: Get Started with Synology DiskStation Manager...
- Page 24 Browse local files and upload files and folders directly in File Browser. 2 Click OK. Note: Enabling this option allows you upload folders in File Browser. Browsing local files is not supported by Opera and Safari for Windows. 24 Chapter 2: Get Started with Synology DiskStation Manager...
-
Page 25: Chapter 3: Modify System Settings
Modify System Settings Chapter 3: After you have connected to Synology DiskStation Manager (DSM) and learned how to access its functions and customize its appearance, you as admin or a user belonging to the administrators group can begin to modify its basic settings. - Page 26 HTTPS. (See the section below for more information.) 3 Click OK. When the HTTPS connection is enabled, any connection to Synology DiskStation via the HTTP protocol will be encrypted with the SSL/TLS encrypting mechanism. More Information About redirecting to HTTPS connection:...
- Page 27 Synology DiskStation User's Guide Based on DSM 3.1 Session Security Click the Session Security tab to modify the security level for each DSM browsing session. To set the logout timer: 1 Enter any value between 1 to 65535 in Logout timer (minutes) to specify the idle time period before the automatic logout.
- Page 28 Synology DiskStation User's Guide Based on DSM 3.1 Enable File Browser log Click the File Browser tab to start monitoring the File Browser activities of all users, including Upload, Download, Delete, Rename, Move, Copy and Property set. Note: For more information about File Browser, see "Access Files via File Browser" on Page 94.
-
Page 29: Change Network Settings
Synology DiskStation User's Guide Based on DSM 3.1 Change Network Settings Go to Main Menu > Control Panel > Network to modify the following network settings of your Synology DiskStation. General In this section, you can change your DiskStation identification on the network by entering a server name. You can also set up the domain name server and default gateway here. -
Page 30: Network Interface
Synology DiskStation User's Guide Based on DSM 3.1 Network Interface In this section, you can connect your DiskStation to the network via any of the following network interfaces. If your DiskStation is connected to a local area network, you can click... - Page 31 Synology DiskStation User's Guide Based on DSM 3.1 Bond For DiskStations with multiple LAN ports, you can combine multiple LAN interfaces into the Bond [number] interface with Link Aggregation . You can configure this interface as you would with any LAN interface.
- Page 32 Wireless Network on the left side to connect Synology DiskStation to a wireless network. Note: Wireless network is available only when a wireless dongle is plugged into the USB port of your Synology DiskStation. To set up a wireless network:...
- Page 33 IPv6 Setup button to change the IPv6 settings. Synology DiskStation supports IPv4/IPv6 dual stack scheme. This means that both IPv4 and IPv6 can work simultaneously on Synology DiskStation. The default setting for IPv6 is Auto. On the IPv6 Setup page, choose between the different setup types: ...
- Page 34 Click the PPPoE on the left side if your Synology DiskStation is connecting to a DSL or cable modem, and your Internet Service Provider (ISP) uses PPPoE (Point to Point Protocol over Ethernet). To connect to the Internet via PPPoE:...
- Page 35 Note: Your external IPv6 address may be automatically updated by the service provider. However, Synology DiskStation will not remove the old IPv6 address immediately. If you are still facing connection problems, contact your Internet Service Provider.
-
Page 36: Modify Regional Options
Language: Set your preferred language for email notification from Synology DiskStation. Codepage: Synology DiskStation uses Unicode to avoid file inaccessibility from computers using different languages. But for the following devices or applications to use Synology DiskStation services without problem, you need to choose the appropriate codepage for them: ... - Page 37 Synology DiskStation User's Guide Based on DSM 3.1 Set Up Time Click the Time tab to set up the time. You can check the current time, manually set the server's date and time, or have them set automatically using a network time server.
-
Page 38: Use Energy Saving Features
Synology DiskStation User's Guide Based on DSM 3.1 More Information Network Time Protocol (NTP) is used to synchronize the time of all clients and servers over a data network. Below are a few recommended NTP servers: time.apple.com time.asia.apple.com ... -
Page 39: Manage General Settings
Enable Wake on LAN Enable Wake on LAN [number] for DiskStations with multiple LAN ports). --------- Wake on LAN is supported on specific models only. See "Appendix A: Synology DiskStation Specifications" on Page 219 for more information. 39 Chapter 3: Modify System Settings... -
Page 40: Manage Beep Control
More Information About Wake on LAN: After Wake on LAN is enabled for your DiskStation, you can turn on Synology DiskStation over the local area network or the Internet by using a WOL (Wake on LAN) application. Activate the function by entering DiskStation’s IP address (or DDNS hostname) and MAC address. - Page 41 You will need another server connected to an UPS that can be communicated via internet, i.e. a network UPS server. A network device, such as a switch or a hub, should be connected to the same UPS, so that Synology DiskStation can still communicate with network UPS server during an unexpected power failure.
- Page 42 Synology DiskStation User's Guide Based on DSM 3.1 Power Schedule Click the Power Schedule tab to start up or shut down automatically at a specified time. To add a new startup/shutdown schedule: 1 Click the Create button to open the Add Schedule dialog.
-
Page 43: Chapter 4: Manage Storage Space
Synology DiskStation Supported RAID Types For Synology DiskStation with 1 bay, you can create a Basic volume. For Synology DiskStation with 2 or more bays, you can choose between several RAID types during volume or Disk Group creation. Some of the RAID types can provide data protection, which means data integrity is protected when one or two of the hard drives fail. -
Page 44: Manage Volumes Or Disk Groups With Storage Manager
Synology DiskStation User's Guide Based on DSM 3.1 Allowed RAID Type HDD # Description Capacity Failed HDD # The system will write identical data to each hard Smallest HDD drive at the same time, so data integrity is RAID 1... - Page 45 Synology DiskStation User's Guide Based on DSM 3.1 Create a Volume The Volume Creation Wizard allows you to create a volume on your DiskStation in several ways. Note: Volume creation might take a while to finish, depending on the capacity to be created.
- Page 46 Synology DiskStation User's Guide Based on DSM 3.1 Create a Volume by Combining Several Hard Disks This action allows you to create a volume by combining several hard disks. To create a volume by combining several hard disks: 1 Click the Volume tab.
- Page 47 Synology DiskStation User's Guide Based on DSM 3.1 5 Choose either of the following: Create a new Disk Group: This action will create a new Disk Group from unused hard disks, and then create a volume on the newly-created Disk Group. Click...
- Page 48 Space on a Disk Group" on Page 46 for more information), you need to repair its Disk Group. --------- This is supported on specific models only. See "Appendix A: Synology DiskStation Specifications" on Page 219 for more information. 48 Chapter 4: Manage Storage Space...
- Page 49 If you want to change the RAID type, enough number of hard drives for the new type is required. See "Synology DiskStation Supported RAID Types" on Page 43 for the required amount of disks for the RAID type. The size of the replacement hard drive must be larger than the smallest disk size of the volume or Disk Group.
- Page 50 1 Turn off the Synology DiskStation (skip this step for models that support disk hot swapping). 2 Replace the first internal hard drive with a larger hard drive. 3 Turn on the Synology DiskStation and repair the volume or Disk Group. See "Repair a Volume" on Page 48 for more information.
- Page 51 Based on DSM 3.1 Expand a Volume or Disk Group by Adding Disks If you have empty hard drive bays in your Synology DiskStation, you can expand JBOD, RAID 5, RAID 5+Spare, RAID 6, and SHR volumes or Disk Groups by adding disks.
-
Page 52: Manage Iscsi Target With Storage Manager
For more information about creating iSCSI LUNs, see "Manage iSCSI LUNs with Storage Manager" on Page 54. 5 Click Next. 6 Click Back to modify or Apply to confirm settings. --------- 32 iSCSI targets are supported on specific models only. Please visit www.synology.com. 52 Chapter 4: Manage Storage Space... - Page 53 Synology DiskStation User's Guide Based on DSM 3.1 Term Explanation IQN: IQN (iSCSI Qualified Name) is a set of unique name for an iSCSI Target. It should not conflict with iSCSI Target IQNs on other servers. IQN must be less than 128 characters and can include letters(case insensitive), numbers, colons, dashes, and dots.
-
Page 54: Manage Iscsi Luns With Storage Manager
LUN tab to manage iSCSI LUNs on your Synology DiskStation. An iSCSI LUN (logical unit number) can be mapped to multiple iSCSI Targets to perform storage operations such as read or write. You can create up to 10 or 256 iSCSI LUNs on your DiskStation. - Page 55 Synology DiskStation User's Guide Based on DSM 3.1 5 About iSCSI Target mapping: If you choose Map existing iSCSI targets from the iSCSI Target mapping drop-down menu, you will be prompted to choose an existing iSCSI Target. If you choose...
-
Page 56: Manage Hard Disks With Storage Manager
Write cache support is only effective on hard disks that support it. Enabling cache offers you enhanced performance on your Synology product. However, to ensure data protection, the usage of a UPS device is strongly recommended. It is also highly suggested that the system is shut down properly every time after use. - Page 57 Synology DiskStation User's Guide Based on DSM 3.1 Run S.M.A.R.T. Analysis Disk S.M.A.R.T. will help you to examine and report the hard disk status to alert possible disk failures. It is recommended that you change your disk if errors are detected.
-
Page 58: Manage External Disks
Synology DiskStation User's Guide Based on DSM 3.1 Manage External Disks You can attach external USB or eSATA disks to the USB or eSATA port of your Synology DiskStation for backup or file sharing purposes. Go to Main Menu >... -
Page 59: Chapter 5: Access Your Diskstation From The Internet
Set Up Port Forwarding Rules for Router If your Synology DiskStation is within the Intranet, you can set up port forwarding rules for the router to allow your Synology DiskStation to be accessible over the Internet. - Page 60 Synology. c If you still have trouble finding your router even after the list is updated, contact Synology. 3 Enter the protocol and port for your router. The protocol and port vary depending on the model of your router. If you cannot connect using the default HTTP protocol and 80 port, refer to the documentation that comes with your router for correct settings.
-
Page 61: Give Synology Diskstation A Ddns Hostname
Once set up, you and your friends no longer need to remember the IP address to access your Synology DiskStation. Simply type in the DDNS hostname on the web browser as you would when connecting to any website. After the setup is complete, the hostname will always point to the external IP of the Synology DiskStation. - Page 62 Service Requirement The DDNS server of the service provider is working normally. The gateway connection is normal. Synology DiskStation is able to connect to the DNS server. The following addresses are unblocked in the Firewall: http://members.dyndns.org:80 ...
- Page 63 4 Click to finish. The newly registered hostname for your Synology DiskStation will be activated in just a few seconds. Note: If you have any problem using your No-IP.com account, visit No-IP.com...
-
Page 64: Chapter 6: Enhance Internet Security
C h a p t e r Enhance Internet Security Chapter 6: After your Synology DiskStation is available on the Internet, you will need to safeguard it against any attacks from Internet hackers. This chapter explains how to set up firewall and enable auto block. -
Page 65: Automatically Block Suspicious Login Attempts
Synology DiskStation User's Guide Based on DSM 3.1 4 Specify the source IP address in the Source IP section. You can choose to allow or deny access from a particular source IP using one of the following options: All: Choose this option to apply the rule to all source IP addresses. - Page 66 Enable email notification to receive email notification when an IP address is blocked. Make sure email notification is enabled for your Synology DiskStation before using this option. Note: For more information about email notification, see "Receive Email Notification" on Page 212.
-
Page 67: Chapter 7: Set Up File Sharing
Enable File Sharing Protocols for All Platforms This section tells you how to enable Synology DiskStation to support file sharing protocols for all platforms. Synology DiskStation supports the following file sharing protocols: For Windows: SMB/CIFS (My Network Places), FTP, WebDAV ... - Page 68 Optimize CIFS database operations Checking this option will disable "Opportunistic Locking" of CIFS, resulting in increased performance when database applications access database files on the shared folder of the Synology DiskStation via network. Enable Local Master Browser Enable Synology DiskStation to be the Local Master Browser.
- Page 69 About Time Machine backup folder: To backup data from Time Machine to Synology DiskStation, select a shared folder from the drop-down menu. Shared folders that are being used for other services will not be available for Time Machine.
-
Page 70: Join A Windows Ads Domain Or Workgroup
In other words, domain users in these groups have administrative right on the DiskStation, including performing DSM/CIFS/FTP/AFP/WebDAV applications. You can also configure domain users’ access privileges to the shared folders on Synology DiskStation. See "Allow Domain Users or Groups to Access Shared Folders" on Page 82 for more information. -
Page 71: Manage Users And Groups
IP: Specify a DC (Domain Controller) IP and Synology DiskStation will try to communicate with it. If there is more than one IP, insert a comma in between each of them. Add an asterisk (*) after the last DC IP if you wish, and Synology DiskStation will try to communicate with other DC when all specified ones failed. - Page 72 Synology DiskStation User's Guide Based on DSM 3.1 Create and Edit Users Follow the steps below to create a user account. The user can login to edit his/her account info after the user account has been established. You can also choose to set an account expiration date or disallow the user to change account password.
- Page 73 Enter (PC) or Return (Mac) on your keyboard. The search result will be displayed in the users list below. This function is especially useful when there are numerous users for your Synology DiskStation. To delete a user: Select the user you want to delete and click Delete.
- Page 74 Synology DiskStation User's Guide Based on DSM 3.1 Apply Password Strength Rules You can enable password strength service to make sure DSM users’ password is secure enough to withstand malicious login attempt. Note: Password Strength rules only work for passwords created or modified after the Password Strength service is enabled.
- Page 75 User Home. 2 Tick Enable user home service. 3 If there are more than one volume on Synology DiskStation, select where you want the homes folder to be stored. 4 Click OK. To disable user home service: 1 Click User Home.
- Page 76 Synology DiskStation User's Guide Based on DSM 3.1 Create Domain User’s Home Folder Go to Main Menu > Control Panel > Domain Privileges to create domain user’s home folder. For DSM admin or users belonging to the administrators group (including domain administrators), domain users’...
- Page 77 Synology DiskStation User's Guide Based on DSM 3.1 Create and Edit Groups Go to Main Menu > Control Panel > Group to create and edit a group, add users to the group, and then edit the group's properties, saving you the trouble of editing users one by one.
- Page 78 Choose Privilege includes from the drop-down menus. Delete the name you entered in the search field and press "Enter" on your keyboard. To allow a user to access applications for Synology DiskStation: 1 Click the Local User Domain User tab, depending on which type of users whose application privileges you want to modify.
-
Page 79: Set Up Shared Folders
Shared Folder to manage the shared folders, which are the root folders of Synology DiskStation. (Folders within the shared folders are called subfolders.) You can store data in the shared folders and share them with users or groups with access privileges. - Page 80 --------- Multiple volumes are available only on DiskStation with more than 1 bay. 200 shared folders are supported on specific models only. See "Appendix A: Synology DiskStation Specifications" on Page 219 for more information. 80 Chapter 7: Set Up File Sharing...
- Page 81 For more information about anonymous FTP, see "Manage FTP Security Settings" on Page 93. Local users: Synology DiskStation users (including guest). See "Manage Users and Groups" on Page 71 for more information. Local groups: Synology DiskStation groups.
- Page 82 Synology DiskStation User's Guide Based on DSM 3.1 Disable file downloading 5 Click OK. Note: When you encounter privilege conflicts, the privilege priority is as follows: No access > Read/Write > Read only. When you create a new shared folder, if the access privilege of admin (or a user belonging to the administrators...
- Page 83 Confirm key field. 3 Tick Mount automatically on startup to mount the encrypted folder automatically after Synology DiskStation starts up next time. By default, encrypted shared folder will be unmounted automatically on startup for security reasons. Note: You can also encrypt a folder when you create it.
- Page 84 Synology DiskStation User's Guide Based on DSM 3.1 Edit an Encrypted Folder After the folder is encrypted, you can use the Encryption drop-down menu to edit the folder. The items shown in the menu depend on the status of the selected shared folder: ...
-
Page 85: Define Windows Acl Privileges For Shared Folder
Synology DiskStation User's Guide Based on DSM 3.1 Define Windows ACL Privileges for Shared Folder Windows Access Control List (ACL) is a list of privileges or permissions that determine specific access rights under the Windows environment. This can help administrator define access control rules for an individual file or a directory, and give different access rights for individual user or group. -
Page 86: Index Shared Folder Contents
Synology DiskStation User's Guide Based on DSM 3.1 Advanced Settings Besides editing the privilege for Everyone, you can also define the access permissions for individual DiskStation account on a certain file or folder. This includes domain user accounts as well. Follow the steps below: 1 Follow steps 1~5 in To edit Windows ACL settings. - Page 87 Synology DiskStation User's Guide Based on DSM 3.1 To index files in a shared folder: 1 Select the shared folder you want to index. 2 Click Edit and then click the File Indexing tab. 3 Tick Enable file indexing. 4 Click OK.
-
Page 88: Chapter 8: Access Files From Anywhere
When you have set up users or groups with proper access privileges to the shared folders, they can share their files with your Synology DiskStation from anywhere. This chapter explains the ways to access the Synology DiskStation shared folders within the Intranet or over the Internet. - Page 89 OK. 4 Click Finish. 5 Enter your user name and password for Synology DiskStation Manager and click OK. Upon completion, you can access the mapped shared folder directly in Windows Explorer. 89 Chapter 8: Access Files from Anywhere...
- Page 90 1 Choose > Connect to Server from the menu bar. 2 Type Synology DiskStation's IP address or server name (appended with .local) preceded by smb:// or afp:// in Server Address field and click Connect. (e.g. smb://EricaWang.local or afp://192.168.0.2) Note: For better performance, it is recommended that you connect to the shared folders via SMB.
-
Page 91: Access Files Via Ftp
The port range of Passive (PASV) FTP can be from 1025 to 65535. It can contain up to 128 ports. The guest account cannot log in to DiskStation via FTP. The codepage setting on the FTP client computer must be the same as that of the Synology DiskStation in order to access the data correctly. - Page 92 Synology DiskStation User's Guide Based on DSM 3.1 Advanced Settings Report external IP in PASV mode By enabling this option, the server will report its external IP to FTP clients. The reported IP will be listed in the connection log of the FTP client. This option only works when the server is behind a NAT, and with the FTP clients residing in a different subnet as the server.
-
Page 93: Access Files Via Webdav
System internal user from the drop-down menu and tick the checkboxes. 3 Click OK. Connect to Synology DiskStation Using a FTP Application Open any FTP application on your computer and enter the following information to connect to Synology DiskStation: Synology DiskStation's IP address or domain name ... -
Page 94: Access Files Via File Browser
File Browser window. Left panel: Displays Synology DiskStation's shared folders and their subfolders in the upper part, and the folders on your local computer in the lower part. Main section: Displays contents of the currently-selected folder. - Page 95 Synology DiskStation User's Guide Based on DSM 3.1 Search for Files or Folders You can filter through files or folders in the current folder. You can also perform advanced search for more refined search results. To search for files or folders in the current folder: 1 Use File Browser to go to the folder containing contents you want to search.
- Page 96 Download Files or Folders from Synology DiskStation Use any of the following methods to download files or folders from Synology DiskStation to your computer. Method 1: 1 Select the files or folders you want to download. (Press and hold Shift or Ctrl while making multiple selections.)
- Page 97 Queue. Copy or Move Files or Folders on Synology DiskStation Use any of the following methods to copy files or folders between folders on Synology DiskStation. Method 1: 1 Select the files or folders you want. (Press and hold Shift or Ctrl while making multiple selections.)
- Page 98 File Browser can extract the following archive formats: .zip, .tar, .gz, .tgz, .rar, .7z, .iso (ISO 9660 + joliet) Compress Files or Folders 1 In the main section, select the files or folders on Synology DiskStation that you want to compress. (Press and hold Shift or Ctrl while making multiple selections.) 2 Do one of the following: ...
- Page 99 Based on DSM 3.1 Open a File in a New Window Open a file on Synology DiskStation in a new tab or window of the web browser to preview it instantly. To open a file in a new window: 1 Select the file you want to preview.
- Page 100 Note: To set access privileges to shared folders, use Synology DiskStation Manager instead. See "Allow Users or Groups to Access Shared Folders" on Page 81 for more information.
- Page 101 With File Browser, you can only perform the upload action for files and folders on your computer. All the other File Browser actions and properties setting are available for files and folders on Synology DiskStation only. Edit Music Information With File Browser’s Music Information Editor, you can view or edit the information of music files.
- Page 102 Synology DiskStation User's Guide Based on DSM 3.1 View Documents, Photos, or Videos With File Browser, you can view documents, videos or photos. View Documents in Google docs 1 Browse to the folder where the document is located. 2 Right-click the document and choose View in Google docs.
- Page 103 Synology DiskStation User's Guide Based on DSM 3.1 Preview Photos 1 Browse to the folder where the photos are located. 2 Right-click any of the photos and choose Preview to open the Photo Viewer window. You should be able to view the photo now.
- Page 104 Synology DiskStation User's Guide Based on DSM 3.1 Play Videos 1 Browse to the folder where the video is located. 2 Right-click the video and choose Play to open the Video Player window. 3 The video should start playing right away. If not, please make sure you have installed VLC Player (Windows, Linux) or VLC web browser plug-in (Mac) on your local computer.
-
Page 105: Access Files Via File Station
File Station. Type Synology DiskStation's IP address or server name or domain name plus a colon and the customized port number (e.g. http://ericawang.dyndns.org:7000) in the address bar of your web browser. Press Enter (PC) or Return (Mac) on your keyboard. -
Page 106: Chapter 9: Back Up Data
Synology offers comprehensive backup solutions for your computer and Synology DiskStation. You can back up data on your computer to Synology DiskStation. If you are admin or a user belonging to the administrators group, you can also back up DiskStation data with local or network backup, or sync shared folder contents between DiskStations. - Page 107 Synology Data Replicator 3 is the next generation of Synology Data Replicator. It can only restore the data on Synology DiskStation that was backed up after Data Replicator 3 was installed. If users have backed up data on Synology DiskStation using Synology Data Replicator, we recommend restoring data on Synology DiskStation to PC first before using Synology Data Replicator 3.
-
Page 108: Back Up Data On Synology Diskstation
Ways to Back Up Synology DiskStation Data Local Backup and Network Backup are ways you can choose to back up data on your Synology DiskStation. Plus, Synology DiskStation also supports Amazon S3 Backup, allowing you to back up data to the Amazon S3 Server. - Page 109 Backup and Restore to perform backup tasks on Synology DiskStation. Before you start, do the following first: For Network Backup to another Synology DiskStation: Log in to the target Synology DiskStation, click the Network Backup Service tab and make sure...
- Page 110 Main Menu > Backup and Restore > Configuration Backup to back up and restore the settings of your Synology DiskStation, including users, groups, and shared folders. To back up system configuration: 1 Choose Back up system configuration. 2 Click OK.
-
Page 111: Sync Shared Folder Contents Between Diskstations
Synology DiskStation User's Guide Based on DSM 3.1 Sync Shared Folder Contents between DiskStations Shared Folder Sync allows you to sync shared folder contents from a source DiskStation (or "client") to a destination DiskStation (or "server") over the network. Enable Shared Folder Sync Service Before performing Shared Folder Sync, you need to enable Shared Folder Sync service on the server (destination DiskStation) before pairing the server with a client (source DiskStation). - Page 112 Synology DiskStation User's Guide Based on DSM 3.1 Manage Sync Tasks After Shared Folder Sync service is enabled on the server (destination DiskStation), you can log in to a client (source DiskStation) to perform Shared Folder Sync with the server.
-
Page 113: Backup Diskstation Data With Time Backup
Backup DiskStation Data with Time Backup Synology Time Backup is a quick and flexible way to backup and restore shared folders on DiskStation. You can back up the data locally onto another volume, or onto an external hard disk. You can set up multiple tasks and create more than one version for each task. -
Page 114: Use Usbcopy To Back Up Data On Usb Device
For more information about installing packages for Synology DiskStation Manager, see "Manage Packages" on Page 211. Use USBCopy to Back Up Data on USB Device You can copy data from a USB device to a shared folder on your Synology DiskStation using the Copy button. -
Page 115: Use Sdcopy To Back Up Data On Sd Card
Only SD cards in FAT or NTFS format are supported. The SD card must be plugged into the SD card slot on the front panel of Synology DiskStation. The available space of the destination shared folder must be larger than the used space of the SD card. -
Page 116: Chapter 10: Host Websites, Email Server, And Print Server
Server Synology DiskStation is especially designed for small and medium businesses (SMB), providing them with the ability to set up web, email, and print servers on a single Synology DiskStation without spending extra money. Use Web Station to Host Websites... - Page 117 Enable Virtual Host to Host Websites The Virtual Host support allows you to host up to 30 websites on one Synology DiskStation. Each website can have different port number or even different hostname.
- Page 118 Based on DSM 3.1 /volume1/@tmp/php Synology DiskStation users can customize the error page by creating any of the following files and putting them in the www shared folder: missing.html, missing.htm, or missing.php. When users try to connect to a page that does not exist, this customized error page will be displayed.
- Page 119 Open Source applications. For a list of featured applications tested to be compatible with Synology DiskStation, visit http://www.synology.com/support/faq_show.php?q_id=404. For the download links and installation instructions of those applications, visit their official websites.
- Page 120 Synology DiskStation User's Guide Based on DSM 3.1 Modify HTTP Service Options Click the HTTP Service Options tab at Control Panel > Services. In addition to the default port number 80, you can add another port for the use of Photo Station and Web Station.
- Page 121 Synology DiskStation User's Guide Based on DSM 3.1 Manage WebDAV Click the WebDAV tab at Main Menu > Control Panel > Web Services to enable WebDAV. By enabling WebDAV, you can manage and edit files on DiskStation remotely. To enable WebDAV: ...
- Page 122 Synology DiskStation User's Guide Based on DSM 3.1 Note: Before you start using a WebDAV client software under Windows environment, please check if you have installed Windows patch Web Folders (KB907306) When using WebDAV service under Windows environment, if you want to switch to another user account, you need to log out of Windows system first.
-
Page 123: Host Mail Server
Synology DiskStation User's Guide Based on DSM 3.1 Host Mail Server You can turn your Synology DiskStation into a mail server, allowing Synology DiskStation users to receive and deliver mail messages using their mail client programs. Before you start Register a domain name for your IP, or apply for a DDNS hostname. - Page 124 Type the following web address in the address bar of your web browser, and then press Enter on your keyboard: http://Synology_Server_IP_Address/mail/ Note: For more information about using the webmail service, see Mail Station 2 User's Guide from Synology's Download Center at: http://www.synology.com/support/download.php...
-
Page 125: Set Synology Diskstation As Print Server
If you want to print to the printer from an iOS device, tick --------- For recommended peripheral models, including hard drive, USB printer, DMA, and UPS, please visit www.synology.com. 125 Chapter 10: Host Websites, Email Server, and Print Server... - Page 126 3 Select the printer named [Printer_Name (DiskStation_Name)], and then tap Print. Note: AirPrint is available for the Network Printer mode only. --------- For recommended peripheral models, including hard drive, USB printer, DMA, and UPS, please visit www.synology.com. 126 Chapter 10: Host Websites, Email Server, and Print Server...
- Page 127 Settings button (with a gear icon) at the top-right corner. Note: Using Synology Assistant to set up print server access under the Network Printer mode is only available for DiskStations running on DSM v2.0.1-3.0368 and onward. Using Synology Assistant to set up print server access under the...
- Page 128 Synology DiskStation User's Guide Based on DSM 3.1 Release the Connection between Printer and Client Under the External Devices tab, you can release the connection between the printer and a client. When do I need to release the printer? After a client connects to the multifunctional printer to receive faxes and scan files, the connection needs to be released to allow the next client in line to connect to the printer for faxing and scanning.
-
Page 129: Chapter 11: Share Photos, Videos, And Blogs With Photo Station
C h a p t e r Share Photos, Videos, and Blogs with Chapter 11: Photo Station Photo Station is an online photo album integrated with a blog saved on your DiskStation. It makes creating albums and blogging fun and easy. This chapter explains how to do the following: ... -
Page 130: Enable Photo Station
If you have a mobile device using iPhone OS 3.0 onward or Android OS 1.5 onward, you can also download DS photo+ on Apple App Store or Android Market to access Photo Station. Note: For more information about using mobile devices to access Synology DiskStation services, see "Chapter 17: Communicate with Mobile Devices" on Page 217. Support and Limitations ... -
Page 131: Enable Personal Photo Station
Synology DiskStation User's Guide Based on DSM 3.1 Browser requirement: JavaScript enabled Microsoft Internet Explorer requirement: ActiveX controls and plug-ins and Active scripting enabled Upload limit: If you upload contents with Photo Station, you can only upload up to 2GB of contents at a time. -
Page 132: Manage Photo Station User Accounts
Select Settings at the top of Photo Station's homepage, and then select the User Accounts tab on the Synology Photo Station 4 Settings page to add and edit Photo Station user accounts. To add a new account: 1 Click Create and enter the username, description, and password. -
Page 133: Create Albums
Upload Albums Using Photo Uploader (Synology Assistant) You can upload your albums to Synology DiskStation using Photo Uploader, one of the several functions of Synology Assistant. - Page 134 Select the photos and videos on your computer, and put them in a folder that will become your new album. To upload within the Intranet: If your computer and Synology DiskStation are within the same Intranet, you can upload the album via the file sharing protocols for your platform.
-
Page 135: Manage Albums
Synology DiskStation User's Guide Based on DSM 3.1 Manage Albums Manage your albums with the upload, delete, download, and reorder functions. Edit the titles, descriptions, and access privileges according to your need. You can also enable virtual albums in Photo Station. - Page 136 Synology DiskStation User's Guide Based on DSM 3.1 2 Click Upload in the album information to select and upload photos and videos to the album. (If you cannot see the button, click the tiny downward triangle in the top-right corner to reveal the album information. The...
- Page 137 You can set the new album as by default from Synology DiskStation Manager. The second tier public albums within the new album will inherit the same attributes from the first tier albums. See "...
- Page 138 Synology DiskStation User's Guide Based on DSM 3.1 Enable Virtual Album Photo Station allows you to display the most recent photos and videos in virtual albums, which will be listed in front of all the other albums on the Photos page.
-
Page 139: View And Edit Photos And Videos
Synology DiskStation User's Guide Based on DSM 3.1 View and Edit Photos and Videos After the album is created, you can connect to Photo Station and enter the Photos page, where you can see the albums you uploaded. Click the thumbnail of your album to see the thumbnails of all the photos and videos within the album. -
Page 140: Customize Album Layout
Synology DiskStation User's Guide Based on DSM 3.1 To add comments to photo or video: Click Add Comments below the photo, and follow onscreen instructions to add comments to the photos. Customize Album Layout You can customize the album layout and photo thumbnails. -
Page 141: Use The Blog
Synology DiskStation User's Guide Based on DSM 3.1 Use the Blog The administrator can post blogs on Photo Station now. Moreover, you can also personalize your blog space by adjusting the layout and modules. Log in to Photo Station, and select Blog at the top of Photo Station's homepage to start editing your blog. - Page 142 Synology DiskStation User's Guide Based on DSM 3.1 To edit basic blog settings: Double-click the item or click Customize on the right side. To edit module settings: Choose a module from the drop-down menu, and click Customize. You can add your personal information here, or a slideshow of one of your photo albums, or links to your friends' sites.
-
Page 143: Chapter 12: Play Music With Audio Station
Chapter 12: Audio Station is a web-based audio application, allowing you to access the music library on your Synology DiskStation, choose available audio sources on the local area network, and add your favorite music to playlists for playback. With Audio Station, you can also browse and play songs on your iPod or on the DLNA-certified Digital Media Servers, and listen to Internet radio. -
Page 144: Enable Audio Station
Synology DiskStation User's Guide Based on DSM 3.1 Enable Audio Station Go to Main Menu > Control Panel > Audio Station to enable Audio Station. After it is enabled, the music shared folder will be created automatically to contain your Audio Station data. -
Page 145: Choose Audio Source
On the left section of Audio Station are several audio sources you can choose from for playback on Audio Station. Library The library contains music in the music shared folders of your Synology DiskStation, which will be organized into the following categories. To browse your music library, do any of the following: Click All Music to browse all music in the music shared folder. -
Page 146: Media Server
If there is an iPod classic connected to the USB port of your DiskStation, you can click the disclosure triangle next to iPod to see the iPod connected to the USB port on Synology DiskStation. To refresh iPod contents: Select Refresh to update the iPod contents. -
Page 147: Organize Your Music
If you see unreadable song titles, album names, or artist names while browsing through your music, go to Synology DiskStation Manager to set the correct codepage that matches the language of your computer, and then re- index your music. See "Language" on Page 36 and "Enable Audio Station" on Page 144 for more information. -
Page 148: Edit Music Information
Synology DiskStation User's Guide Based on DSM 3.1 Click any of the path names to the right of the icon to go back to a previous directory. Search Music You can use the search field above the music player section of Audio Station to search your music. -
Page 149: Work With Playlist
Synology DiskStation User's Guide Based on DSM 3.1 Display Additional Attributes You can display additional attributes of your music to show them in new columns of the main section. To display additional attributes: 1 Hover the pointer over any column header of the main section, and click the downward arrow that appears to the right of the header. -
Page 150: Play Music
Synology DiskStation User's Guide Based on DSM 3.1 Note: You cannot add folders to playlists. You can also add songs from the queue to a new playlist. See "About the Output Modes and the Queue Panel" on Page 151 for more information. - Page 151 Mode: Stream music to your computer for playback via the speakers of your computer. Mode: Play music via the USB speakers connected to the USB port of your Synology DiskStation, or via external speakers or home stereo equipment connected to the audio dock of Synology Remote (sold separately).
- Page 152 Synology DiskStation User's Guide Based on DSM 3.1 To add a playlist to the queue and replace the existing songs in the queue: Right-click the playlist and choose Play. Audio Station will play the songs in the playlist immediately. To append a playlist to the queue without replacing the existing songs in the queue:...
- Page 153 Synology DiskStation User's Guide Based on DSM 3.1 To skip to any point in the currently playing song: Drag the playhead along the timeline (below the song's duration) to any point you want. To customize sound frequencies with equalizer (USB mode only): Click the button to open the equalizer, tick the checkbox, and choose a preset from the drop-down menu.
-
Page 154: Download Music
Synology DiskStation User's Guide Based on DSM 3.1 To enable transcoder: 1 Go to Settings > Transcoder. 2 Tick Enable transcoders and choose any of the following: Transcode to WAV format: WAV format is supported on specific browsers only. (Firefox 3.5 and above, Safari 5, Opera 10.60) -
Page 155: Chapter 13: Download Files With Download Station
C h a p t e r Download Files with Download Station Chapter 13: Download Station is a web-based download application, allowing you to download files from the Internet to your DiskStation. This chapter explains how to enable Download Station and manage download tasks. Enable Download Station Go to Main Menu... -
Page 156: Set Up Bt/Http/Ftp/Nzb
Synology DiskStation User's Guide Based on DSM 3.1 To connect to Download Station, do any of the following: Click Launch Download Station. Go to Main Menu > Download Station. To go to the BT/HTTP/FTP/NZB or eMule section of Download Station:... - Page 157 Synology DiskStation User's Guide Based on DSM 3.1 Download Schedule You can limit BT/HTTP/FTP/NZB's download tasks to certain time period of a week and alternative speeds, so that you can free up more network bandwidth when needed. To set advanced schedule:...
-
Page 158: Torrent Search
Synology DiskStation User's Guide Based on DSM 3.1 Premium Account There are many online file sharing websites, where registered users can upload files and share the download links to the files with other people. If you have a premium membership for such websites, you can use Download Station to directly download their files without entering user credentials for each download task. -
Page 159: Create Bt/Http/Ftp/Nzb Download Tasks
Synology DiskStation User's Guide Based on DSM 3.1 FTP / HTTP In this section, you can set the number of simultaneous connections to one FTP server, and limit the maximum download rate of each FTP task. Download Station allows you to download files via a news server. The news server information must be assigned before downloading NZB files. -
Page 160: Create By Uploading Files
Synology DiskStation User's Guide Based on DSM 3.1 Create by Uploading Files You can create download tasks by uploading the following files from your local computer to Download Station: Torrent (.torrent) contains information for downloading files being shared over the BitTorrent network. - Page 161 Synology DiskStation User's Guide Based on DSM 3.1 Create via Torrent Search You can search for torrent files with BitTorrent search engines to help you find your favorite downloads more easily. Note: Before you use the Search function, make sure you have enabled at least one search engine at Setting >...
- Page 162 Synology DiskStation User's Guide Based on DSM 3.1 Create Download Tasks for RSS Feeds You can use Download Station to download RSS feeds. More Information What is RSS? RSS (Really Simple Syndication, also known as RSS feed) is an alternative way of web browsing. Web publishers often use RSS feeds to publish frequently-updated works, such as blog entries, news headlines, podcasts, photo albums, or audio/video clips.
- Page 163 Synology DiskStation User's Guide Based on DSM 3.1 5 Select the RSS file and view the list of its RSS feeds under the RSS Feeds tab. 6 Click Update above the file list to update the list of RSS feeds for the selected RSS file, or click Update All update the lists of RSS feeds for all RSS files in the file list.
- Page 164 Synology DiskStation User's Guide Based on DSM 3.1 To create download tasks by setting download filter: 1 Click RSS Feeds on the left panel, and then select the RSS file containing feeds you want to download. 2 Under the Download Filter tab, click Add.
-
Page 165: Manage Bt/Http/Ftp/Nzb Download Tasks
Synology DiskStation User's Guide Based on DSM 3.1 Manage BT/HTTP/FTP/NZB Download Tasks You can check and manage the download tasks you just created. View BitTorrent/HTTP/FTP/NZB Tasks Click any of the following on the left panel to view BitTorrent/HTTP/FTP/NZB tasks: ... - Page 166 Synology DiskStation User's Guide Based on DSM 3.1 To edit download tasks: 1 Click Edit to customize the general settings (auto stop task, maximum upload/download rate, maximum peers allowed per torrent) and tracker lists for the current task. 2 Click OK.
-
Page 167: Set Up Emule
Synology DiskStation User's Guide Based on DSM 3.1 Set up eMule Click the BT/HTTP/FTP/NZB tab at the bottom of Download Station, and click the gear icon next to the search field at the top of Download Station to manage the following settings of eMule. - Page 168 Synology DiskStation User's Guide Based on DSM 3.1 Connection In this section, you can set up connection for eMule downloads. Location In this section, you can set the default destination folder for eMule, and share your files on the ED2K network.
-
Page 169: Connect To Ed2K Server/Kad
Synology DiskStation User's Guide Based on DSM 3.1 Bandwidth In this section, you can set upload and download rates and download schedule to limit download and upload bandwidths. To set upload and download rates: Enter the maximum upload and download rate for eMule downloads and uploads. ("0" means unlimited.) To set the download schedule: Like BT/HTTP/FTP/NZB’s download schedule, eMule’s download schedule is set up in the same manner. -
Page 170: Create Emule Download Tasks
Synology DiskStation User's Guide Based on DSM 3.1 Update server.met from URL: Enter the URL of the server.met file (e.g. http://www.synology.com/server.met). 3 Click Add. To delete ED2K servers: Select the servers from the list and click the Delete button. - Page 171 Synology DiskStation User's Guide Based on DSM 3.1 Create by Uploading Files You can create download tasks by uploading a text file (.txt) containing ED2K links from your local computer to Download Station: To create download tasks by uploading a file:...
- Page 172 Synology DiskStation User's Guide Based on DSM 3.1 Create by Entering URLs You can create download tasks by entering URLs. To create download tasks by entering URLs: 1 Click Create. 2 In the window that appears, choose Enter URL, and enter the URLs of the file you want to download. You can enter up to 20 URLs in the box.
- Page 173 Synology DiskStation User's Guide Based on DSM 3.1 To create download tasks via general search: 1 Enter a keyword in the search field at the top-left corner of eMule, select a file type and search method. Press "Enter" on your keyboard to start searching. Click Start/Stop search to stop searching.
-
Page 174: Manage Emule Download Tasks
Synology DiskStation User's Guide Based on DSM 3.1 Manage eMule Download Tasks You can check the download tasks you just created, and manage the tasks with eMule. Manage Download Queue Click Download Queue on the left panel to manage the download tasks. - Page 175 Synology DiskStation User's Guide Based on DSM 3.1 To edit download tasks: 1 Click Edit to edit the priority and change destination folder for the task. Note: To change the default destination folders for all download tasks, see "Location" on Page 168.
-
Page 176: Chapter 14: Safeguard Your Environment With Surveillance Station
Surveillance Station. Type Synology DiskStation's IP address or server name or domain name plus a colon and the customized port number (e.g. http://ericawang.dyndns.org:9900) in the address bar of your web browser. Press Enter (Windows) or Return (Mac) on your keyboard. -
Page 177: Manage Ip Cameras
Synology DiskStation User's Guide Based on DSM 3.1 Manage IP Cameras Go to Device > Camera under Management to add and edit cameras, set up recording schedule, and set up the guard settings. Add a Camera 1 Click Add. 2 Choose... - Page 178 Synology DiskStation User's Guide Based on DSM 3.1 c Change the port number if the camera is using another port. d Select the camera brand from the drop-down menu. e Select the camera model from the drop-down menu. f Select the video channel from the drop-down menu if the camera device is a video server.
- Page 179 Synology DiskStation User's Guide Based on DSM 3.1 Edit Camera and Recording Settings To edit camera settings: 1 Choose the camera you want to change settings, and click Edit > Settings. Or you can double-click the camera to change its settings.
- Page 180 Synology DiskStation User's Guide Based on DSM 3.1 8 Click Apply to apply the settings into camera or Surveillance Station. You can preview the changes in the screen on the right. 9 Click Close to finish. Note: 1 The level of sensitivity determines whether a camera is quick to respond to slight motion and start recording. You can reach this by setting a high value for detection sensitivity, and a low value on threshold, object size, and trigger percentage.
- Page 181 Synology DiskStation User's Guide Based on DSM 3.1 To enable cameras: Choose the cameras you want to enable (press and hold Shift or Ctrl while making multiple selections), and click Enable in the Enable drop-down menu. Export or Import Camera Configuration You can export cameras' settings to a configuration folder, and import the configuration at a later time.
-
Page 182: Watch Live View
Synology DiskStation User's Guide Based on DSM 3.1 Watch Live View Live View page displays real-time videos of all configured cameras. With Surveillance Station, you can perform various functions, from the basic PTZ (Pan/Tilt/Zoom) and snapshot features to the e-map and manual recording functions. - Page 183 Synology DiskStation User's Guide Based on DSM 3.1 Configure Layout The administrator can configure layout setting using Internet Explorer. To customize how the live view will be displayed, click on Configure and follow the steps below: a new layout or click on an existing layout to edit.
- Page 184 Synology DiskStation User's Guide Based on DSM 3.1 4 Select a type of layout. If you have selected sequential layout, You can adjust the speed of camera rotation at Interval drop-down menu. 5 Drag cameras from the camera list to the preferred layout position, or drag cameras back to the camera list to remove them from the layout.
-
Page 185: Play And Manage Events
Synology DiskStation User's Guide Based on DSM 3.1 4 Click on Show information, and the status for each camera will be displayed on the corner of each live view window. 5 To save the current image, click on the Snapshot button. - Page 186 Synology DiskStation User's Guide Based on DSM 3.1 Play Events with Timeline Click the Timeline tab to see the timeline page, which offers the Multiple-Event Playback function allowing you to simultaneously watch events recorded on one day or at the same time by different cameras. All event videos are lined up in the timeline.
- Page 187 Synology DiskStation User's Guide Based on DSM 3.1 2 In the non-sync mode, click the Previous button or Next button on the Controller panel to go to the previous or next event. 3 To take a snapshot, you can pause the player, and then click the Snapshot button to save the image.
- Page 188 Synology DiskStation User's Guide Based on DSM 3.1 Focus Lost: Search for the time points when the camera focus is lost and unable to effectively monitor the environment. b Choose a sensitivity level from the Sensitivity drop-down menu. c Choose a search interval from the...
- Page 189 Synology DiskStation User's Guide Based on DSM 3.1 Edit Events Go to Event > Event List under Management to edit your events. To play an event with the Event Player: Choose the event you want to play, and click Play. Or you can double-click the event to activate the Event Player.
- Page 190 Synology DiskStation User's Guide Based on DSM 3.1 You can lock the events to avoid them being deleted by the archive rotation mechanism or the delete button. To lock events, choose the event(s) you want to lock , and click...
- Page 191 Synology DiskStation User's Guide Based on DSM 3.1 To export an archive: 1 Click Add. 2 Name the archive and select a destination. Click Next. 3 Select the cameras which events are to be exported. Click Next. 4 Select the date and time range of the events to be exported. Click Finish to export.
-
Page 192: Use E-Map
Synology DiskStation User's Guide Based on DSM 3.1 Use E-Map You can add, edit, and delete E-Maps at System > E-Map under Management. To add an E-Map: 1 Click Add. 2 Name the E-Map. 3 Click Browse to locate the image file and upload the file. -
Page 193: Receive Email Or Sms Notification
Synology DiskStation User's Guide Based on DSM 3.1 Note: The recommended image dimension is 480 x 320. Any Image with larger dimension will be resized to fit in the dimension, with its aspect ratio maintained. Supported image formats: BMP, JPG, JPEG, GIF, PNG... -
Page 194: Manage Advanced Settings
Synology DiskStation User's Guide Based on DSM 3.1 Manage Advanced Settings Go to System > Advanced under Management to manage the advanced settings for Surveillance Station. Initial Page Setting You can choose from the drop-down menu to set the initial page after logging in to Surveillance Station. - Page 195 Synology DiskStation User's Guide Based on DSM 3.1 3 Name your client, enter its IP address, port number, and authentication key (5000 by default), and then click Test Client. 4 If the values are correct, a dialog will appear to tell you the connection is successful. Click to close the dialog.
-
Page 196: View Log
Synology DiskStation User's Guide Based on DSM 3.1 View Log Go to System > under Management to see critical events such as camera disconnection or changes on the camera settings. You can view the logs and manually delete/save the log for further use. -
Page 197: Assign Privilege
Go to System > Privilege under Management to assign the privileges for Synology DiskStation users. Admin has full authority on Surveillance Station and can assign different privileges to local users on DiskStation. Manager can manage all functions except license management. Spectator can only watch live view and event playback but cannot edit camera settings. -
Page 198: About Camera License
VisualStation from Synology DiskStation. With VisualStation, you can see the live view of the cameras on a TV set or LCD monitor directly without using a computer. A VisualStation can only be managed by a DiskStation within LAN. - Page 199 Synology DiskStation User's Guide Based on DSM 3.1 To add a VisualStation: 1 Click on the button. 2 The search result will show all the VisualStations within the network. Select the VisualStation that you would like to pair. Make sure the status of the VisualStation is Unlocked.
-
Page 200: Chapter 15: Manage Media Server And Itunes Service
Windows Media Player or iTunes) and DLNA/UPnP home devices (such as stereo system or TV set) to play its multimedia contents. This chapter explains how to stream multimedia contents from Synology DiskStation to your computer or other DLNA/UPnP home devices. - Page 201 Synology DiskStation with your DMA device. The process will be executed in the background. Record Diagnostic Log The log can help determine the cause of the problem when you contact Synology Support for assistance. To manage DMA communication log:...
- Page 202 Synology DiskStation User's Guide Based on DSM 3.1 Manage Browsing Settings In the Browsing Settings section, you can manage the browsing settings for DMA. To quickly browse images: Tick Transmit low resolution images instead of the original images. To change how your music files will be displayed:...
- Page 203 Play Multimedia Contents with DMA Devices Synology DiskStation can pair up perfectly with Sony PS3, Xbox 360, and many other DMA devices. You can use those devices to browse and stream multimedia contents from your DiskStation to your stereo system and TV set.
-
Page 204: Manage Itunes Service
After it is enabled, all iTunes clients on the same local area network can browse and play songs or videos on your Synology DiskStation. The following shared folders will be accessed by iTunes clients: ... - Page 205 Click Re-index to reconstruct the index structure of the audio files if you find missing files while browsing through Synology DiskStation with iTunes. The process will be executed in the background. 205 Chapter 15: Manage Media Server and iTunes Service...
-
Page 206: Chapter 16: Perform Advanced Management Tasks
Network: You can see the MAC address, IP address, and the other network information of your Synology DiskStation here. Time: You can see the time setting of your Synology DiskStation here, including time server and time zone. To set up your time server, see "Set Up Time" on Page 37. - Page 207 Synology DiskStation User's Guide Based on DSM 3.1 Network You can view the status of network configuration and network interfaces. The network status includes the following: Basic information: See the basic information of your DiskStation’s network configuration. [Interface Name]: See the detailed information of the network interface(s) currently configured on your DiskStation.
- Page 208 Synology DiskStation User's Guide Based on DSM 3.1 The hard drive status might be any of the following: Normal: System partition and volume are available for use on the hard drive. Initialized: System partition is established, but no volume has been created.
-
Page 209: Monitor System Resources
Synology DiskStation User's Guide Based on DSM 3.1 Monitor System Resources Go to Information > Resource Monitor to monitor system resources. When you launch Resource Monitor, it will start to collect and display data. The data will be deleted when you quit the application. -
Page 210: Update Dsm
To check if the latest DSM is available for download: When you go to this page, the system will check with Synology Website for any updates. The check results (shown in the... -
Page 211: Manage Packages
Make sure your DiskStation is connected to the Internet. Synology's download server might be busy at the moment. Retrying download at a later time might solve the problem. If the problem remains, please contact Synology's Technical Support. -
Page 212: Receive Event Notification
Control Panel > Notification and set up Synology DiskStation to notify you via Email or text messages whenever an important event occurs (for example, status change, system error, lost connection, fan behavior change, or storage volume running out of space). -
Page 213: Receive Sms Notification
Synology DiskStation User's Guide Based on DSM 3.1 5 Enter the email address that will receive the notification mails in the Primary email or the Secondary email field. 6 Click Send a test email to see if your email settings are set up properly. -
Page 214: Reset Admin's Password
To reset admin's password: Press and hold the RESET button on the back panel of your Synology DiskStation for 4 seconds until you heard a beep sound. Note: Other than resetting administrator's password, using the... -
Page 215: Reinstall Synology Diskstation
4 seconds until the Synology DiskStation emits a beep sound. 3 Run Synology Assistant and follow the installation instructions in the Quick Installation Guide that came with your installation CD to set up the Synology DiskStation. Important: The data saved on the Synology DiskStation will not be erased during the reinstallation. -
Page 216: Enable Terminal Services
SSH service is disabled. 2 Click OK. Important: Use the Terminal service with caution. Improper manipulation or modification to Synology DiskStation may result in system malfunction or data loss. 216 Chapter 16: Perform Advanced Management Tasks... -
Page 217: Chapter 17: Communicate With Mobile Devices
Synology DiskStation using iOS/Android devices or other mobile devices. Use iOS and Android Apps The 4 Apps designed by Synology are now available on Apple's App Store or Android’s Market, allowing you to communicate with Synology DiskStation wherever Wi-Fi access is available. You can manage your DiskStation files, music, photo and video albums, and even the surveillance videos on the go. -
Page 218: Use Other Mobile Devices
Symbian OS 9.1 (with S60 3rd Edition or later), or iPhone OS 2.3.1 or later, you can use the device to log in to Synology DiskStation to view photos with Mobile Photo Station and read supported file formats with Mobile File Station around the world where Internet access is available. -
Page 219: 1-Bay Models
A p p e n d i x Synology DiskStation Specifications Appendix A: For the most recent product specification, please visit www.synology.com. 1-Bay Models Item DS110j DS110+ DS111 Internal HDD 3.5 SATA (II) x 1 3.5 SATA (II) x 1 3.5 SATA (II) x 1... -
Page 220: 2-Bay Models
Max. Supported IP Cameras ‧EXT4‧EXT3‧FAT (External Disk, Read/Write) ‧NTFS (External Disk, Read/Write) File System ‧Basic ‧JBOD‧RAID 0‧RAID 1 Volume Type Agency ‧FCC Class B ‧CE Class B ‧BSMI Class B Certifications HDD Hibernation Event Notification 220 Appendix A: Synology DiskStation Specifications... -
Page 221: 4-Bay Models
457.5 Weight (Kg) 2.23 0.66 2.23 2.23 9.68 ‧Windows 2000 onward ‧Mac OS X 10.3 onward Supported Clients ‧Ubuntu 9.04 onward Max. User 2048 2048 1024 2048 2048 2048 2048 Accounts Max. Group Accounts 221 Appendix A: Synology DiskStation Specifications... -
Page 222: 5-Bay Models
15TB Max. Capacity (5 x 3TB hard drives) Hot Swappable HDD USB x 4 External HDD Interface eSATA x 2 LAN Port Gigabit x 2 USBCopy System Fan (mm) x 2 (80 x 80) 222 Appendix A: Synology DiskStation Specifications... -
Page 223: 10-Bay Models
‧Relative Humidity: 5% to 95% RH ‧Maximum Operating Altitude: 10000 feet (3048m) 10-Bay Models Item RS2211+ RS2211RP+ Internal HDD SATA (II) x 10 30TB Max. Capacity (10 x 3TB hard drives) Hot Swappable HDD 223 Appendix A: Synology DiskStation Specifications... - Page 224 ‧Frequency: 50/60Hz Power Consumption and ‧Operating Temperature: 40 to 95˚F (5 to 35˚C) Environment ‧Storage Temperature: 15 to 155˚F (-10 to 70˚C) Requirements ‧Relative Humidity: 5% to 95% RH ‧Maximum Operating Altitude: 10000 feet (3048m) 224 Appendix A: Synology DiskStation Specifications...
-
Page 225: Limitations
Some digital cameras are defined as a Still Image Device, such as Canon. For such devices, Synology DiskStation only supports USBCopy function (No USB share function). For Mac users, Synology DiskStation only supports USB printers with PostScript. 225 Appendix A: Synology DiskStation Specifications... -
Page 226: Appendix B: Led Indication Tables
A p p e n d i x LED Indication Tables Appendix B: 1-Bay Models LED Indication Color Status Description Static Volume normal Green HDD Hibernation Available volume space < 1GB STATUS Static Available volume space < 1 % Orange Volume degraded or crashed Blinking No volume... -
Page 227: 2-Bay Models
Booting up or Power Blue Blinking Shutting down Power off --------- DS211+ only. USBCopy or SDCopy is supported on specific models only. See "Appendix A: Synology DiskStation Specifications" on Page 219 for more information. 227 Appendix B: LED Indication Tables... - Page 228 Synology DiskStation User's Guide Based on DSM 3.1 DS710+ LED Indication Color Status Description Static Volume Normal Green HDD Hibernation Available volume space < 1GB STATUS Static Available volume space < 1 % Orange Volume degraded or crashed Blinking No volume...
-
Page 229: 4-Bay Models
Synology DiskStation User's Guide Based on DSM 3.1 4-Bay Models DiskStations LED Indication Color Status Description Static Volume Normal Green HDD Hibernation Available volume space < 1GB STATUS Static Available volume space < 1 % Orange Volume degraded or crashed... - Page 230 Synology DiskStation User's Guide Based on DSM 3.1 RackStations LED Indication Color Status Description Static Volume Normal Green HDD Hibernation Available volume space < 1GB STATUS Static Available volume space < 1 % Orange Volume degraded or crashed Blinking No volume...
-
Page 231: 5-Bay Models
Synology DiskStation User's Guide Based on DSM 3.1 5-Bay Models DS1511+ LED Indication Color Status Description Static Volume Normal Green HDD Hibernation Available volume space < 1GB STATUS Static Available volume space < 1 % Orange Volume degraded or crashed... - Page 232 Synology DiskStation User's Guide Based on DSM 3.1 LED Indication Color Status Description Static 10/100M Link Orange Blinking Network is active Network is down Static Disk ready Hard drive Status Green Blinking Disk is being accessed Indicator No internal disk...
-
Page 233: Troubleshooting
Troubleshooting For any questions about managing your Synology DiskStation, go to Main Menu > DSM Help or click the Help button (with a question mark) at the top-right corner of every window. For any questions other than that, please visit Synology Inc. website www.synology.com... - Page 234 IMPORTANT–READ CAREFULLY: THIS END USER LICENSE AGREEMENT ("EULA") IS A LEGAL AGREEMENT BETWEEN YOU (EITHER AN INDIVIDUAL OR A SINGLE ENTITY) AND SYNOLOGY, INC. AND ITS AFFILIATES, INCLUDING SYNOLOGY AMERICAN CORP, (COLLECTIVELY, "SYNOLOGY") FOR ANY SYNOLOGY SOFTWARE, TOGETHER WITH ANY OTHER ASSOCIATED FIRMWARE, MEDIA, PRINTED MATERIALS AND "ONLINE" OR...
- Page 235 Section 16. Termination. Without prejudice to any other threatened breach of any provision of this EULA relating to rights, Synology may terminate this EULA if you do not abide Synology's intellectual property rights. by the terms and conditions contained herein. In such event, you must cease use of the Software and destroy all copies of Section 20.
- Page 236 SYNOLOGY, INC. LIMITED PRODUCT WARRANTY THIS LIMITED WARRANTY ("WARRANTY") APPLIES TO THE PRODUCTS (AS DEFINED BELOW) OF SYNOLOGY, INC. AND ITS AFFILIATES, INCLUDING SYNOLOGY AMERICA CORP, (COLLECTIVELY, "SYNOLOGY"). YOU ACCEPT AND AGREE TO BE BOUND BY THE TERMS OF THIS WARRANTY BY OPENING THE PACKAGE CONTAINING AND/OR USING THE PRODUCT.
- Page 237 Software and documentation provided with WARRANTY ARE EXCLUSIVE AND IN SUBSTITUTION the Product include proprietary and intellectual property FOR, AND CUSTOMER HEREBY WAIVES, RELEASES rights of Synology and its third party suppliers and licensors. DISCLAIMS, OTHER WARRANTIES, Synology retains and reserves all right, title, and interest in...
- Page 238 Nothing in this Section shall be deemed to prohibit or restrict between Synology and Customer related to the subject matter Synology from seeking injunctive relief or seeking such other hereof. No amendment, modification or waiver of any of the...
Need help?
Do you have a question about the DiskStation DS111 and is the answer not in the manual?
Questions and answers