
Summary of Contents for Quicklynks T55
- Page 1 OWNER’S MANUAL FASTER & EASIER FOR 1996 NEWER OBD II VEHICLES DIGITAL OBD2/CAN CAR SCANNER...
-
Page 3: Table Of Contents
OWNER S MANUAL CHECK Table of contents 1. Introduction --------------------------------------------------------------------------------------2 1.1 What Is OBD? ---------------------------------------------------------------------------------2 1.2 Safety Precautions and Warnings-----------------------------------------------------2 1.3 Vehicle Coverage----------------------------------------------------------------------------3 1.4 Data Link Connector (DLC) Location------------------------------------------------4 1.5 How To Use------------------------------------------------------------------------------------4 2. Product Information -------------------------------------------------------------------------5 2.1 Tool descri ption -----------------------------------------------------------------------------5 2.2 Specifications --------------------------------------------------------------------------------6 2.3 Accessories included ---------------------------------------------------------------------6 2.4 Navigation characters --------------------------------------------------------------------6... -
Page 4: Introduction
OWNER S MANUAL CHECK 1. Introduction 1.1 What Is OBD? Definition: Onboard Diagnostics II - A second-generation emissions diagnostic system required on all 1996 and newer vehicles (though some 1994 and 1995 model year vehicles were equipped with early versions of the system). This OBD2/EOBD/CAN Code scanner is designed to work on all OBD2 compliant vehicles (include all 1996 and newer cars, lig ht trucks and SUVs sold in the World). -
Page 5: Vehicle Coverage
OWNER S MANUAL CHECK Always perform automotive testing in a safe environment. Wear safety eye protection that meets ANSI standards. Keep clothing, hair, hands, tools, test equi pment, etc. away from all moving or hot engine parts. Operate the vehicle in a well ventilated work area: Exhaust gases are poisonous. -
Page 6: Data Link Connector (Dlc) Location
OWNER S MANUAL CHECK 1.4 Data Link Connector (DLC) Location The 16-pin DLC is usually located under the instrument panel (dash), within 12 inches(300 mm) of center of the panel, on the driver's side of most vehicles. It should be easily accessible and visible from a kneeling position outside the vehicle with the door open. -
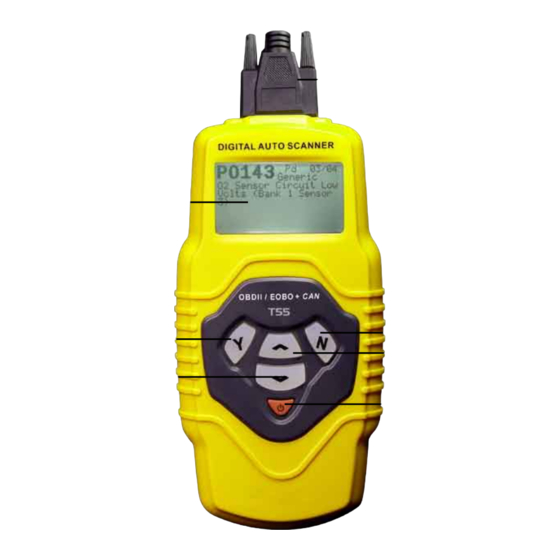
Page 7: Product Information
OWNER S MANUAL CHECK 2.Product Information 2.1 Tool Description 1. LCD DISPLAY --—Indicates test results. Backlit, 128 X 64 pixel display with contrast adjustment. 2. "Y" BUTTON -- Confirms a selection (or action) from a menu. When a DTCs definition covers more than one screen.it is used to move down to the next screen for additional data. -
Page 8: Specifications
OWNER S MANUAL CHECK UP SCROLL BUTTON -- Moves up throug h menu and submenu items in menu mode. When more than one DTC is retrieved, moves up throug h the current screen to the previous screens for additional DTCs and definitions. DOWN SCROLL BUTTON -- Moves down throug h menu and submenu items in menu mode. -
Page 9: Keyboard
OWNER S MANUAL CHECK 3). " "”-- A flashing UP Arrow indicates additional information is available on the previous screen. 4). " Pd " -- Identifying a Pending DTC when viewing DTCs. 2.5 Keyboard No solvents such as alcohol are allowed to clean the keypad or display. Use a mild nonabrasive detergent and a soft cotton cloth. - Page 10 OWNER S MANUAL CHECK 2). From the Main Menu: Use the UP/DOWN scroll buttons to select System Setup and then press the Y button. Follow the instructions to make adjustments and settings as described in the following setup options. Main Menu ====================== 1) VW/AUDI 2) OBDII/EOBD...
-
Page 11: Display Test
OWNER S MANUAL CHECK 3). Press the Y button to save your selection and return to previous menu. 4). Press the N button to return to previous menu. Display Test The Display Test is used to check the LCD display. 1). -
Page 12: Operating Instructions
OWNER S MANUAL CHECK System Setup ====================== 1) Contrast 2) Display Test 3) Keyboard Test 2). Press any key to start test. When you press a key, the key name should be observed on the display. If the name does not show up, then the key is not functioning properly. -
Page 13: Main Menu
OWNER S MANUAL CHECK 5). Press the Y button. The Main Menu will be observed on the Display. 6). Use the UP/DOWN scroll buttons to select VW/AUDI from the menu and press the Y button. Main Menu ==================== 1) VW/AUDI 2) OBDII/EOBD 3) Oil Reset 4) System Setup... - Page 14 OWNER S MANUAL CHECK The numbers (01.02.15.03.08.etc) in front of the system names refer to the physical addresses assigned to the systems, not the sequence of the systems to be arranged. 8). Select Read Codes from the Select Function menu and press the Y button.
-
Page 15: Erasing Codes
OWNER S MANUAL CHECK Erasing Codes CAUTION:Erasing the Diagnostic Trouble Codes may allow the scan tool to delete not only the codes from the vehicle's on—board computer, but also " Freeze Frame " data and manufacturer specific enhanced data. Further, the I/M Readiness Monitor Status for all vehicle monitors is reset to Fail status.Do not erase the codes before the system has been checked completely by a technician. -
Page 16: Readiness Test
OWNER S MANUAL CHECK 6). If the codes are not cleared then an "ERASE FAILURE!" message will appear. Press the N button to return to previous menu. Viewing ECU Information 1). To view ECU Information.Use the UP/DOWN scroll buttons to select ECU Information from the Select Function menu and press the Y button. - Page 17 OWNER S MANUAL CHECK " Pass " --- Indicates that a particular monitor being checked has not compl- eted its diagnostic testing. " Fail " --- Indicates that a particular monitor being checked has not comple- ted its diagnostic testing or the monitor is not supported on that vehicle. 3).
-
Page 18: Obdii/Eobd Diagnostics
OWNER S MANUAL CHECK 3.2 OBDII/EOBD Diagnostics Reading Codes CAUTION: Don't connect or disconnect any test equi pment with ignition on or engine running. I). Turn the ignition off. 2). Locate the vehicle's 16 pin Data Link connector(DLC). 3). Plug into the scan tool cable connector to the vehicle DLC. 4). - Page 19 OWNER S MANUAL CHECK 9). Use the UP/DOWN scroll buttons to select Read Codes from the menu and press the Y button. OBDII/EOBD Diag. ======================== 1) Read Codes 2) Erase Codes If there are no Diagnostic Trouble Codes present, the display will indicate NO CODES ARE STORED IN THE MODULE! ”...
- Page 20 OWNER S MANUAL CHECK 10). If more than are DTC is found, use the UP/DOWN scroll buttons, as necessary, until all the codes have been shown up. Erasing Codes 1). If you decide to erase the DTCs, use the UP/DWON scroll buttons to select Erase Codes from the OBDII/EOBD Diag.
-
Page 21: Oil Reset
OWNER S MANUAL CHECK 3.3 Oil Reset 1). Turn the ignition off. 2). Locate the vehicle's 16-pin Data Link Connector(DLC). 3). Plug into the scan tool cable connector to the vehicle's DLC. 4). Turn the ignition on. But do not start the engine. 5). -
Page 22: Warranty And Service
OWNER S MANUAL CHECK 9). If the Service Reset Failed message appears then there mig ht be problems for the scan tool to communicate with the vehicle being tested. Refer to the vehicle service manual for more information. 10). When done, turn off the ignition and disconnect the scan tool. 4. - Page 24 OWNER’S MANUAL FASTER & EASIER FOR 1996 NEWER OBD II VEHICLES DIGITAL OBD2/CAN CAR SCANNER...
Need help?
Do you have a question about the T55 and is the answer not in the manual?
Questions and answers
Tarvitsen ohjekirjan Suomenkielellä, OBD2 T55