Table of Contents
Advertisement
Advertisement
Table of Contents

Related Manuals for SPL Auditor 2910


Summary of Contents for SPL Auditor 2910
- Page 1 Manual Auditor Model 2910 120 volts headphone amplifier...
- Page 2 This document is the property of SPL and may not be copied or reproduced in any manner, in part or fully, without prior authorization by SPL.
-
Page 3: Table Of Contents
Content Symbols & Notes ............4 Scope of Delivery &... -
Page 4: Symbols & Notes
Attention Do not attempt any alterations to this machine without the approval or supervision of SPL electronics GmbH. Doing so could nullify com- pletely any and all of your warranty/guarantee rights and claims to user support. -
Page 5: Important Security Information
Important Security Information Please note and retain this manual. Carefully read and follow all of the safety and operating instructions before you use the machine. Be dou- bly careful to follow all warnings and special safety instructions noted in this manual and on the unit. Connections: Only use the connections as described. - Page 6 Important Security Information Air circulation: Chassis openings offer ventilation and serve to protect the machine from overheating. Never cover or otherwise close off these openings. never place the machine on a soft surface (carpet, sofa, etc.). Make sure to provide for a mounting space of 4-5 cm/2 inches to the sides of the unit when mounting the unit in racks or cabinets.
-
Page 7: Hook Up
Hook Up Power Connection Be very careful to check that the rear chassis power selection switch is set to the correct local line voltage position before using the unit (230 V position: 220-240 V/50 Hz, 115 V position: 110-120 V/60 Hz)! When in doubt about a source, contact your dealer or a professional electrician. -
Page 8: Introduction
The basis for such high-end developments is our proved 120 volts ref- erence technology. Core elements are the handmade SPL SUPRA op- amps running on 120 volts – it corresponds to approximately twice that of most modern analog audio semiconductor technologies. -
Page 9: The End Of Ear Fatigue
– and in the pro- ductive power of electronics, voltage level functions similarly. For some years, now, SPL has addressed this issue in all of its master- ing product series through its own specifically developed 120 volt tech- nology. -
Page 10: Rear Panel
Rear Panel/Connections Wiring Auditor... -
Page 11: Voltage Selector, Power Connector & Fuse, On/Off Switch
Rear Panel/Connections Sockets & Switches Voltage The rear panel voltage selector switch serves to let the user switch to the local line voltage standard. IMPORTANT ADVICE: Before you use the Auditor, make sure that this switch setting reflects the correct local power line voltage (115 V... -
Page 12: Xlr Sockets, Unbalanced Connections (E. G. Rca, Ts Jack)
Rear Panel/Connections XLR Connections Switch off the unit before you begin the process of making the first or any subsequent connections (rear panel On/Off switch). Neglecting this can damage either or both your ears and your headphones! Connect the monitoring signal to the left and right channel XLR input sockets. -
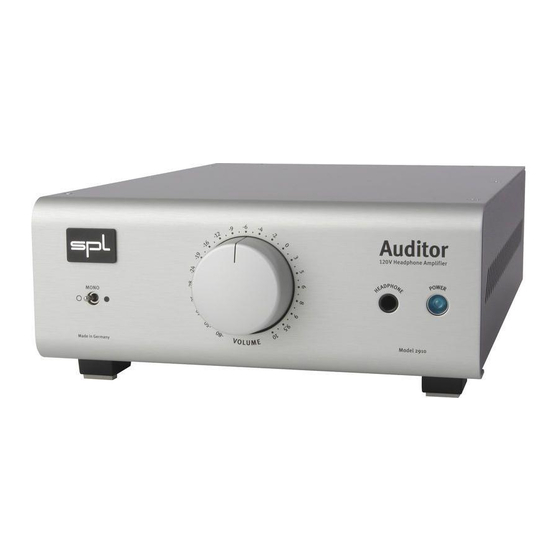
Page 13: Front Panel
Front Panel/Connection Headphone Connection You can use all dynamic headphones from 20-600 ohms (connection impedance). Connect your headphones to the standard 1/4" (TRS) stereo jack plug on the front panel. Make sure that the plug is firmly seated for a solid connection. Pin wiring TRS jack: Tip=left channel, ring=right channel, sleeve=ground. -
Page 14: Control Elements
Control Elements Usually already a short contemplative moment should be sufficient to get a general idea of the Auditor’s user interface and it’s control ele- ments. Once more the advantages of a consequently purist design ap- proach are becoming obvious – writing and reading the actual opera- tional instructions just takes two beats. -
Page 15: Protect Your Hearing
Protect Your Hearing Always reduce volume before you put on headphones or before you re- move or plug in the headphone. This excludes louder clicks and pops reaching the ear. In addition, this can avoid unpleasant surprise that follows when a headphone’s lower impedance suddenly reproduces a much higher –... -
Page 16: Phase Response
Measurements Audio Precision Auditor Phase/FC 05/14/08 13:23:13 +150 +100 -100 -150 100k Phase Response Input vs. Output, Left and Right Channel Measuring output and input 600 Ohm, Volume control Auditor 0 dB. This measurement shows the minimum deviation of phase in the upper frequency range. -
Page 17: Specifications
Specifications Audio Frequency response: ‹5 Hz to ›200 kHz ( -3 dB) CMRR: -80 dBu (@1 kHz, 0dBu input level and unity gain) Crosstalk @ 1 kHz: -84 dB THD @ 1 kHz: 0,001 % (@1 kHz, 0dBu input level and unity gain) Noise (A-weighted): -97 dBu Dynamic range:... -
Page 18: Guarantee & Product Registration
Please note the terms on the guarantee card enclosed in the package. Direct SPL product support requires product registration. Please fill out the guarantee card in printed letters and send it directly to SPL. Or use the online registration form that may be reached at www.spl.info.
Need help?
Do you have a question about the Auditor 2910 and is the answer not in the manual?
Questions and answers