Table of Contents
Advertisement
Quick Links
Advertisement
Table of Contents

Related Manuals for Alpine PXE-H650


Summary of Contents for Alpine PXE-H650
- Page 1 ® PXE-H650 Audio Processor OWNER’S MANUAL...
- Page 2 It is dangerous and illegal for a driver to watch the Video/TV while WARNING driving any vehicle. The driver may be distracted from looking ahead and an accident could occur. Caution • Read this manual thoroughly before starting installation and operation. You will fi nd a number of Safety Warnings in this manual to tell you about things that could hurt you or other people if you were to ignore the Warnings.
- Page 3 If the fuse(s) blows more than once, carefully check all electrical connections for shorted circuitry. Also have your vehicle’s voltage regulator checked. Maintenance If you have problems, do not attempt to repair the unit yourself. Return it to your Alpine dealer or the nearest Alpine Service Station for servicing. Installation Location Make sure the PXE-H650 will not be exposed to: •...
-
Page 4: Table Of Contents
CONTENTS Warnings ..................2 Features/Description ...............5 SETUP CD - Contents ..............6 CAUTION - Input Level Adjustment ..........6 Remote Control ................7 Main Chassis ...................8 Wiring/Connections .................9 Basic Operation Initial Setup & AntEQ ..............11 MultEQ ..................13 Demo Mode ...................15 Sound Customization Equalizer ..................16 Crossover ..................17 Time Delay ..................19 Mounting ..................20... -
Page 5: Warnings
FEATURES/DESCRIPTION The Alpine PXE-H650 is a versatile processor that takes an OK sounding factory system turns it into a high-end, audiophile system. The PXE-H650 utilizes advanced sound tuning of the factory equipment to correct the acoustical problems inherent in the vehicle. -
Page 6: Setup Cd - Contents
Therefore, it is very important that the output from the factory radio be properly set so the PXE-H650 receives the correct audio level (not so high that it's distorted and not so low that it's noisy). This ensures that the DSP chip in the unit can see every detail of the audio signal. This important step is done during the initial stages of the Set Up sequence. -
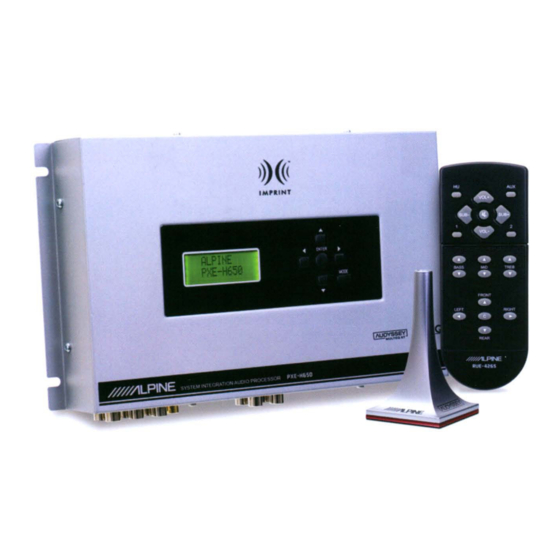
Page 7: Remote Control
REMOTE CONTROL Remote Function Call-outs AUX Source Select Factory H/U Select Volume UP User Preset 1 Subwoofer DN Subwoofer UP Volume DN User Preset 2 Treble EQ UP/DN 10 Midrange EQ UP/DN Bass EQ UP/DN 12 Balance Left (CLEAR) 13 Balance Right (DONE) 14 Fader Rear (CANCEL) 15 Fader Front (MEASURE) Mute... -
Page 8: Main Chassis
MAIN CHASSIS... -
Page 9: Wiring/Connections
This is a constant +12V for the main unit. It will remain powered even when the Ignition key position is OFF. It draws minimal current to maintain processor memory. • Remote OUT (BLU/WHT) This output can turn on external amplifi ers. The signal goes high after the PXE-H650 audio mute is OFF. • Remote ON (BLU/WHT) If the OEM head unit is not turning on the EQ using the AUTO RANGING INPUT, use this wire. - Page 10 PRIOR TO SETUP Before Running AntEQ The following guidelines will ensure a smooth and accurate setup procedure. Have the MultEQ CD, microphone and LED available and take a note of the conditions below as they are needed in the next section. Some type of stand is also needed to place the microphone at different locations in the vehicle.
-
Page 11: Basic Operation
PXE-H650. The PXE-H650 display = "ALPINE PXE-H650" if already setup. If this is the very fi rst time the PXE-H650 is being used, the system will enter the SETUP mode automatically. When it does so, follow the steps below. If you don't enter the setup mode automatically please refer to page 15 and FACTORY RESET. - Page 12 10. "ADJUST XOVER + AMP LEVELS" - Make adjustments to match amp levels Play Track 3 of the PXE-H650 Setup Disc in the Factory Head unit. This is a Pink Noise signal to facilitate the trimming of the amplifi er level controls.
-
Page 13: Multeq
(1 Hz) during normal operation. 2. "CONNECT LED & MIC" If the PXE-H650 does not detect the microphone, "CONNECT LED & MIC" is displayed and the MultEQ LED blinks quickly. Troubleshoot the microphone to ensure proper operation and connection. The system will continue automatically when the microphone is detected. - Page 14 After completing the desired number of MIC positions, press "DONE" while "MEASURE POS X" (Where X is either 5,6,or 7) is showing on the display. When calibration is completed in the last step, "CALCULATING FILTERS" then "SAVING FILTERS" is displayed on the LCD and fi nally "ALPINE PXE-H650" is displayed.
-
Page 15: Demo Mode
Demo Mode • Press the MODE button once on the PXE-H650 to reach the Demo mode screen on the LCD. Press the "ENTER" button once to enter the Demo mode. At this time, "DEMO MODE ON"... -
Page 16: Sound Customization
The Equalizer uses 3 Bands for each of the 7 channels to customize the tone of the music. Each Source Input to the PXE-H650 has its own EQ. Each of the Bands (Bass, Mid and Treble) is adjusted in a similar manner. The following steps use the Bass Band as an example. -
Page 17: Crossover
Use the MODE button at any point, to return to the previous sub-menu. Crossover Overview The PXE-H650 crossover allows custom cut-off points for the high-pass and low-pass fi lters of the Front and Rear speakers and the Subwoofer. This is especially useful when the factory speakers have been upgraded to handle a much wider audio bandwidth. - Page 18 3. Crossover Adjustment a) Use the ▼ or ▲ button to make the selection. In this example, "CROSSOVER" b) The user can also use these buttons to select "TIME DELAY." The following "FRONT 2" adjustment procedures will be similar in nature to adjustments for the other channels.
-
Page 19: Time Delay
Time Delay Overview MultEQ determines the default delay during initial Setup. However, there may be times when the delay needs to be tweaked or temporarily modifi ed. Be advised, any changes made causes deviation from MultEQ's default specs and no longer conforms to its ideal sound stage. -
Page 20: Mounting
MOUNTING... -
Page 21: Adjustments And Ranges
ADJUSTMENTS & RANGES 3 Band Parametric Q ................0.5 to 2 (0.5 steps) Level ..............-6 to +6 dB (1 dB steps) Bass Frequency........ Fc = 30, 40, 50, 60, 80, 100, 125, 150 Hz Mid ..........Fc = 0.5, 0.75, 1.0, 1.5, 2.0, 3.0, 4.0, 5.0 kHz Treble ............ -
Page 22: Specifi Cations
SPECIFICATIONS SPECIFICATION VALUE MAIN UNIT MAIN Input Max Input Level 16 Vrms AUX Input Max Input Level 1.5 Vrms (AUX PRIMARY OFF) Max Input Level 2.5 Vrms (AUX PRIMARY ON) Output Impedance < 1kΩ Frequency Response 20 Hz to 20 kHz <... - Page 23 TYPICAL OEM SYSTEM...
- Page 24 TYPICAL AFTERMARKET SYSTEM...
- Page 25 NOTES...
- Page 26 LIMITED WARRANTY...
- Page 28 1-888-NAV-HELP (1-888-628-4357) ALPINE ELECTRONICS OF CANADA, INC. Suite 203, 7300 Warden Ave. Markham, Ontario L3R 9Z6, Canada Tel.: 1-800-ALPINE1 (1-800-257-4631) ALPINE ELECTRONICS OF AUSTRALIA PTY. LTD. 6-8 Fiveways Boulevarde Keysborough Victoria 3173, Australia Tel.: (03) 9769-0000 ALPINE ELECTRONICS GmbH Kreuzerkamp 7-11 40878 Ratingen, Germany Tel.: 02102-45 50...
Need help?
Do you have a question about the PXE-H650 and is the answer not in the manual?
Questions and answers