MakerBot Replicator 2 User Manual
Desktop 3d printer
Hide thumbs
Also See for Replicator 2:
- User manual (64 pages) ,
- Quick start manual (14 pages) ,
- Replacement instructions (3 pages)
Table of Contents
Advertisement
Quick Links
Download this manual
See also:
User Manual
Advertisement
Table of Contents
Troubleshooting

Related Manuals for MakerBot Replicator 2


Summary of Contents for MakerBot Replicator 2
- Page 1 ® USER MANUAL...
-
Page 3: Table Of Contents
TABLE OF CONTENTS WELCOME. LET’S GET STARTED Specifications How Does it Work? SETTING UP YOUR MAKERBOT REPLICATOR 2 DESKTOP 3D PRINTER What’s in The Box MakerBot Replicator 2 Diagram Unpacking Your MakerBot Replicator 2 Installing Build Plate Installing Filament Guide Tube and Spool Holder... -
Page 4: Awelcome. Let's Get Started
Welcome. Let’s get started. - Page 5 WARNING: The MakerBot Replicator 2 generates high temperatures and includes moving parts that can cause injury. Never reach inside the MakerBot Replicator 2 while it is in operation. Always allow the MakerBot Replicator 2 to cool down before reaching inside.
-
Page 6: Specifications
Ambient Operating 15° – 32° C [60° – 90° F] Nozzle Diameter: 0.4 mm [0.015 in] Temperature: Storage Temperature: 0° – 32° C [32° – 90° F] SOFTWARE Software Bundle: MakerBot MakerWare ™ ELECTRICAL File Types: .stl, .obj, .thing AC Input: 100 – 240 V, 2 amps, 50 –... -
Page 7: How Does It Work
PLA Filament. Your 3D design files are translated into instructions for the MakerBot Replicator 2 and sent to the machine via USB cable or SD Card. Then the MakerBot Replicator 2 heats the MakerBot PLA Filament and squeezes it out through a nozzle to make a solid object layer by layer. -
Page 8: Bsetting Up Your Makerbot Replicator 2 Desktop 3D Printer
Setting Up Your MakerBot Replicator ® ® Desktop 3D Printer... - Page 9 We hope you’ll take your time and be just as careful unpacking it and getting it set up. NOTE: Do not force or tear anything during unpacking and setup. This may damage the MakerBot Replicator 2 Desktop 3D Printer. B SETTING UP YOUR MAKERBOT REPLICATOR 2 DESKTOP 3D PRINTER...
-
Page 10: What's In The Box
Spool holder [1lb Spool] Build plate Power supply USB-A to SD card and cable USB-B cable Hex wrenches PTFE-based grease Support card Blue tape sheets More options available at makerbot.com/store B SETTING UP YOUR MAKERBOT REPLICATOR 2 DESKTOP 3D PRINTER... -
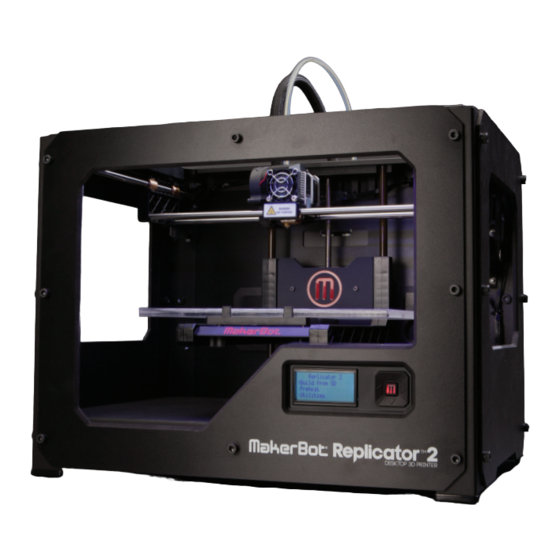
Page 11: Makerbot Replicator 2 Diagram
[2] LCD PANEL [3] KEY PAD [4] THREADED Z-AXIS ROD [5] BUILD PLATE [6] BUILD PLATFORM [7] FILAMENT GUIDE TUBE [8] EXTRUDER CABLE [9] EXTRUDER [10] FILAMENT SPOOL ® [11] SPOOL HOLDER B SETTING UP YOUR MAKERBOT REPLICATOR 2 DESKTOP 3D PRINTER... -
Page 12: Unpacking Your Makerbot Replicator 2
1c. Remove the layer of foam and the sheet of cardboard underneath. 1d. Remove the two protective foam pieces from the sides of the Replicator 2. NOTE: You can download a PDF copy of this manual at makerbot.com/support/replicator2. B SETTING UP YOUR MAKERBOT REPLICATOR 2 DESKTOP 3D PRINTER... - Page 13 NOTE: Your MakerBot Replicator 2 should now be fully unpacked. We recommend that you keep the box and foam inserts in case you need to transport your MakerBot Replicator 2 in the future. B SETTING UP YOUR MAKERBOT REPLICATOR 2 DESKTOP 3D PRINTER...
-
Page 14: Installing Build Plate
Carefully snap the pieces holding them in place. piece off of the rods and tilt it to slide it off of the belt. NOTE: Operate scissors with care. B SETTING UP YOUR MAKERBOT REPLICATOR 2 DESKTOP 3D PRINTER... -
Page 15: Installing Filament Guide Tube And Spool Holder
7a. Locate the spool holder. Tilt the spool holder and insert the square end into the left side opening on the back of the MakerBot Replicator 2 [when viewed from the back]. B SETTING UP YOUR MAKERBOT REPLICATOR 2 DESKTOP 3D PRINTER... -
Page 16: Mounting Filament Spool And Attaching Usb Cable
Do not attach the other end of the USB cable to anything yet. 9b. Do not plug the AC power cord into an electrical outlet until step 11 of this chapter. USB cable B SETTING UP YOUR MAKERBOT REPLICATOR 2 DESKTOP 3D PRINTER... -
Page 17: Attaching Power Supply And Powering On
CAUTION: Do not use an extension cord or power supply other than the ones shipped with your MakerBot Replicator 2. Ensure that the plug is easily accessible in case the Replicator 2 needs to be disconnected. B SETTING UP YOUR MAKERBOT REPLICATOR 2 DESKTOP 3D PRINTER... -
Page 18: Cstartup Process: Leveling, Loading, Testing
Startup Process: Leveling, Loading, Testing... - Page 19 You can use these menus to return to the Startup Script at any time. You can also find a video of this process at makerbot.com/support/replicator2/videos. If you have problems or questions, refer to the troubleshooting chapter in this manual or contact MakerBot Support at support@makerbot.com.
-
Page 20: Leveling The Build Plate
• If the build platform is too close to the extruder nozzle, the build plate can block the MakerBot PLA Filament from extruding from the nozzle. This can also scratch the build plate. - Page 21 LEVELING THE BUILD PLATE CONTINUED Make Some Room Between the Build Plate and the Nozzle When directed by the LCD screen, tighten each of the three knobs under the build platform about four turns. Support Card Leveling Knobs ® C STARTUP PROCESS: LEVELING, LOADING, TESTING...
- Page 22 Build Plate and select it. You can use these menus to return to the leveling script at any time. For a demonstration of this process, see the MakerBot Replicator 2 video page at makerbot.com/support/replicator2/videos. C STARTUP PROCESS: LEVELING, LOADING, TESTING...
-
Page 23: Loading Makerbot Pla Filament
“Aaah, that feels much better. Let’s go on and load some plastic!” Before building, you must load the MakerBot PLA Filament into the extruder. The extruder will heat the MakerBot PLA Filament and use the melted material to build things. - Page 24 Feed the end of the MakerBot PLA Filament into the end of the guide tube where it attaches to the back of the MakerBot Replicator 2. Feed the MakerBot PLA Filament through the guide tube until it emerges from the other end of the tube.
- Page 25 After the extruder reaches 230° C, the LCD panel will prompt you to load the MakerBot PLA Filament into the extruder. Click through the message until your MakerBot Replicator 2 asks you to press the M when you see plastic extruding. C STARTUP PROCESS: LEVELING, LOADING, TESTING...
- Page 26 There’s probably some filament inside the extruder left over from our testing process at the MakerBot BotCave. Wait until you see the color that you loaded come out of the nozzle before you press the M button.
-
Page 27: Unloading Makerbot Pla Filament
Unloading MakerBot PLA Filament To unload MakerBot PLA Filament, go to the LCD panel and select Preheat > Start Preheat. Wait for the extruder to heat to the set temperature. Then push down on the Extruder Arm and continue to hold it down as you gently pull the filament out of the extruder. -
Page 28: Making A Test Object From The Sd Card
2a. Use the up and down arrow buttons to navigate through the list of models on the SD card. 2b. To select a model, press M. 2c. The MakerBot Replicator 2 will begin to build your object. You can use the LCD panel to monitor the temperature of the extruder and the status and progress of your object. - Page 29 MAKING A TEST OBJECT FROM THE SD CARD CONTINUED Projects Available on the SD Card CHAIN LINKS COMB MR JAWS File Name: Chain Links File Name: Comb File Name: Mr Jaws Make Time: 15 Minutes Make Time: 26 Minutes Make Time: 18 minutes Design By: Design By: repraprook...
-
Page 30: Dmaking An Object With Makerbot Makerware
Making an Object with MakerBot MakerWare... - Page 31 How to make an object using a computer and MakerBot MakerWare ® ™ ™ D MAKING AN OBJECT WITH MAKERBOT MAKERWARE...
- Page 32 MakerBot Replicator 2 Desktop 3D Printer for building. Download and Install MakerBot MakerWare 1a. Go to the computer you plan to connect to your MakerBot Replicator 2 and open a browser session. 1b. Enter the URL makerbot.com/makerware and download the correct MakerWare installer for your operating system.
- Page 33 USING MAKERBOT MAKERWARE CONTINUED Download an Object From MakerBot Thingiverse Thingiverse is a website where MakerBot users and others can share design files. 2a. Open a browser session and go to www.thingiverse.com. Use the search field at the upper right to search for “Minimalist NYC buildings.”...
- Page 34 M key to go into Move mode. In this mode, print resolution and other options and send click and drag with your mouse to move an your object to your MakerBot Replicator 2 object around the plate. Use the arrow at for building.
- Page 35 USING MAKERBOT MAKERWARE CONTINUED Open MakerBot MakerWare | Continued NUT AND BOLT Design By: aubenc Thingiverse: 9095 D MAKING AN OBJECT WITH MAKERBOT MAKERWARE...
- Page 36 USING MAKERBOT MAKERWARE CONTINUED Open the .stl files in MakerBot MakerWare 4a. Click on the Add button. Navigate to the location of the file FlatIron.stl and select it. The file will open at the center of the build plate. 4b. Select the Move button and click and drag the Flatiron Building to the left.
- Page 37 USING MAKERBOT MAKERWARE CONTINUED Open the .stl files in MakerBot MakerWare | Continued 4e. Click on the Flatiron Building to select it. Hold down the shift key and click on the Woolworth Building. Then release the shift key. Both models should be selected.
- Page 38 [5] SUPPORTS: Select this to the top of the Make dialog instead of “Make It Now.” have your object include easily If your Replicator 2 is not connected to your computer, removable support structures under “Export to File” will be selected automatically.
- Page 39 MakerBot Replicator 2. To download the ReplicatorG software, go to http://www.replicat.org/download. To configure the ReplicatorG software to work with your MakerBot Replicator 2, go to http://www.makerbot.com/support/replicatorg/documentation/usage. D MAKING AN OBJECT WITH MAKERBOT MAKERWARE...
-
Page 40: Troubleshooting, Diagnostics, And Maintenance
Troubleshooting, Diagnostics, and Maintenance... - Page 41 This chapter describes basic troubleshooting and maintenance tasks for your MakerBot Replicator ® ® Desktop 3D Printer. For details on more advanced troubleshooting and maintenance tasks, go to makerbot.com/support. ® E TROUBLESHOOTING, DIAGNOSTICS, AND MAINTENANCE...
-
Page 42: Troubleshooting
Common Problems and How To Fix Them PROBLEM SOLUTION Can’t load MakerBot Make a fresh cut at the end of the MakerBot PLA Filament. Cut the filament at an angle—a narrow tip will help with PLA Filament loading. It is also important that the filament have no into the extruder bends in it. - Page 43 Can’t Remove MakerBot Press down on the extruder arm and push a short length of the filament through the heated extruder. Then, continuing to hold PLA Filament down the extruder arm, try pulling the filament free again.
-
Page 44: Diagnostics
Unload the filament, cut a fresh edge, and load the filament again. NOTE: For more detailed troubleshooting information, see the MakerBot Replicator 2 Troubleshooting page makerbot.com/support/replicator2/troubleshooting. For video walkthroughs of troubleshooting issues, see the MakerBot Replicator 2 video collection makerbot.com/support/replicator2/videos. -
Page 45: Lcd Panel | Utilities Menu
This option appears only when the stepper motors are engaged. Blinks the LED lights on the MakerBot Replicator 2 at Blink LEDs about 4 blinks per second. When the LED lights are blinking, this option is replaced by Stop Blinking. -
Page 46: Lcd Panel | Info And Settings Menu
[On] or abbreviated help text [Off]. HEAT LEDs. Changes LED colors when the MakerBot Replicator 2 is heating. When this option is set to On, the LED color will change from blue to red during the heating process and will return to the default color when the process is complete. -
Page 47: Maintenance
4. Make sure you get the grease inside of the threads themselves. 5. Grasp both sides of the build platform and move it to the top of the MakerBot Replicator 2. 6. Use a clean, lint-free rag [or your finger] to spread the PTFE-based grease onto the bottom section of the threaded rod. - Page 48 Lubricating the Threaded Rod and the X-Axis Idler Pulley | Continued 7. Locate the X-axis idler pulley. If you are facing the front of the MakerBot Replicator 2, the idler pulley is at the top left side. The idler pulley is one of the pulleys that allow the rubber belt to move the extruder from left to right, or along the X-axis.
-
Page 49: Cleaning The Drive Gear
The drive gear is the part of the extruder that pushes filament through the extruder. When you make things with your MakerBot Replicator 2, small pieces of hardened PLA can stick to the drive gear. If you are having problems with your extruder, cleaning the drive gear might help. - Page 50 Utilities > Filament Options > Load. Updating Your Firmware Keeping your firmware up to date will ensure that your MakerBot Replicator 2 always operates at its best. When MakerWare tells you that there’s a new firmware release, click the MakerBots menu and select Upload Firmware.
-
Page 51: Glossary Of Terms
MakerBot BUILD PLATE: The acrylic surface on Replicator 2 will use to build an object. which the MakerBot Replicator 2 builds GCode is converted to .x3g before being an object. - Page 52 SPOOL HOLDER: The plastic piece that wires that provide power to the motor. attaches to the back of the MakerBot Replicator 2 and holds the spool of NOZZLE: The opening on the end of the MakerBot PLA Filament. The spool holder...
-
Page 53: Contact Us
If you ever need help resolving an issue with your MakerBot Replicator 2, send an email to the address above to open a ticket with the MakerBot Support Team. To help us understand your problem from the start, it is very helpful to include pictures or a video as attachments with your email. -
Page 54: Safety And Compliance
SAFETY AND COMPLIANCE RADIO AND TELEVISION INTERFERENCE This equipment has been tested and found to comply with the limits for a Class B digital device, pursuant to Part 15 of the FCC rules. These limits are designed to provide reasonable protection against harmful interference in a residential installation. -
Page 55: Fterms Of Service
Website. Print and save these Terms and, periodically, check for the latest version at store.makerbot.com/terms. MakerBot reserves the right to modify or revise these Terms in its sole discretion and at any time. You agree to be bound by any modifications and/or revisions. - Page 56 Third Party Links. From time to time, this Website may contain links to websites that are not owned, operated or controlled by MakerBot or their respective affiliates. All such links are provided solely as a convenience to you. If you use these links, you will leave this Website. Neither we nor any of our respective affiliates are responsible for any content, materials or other information located on or accessible from any other website.
- Page 57 WARRANTIES DO NOT APPLY TO THE EXTENT PROHIBITED BY LAW. PLEASE REFER TO YOUR LOCAL LAWS FOR ANY SUCH PROHIBITIONS. 11. LIMITATIONS OF LIABILITY. MakerBot Industries assumes no responsibility, nor will be liable, for any damages to, or any viruses or malware that may infect your computer, telecommunication...
- Page 58 13. Choice of Law; Jurisdiction. These terms of service supersede any other agreement between you and MakerBot Industries to the extent necessary to resolve any inconsistency or ambiguity between them. These terms of service will be governed by and construed in accordance with the laws of the State of New York, without giving effect to any principles of conflicts of laws.
- Page 59 NOTES...
- Page 60 MakerBot One MetroTech Center, 21st Floor, Brooklyn, NY support@makerbot.com makerbot.com...
Need help?
Do you have a question about the Replicator 2 and is the answer not in the manual?
Questions and answers