Table of Contents
Advertisement
IMPORTANT SAFETY INFORMATION: Always read this manual first
before attempting to install or use this fireplace. For your safety, always
comply with all warnings and safety instructions contained in this manual
to prevent personal injury or property damage.
To view the full line of Dimplex products, please visit
www.dimplex.com
Owner's Manual
Model
DFG3033
7210600100rev01
Advertisement
Table of Contents

Related Manuals for Dimplex DFG3033


Summary of Contents for Dimplex DFG3033
- Page 1 For your safety, always comply with all warnings and safety instructions contained in this manual to prevent personal injury or property damage. To view the full line of Dimplex products, please visit www.dimplex.com 7210600100rev01...
-
Page 2: Table Of Contents
CAUTION: Procedures and techniques which, if not carefully followed, will result in damage to the equipment. W ARNINg: Procedures and techniques which, if not carefully followed, will expose the user to the risk of fire, serious injury, or death. www.dimplex.com... -
Page 3: Welcome & Congratulations
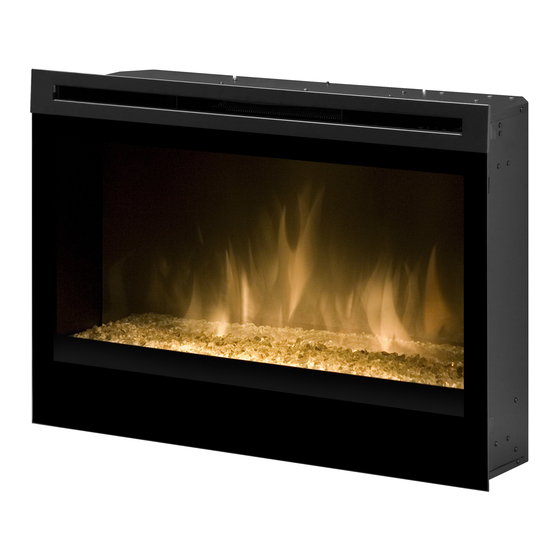
Welcome & Congratulations Thank you and congratulations for choosing to purchase an electric NO NEED TO RETURN fireplace from Dimplex, the world TO THE STORE leader in electric fireplaces. Questions With the Assembly? Please carefully read and save these instructions. -
Page 4: Important Instructions
Do not use in areas where mechanical adjustment, or repair. gasoline, paint, or flammable liquids are used or stored or ⑥ Do not use outdoors. where the unit will be exposed to ⑦ The electric fireplace is not flammable vapors. www.dimplex.com... -
Page 5: Important Instructions
IMPORTANT INSTRUCTIONS ⑬ ⑰ Do not modify the electric Always use a certified fireplace. Use it only as described electrician should new circuits or in this manual. Any other use not outlets be required. recommended by the ⑱ Always use properly manufacturer may cause fire, grounded, fused and polarized electric shock or injury to persons. -
Page 6: Quick Reference Guide
· consult the dealer or an experienced radio/Tv technician for help. Operation is subject to the following two conditions: (1) this device may not cause interference and (2) this device must accept any interference, including interference that may cause undesired operation of the device. www.dimplex.com... -
Page 7: Site Selection And Preparation
Dimplex mantel blows on a regular basis when surround. the heater is operating. ①... -
Page 8: Fireplace Installation
Use studs to frame an IMPORTANT: If not using a opening of 31 ¾ inches (807 mm) Dimplex mantel, the fireplace wide x 22 ¾ inches (578 mm) must be installed in an high x 9 ½ inches (241 mm) deep. - Page 9 Fireplace Installation Option #3 - Hardwire Figure 2 ① Wire a dedicated, properly fused circuit with 120 volt, 15 Amp rating. Allow up to eight (8) feet (2.4 m) of service cable for connecting power supply to junction box on fireplace when installing after finishing wall.
- Page 10 Front glass hooks if installing the fireplace in a carpeted area, place a one- White wire (N) White wire (N) Fireplace 120 v power Junction black wire (l) black wire (l) Supply (breaker panel) Green wire (G) Green wire (G) www.dimplex.com...
-
Page 11: Operation
Flame (center position): The heater, unplug the unit and flame effect is turned on. call Dimplex North America Flame & Heat (right position): limited at 1-888-346-7539 The flame effect and heater are for technical support. Please turned on simultaneously. -
Page 12: Remote Control
Press and hold the initialization button on the unit ② Install two (2) AAA batteries (Figure 5C). into the remote control (included). ⑤ While holding the Initialization ③ Ensure child lock is in the button, press the Flame/Heat “unlocked” position (Figure 6). www.dimplex.com... - Page 13 Operation On/Off button on the remote button button on the remote. control transmitter. Your remote will now have a ⑥ different frequency Release the Initialization communicating with the fireplace. button on the unit. ⑦ Press the Flame/heat On/Off button to turn the Flame/heat function on.
- Page 14 H. Temperature Up B. Set Temperature Dimmer Down C. Dimmer Dimmer Up D. Flame Speed Control K. Flame Speed Down E. Sleep Timer Flame Speed Up Flame & Heat On/Off M. Sleep Timer Down g. Temperature Down N. Sleep Timer Up www.dimplex.com...
- Page 15 Operation B. Set Temperature E. Sleep Timer Press F. Flame & Heat On/Off The Sleep Timer automatically shuts off the fireplace after a button to turn fireplace on. preset time (from 30 minutes to 8 Press H. Temperature Up to hours).
- Page 16 When the remote transmitter’s Child Lock (Figure 8) backlight is illuminated the Child Lock is bypassed. When the Figure 8 backlight is off the Child Lock is re-activated. Unlocked Locked Child Lock Tab www.dimplex.com...
-
Page 17: Maintenance
Maintenance Light Bulb Replacement To access the lower light bulb area: Allow at least five (5) minutes for ① light bulbs to cool before touching Carefully remove the front bulbs to avoid accidental burning glass assembly. be aware that of skin. some of the glass media may fall out of the tray (Figure 9). - Page 18 ⑤ ⑨ Insert new bulb(s). Replace media tray back into firebox. ⑥ re-install upper light bracket. ⑩ Gently pour and evenly ⑦ Replace glass assembly. spread the glass media. ⑪ Replace glass assembly. www.dimplex.com...
-
Page 19: Glass Cleaning
Maintenance glass Cleaning Fireplace Surface Cleaning The glass is cleaned in the factory during the assembly operation. Use a cloth dampened with During shipment, installation, warm water only to clean painted handling, etc., the glass may surfaces of the electric fireplace. collect dust particles;... -
Page 20: Warranty
This limited warranty applies to What this limited warranty covers and the following model of your newly for how long purchased Dimplex electric fireplace DFg3033 and to newly purchased products, other than fireplace Dimplex fireplace surrounds (mantels) surrounds (mantels) and trims, and trims. This... - Page 21 (mantels) and trims and the limited 1 year warranty period What Dimplex will do in the event of for fireplace surrounds (mantels) a defect and trims also applies to any implied...
- Page 22 The Dimplex may, in lieu of repair or purchaser shall not be entitled replacement, choose to refund the to on-site or in-home warranty purchase price for such product or services.
- Page 23 DAMAGes Are ForeseeAble. labour costs. Such costs shall not iN No eveNT Will DiMpleX, be the responsibility of Dimplex. OR ITS OFFICERS, DIRECTORS, or AGeNTs be liAble For •...
-
Page 24: Replacement Parts List
13. Flicker Rod ........5901250100RP Dimplex North America Limited 1367 Industrial Road Cambridge ON Canada N1R 7G8 © 2010 Dimplex North America Limited www.dimplex.com...
Need help?
Do you have a question about the DFG3033 and is the answer not in the manual?
Questions and answers