DSC PTK5507 User Manual
V1.0 touchscreen keypad
Hide thumbs
Also See for PTK5507:
- Installation instructions manual (8 pages) ,
- Installation instructions manual (32 pages)
Table of Contents

Related Manuals for DSC PTK5507


Summary of Contents for DSC PTK5507
- Page 1 PTK5507 v1.0 Touchscreen User Manual WARNING: This manual contains information on limitations regarding product use, function and information on the limitation as to liability of the manufacturer. The entire manual should be carefully read.
-
Page 3: Table Of Contents
Bypassing Zones with a PTK5507 ........9... -
Page 4: Important Safety Instructions
• Do not use the Alarm System to report a gas leak if the system is near a leak. REGULAR MAINTENANCE AND TROUBLESHOOTING Keep your PTK5507 Touchscreen keypad in optimal condition by following all the instructions that are included within this manual and/or marked on the product. - Page 5 Introduction The PTK5507 Touchscreen is an interactive touch-sensitive color LCD that can be used on any Power- Series v4.2 and greater control panel. Due to the custom requirements of individual installations, some of the features described here may perform differently than described.
-
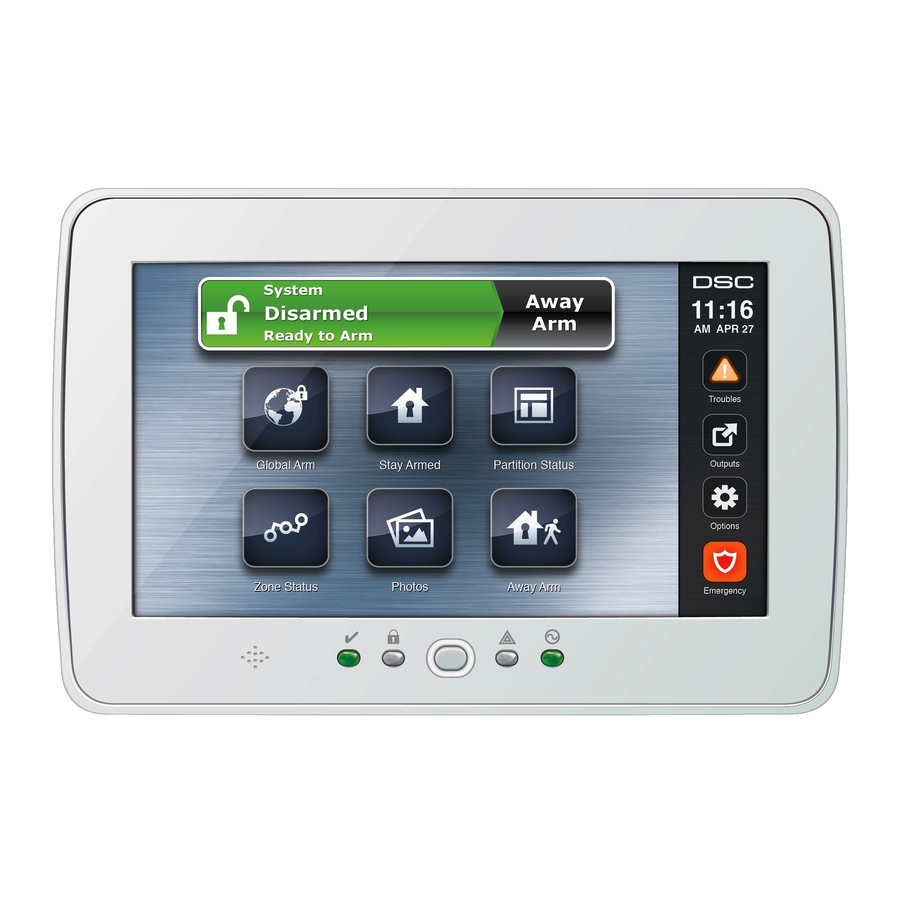
Page 6: Welcome Screen
Welcome Screen The date & time are displayed in the upper right corner of the screen. The system status (i.e., Ready, Armed, Exit Delay etc.) is displayed at the top of the screen. Figure 1 - Welcome Screen System Status Chime ON/OFF Zone Status Time/... -
Page 7: Arming And Disarming The System
NOTE: These events are recorded in the log. Figure 3 - Controls & Indicators Stay Arm Partition Status System Status Time/Date Trouble Menu Global Arm Command Output Keypad/ Security Functions Zone Status Emergency Key Away Arm Photo Frame Ready Armed Home/ Trouble SD card slot... - Page 8 NOTE: If Quick Arm is not enabled by the installer, then a numerical keypad is displayed (see Figure 4). Enter a valid access code to proceed. Figure 4 - Keypad If Disarm is selected during the exit delay, a numeric keypad is displayed. •...
-
Page 9: Disarm
Disarm If Disarm is selected: • A numerical keypad is displayed. • Enter your Access Code in the keypad. • The system returns to the Home screen and the red Armed indicator turns OFF. • The alarm status is momentarily displayed in the status bar, then "Ready" is displayed. •... -
Page 10: Intrusion (Burglary) Alarm Continuous Siren
Once done, press Save. Keypad Mode This option allows the PTK5507 Touchscreen to function as a traditional DSC keypad. Door Chime (Chime enable/disable) The keypad indicates the current state of the door chime function (Enabled or Disabled). To choose the opposite function, tap the 'Chime' icon. -
Page 11: Zone Status
Zone Status This screen allows you to view the status of the zones on the system. Figure 5 - Zone Closed Zones are Closed (Restored) Ready – the zone is closed. (See Figure 5 on page 7). Open – the zone is open and needs to be closed. (See Figure 6 on page 7.) Figure 6 - Zone Open Zone is Open... - Page 12 Trouble – the alarm panel has detected a technical problem with one or more components of the alarm system e.g., loss of AC power. (See Troubles on page 10.) Fault – one or more of the zones on your system is not secure e.g., a window or door is open. (See Fig- ure 7 on page 8.) Figure 7 - Zone Fault Zone Fault...
-
Page 13: Bypassed Zones
NOTE: For security reasons, your installer has programmed the system to prevent certain zones from being bypassed. (e.g., smoke detectors). Bypassing Zones with a PTK5507 When in the Zone Status page, scroll up/down through the desired zones, and tap on the bypass icon to... -
Page 14: Troubles
Troubles When a trouble condition is detected, the Trouble ( ) or System indicator will turn on, and the keypad will beep every 10 seconds. Press the ( ) key to silence the beeps. Press ( ) to view the trouble con- dition. -
Page 15: Alarm Memory
Alarm Memory When an alarm occurs, the Memory or System indicator will turn on. To view which sensor(s) generated the alarm, press Alarms . The sensor number where the alarm occurred will be displayed (e.g. zone 3) (see Figure 10 on page 11). Use the [<][>] scroll keys to view the sensors in alarm memory. -
Page 16: Outputs
Outputs Your installer may have programmed these keys to perform various functions (reset smoke detector after an alarm, open your garage door, etc.) To activate these functions, press Output and then press the appropriate option. See also Sensor Reset on page 11. Figure 11 - Outputs Options From the Options menu on the right side of the Touchscreen (see Figure 12 on page 12), the following... -
Page 17: Access Codes
Access Codes When Access Codes is selected from the Options menu, the keypad prompts for a Master Code. When a valid Master Code is entered, a numeric keypad is displayed with arrows to scroll to the desired user to add/edit. Press the select button to enter the user options. Set Access Code –... -
Page 18: Erasing An Access Code
Partition Assignment Mask ([,][5][Master/Supervisor Code][98][Code]) 1. Partition One Access (available for PC1616/PC1832/PC1864) 2. Partition Two Access (available for PC1616/PC1832/PC1864) 3. Partition Three Access (available for PC1832/PC1864) 4. Partition Four Access (available for PC1832/PC1864) 5. Partition Five Access (available for PC1864) 6. -
Page 19: Keypad Configuration
System Test The system’s Bell Output (2s), Keypad Lights and Communicator are tested. This test will also measure the panel’s standby battery. Auto-Arm/Disarm Control Pressing Auto-Arm while in the User Function menu will enable (three beeps) or disable (one long beep) the Auto-Arm and Auto-Disarm feature, by partition. -
Page 20: Chime Enabled/Disabled
Clean Mode – allows the user to touch (i.e., clean) the screen without enabling or disabling any func- tions. The screen will remain in this mode for 30 seconds (See Figure 14 on page 16), then return to the Keypad Configuration screen ( See Figure 13 on page 15). Figure 14 - Clean Mode Home Page –... -
Page 21: Partition Status
Figure 16 on page 17 is an example of a keypad loaned to Global mode. Figure 16 - Partition Status Keypad Mode This option allows the PTK5507 Touchscreen to function as a traditional DSC keypad. -
Page 22: Reference Sheets
Reference Sheets Fill out the following information for future reference and store this guide in a safe place. System Information Enabled? FIRE AUXILIARY PANIC The Exit Delay Time is _______ seconds. The Entry Delay Time is _______ seconds. For Service Central Station Information Account#: ___________________ Telephone#: __________________ Installer Information:... -
Page 23: Access Codes
Access Codes PC1616/PC1832/PC1864 Master Code [40]: _________________________ Access Access Access Access Code Code Code Code Code Code Code Code... -
Page 24: Sensor/Zone Information
Sensor / Zone Information Sensor Protected Area Sensor Type Sensor Protected Area Sensor Type... -
Page 25: Testing Your System
The zone light turns OFF when the zone is closed (e.g., door or window closed). On a PTK5507 keypad, the following message will be displayed when each zone (detector) is acti- vated: “Ready to Force,” “Not Ready”. Use the zone status button to view which zones are open. The message will disappear when the zones are closed. - Page 26 If You 3. COPYRIGHT - All title and intellectual property do not agree to the terms of this EULA, DSC is rights in and to the SOFTWARE PRODUCT (including unwilling to license the Software Product to You, and but not limited to any images, photographs, and text You have no right to use it.
- Page 27 Both of these components are protected by copyright and have terms and conditions associated with their use. The open source software code and associated components used in this product are downloadable from the DSC web- site. Please visit http://www.dsc.com/open-source-documentation for detailed information.
- Page 28 © 2012 Tyco International Ltd. and its Respective Companies. All Rights Reserved. Toronto, Canada • www.dsc.com • Printed in Canada The trademarks, logos, and service marks displayed on this document are registered in the United States [or other countries]. Any misuse of the trademarks is strictly prohibited and Tyco International Ltd.
Need help?
Do you have a question about the PTK5507 and is the answer not in the manual?
Questions and answers