Omron BP791IT Instruction Manual
10 series plus blood pressure monitors with comfit cuff
Hide thumbs
Also See for BP791IT:
- Getting started (3 pages) ,
- Instruction manual (60 pages) ,
- Troubleshooting manual (3 pages)

Related Manuals for Omron BP791IT


Summary of Contents for Omron BP791IT
- Page 1 INSTRUCTION MANUAL 10 series Plus Blood Pressure Monitor with ComFit Cuff BP791IT Model...
-
Page 2: Table Of Contents
TABLE OF CONTENTS Before Using the Monitor Introduction. . . . . . . . . . . . . . . . . . . . . . . . . . . . . . . . . . . . . . . . . . . . . . . . . . 4 Safety.Information. - Page 3 .. . . . . . . . . . 45 . D ownloading.and.installing.Omron.Health. Management.Software . . . . . . . . . . . . . . . . . . . . . . . . . . . . . . . . . . . 47 Using.the.Software .
-
Page 4: Before Using The Monitor
Before Using the Monitor INTROdUCTION ® Thank.you.for.purchasing.the.Omron .BP791IT.10.series.Plus. Automatic.Blood.Pressure.Monitor.with.ComFit .Cuff . Fill in for future reference. DATE PURCHASED: __________________ SERIAL NUMBER: ____________________ • Staple your purchase receipt here • Register your product on-line at www.register-omron.com Your.new.blood.pressure.monitor.uses.the.oscillometric.method.of.blood. pressure.measurement ..This.means.the.monitor.detects.your.blood’s. movement.through.your.brachial.artery.and.converts.the.movements.into. a.digital.reading ..The.monitor.stores.measurement.results.for.two.people. -
Page 5: Safety.information
SAFETy INFORMATION IntenDeD Use This.product.is.designed.to.measure.the.blood.pressure.and.pulse.rate. of.people.within.the.range.of.the.designated.arm.cuff,.following.the. instructions.in.this.instruction.manual . It.is.mainly.designed.for.general.household.use ..Please.read.the.“Safety. Information”.in.this.instruction.manual.before.using.the.unit . To assure the correct use of the product basic safety measures should always be followed including the warnings and cautions listed in this instruction manual. sAFetY sYMBOLs UseD In tHIs InstRUCtIOn MAnUAL Indicates.a.potentially.hazardous.situation. - Page 6 ..Do.not.use.this.device.on.infants.or. persons.who.cannot.express.their.intentions . R ead.the.Special.Conditions.section.(page.37).of.the.instruction. manual.if.your.systolic.pressure.is.known.to.be.more.than.220. mmHg ..Inflating.to.a.higher.pressure.than.necessary.may.result.in. bruising.where.the.cuff.is.applied . O perate.the.device.only.as.intended ..Do.not.use.the.device.for.any. other.purpose . D ispose.of.the.device,.components.and.optional.accessories. according.to.applicable.local.regulations ..Unlawful.disposal.may. cause.environmental.pollution . D o.not.use.a.cellular.phone.near.the.device ..It.may.result.in.an. operational.failure . U se.only.Omron.authorized.parts.and.accessories ..Parts.and. accessories.not.approved.for.use.with.the.device.may.damage.the. unit . U se.only.1 .5V.alkaline.batteries.with.this.device .. Do.not.use.other.types.of.batteries ..This.may.damage.the.unit .
-
Page 7: Risk.of.electrical.shock
SAFETy INFORMATION RIsk OF eLeCtRICAL sHOCk ..D o.not.plug.or.unplug.the.power.cord.into.the.electrical.outlet.with. wet.hands ..D o.not.overload.power.outlets ..Plug.the.device.into.the.appropriate. voltage.outlet . CARe AnD MAIntenAnCe D o.not.subject.the.monitor.to.strong.shocks,.such.as.dropping.the. unit.on.the.floor . D o.not.submerge.the.device.or.any.of.the.components.in.water . S tore.the.device.and.the.components.in.a.clean,.safe.location . C hanges.or.modification.not.approved.by.Omron.Healthcare.will. void.the.user.warranty ..Do.not.disassemble.or.attempt.to.repair.the. unit.or.components . -
Page 8: Before.taking.a.measurement
BEFORE TAkING A MEASUREMENT To.ensure.a.reliable.reading.follow.these.recommendations: 1 ..Avoid.eating,.drinking.alcohol,.smoking,.exercising,.and.bathing. for.30.minutes.prior.to.taking.a.measurement ..Rest.for.at.least.15. minutes.prior.to.taking.the.measurement . 2 ..Stress.raises.blood.pressure ..Avoid.taking.measurements.during. stressful.times . 3 ..Measurements.should.be.taken.in.a.quiet.place . 4 ..Remove.tight-fitting.clothing.from.your.arm . 5 ..Sit.on.a.chair.with.your.feet.flat.on.the.floor ..Rest.your.arm.on.. a.table.so.that.the.cuff.is.at.the.same.level.as.your.heart . 6 ..Remain.still.and.do.not.talk.during.the.measurement . 7 ..Keep.a.record.of.your.blood.pressure.and.pulse.readings.for.your. physician ..A.single.measurement.may.not.provide.an.accurate.. indication.of.your.true.blood.pressure ..You.need.to.take.and.record. several.readings.over.a.period.of.time ..Try.to.measure.your.blood. pressure.at.about.the.same.time.each.day.for.consistency . -
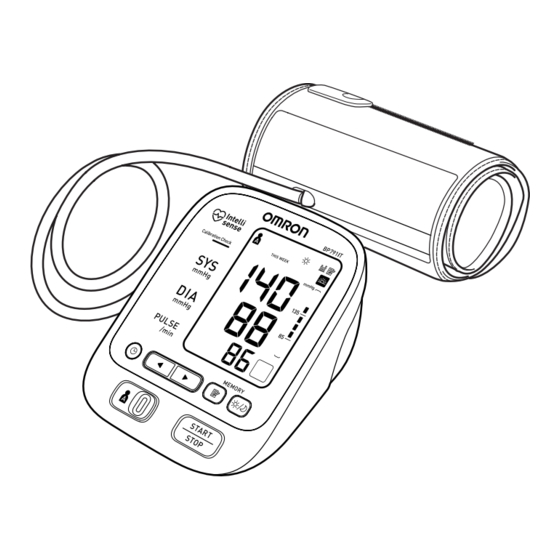
Page 9: Operating Instructions
Operating Instructions kNOW yOUR UNIT Main Unit: Display Calibration Check System SET Button Morning/Evening Average USER ID ) Button Selection Switch Memory ( ) Button Up/Down Start/Stop Button ) Buttons Battery Compartment USB Port Air Jack AC Adapter Jack... - Page 10 UNIT Components: Housing Air Tube Cord AC Adapter Air Plug (Connects to Air Jack) Arm Cuff Alkaline “ ” Batteries USB Cable INSTRUCTION MANUAL 10 series Plus Blood Pressure Monitor with ComFit Cuff BP791IT Model Quick Start Guide Instruction Manual...
-
Page 11: Unit.display
UNIT dISPLAy Morning Average Symbol Evening Average Symbol Date/Time Display Irregular Heartbeat Symbol USER ID Symbol (A or B) Average Value Symbol Week Display TruRead Symbol Memory Symbol Systolic Blood Pressure Morning Hypertension Symbol Movement Symbol Blood Pressure Level Indicator Diastolic Blood Pressure Deflation Symbol Heartbeat Symbol... -
Page 12: Display.symbols
dISPLAy SyMBOLS IRRegULAR HeARtBeAt sYMBOL ( When.the.monitor.detects.an.irregular.rhythm.two.or.more.times.during. the.measurement,.the.Irregular.Heartbeat.Symbol.( ).will.appear.on.the. display.with.the.measurement.values . An.irregular.heartbeat.rhythm.is.defined.as.a. Normal Heartbeat rhythm.that.varies.by.less.than.25%.from. Pulse the.average.rhythm.or.25%.more.than.the. Blood average.rhythm.detected.while.the.monitor. pressure is.measuring.the.systolic.and.diastolic.blood. Irregular Heartbeat pressure . Short Long If.the.irregular.heartbeat.symbol.( Pulse displays.with.your.measurement.results,.we. Blood recommend.you.consult.your.physician .. pressure Follow.the.directions.of.your.doctor . MOveMent eRROR sYMBOL ( The.Movement.Error.Symbol.is.displayed.if.you.move.your.body.during. -
Page 13: Morning.hypertension.symbol
SyMBOLS Internationally.recognized.guidelines.for.upper.limit.of.normal.home. blood.pressure.readings.are.as.follows: Home guideline for Upper Limit of normal Bp Systolic.Blood.Pressure 135.mmHg Diastolic.Blood.Pressure 85.mmHg This.is.a.general.guideline.because.blood.pressure.depends.on. age.and.morbidity ..A.lower.home.blood.pressure.goal.may.be. recommended.for.certain.patients,.including.diabetic.patients,. pregnant.women,.and.patients.with.renal.failure .. The.monitor.is.not.intended.to.be.a.diagnostic.device .. MORnIng HYpeRtensIOn sYMBOL ( The.Morning.Hypertension.Symbol.is.displayed.if.the.morning.average. reading.for.a.week.is.above.135.for.the.Systolic.Blood.Pressure.value. and/or.85.for.the.Diastolic.Blood.Pressure.value.when.viewing.the. Morning.Averages.and.the.Evening.Averages.in.the.memory . Omron.Healthcare.recommends.you.contact.your.physician.if.the. MORNING.HYPERTENSION.SYMBOL.appears.on.the.display.with. your.measurement.values . -
Page 14: Heartbeat.symbol
dISPLAy SyMBOLS HeARtBeAt sYMBOL ( The.Heartbeat.symbol.flashes.on.the.display.at.every.heartbeat.during. the.measurement .. AveRAge vALUe sYMBOL ( The.Average.Value.Symbol.is.displayed.when.you.press.the.memory. button ..The.most.recent.average.reading.appears.on.the.display.screen . MORnIng AveRAge sYMBOL ( The.Morning.Average.symbol.is.displayed.when.viewing.Morning. Averages.using.the.Memory.Function . evenIng AveRAge sYMBOL ( The.Evening.Average.symbol.is.displayed.when.viewing.Evening. Averages.using.the.Memory.Function .. CUFF WRAp gUIDe sYMBOL ( When.the.cuff.is.wrapped.around.the.arm.correctly,.( ).is.displayed. while.taking.a.measurement.or.using.the.memory.function ..If.the.cuff.is. not.wrapped.around.the.arm.correctly,.( ).is.displayed . -
Page 15: Using.the.ac.adapter
FIRE OR ELECTRIC SHOCk, CAREFULLy FOLLOW THESE INSTRUCTIONS. . F or.connection.to.a.power.supply.not.in.the.U .S .A .,.use.an. attachment.plug.adapter.of.the.proper.configuration.for.the.power. outlet . . T he.power.unit.(AC.Adapter).is.intended.to.be.correctly.oriented. in.a.vertical.or.floor.mount.position . NOTES:. •.. U se.only.the.authorized.Omron.AC.Adapter.that.came.with. this.monitor . •.. W e.recommend.you.install.the.batteries.even.if.the.AC. Adapter.is.used ..If.no.batteries.are.installed,.you.may.need.to. reset.the.date.and.time.if.the.AC.Adapter.is.disconnected ..The. measurement.results.will.not.be.deleted . . C AUTION Use.only.Omron.authorized.parts.and.accessories ..Parts.and. - Page 16 USING THE AC AdAPTER tO COnneCt tHe AC ADApteR ① Insert.the.AC.Adapter.Plug.into. Housing the.AC.Adapter.Jack.on.the.back. side.of.the.monitor.as.illustrated . ② Plug.the.AC.Adapter.into.a.120V. AC.outlet.(60.cycles) . Cord tO DIsCOnneCt tHe AC ADApteR ① Hold.the.Housing.to.remove.the.AC.Adapter.from.the.electrical. outlet . ② Remove.the.AC.Adapter.plug.from.the.monitor . . W ARNING Do.not.plug.or.unplug.the.power.cord.into.the.electrical.outlet.with. wet.hands . . W ARNING Do.not.overload.power.outlets ..Plug.the.device.into.the.appropriate.
-
Page 17: Battery.installation
BATTERy INSTALLATION Battery Cover 1 ..Remove.the.battery.cover.by.pulling.the. hook.up.while.pushing.it.in.the.direction. of.the.arrow . 2 ..Install.4.“AA”.size.batteries.so.the.+. (positive).and.-.(negative).polarities.match. the.polarities.of.the.battery.compartment. as.indicated . 3 ..Replace.the.battery.cover . -
Page 18: Battery Replacement
BATTERy INSTALLATION BAtteRY RepLACeMent Low.Battery.Indicator When.the.Low.Battery.Indicator.appears.on.the.display.screen.turn.the. monitor.off.and.remove.all.the.batteries ..Replace.with.four.new.batteries. at.the.same.time ..Longlife.alkaline.batteries.are.recommended . . W ARNING If.battery.fluid.should.get.in.your.eyes,.immediately.rinse.with. plenty.of.clean.water ..Contact.a.physician.immediately . NOTES:. •.. T urn.the.unit.off.before.replacing.the.batteries ..If.the.batteries. are.removed.while.the.unit.is.still.on,.the.date.and.time.will.be. reset.to.that.of.the.previous.use ..However,.the.measurement. results.are.not.deleted . •.. W hen.the.batteries.are.replaced,.you.may.need.to.reset.the. date.and.time ..If.“-:--”.appears.on.the.display,.refer.to.“Setting. the.Date.and.Time” . •.. T he.supplied.batteries.may.have.a.shorter.life . . C AUTION Dispose.of.the.device,.components.and.optional.accessories. -
Page 19: Setting.the.date.and.time
SETTING THE dATE ANd TIME Set.the.monitor.to.the.current.date.and.time.before.taking.a.measurement. for.the.first.time ..If.the.date.and.time.are.not.set.correctly,.the. measurement.values.stored.in.the.memory.and.the.average.values.may. not.be.correct . If.the.date.and.time.are.not.set,.“-:--”.appears.during.or.after. measurement . The.Blood.Pressure.Monitor.automatically.stores.up.to.100.measurement. values.per.user.with.the.dates.and.times ..The.monitor.also.calculates. weekly.averages.for.measurements.in.the.morning.and.in.the.evening .. Morning.and.Evening.averages.are.stored.for.this.week.and.the.last. seven.weeks . The.monitor.can.also.calculate.an.average.reading.based.on.the.three. most.recent.measurements.taken.within.10.minutes.of.the.last.reading . •.. I f.only.two.readings.are.stored.in.the.memory.for.the. NOTE:. 10-minute.period,.the.average.is.based.on.the.two.readings . •.. I f.one.reading.is.stored.in.the.memory.for.the.10-minute. period,.this.reading.is.displayed.as.the.average . - Page 20 SETTING THE dATE ANd TIME 1. tO stARt tHe settIng . Press.and.hold.the.SET.button.to. adjust.the.date.and.time . . The.year.flashes.on.the.display . 2. settIng tHe YeAR . The.year.can.be.set.between.2010.and. 2040 ..When.the.display.reaches.2040,. it.will.return.to.2010 . . Press.the.Up.button.( ).to.advance. by.one.year . . Press.the.SET.button.to.set.the.current. year . . The.month.flashes.on.the.display . NOTES:. •.Press.the.Down.button.( ).to.decrease.the.date.and.time.
- Page 21 SETTING THE dATE ANd TIME 3. settIng tHe MOntH . Press.the.Up.button.( ).to.advance. by.one.month . . Press.the.SET.button.to.set.the.current. month . . The.day.flashes.on.the.display . 4. settIng tHe DAY . Press.the.Up.button.( ).to.advance. by.one.day . . Press.the.SET.button.to.set.the.current. day . . The.hour.flashes.on.the.display .
- Page 22 SETTING THE dATE ANd TIME 5. settIng tHe HOUR . The.time.is.set.using.AM.or.PM . . Press.the.Up.button.( ).to.advance. by.one.hour . . Press.the.SET.button.to.set.the.current. hour . . The.minute.flashes.on.the.display . 6. settIng tHe MInUte . Press.the.Up.button.( ).to.advance.by.one.minute . . Press.the.SET.button.to.set.the.minute.setting . 7. tO tURn tHe MOnItOR OFF .
-
Page 23: Setting.truread
SETTING TRUREAd . .Mode.takes.three.consecutive.measurements . The.TruRead The.monitor.will.inflate,.take.a.measurement,.and.deflate.three.times. separated.by.a.short.interval.of.time.between.each.measurement .. 1 ..Select.your.USER.ID.(A.or.B) . 2 ..Press.the.SET.button . The.TruRead .symbol. .and.the.oFF.setting.appears. on.the.display . 3 ... P ress.the.Up.or.Down.button.( ).to.select.on . NOTE:.. P ress.the.Up.or.Down.button. to.alternate.between.on.and. oFF . - Page 24 SETTING TRUREAd 4 ..Press.the.SET.button.to.confirm.the.change . If.on.is.selected,.the.number.of.seconds.between.each.measurement.is. displayed . NOTE:.. T he.default.value.between.each.measurement.is.60.seconds . 5 ... P ress.the.Up.or.Down.button.( ).to.change.the.interval.of. time.between.each.measurement . The.interval.can.be.set.to.15.seconds,.30.seconds,.60.seconds.or.120. seconds ..Continue.to.press.the.Up.or.Down.button.until.the.desired. interval.appears.on.the.display . 6 ... P ress.the.SET.button.to.confirm.the.setting . The.year.flashes.on.the.display .
- Page 25 SETTING TRUREAd 7 ... I f.the.date.and.time.are.correct,.press.the.START/STOP.button.to.turn. the.monitor.off .. To.change.the.date.and.time,.refer.to.“Setting.the.Date.and.Time” .
-
Page 26: Applying.the.arm.cuff
APPLyING THE ARM CUFF CAUTION Read.all.of.the.information.in.the.instruction.manual.and.any.other. literature.in.the.box.before.operating.the.unit . . C AUTION This.device.is.intended.for.use.in.measuring.blood.pressure.and. pulse.rate.in.the.adult.population ..Do.not.use.this.device.on.infants. or.persons.who.cannot.express.their.intentions . AppLYIng tHe CUFF On tHe LeFt ARM 1 ..Make.sure.the.air.plug.is.securely.inserted.in.the.main.unit . 2 ..Remove.tight-fitting.clothing.from.your.upper.left.arm . - Page 27 APPLyING THE ARM CUFF 3 ..Sit.on.a.chair.with.your.feet.flat.on.the.floor ..Place.your.left.arm.. on.a.table.so.the.cuff.is.level.with.your.heart . 4 ..Hold.the.thumb.grip.on.the.cuff. Thumb Grip securely.with.your.right.hand . Cloth Fastener 5 ..Turn.the.palm.of.your.left.hand. upward .
- Page 28 APPLyING THE ARM CUFF 6 ..Apply.the.cuff.to.your.left.upper.arm.so.the.blue.stripe.is.on.the. inside.of.your.arm.and.aligned.with.your.middle.finger ..The.air.tube. runs.down.the.inside.of.your.arm ..The.bottom.of.the.cuff.should.be. approximately.1/2".above.your.elbow . 1/2 inch (1 - 2 cm) Blue Stripe Air Tube 7 ..Wrap.the.cuff.firmly.in.place.around.your.arm.using.the.cloth. fastener .
-
Page 29: Applying The Cuff On The Right Arm
APPLyING THE ARM CUFF AppLYIng tHe CUFF On tHe RIgHt ARM When.taking.a.measurement.using.the.right.arm.use.this.instruction.. for.Step.6.on.page.28 . Apply.the.cuff.to.your.right.upper.arm.so.the.thumb.grip.is.centered.. on.the.inside.of.your.inner.arm ..The.bottom.of.the.cuff.should.be. approximately.1/2''.above.your.elbow . Thumb Grip NOTE:.. B e.careful.not.to.rest.your.arm.on.the.air.tube ..This.will.restrict. the.flow.of.air.to.the.cuff . -
Page 30: Taking.a.measurement
TAkING A MEASUREMENT The.monitor.is.designed.to.take.measurements.and.store.the. measurement.values.in.the.memory.for.two.people.using.. USER.ID.A.and.USER.ID.B . The.monitor.can.also.be.used.to.take.a.single.measurement.for.other. persons.using.the.GUEST.Mode ..The.USER.ID.symbol.is.not.displayed. when.using.the.GUEST.Mode ..Measurements.taken.using.the.GUEST. Mode.are.not.stored.in.the.memory . . W ARNING Contact.your.physician.for.specific.information.about.your.blood. pressure ..Self-diagnosis.and.treatment.using.measured.results.may. be.dangerous ..Follow.the.instructions.of.your.physician.or.licensed. healthcare.provider . . C AUTION . O perate.the.device.only.as.intended ..Do.not.use.the.device.for.any. other.purpose . CALIBRAtIOn CHeCk sYsteM When.you.press.the.START/STOP.button,.the.Calibration. Check.System.light.turns.on.and.the.unit.starts.monitoring.your. readings.using.dual.sensors ..If.the.unit.is.accurate.and.functioning. correctly,.the.Calibration.Check.System.light.remains.lit.during. -
Page 31: Using.the.guest.mode
TAkING A MEASUREMENT UsIng tHe gUest MODe 1 ..Press.and.hold.the.START/STOP.button . . The.A.and.B.Symbols.disappear.from.the.display . A and B Symbols disappear 2 ..Release.the.START/STOP.button . . The.cuff.starts.to.inflate.automatically . . NOTE:.. T o.stop.the.inflation.press.the.START/STOP.button .. The.monitor.will.stop.inflating,.start.deflation.and.turn.off . 3 ..Inflation.stops.and.the.measurement.is.started ..When.the.measurement. is.completed,.your.blood.pressure.and.pulse.rate.appear.on.the.display . -
Page 32: Selecting.the.user.id
TAkING A MEASUREMENT seLeCtIng tHe UseR ID Select.your.USER.ID ..Always.use.the.same.USER.ID.when.taking. a.measurement ..The.monitor.stores.the.measurement.values.in.the. memory.by.the.USER.ID.selected ..These.measurement.values.are.used. to.calculate.the.Morning.Averages.and.Evening.Averages . Slide.the.USER.ID.Selection.Switch.right.or.left.to.select.USER.A.or.B . UsIng tHe UseR ID After.you.select.a.USER.ID,.the.monitor.can.be.set.to.take.one. measurement.using.the.Single.Mode.or.three.consecutive.measurements. using.the.TruRead .Mode . NOTE:.. T he.default.value.is.set.to.the.Single.Mode.to.take.one. measurement ..Refer.to.“Setting.TruRead ” . -
Page 33: Using.the.single.mode
TAkING A MEASUREMENT UsIng tHe sIngLe MODe 1 ..Select.your.USER.ID.(A.or.B) . 2 ..Press.the.START/STOP.button . . All.symbols.appear.on.the.display ..The.USER.ID.Symbol.you.selected. flashes.on.the.display .. . The.cuff.starts.to.inflate.automatically ..As.the.cuff.inflates,.the.monitor. automatically.determines.your.ideal.inflation.level ... This.monitor.detects.the.pulse.during.inflation ..Do.not.move.your.arm. and.remain.still.until.the.entire.measurement.process.is.completed . . NOTE:.. T o.stop.the.inflation.or.measurement,.press.the.START/STOP. button ..The.monitor.will.stop.inflating,.start.deflating.and.will. turn.off . - Page 34 TAkING A MEASUREMENT 3 ..Inflation.stops.automatically.and.the.measurement.is.started .. . As.the.cuff.deflates,.decreasing.numbers.appear.on.the.display ... The.Heartbeat.Symbol.( ).flashes.at.every.heartbeat . 4 ..When.the.measurement.is.complete,.the.arm.cuff. completely.deflates ..Your.blood.pressure.and.pulse. rate.are.displayed .. 5 ..Press.the.START/STOP.button.to.turn.the. monitor.off . . NOTE:.. T he.monitor.will.automatically.turn. off.after.two.minutes .
-
Page 35: Using.the.truread Tm .Mode
TAkING A MEASUREMENT UsIng tHe tRUReAD MODe 1 ..Select.your.USER.ID.(A.or.B) . 2 ..Press.the.START/STOP.button . . All.symbols.appear.on.the.display ..The.USER.ID.Symbol.you.selected. flashes.on.the.display ..The.cuff.starts.to.inflate.automatically . . NOTE:.. T o.stop.the.inflation.or.measurement,.press.the.START/STOP. button ..The.monitor.will.stop.inflating,.start.deflating.and.will. turn.off . 3 ..Inflation.stops.automatically.and.the.measurement.is.started . . As.the.cuff.deflates,.decreasing.numbers.appear.on.the.display ... The.Heartbeat.Symbol.( ).flashes.at.every.heartbeat ..When.the. measurement.is.complete,.the.arm.cuff.completely.deflates . . NOTE:.. D o.not.move.your.arm.and.remain.still.until.the.entire. measurement.process.is..completed . - Page 36 TAkING A MEASUREMENT . The.second.measurement.is.complete,.waiting.to.start.the.. next.measurement . . The.consecutive.measurements.are.complete ..The.average.for.three. measurements.appears.on.the.display . 5 ..Press.the.SET.button.to.display.the.blood.pressure.and.pulse.rate.for. the.first.measurement ..Press.the.SET.button.again.to.display.the.next. measurement . 6 ..Press.the.START/STOP.button.to.turn.the.monitor.off . . W ARNING Contact.your.physician.for.specific.information.about.your.blood. pressure ..Self-diagnosis.and.treatment.using.measured.results.may. be.dangerous ..Follow.the.instructions.of.your.physician.or.licensed. healthcare.provider . . W ARNING DO.NOT.adjust.medication.based.on.measurement.results.from. this.blood.pressure.monitor ..Take.medication.as.prescribed.by.your. physician ..Only.a.physician.is.qualified.to.diagnose.and.treat.High. Blood.Pressure .
-
Page 37: Special.conditions
TAkING A MEASUREMENT . W ARNING The.monitor.is.not.intended.to.be.a.diagnostic.device . speCIAL COnDItIOns . C AUTION Inflating.to.a.higher.pressure.than.necessary.may.result.in.bruising. where.the.cuff.is.applied . . If.your.systolic.pressure.is.known.to.be.more.than.220.mmHg,.press. and.hold.the.START/STOP.button.until.the.monitor.inflates.30.to.40. mmHg.higher.than.your.expected.systolic.pressure . . NOTES: •.Do.not.apply.more.pressure.than.necessary .. . •.The.monitor.will.not.inflate.above.299.mmHg . . When.the.measurement.is.complete,.the.arm.cuff.completely.deflates .. Your.blood.pressure.and.pulse.rate.are.displayed . -
Page 38: Using.the.memory.function
USING THE MEMORy FUNCTION The.monitor.is.designed.to.store.the.blood.pressure.and.the.pulse.. rate.in.the.memory.for.two.people.(USER.A.and.USER.B).every.time.. a.measurement.is.completed . The.monitor.automatically.stores.up.to.100.sets.of.measurement.values. (blood.pressure.and.pulse.rate).for.each.user.(A.and.B) ..When.100.sets.. of.measurement.values.are.stored,.the.oldest.record.is.deleted.to.save.. the.most.recent.values ..The.monitor.also.stores.8.weeks.of.Morning. Averages.and.8.weeks.of.Evening.Averages.for.each.user.(A.and.B) . AveRAgIng FUnCtIOn The.monitor.calculates.the.average.reading.based.on.the.three.most. recent.sets.of.measurement.values.taken.within.10.minutes.of.the.most. recent.reading . NOTES:. •.If.two.sets.of.measurement.values.are.stored.in.the.memory. for.the.10.minutes.period,.the.average.is.based.on.the.two. sets.of.measurement.values ..If.one.set.of.measurement. values.is.stored,.this.is.displayed.as.the.average . •.When.viewing.the.reading.taken.without.setting.the.date.and. time,.“-:--”.is.displayed.instead.of.the.date.and.time . -
Page 39: To.display.the.measurement.values
USING THE MEMORy FUNCTION tO DIspLAY tHe MeAsUReMent vALUes 1 ..Select.your.USER.ID.(A.or.B) . 2 ..Press.the.Memory.button.( . The.Average.Symbol.( ).appears.on.the.display.when.the.average. reading.is.shown . - Page 40 USING THE MEMORy FUNCTION 3 ..Press.the.Down.button.( ).to.display.the.most.recent.set.of. measurement.values.on.the.screen ..The.values.are.displayed.from.the. most.recent.to.the.oldest . . NOTE:.. T he.date.and.time.are.alternately. displayed.with.the.measurement. Alternating display values . . Press.the.Up.or.Down.button.to.display.the. next.set.of.values . :.To.the.older.readings :.To.the.more.recent.readings . NOTE:.. P ress.and.hold.the.Up.or.Down.button.to.display.the.values. faster . . truRead Mode . The.average.for.the.consecutive.measurements.appears.on.the.display. with.the.TruRead .symbol.( ) ..To.display.the.values.for.the. individual.measurements.press.the.SET.button.while.the.average.is.
-
Page 41: Morning.and.evening.averages
USING THE MEMORy FUNCTION MORnIng AnD evenIng AveRAges The.monitor.calculates.and.displays.a.weekly.average.for.measurements. taken.in.the.morning.( ).and.evening.( ) ..The.monitor.stores.8. weeks.of.Morning.Averages.and.8.weeks.of.Evening.Averages.for.each. user.(A.and.B) . NOTE:.. T he.week.begins.Sunday.at.4:00.AM . MORnIng AveRAges . Morning.averages.are.based.on.the.first.average.reading.using.the. TruRead .Mode.or.the.first.reading.using.the.Single.Mode . . Measurement.times.must.be.between: 4:00 AM and 9:59 AM. evenIng AveRAges . Evening.averages.are.based.on.the.last.average.reading.using.the. TruRead .Mode.or.the.last.reading.using.the.Single.Mode . . -
Page 42: To.display.morning.and.evening.averages
USING THE MEMORy FUNCTION tO DIspLAY MORnIng AnD evenIng AveRAges 1 ..Select.your.USER.ID.(A.or.B) . 2 ..Press.the.Morning/.Evening. Average.button.( ).to.select. the.Morning.or.Evening.average . . The.average.for.the.current.week. “THIS.WEEK”.appears.on.. the.display . 3 ..Press.the.Down.( ).button.to.display.the.previous.weeks . . With.each.press.of.the.Down.( ).button,.the.values.are.displayed. from.1.week.ago.to.the.older .. With.each.press.of.the.Up.( ).button,.the.values.are.displayed.from. 7.weeks.ago.to.the.recent . . NOTE:.. I f.no.measurement.is.taken.in.a.given.week,.the. display.will.appear.as.illustrated . -
Page 43: Display.combinations
USING THE MEMORy FUNCTION DIspLAY COMBInAtIOns In.addition.to.the.Morning.Average.and.Evening.Average.Symbols,. the.monitor.may.also.display.the.Morning.Hypertension.Symbol.if.the. morning.average.for.that.week.is.above.the.internationally.recognized. guidelines ..(See.page.13.for.details .).Depending.on.your.measurement. results,.these.may.be.displayed.in.the.following.combinations . display Morning Average Morning average from This Week Morning average from 7 weeks ago with Morning Average Symbol with Morning Average Symbol + Morning Hypertension Symbol Evening Average Evening average from This Week... -
Page 44: To.delete.all.values.stored.in.the.memory
USING THE MEMORy FUNCTION The.Morning.Hypertension.Symbol. .appears.if.the.weekly.average. for.morning.measurements.is.above.135/85 . In.this.case.the.Morning.Hypertension.Symbol. .is.displayed.when. the.Evening.Average.is.displayed,.regardless.of.the.values.for.the. Evening.Average . tO DeLete ALL vALUes stOReD In tHe MeMORY The.values.stored.in.the.memory.are.deleted.by.USER.ID .. You.cannot.partially.delete.values.stored.in.the.memory ..All.values.for. the.user.you.select.will.be.deleted . 1 ..Select.your.USER.ID.(A.or.B) . 2 ..While.holding.the.Memory.button.( ).and.the.START/STOP.button. simultaneously.for.more.than.2.seconds.all.values.will.be.deleted . -
Page 45: Downloading Instructions
Downloading Instructions INSTALLING THE SOFTWARE Optional Instructions for PC Connection ® To.install.software,.choose.either.Microsoft .HealthVault .or.Omron. Health.Management.software . NOTE:.. A ny.measurement.values.taken.before.setting.the.date.and.time. are.not.transferred.to.Microsoft.HealthVault .and.Omron.Health. Management.software . ® DOWnLOADIng AnD InstALLIng MICROsOFt HeALtHvAULt HealthVault.is.a.free.Web-based.platform.designed.to.put.people.in. control.of.their.health.data ..It.helps.them.collect,.store.and.share.health. information.with.family.members.and.participating.healthcare.providers,. and.provides.people.with.a.choice.of.third-party.applications.and.devices. to.help.them.manage.things.such.as.fitness,.diet.and.health .. 1 ..Go.to.http://www .healthvault .com/hvcc/system-requirements .aspx 2 ..Create.a.HealthVault.account.to.store.your.blood. - Page 46 INSTALLING THE SOFTWARE OpeRAtIng envIROnMent ReqUIReMents ® The.following.operating.environments.are.required.to.run.Microsoft HealthVault . supported Os*:..HealthVault.works.best.with.the.following.operating.systems: either 32-bit or 64-bit versions of: Microsoft ® .Windows ® ® .Home.Premium Windows .Professional ® ® Windows ® ® .Ultimate either 32-bit or 64-bit versions of: Microsoft ®...
-
Page 47: Downloading And Installing Omron Health
INSTALLING THE SOFTWARE DOWnLOADIng AnD InstALLIng OMROn HeALtH MAnAgeMent sOFtWARe Omron.Health.Management.Software.allows.you.to.view,.process.and. print.data.about.blood.pressure.and.walking.measured.by.Omron’s. compatible.blood.pressure.monitor.and.pedometer . •.. T o.install.Omron.Health.Management.Software.onto.your.PC,.you. must.have.administrative.privileges . •.Close.all.applications.currently.running.before.you.install.the.software . •.. W hen.using.anti-virus.software,.disable.anti-virus.software.before. installation ..It.may.interfere.with.the.set-up.program.of.this.software .. Enable.the.anti-virus.software.again.after.installation.is.complete . 1 ..Download.the.Omron.Health.Management.Software.at.www .software . omronhealthcare .com ..Follow.the.installation.directions.when. prompted ..Read.the.License.Agreements.thoroughly.and.accept.the. terms.if.you.agree ..Once.Omron.Health.Management.Software.is. - Page 48 INSTALLING THE SOFTWARE OpeRAtIng envIROnMent ReqUIReMents The.following.operating.environments.are.required.to.run.the.Omron. Health.Management.software . supported Os: Microsoft ® .Windows ® .2000.Professional.(SP4) Microsoft .Windows .XP.Home.Edition.(SP2) ® ® Microsoft .Windows .XP.Professional.(SP2) ® ® Microsoft .Windows .Vista .Home.Basic ® ® ® Microsoft .Windows .Vista .Home.Premium ® ® ®...
-
Page 49: Using.the.software
USING THE SOFTWARE . F or.help.using.the.software,.double-click.[Omron. Health.Management.Software.Users.Manual . pdf].shortcut.on.desktop,.or.click.[Help].in.this. software.after.starting.up . 1 ..Double-click.the.[Omron.Health.Management.Software]. shortcut.icon.on.the.desktop .. . If.no.icon.appears.on.the.desktop:.From.the.[Start]. menu,.select.[All.programs].or.[Programs]...[Omron. Health.Management.Software],.and.click.the.[Omron. Health.Management.Software].shortcut . 2 ..If.you.are.using.Omron.Health. Management.Software.for.the. first.time,.click.[Add.User].on. the.User.Management.screen .. - Page 50 USING THE SOFTWARE 3 ..In.the.New.User.Registration. box,.enter.your.name.. (e .g .,.Chuck).and.click.[OK] . . NOTES: . •.. O mron.Health.Management. Software.can.manage.multiple.users’.data ..Data.is.controlled.by.user. name . . •.. T he.number.of.users.who.can.register.for.this.software.varies. depending.on.the.amount.of.free.disc.space.in.your.PC . . •.. T he.user.name.can.be.up.to.28.characters .. 4 ..Click.the.user.name,.and.click. [Graph.Screen] .. 5 ..Click.the.[Blood.Pressure. Monitor].icon .
- Page 51 USING THE SOFTWARE Use.only.the.authorized.Omron.USB.cable,.Model.HHX-CABLE- USB2,.included.with.this.unit . . C AUTION Use.only.Omron.authorized.parts.and.accessories ..Parts.and. accessories.not.approved.for.use.with.the.device.may.damage.. the.unit . Open the USB Port cover. Plug the normal USB Connector Normal USB (Large Connector) into the Connector personal computer. Mini USB Connector Plug the mini USB connector (Small Connector) into the USB Port.
- Page 52 USING THE SOFTWARE Click [download data] icon to import the data. The Confirm dialog appears. Make sure your cable is connected then click [yes]. Select the blood pressure monitor being used and click [Ok]. Start importing data. Click [Cancel] if you want to cancel.
-
Page 53: Care And Maintenance
Care and Maintenance CARE ANd MAINTENANCE To keep your blood pressure monitor in the best condition and protect the unit from damage, follow the directions listed below: Do not forcefully bend.the.arm.cuff.or.air.tube ..Do.not.fold.tightly . Clean the monitor with a soft dry cloth..Do.not.use.any.abrasive. or.volatile.cleaners ..Do.not.attempt.to.clean.the.cuff .. - Page 54 CARE ANd MAINTENANCE Use the unit consistent with the instruction provided in this manual. . C AUTION Changes.or.modification.not.approved.by.Omron.Healthcare.will. void.the.user.warranty ..Do.not.disassemble.or.attempt.to.repair.the. unit.or.components . . C AUTION Use.only.Omron.authorized.parts.and.accessories ..Parts.and. accessories.not.approved.for.use.with.the.device.may.damage.. the.unit ..
-
Page 55: Error.indicators.and.troubleshooting.tips
ERROR INdICATORS ANd TROUBLESHOOTING TIPS eRROR InDICAtORs SyMBOL CAUSE CORRECTION Insert.the.plug.securely ..Refer.to.“Applying.the. Air.plug.disconnected . Arm.Cuff” . Apply.the.arm.cuff.correctly ..Refer.to.“Applying. Arm.cuff.not.applied.correctly . the.Arm.Cuff” . Air.is.leaking.from.the.arm.cuff . Replace.the.cuff.with.the.new.one . Repeat.measurement ..Remain.still.and.do.not. talk.during.measurement ..Refer.to.“Taking.a. Measurement” . Cuff.over.or.under.inflated . If.“E2”.appears.repeatedly,.inflate.the.cuff.manually. until.it.is.30.to.40.mmHg.above.your.previous. measurement.result ..Refer.to.“Taking.a.Measurement” . The.arm.cuff.was.inflated.above.299. Do.not.inflate.the.cuff.above.299.mmHg ..Refer.to. -
Page 56: Troubleshooting Tips
ERROR INdICATORS ANd TROUBLESHOOTING TIPS eRROR InDICAtORs SyMBOL CAUSE CORRECTION Replace.the.four.batteries ... Batteries.are.worn . Refer.to.“Battery.Installation” . tROUBLesHOOtIng tIps PROBLEM CAUSES ANd SOLUTIONS No.power . Replace.all.four.batteries.with. new.ones . No.display.appears.on.the.unit . Check.the.battery.installation.. for.proper.placement.of.the.. battery.polarities . Blood.pressure.varies.constantly .. Many.factors.including.stress,. time.of.day,.and.how.you.wrap. Measurement.values.appear.too. the.cuff,.may.affect.your.blood. high.or.too.low . pressure ... -
Page 57: Fcc.statement
FCC STATEMENT NOTE: POTENTIAL.FOR.RADIO/TELEVISION.INTERFERENCE.(for.U .S .A ..only) This.product.has.been.tested.and.found.to.comply.with.the.limits.for.a.Class.B. digital.device,.pursuant.to.part.15.of.the.FCC.rules . These.limits.are.designed.to.provide.reasonable.protection.against.harmful. interference.in.a.residential.installation ..The.product.generates,.uses,.and.can. radiate.radio.frequency.energy.and,.if.not.installed.and.used.in.accordance.. with.the.instructions,.may.cause.harmful.interference.to.radio.communications .. However,.there.is.no.guarantee.that.interference.will.not.occur.in.a.particular. installation ..If.the.product.does.cause.harmful.interference.to.radio.or.television. reception,.which.can.be.determined.by.turning.the.product.on.and.off,.the.. user.is.encouraged.to.try.to.correct.the.interference.by.one.or.more.of.the.. following.measures: •.Reorient.or.relocate.the.receiving.antenna . •.Increase.the.separation.between.the.product.and.the.receiver . •.Connect.the.product.into.an.outlet.on.a.circuit.different.from.that.to.which.. the.receiver.is.connected . •.Consult.the.dealer.or.an.experienced.radio/TV.technician.for.help . POTENTIAL.FOR.RADIO/TELEVISION.INTERFERENCE.(for.Canada.only) This.digital.apparatus.does.not.exceed.the.Class.B.limits.for.radio.noise.. emissions.from.digital.apparatus.as.set.out.in.the.interference-causing.equipment. standard.entitled.“Digital.Apparatus”,.ICES-003.of.the.Canadian.Department.of. Communications . Cet.appareil.numérique.respecte.les.limites.de.bruits.radioeléctriques.applicables. aux.appareils.numériques.de.Clase.B.prescrites.dans.la.norme.sur.le.materiel. brouilleur:.“Appareils.Numériques”,.ICES-003.édictée.par.le.minister.des. communications .. -
Page 58: Limited.warranty
AnD OtHeR teRMs tHAt MAY Be IMpOseD BY LAW, IF AnY, ARe LIMIteD In DURAtIOn tO tHe peRIOD OF tHe ABOve eXpRess WARRAntY. OMROn sHALL nOt Be LIABLe FOR LOss OF Use OR AnY OtHeR speCIAL, InCIDentAL, COnseqUentIAL OR InDIReCt COsts, eXpenses OR DAMAges. -
Page 59: Specifications
SPECIFICATIONS Model:. Bp791It (HeM-7222-ItZ) Display:. LCD.Digital.Display Measurement.Range:. Pressure:.0.to.299.mmHg,.Pulse:.40.to.180/min . Accuracy/Calibration:. . P ressure:.±3mmHg.or.2%.of.reading. Pulse:. .±5%.of.reading Inflation:. Automatic.by.electric.pump Deflation:.. Automatic.pressure.release.valve Rapid.Air.Release:. Automatic.exhaust.valve Measurement.Method:. Oscillometric.method Power.Source:. 120V.60Hz..AC.adapter.or.4.“AA”.batteries. Battery.Life:. Approx ..300.uses.when.used.6.times.a.day.. with.4.new.alkaline.batteries Operating.Temperature. 50ºF.to.104ºF.(10ºC.to.40ºC)./15.to.90%.RH. /Humidity:. Storage.Temperature. -4ºF.to.140ºF.(-20ºC.to.60ºC)./10.to.95%.RH. /Humidity/Air.Pressure:.. / 700.-.1060.hPa Main.Unit.Weight:. . A pproximately.15.1/2.oz ..(440.g).. - Page 60 Manufactured.for.OMRON.HEALTHCARE.Co .,.Ltd . Made.in.China Distributed.by: OMROn HeALtHCARe, InC. 1925.West.Field.Court. Lake.Forest,.IL.60045.U .S .A .. www .omronhealthcare .com ©.2012.OMRON.HEALTHCARE,.INC .
- Page 61 MANUAL dE INSTRUCCIONES Serie 10 Plus Monitor de Presión Arterial con brazalete ComFit BP791IT Modelo...
- Page 62 ÍNdICE Antes de usar el monitor Introducción....................E4 Información.de.seguridad .
- Page 63 . D escarga.e.Instalación.del.software.para.el.. Cuidado.de.la.Salud.de.Omron............E47 Utilización.del.software. ................E49 Cuidado y mantenimiento Cuidado.y.mantenimiento.
-
Page 64: Antes De Usar El Monitor
Antes de usar el monitor INTROdUCCIóN Gracias.por.comprar.el.Monitor.de.Presión.Arterial.Automático.Serie.10.Plus. ® BP791IT.con.brazalete.ComFit .de.Omron Completar para futura referencia. FECHA DE COMPRA: _________________ NÚMERO DE SERIE: __________________ • Anexe aquí su comprobante de compra • Registre su producto en línea en www.register-omron.com Su.nuevo.monitor.de.presión.arterial.utiliza.el.método.oscilométrico.de. medición.de.la.presión.arterial ..Esto.significa.que.el.monitor.detecta.el. -
Page 65: Información.de.seguridad
INFORMACIóN dE SEGURIdAd ApLICACIÓn Este.producto.está.diseñado.para.medir.la.presión.arterial.y.el.pulso. en.personas.usando.el.rango.del.brazalete.designado.y.siguiendo. las.instrucciones.de.este.manual.de.instrucciones ..Está.diseñado. principalmente.para.uso.doméstico.general ..Lea.la."Información.de. seguridad".de.este.manual.de.instrucciones.antes.de.usar.la.unidad . A fin de garantizar el uso adecuado del producto, siempre se deben seguir medidas básicas de seguridad, incluyendo las precauciones indicadas en este manual de instrucciones. sÍMBOLOs De segURIDAD UtILIZADOs en este MAnUAL De InstRUCCIOnes Indica.una.situación.potencialmente.peligrosa. - Page 66 INFORMACIóN dE SEGURIdAd OpeRACIÓn DeL DIspOsItIvO (continuación) E l.monitor.no.está.diseñado.para.ser.utilizado.como.dispositivo.de. diagnóstico . S i.el.fluido.de.las.pilas.entra.en.contacto.con.sus.ojos,.enjuague. inmediatamente.con.abundante.agua.limpia ..Contacte.a.un.médico. inmediatamente . L ea.toda.la.información.del.manual.de.instrucciones.y.cualquier.otro. material.impreso.incluido.en.la.caja.antes.de.operar.la.unidad . E ste.dispositivo.está.diseñado.para.medir.la.presión.arterial.y. frecuencia.del.pulso.en.adultos ..Este.dispositivo.no.debe.utilizarse. con.bebés.ni.con.otras.personas.que.no.puedan.expresar.sus. intenciones . L ea.la.sección.sobre.condiciones.especiales.(página.E37).del.manual. de.instrucciones.si.le.consta.que.su.presión.sistólica.es.superior.a.los. 220.mmHg ..Inflar.el.dispositivo.a.una.presión.más.alta.que.la. necesaria.puede.provocar.magulladuras.en.el.lugar.donde.se.aplica.el. brazalete . O pere.el.dispositivo.sólo.con.el.fin.para.el.que.fue.diseñado ..No. utilice.el.dispositivo.con.ningún.otro.fin . .
-
Page 67: Riesgo.de.descarga.eléctrica
INFORMACIóN dE SEGURIdAd S ólo.utilice.las.piezas.y.accesorios.autorizados.por.Omron ..Las. piezas.y.accesorios.que.no.estén.aprobadas.para.utilizar.con.el. dispositivo.podrían.dañar.la.unidad . U tilice.sólo.pilas.alcalinas.de.1 .5V.en.este.dispositivo .. No.utilice.ningún.otro.tipo.de.pilas ..Eso.podría.dañar.la.unidad . RIesgO De DesCARgA eLéCtRICA N o.enchufe.ni.desenchufe.el.cable.de.alimentación.en.el. tomacorriente.eléctrico.con.las.manos.mojadas . N o.sobrecargue.los.tomacorrientes ..Enchufe.el.dispositivo.en.un. tomacorriente.con.el.voltaje.adecuado . CUIDADO Y MAntenIMIentO N o.someta.el.monitor.a.golpes.fuertes,.como.por.ejemplo,.dejar.caer. la.unidad.al.suelo . N o.sumerja.el.dispositivo.ni.ninguno.de.sus.componentes.en.agua . G uarde.el.dispositivo.y.los.componentes.en.un.lugar.limpio.y. -
Page 68: Antes.de.tomar.una.medición
ANTES dE TOMAR UNA MEdICIóN A.fin.de.garantizar.una.lectura.confiable,.siga.las.siguientes. recomendaciones: 1 ..Evite.comer,.tomar.bebidas.alcohólicas,.fumar,.hacer.ejercicio.y. bañarse.por.30.minutos.antes.de.tomar.una.medición ..Descanse. durante.al.menos.15.minutos.antes.de.realizar.la.medición . 2 ..El.estrés.eleva.la.presión.arterial ..Evite.realizar.mediciones.en. momentos.de.estrés . 3 ..Las.mediciones.se.deben.llevar.a.cabo.en.un.lugar.tranquilo . 4 ..Retire.la.ropa.ajustada.del.brazo . 5 ..Siéntese.en.una.silla.con.los.pies.apoyados.sobre.el.piso ..Coloque. el.brazo.sobre.una.mesa,.de.modo.que.el.brazalete.quede.al.mismo. nivel.que.su.corazón . 6 ..Quédese.quieto.y.no.hable.durante.la.medición . 7 ..Lleve.un.registro.de.las.lecturas.de.presión.arterial.y.del.pulso. para.que.las.revise.su.médico ..Es.posible.que.una.sola.medición. no.brinde.una.indicación.precisa.de.su.verdadera.presión.arterial .. Es.necesario.realizar.varias.mediciones.y.registrarlas.durante.un. período.de.tiempo ..Trate.de.medir.su.presión.arterial.todos.los.días.a. -
Page 69: Instrucciones De Operación
Instrucciones de operación CONOzCA SU UNIdAd Unidad principal: Pantalla Sistema de verificación de calibración Botón SET (Configuración) Botón de promedio matutino/vespertino Interruptor de selección de ID DE USUARIO Botón de memoria ( Botones Up/Down Botón Start/Stop (Inicio/ (Arriba/Abajo) Detener) Compartimiento de las pilas Puerto USB Enchufe hembra del aire... - Page 70 Cable Adaptador de CA Enchufe macho del aire (Se conecta al enchufe hembra del aire) Brazalete 4 pilas alcalinas “AA” Cable USB INSTRUCTION MANUAL 10 series Plus Blood Pressure Monitor with ComFit Cuff BP791IT Model Manual de instrucciones Guía rápido...
-
Page 71: Pantalla.de.la.unidad
PANTALLA dE LA UNIdAd Símbolo de promedio matutino Símbolo de promedio vespertino Pantalla de fecha/hora Símbolo de latido irregular Símbolo de ID DE USUARIO (A o B) Símbolo de valor promedio Pantalla de semana Símbolo TruRead Símbolo de memoria Símbolo de hipertensión Presión arterial sistólica matutina Símbolo de movimiento... -
Page 72: Símbolos.de.la.pantalla
SÍMBOLOS dE LA PANTALLA sÍMBOLO De LAtIDO IRRegULAR ( Cuando.el.monitor.detecta.un.ritmo.irregular.dos.o.más.veces.durante.la. medición,.aparecerá.en.la.pantalla.el.Símbolo.de.latido.irregular.( con.los.valores.de.medición . El.ritmo.cardíaco.irregular.se.define.como.. Latido normal un.ritmo.que.sufre.una.variación.de. Pulso menos.del.25%.del.ritmo.promedio.o. Presión de.más.del.25%.del.ritmo.promedio.que. arterial se.detecta.mientras.el.monitor.mide.la. Latido irregular presión.arterial.sistólica.y.diastólica . Corto Largo Si.el.símbolo.de.latido.irregular.( ). Pulso aparece.con.los.resultados.de.su.medición,. Presión arterial le.recomendamos.que.consulte.a.su. médico ..Siga.las.instrucciones.del.médico . sÍMBOLO De eRROR De MOvIMIentO ( El.Símbolo.de.error.de.movimiento.aparece.si.usted.se.mueve.mientras. -
Page 73: Símbolo.de.hipertensión.matutina
135.mmHg Presión.arterial.sistólica 85.mmHg Presión.arterial.diastólica. Esta.es.una.pauta.general,.puesto.que.la.presión.arterial. depende.de.la.edad.y.de.la.morbilidad ..Se.recomienda.un. objetivo.de.presión.arterial.tomada.en.el.hogar.más.bajo. para.ciertos.pacientes,.como.pacientes.diabéticos,.mujeres. embarazadas.y.pacientes.con.insuficiencia.renal .. El.monitor.no.está.diseñado.para.ser.utilizado.como.dispositivo.de. diagnóstico .. sÍMBOLO De HIpeRtensIÓn MAtUtInA ( El.símbolo.de.hipertensión.matutina.aparece.en.pantalla.cuando.la. lectura.promedio.matutina.que.corresponde.a.una.semana.es.superior.a. 135.para.el.valor.de.la.presión.arterial.sistólica.y/o.85.para.el.valor.de. la.presión.arterial.diastólica.al.visualizar.los.promedios.matutinos.y.los. promedios.vespertinos.en.la.memoria . Si.el.SÍMBOLO.DE.HIPERTENSIÓN.MATUTINA.aparece.en. la.pantalla.junto.con.los.valores.de.medición,.Omron.Healthcare. recomienda.que.consulte.a.su.médico . -
Page 74: Símbolo.de.latido
SÍMBOLOS dE LA PANTALLA sÍMBOLO De LAtIDO ( El.símbolo.de.latido.titila.en.la.pantalla.con.cada.latido.del.corazón. durante.la.medición .. sÍMBOLO De vALOR pROMeDIO ( El.Símbolo.de.valor.promedio.aparece.cuando.se.presiona.el.botón.de. memoria ..La.lectura.promedio.más.reciente.aparece.en.la.pantalla . sÍMBOLO De pROMeDIO MAtUtInO ( El.símbolo.de.promedio.matutino.aparece.al.visualizar.los.promedios. matutinos.utilizando.la.función.Memoria . sÍMBOLO De pROMeDIO vespeRtInO ( El.símbolo.de.promedio.vespertino.aparece.al.visualizar.los.promedios. vespertinos.utilizando.la.función.Memoria .. sÍMBOLO gUÍA pARA COLOCAR eL BRAZALete ( Cuando.el.brazalete.se.coloca.alrededor.del.brazo.correctamente,. -
Page 75: Uso.del.adaptador.de.ca
INCENdIO O dESCARGA ELÉCTRICA, SIGA ATENTAMENTE ESTAS INSTRUCCIONES. . P ara.conexiones.a.un.suministro.de.energía.que.no.sea.en.los.EE .. UU .,.utilice.un.adaptador.de.enchufe.con.la.configuración. apropiada.para.el.tomacorriente . . L a.unidad.de.potencia.(adaptador.de.CA).está.diseñada.para.estar. correctamente.orientada.en.posición.vertical.o.montada.en.el. suelo . NOTAS:. •.. U se.sólo.el.adaptador.de.CA.autorizado.de.Omron.que.vino. con.este.monitor . •.. L e.recomendamos.colocar.las.pilas.incluso.si.se.utiliza. el.adaptador.de.CA ..Si.no.hay.ninguna.pila.colocada,.es. posible.que.necesite.volver.a.configurar.la.fecha.y.la.hora. si.el.adaptador.de.CA.se.desconecta ..Los.resultados.de.la. medición.no.se.borran ..P RECAUCIóN Use.sólo.las.piezas.y.accesorios.autorizados.por.Omron ..Las.piezas. - Page 76 USO dEL AdAPTAdOR dE CA pARA COneCtAR eL ADAptADOR De CA ① Inserte.el.enchufe.macho.del. Carcasa adaptador.de.CA.en.el.enchufe. hembra.del.adaptador.de.CA. ubicado.en.la.parte.trasera.del. monitor.como.se.indica.en.la. ilustración . Cable ➁ Enchufe.el.adaptador.de.CA.a.un. tomacorrientes.de.120.VCA.. (60.ciclos) . pARA DesCOneCtAR eL ADAptADOR De CA ① Sostenga.la.carcasa.para.retirar.el.adaptador.de.CA.del. tomacorrientes . ➁ Retire.el.enchufe.del.adaptador.de.CA.del.monitor . . A dVERTENCIA No.enchufe.ni.desenchufe.el.cable.de.alimentación.del.tomacorriente.
-
Page 77: Colocación.de.las.pilas
COLOCACIóN dE LAS PILAS Tapa del compartimiento 1 ..Retire.la.tapa.del.compartimento.de.las.pilas. de las pilas jalando.el.gancho.hacia.arriba,.mientras. lo.empuja.en.la.dirección.que.indica.la. flecha . 2 ..Coloque.4.pilas.“AA”.de.modo.que.las. polaridades.+.(positiva).y.-.(negativa). concuerden.con.las.polaridades.que.se. indican.en.el.compartimiento.de.las.pilas . 3 ..Vuelva.a.colocar.la.tapa.del.compartimiento.de.las.pilas . - Page 78 COLOCACIóN dE LAS PILAS CAMBIO De LAs pILAs Indicador.de.pilas.bajas Cuando.el.Indicador.de.pilas.bajas.aparezca.en.la.pantalla,.apague.el. monitor.y.retire.todas.las.pilas ..Reemplácelas.por.cuatro.pilas.nuevas.al. mismo.tiempo ..Se.recomienda.usar.pilas.alcalinas.de.larga.duración . . A dVERTENCIA En.caso.de.que.el.fluido.de.las.pilas.entre.en.contacto.con.los. ojos,.enjuague.de.inmediato.con.abundante.agua.limpia ..Consulte. inmediatamente.a.un.médico . NOTAS:. •.. A pague.la.unidad.antes.de.cambiar.las.pilas ..Si.las.pilas. se.retiran.mientras.la.unidad.está.encendida,.la.fecha.y.la. hora.se.reconfigurarán.en.base.a.los.datos.anteriores ..Sin. embargo,.los.resultados.de.la.medición.no.se.borran . •.. A l.cambiar.las.pilas,.es.posible.que.deba.volver.a.configurar. la.fecha.y.la.hora ..Si.aparece.“-:--”.en.la.pantalla,.consulte. “Configuración.de.la.fecha.y.hora” . •..
-
Page 79: Configuración.de.la.fecha.y.hora
CONFIGURACIóN dE LA FECHA y HORA Configure.el.monitor.con.la.fecha.y.hora.actuales.antes.de.realizar.la. primera.medición ..Si.no.se.configuran.la.fecha.y.hora.correctamente,. es.posible.que.los.valores.de.medición.guardados.en.la.memoria.y.los. valores.promedio.no.sean.correctos . Si.la.fecha.y.la.hora.no.están.configuradas,.aparece.“-:--”.durante.o. después.de.la.medición . El.Monitor.de.Presión.Arterial.almacena.automáticamente.hasta.100. valores.de.medición.por.usuario.con.las.fechas.y.horas ..El.monitor. también.calcula.los.promedios.semanales.para.mediciones.por.la. mañana.y.por.la.tarde ..Se.almacenan.los.promedios.matutinos.y. vespertinos.correspondientes.a.esta.semana.y.a.las.últimas.siete. semanas . El.monitor.también.puede.calcular.una.lectura.promedio.basada.en.las. tres.mediciones.más.recientes.que.se.tomaron.dentro.de.un.período.de. 10.minutos.a.partir.de.la.última.lectura . NOTAS:. •.. S i.sólo.se.almacenan.dos.lecturas.en.la.memoria.por.el. período.de.10.minutos,.el.promedio.se.basa.en.las.dos. lecturas . •.. S i.se.almacena.una.lectura.en.la.memoria.por.el.período.de. 10.minutos,.esta.lectura.se.muestra.como.el.promedio . - Page 80 CONFIGURACIóN dE LA FECHA y HORA 1. pARA InICIAR LA COnFIgURACIÓn . Presione.el.botón.SET.(Configuración). para.ajustar.la.fecha.y.hora . . El.año.titila.en.la.pantalla . 2. COnFIgURACIÓn DeL AÑO . El.año.se.puede.configurar.entre.2010. y.2040 ..Cuando.la.pantalla.llega.a. 2040,.vuelve.a.2010 . . Presione.el.botón.Up.(Arriba).( para.avanzar.por.año . . Presione.el.botón.SET.(Configuración). para.establecer.el.año.actual . . El.mes.titilará.en.la.pantalla . NOTAS:. •.. P resione.el.botón.Down.(Abajo).( ).para.retroceder.los.
- Page 81 CONFIGURACIóN dE LA FECHA y HORA 3. COnFIgURACIÓn DeL Mes . Presione.el.botón.Up.(Arriba).( para.avanzar.por.mes . . Presione.el.botón.SET.(Configuración). para.establecer.el.mes.actual . . El.día.titila.en.la.pantalla . 4. COnFIgURACIÓn DeL DÍA . Presione.el.botón.Up.(Arriba).( para.avanzar.por.día . . Presione.el.botón.SET.(Configuración). para.establecer.el.día.actual . . La.hora.titilará.en.la.pantalla .
- Page 82 CONFIGURACIóN dE LA FECHA y HORA 5. COnFIgURACIÓn De LA HORA . La.hora.se.configura.en.AM.o.PM . . Presione.el.botón.Up.(Arriba).( para.avanzar.por.hora . . Presione.el.botón.SET.(Configuración). para.establecer.la.hora.actual . . Los.minutos.titilarán.en.la.pantalla . 6. COnFIgURACIÓn De LOs MInUtOs . Presione.el.botón.Up.(Arriba).( ).para.avanzar.por.minuto . . Presione.el.botón.SET.(Configuración).para.establecer.los.minutos. actuales . 7. pARA ApAgAR eL MOnItOR .
-
Page 83: Configuración.de.truread
CONFIGURACIóN dE TRUREAd™ El.modo.TruRead .realiza.tres.mediciones.consecutivas . El.monitor.se.infla,.toma.una.medición.y.se.desinfla.tres.veces.con.un. breve.intervalo.de.tiempo.entre.cada.medición .. 1 ..Seleccione.su.ID.DE.USUARIO.(A.o.B) . 2 ..Presione.el.botón.SET.(Configuración) . El.símbolo.TruRead .y.la.configuración.oFF.aparecen. en.la.pantalla . 3 ... P resione.el.botón.Up.(Arriba).o.Down. (Abajo).( ).para.seleccionar. on . NOTA:.. P resione.el.botón.Up.(Arriba). o.Down.(Abajo).para.alternar. entre.on..y.oFF . - Page 84 CONFIGURACIóN dE TRUREAd™ 4 ..Presione.el.botón.SET.(Configuración).para.confirmar.el.cambio . Si.se.selecciona.on,.la.cantidad.de.segundos.entre.cada.medición. aparece.en.pantalla . NOTA:.. E l.valor.predeterminado.entre.cada.medición.es.de.60. segundos . 5 ... P resione.el.botón.Up.(Arriba).o.Down.(Abajo).( ).para. cambiar.el.intervalo.de.tiempo.entre.cada.medición . El.intervalo.se.puede.configurar.a.15.segundos,.30.segundos,.60. segundos.o.120.segundos ..Mantenga.presionado.el.botón.Up.o.Down. hasta.que.el.intervalo.deseado.aparezca.en.la.pantalla . 6 ... P resione.el.botón.SET.(Configuración).para.confirmar.la.configuración . El.año.titila.en.la.pantalla .
- Page 85 CONFIGURACIóN dE TRUREAd™ 7 ... S i.la.fecha.y.hora.están.correctas,.presione.el.botón.START/STOP. (Inicio/Detener).para.apagar.el.monitor .. Para.cambiar.la.fecha.y.hora.consulte.“Configuración.de.la.fecha.y. hora” .
-
Page 86: Colocación.del.brazalete.para.el.brazo
COLOCACIóN dEL BRAzALETE PARA EL BRAzO PRECAUCIóN Lea.toda.la.información.del.manual.de.instrucciones.y.cualquier. otro.material.impreso.incluido.en.la.caja.antes.de.comenzar.a.usar.la. unidad . PRECAUCIóN Este.dispositivo.está.diseñado.para.medir.la.presión.arterial.y.la. frecuencia.del.pulso.en.pacientes.adultos ..Este.dispositivo.no.debe. utilizarse.con.bebés.ni.con.otras.personas.que.no.puedan.expresar. sus.intenciones . COLOCACIÓn DeL BRAZALete en eL BRAZO IZqUIeRDO 1 ..Asegúrese.de.que.el.enchufe.macho.del.aire.esté.correctamente. insertado.en.la.unidad.principal . 2 ..Retire.la.ropa.ajustada.de.la.parte.superior.del.brazo.izquierdo . - Page 87 COLOCACIóN dEL BRAzALETE PARA EL BRAzO 3 ..Siéntese.en.una.silla.con.los.pies.apoyados.sobre.el.piso ..Coloque.el. brazo.izquierdo.sobre.una.mesa,.de.modo.que.el.brazalete.quede.al. mismo.nivel.que.su.corazón . Soporte para 4 ..Sostenga.firmemente.el.soporte.del. el pulgar pulgar.en.el.brazalete.con.la.mano. derecha . Sujetador de tela 5 ..Gire.la.palma.de.la.mano.izquierda.hacia.arriba .
- Page 88 COLOCACIóN dEL BRAzALETE PARA EL BRAzO 6 ..Coloque.el.brazalete.en.la.parte.superior.del.brazo.izquierdo.de.modo. que.la.cinta.azul.quede.en.la.parte.interna.del.brazo.y.alineada.con.el. dedo.mayor ..El.tubo.de.aire.baja.por.la.parte.interna.del.brazo ... La.parte.inferior.del.brazalete.debe.quedar.aproximadamente.a.1/2". (1.-.2.cm).por.encima.del.codo . Cinta azul 1/2 pulgada (1 - 2 cm) Tubo de aire 7 ..Coloque.el.brazalete.de.modo.que.quede.bien.envuelto.alrededor.del. brazo.usando.el.sujetador.de.tela .
- Page 89 COLOCACIóN dEL BRAzALETE PARA EL BRAzO COLOCACIÓn DeL BRAZALete en eL BRAZO DeReCHO Cuando.se.realiza.una.medición.en.el.brazo.derecho,.utilice.estas. instrucciones.para.el.paso.6.de.la.página.E28 . Coloque.el.brazalete.en.la.parte.superior.del.brazo.derecho,.de.modo. que.el.soporte.para.el.pulgar.quede.centrado.en.la.parte.interna.del. brazo ..La.parte.inferior.del.brazalete.debe.quedar.aproximadamente.a. 1/2".(1.-.2.cm).por.encima.del.codo . Soporte para el pulgar NOTA:.. T enga.cuidado.de.no.apoyar.el.brazo.sobre.el.tubo.de.aire .. Esto.impedirá.el.flujo.de.aire.hacia.el.brazalete .
-
Page 90: Cómo.tomar.una.medición
CóMO TOMAR UNA MEdICIóN El.monitor.ha.sido.diseñado.para.tomar.mediciones.y.guardar.los.valores.de. medición.en.la.memoria.para.dos.personas,.utilizando.la.ID.DEL.USUARIO. A.y.la.ID.DEL.USUARIO.B . El.monitor.también.se.puede.usar.para.tomar.una.sola.medición.para.otras. personas.con.el.modo.GUEST.(Invitado) ..El.símbolo.de.ID.DE.USUARIO.no. aparece.en.la.pantalla.cuando.se.utiliza.el.modo.GUEST ..Las.mediciones.que. se.toman.con.el.modo.GUEST.no.se.guardan.en.la.memoria . . A dVERTENCIA Consulte.a.su.médico.para.obtener.información.específica.acerca.de. su.presión.arterial ..El.autodiagnóstico.y.tratamiento.realizados.en. base.a.los.resultados.de.la.medición.pueden.ser.peligrosos ..Siga.las. instrucciones.de.su.médico.o.profesional.médico.autorizado . . P RECAUCIóN . O pere.el.dispositivo.sólo.con.el.fin.para.el.que.fue.diseñado ... No.use.el.dispositivo.para.ningún.otro.fin . sIsteMA De veRIFICACIÓn De CALIBRACIÓn Cuando.presiona.el.botón.START/STOP,.se.enciende.la.luz.del. Sistema.de.verificación.de.calibración.y.la.unidad.comienza.a. -
Page 91: Uso.del.modo.guest.(Invitado)
CóMO TOMAR UNA MEdICIóN UsO DeL MODO gUest (InvItADO) 1 ..Presione.y.mantenga.presionado.el.botón.START/STOP.(Inicio/ Detener). . . Los.símbolos.A.y.B.desaparecen.de.la.pantalla . Los símbolos A y B desaparecen 2 ..Suelte.el.botón.START/STOP.(Inicio/Detener) . . El.brazalete.comienza.a.inflarse.automáticamente ..N OTA:.. P ara.detener.el.inflado,.presione.el.botón.START/STOP. (Inicio/Detener) ... El.monitor.dejará.de.inflarse,.comenzará.a.desinflarse.y.se. apagará . 3 ..El.inflado.se.detiene.y.se.inicia.la.medición ..Una.vez.finalizada.la. -
Page 92: Selección.del.id.de.usuario
CóMO TOMAR UNA MEdICIóN seLeCCIÓn DeL ID De UsUARIO Seleccione.su.ID.DE.USUARIO ..Use.siempre.el.mismo.ID.DE. USUARIO.al.tomar.una.medición ..El.monitor.guarda.los.valores.de. medición.en.la.memoria.a.través.del.ID.DE.USUARIO.seleccionado .. Estos.valores.de.medición.se.usan.para.calcular.los.promedios.matutinos. y.los.promedios.vespertinos . Deslice.el.interruptor.de.selección.de.ID.DE.USUARIO.hacia.la.derecha. o.izquierda.para.seleccionar.USUARIO.A.o.B . UsO DeL ID De UsUARIO Después.de.seleccionar.un.ID.DE.USUARIO,.el.monitor.se.puede. configurar.para.que.tome.una.sola.medición.usando.el.modo.Individual. o.tres.mediciones.consecutivas.usando.el.modo.TruRead NOTA:.. L a.configuración.predeterminada.se.establece.en.modo.Single. (Individual).para.tomar.una.medición ..Consulte.“Configuración. de.TruRead ” . -
Page 93: Uso.del.modo.single.(Individual)
CóMO TOMAR UNA MEdICIóN UsO DeL MODO sIngLe (InDIvIDUAL) 1 ..Seleccione.su.ID.DE.USUARIO.(A.o.B) . 2 ..Presione.el.botón.START/STOP.(Inicio/Detener) . . Todos.los.símbolos.aparecen.en.la.pantalla ..El.símbolo.de.ID.DE. USUARIO.que.ha.seleccionado.titila.en.la.pantalla .. . El.brazalete.comienza.a.inflarse.automáticamente ..A.medida.que.el. brazalete.empieza.a.inflarse,.el.monitor.determinará.automáticamente. el.nivel.óptimo.de.inflado ... Este.monitor.detecta.el.pulso.durante.el.inflado ..No.mueva.el.brazo.y. quédese.quieto.hasta.que.finalice.el.proceso.de.medición . . NOTA:.. P ara.detener.el.inflado.o.la.medición,.presione.el.botón. START/STOP.(Inicio/Detener) ..El.monitor.dejará.de.inflarse,. comenzará.a.desinflarse.y.se.apagará . - Page 94 CóMO TOMAR UNA MEdICIóN 3 ..El.inflado.se.detiene.automáticamente.y.se.inicia.la.medición .. . A.medida.que.el.brazalete.se.desinfla,.aparecen.números.en.pantalla. en.orden.decreciente ... El.símbolo.de.latido.( ).titila.con.cada.latido.del.corazón . 4 ..Una.vez.finalizada.la.medición,.el.brazalete.se. desinfla.por.completo ..Aparecen.en.pantalla.la.presión. arterial.y.la.frecuencia.del.pulso .. 5 ..Presione.el.botón.START/STOP.(Inicio/ Detener).para.apagar.el.monitor . . NOTA:.. E l.monitor.se.apaga. automáticamente.después.de.dos. minutos .
-
Page 95: Uso.del.modo.truread
CóMO TOMAR UNA MEdICIóN UsO DeL MODO tRUReAD 1 ..Seleccione.su.ID.DE.USUARIO.(A.o.B) . 2 ..Presione.el.botón.START/STOP.(Inicio/Detener). . . Todos.los.símbolos.aparecen.en.la.pantalla ..El.símbolo.de.ID.DE. USUARIO.que.ha.seleccionado.titila.en.la.pantalla ..El.brazalete. comienza.a.inflarse.automáticamente . . NOTA:.. P ara.detener.el.inflado.o.la.medición,.presione.el.botón. START/STOP.(Inicio/Detener) ..El.monitor.dejará.de.inflarse,. comenzará.a.desinflarse.y.se.apagará . 3 ..El.inflado.se.detiene.automáticamente.y.se.inicia.la.medición . . A.medida.que.el.brazalete.se.desinfla,.aparecen.números.en.pantalla. en.orden.decreciente ... El.símbolo.de.latido.( ).titila.con.cada.latido.del.corazón ..Una.vez. finalizada.la.medición,.el.brazalete.se.desinfla.por.completo . . - Page 96 CóMO TOMAR UNA MEdICIóN La.segunda.medición.ha.finalizado,.esperando.para.iniciar.la.próxima. medición . Las.mediciones.consecutivas.han.finalizado ..El.promedio.de. tresmediciones.aparece.en.la.pantalla . 5 ..Presione.el.botón.SET.(Configuración).para.visualizar.la.presión.arterial. y.la.frecuencia.del.pulso.de.la.primera.medición ..Presione.nuevamente.el. botón.SET.(Configuración).para.visualizar.la.próxima.medición . 6 ..Presione.el.botón.START/STOP.(Inicio/Detener).para.apagar.el. monitor . . AdVERTENCIA Consulte.a.su.médico.para.obtener.información.específica.acerca.de. su.presión.arterial ..El.autodiagnóstico.y.tratamiento.realizados.en. base.a.los.resultados.de.la.medición.pueden.ser.peligrosos ..Siga.las. instrucciones.de.su.médico.o.profesional.médico.autorizado . . A dVERTENCIA NO.ajuste.la.medicación.en.base.a.resultados.de.mediciones. realizadas.en.este.monitor.de.presión.arterial ..Tome.los. medicamentos.tal.como.se.los.recetó.su.médico ..Sólo.un.médico.está. capacitado.para.diagnosticar.y.tratar.la.presión.arterial.alta .
-
Page 97: Condiciones.especiales
CóMO TOMAR UNA MEdICIóN AdVERTENCIA El.monitor.no.está.diseñado.para.ser.utilizado.como.dispositivo.de. diagnóstico . COnDICIOnes espeCIALes . P RECAUCIóN Inflar.el.dispositivo.a.una.presión.más.alta.que.la.necesaria.puede. provocar.magulladuras.en.el.lugar.donde.se.coloca.el.brazalete . . Si.le.consta.que.su.presión.sistólica.es.mayor.a.220.mmHg,.mantenga. presionado.el.botón.START/STOP.(Inicio/Detener).hasta.que.el. monitor.se.infle.de.30.a.40.mmHg.más.que.su.presión.sistólica. esperada . . NOTAS: •.No.aplique.más.presión.de.la.necesaria .. . •.El.monitor.no.se.infla.más.de.299.mmHg . . Una.vez.finalizada.la.medición,.el.brazalete.se.desinfla.por.completo .. Aparecen.en.pantalla.la.presión.arterial.y.la.frecuencia.del.pulso . -
Page 98: Uso.de.la.función.memoria
USO dE LA FUNCIóN MEMORIA El.monitor.ha.sido.diseñado.para.almacenar.la.presión.sanguínea.y.la. frecuencia.del..pulso.en.la.memoria.para.dos.personas.(USUARIO.A.y. USUARIO.B).cada.vez.que.se.complete.una.medición . El.monitor.almacena.automáticamente.hasta.100.grupos.de.valores.de. medición.(presión.arterial.y.frecuencia.del.pulso).para.cada.usuario.. (A.y.B) ..Una.vez.que.se.almacenan.100.grupos.de.valores.de.medición. en.la.memoria,.el.registro.más.antiguo.se.borra.para.guardar..los.valores. de.medición.más.recientes ..El.monitor.también.almacena.8.semanas.de. promedios.matutinos.y.8.semanas.de.promedios.vespertinos.para.cada. usuario.(A.y.B) . FUnCIÓn De pROMeDIO El.monitor.calcula.la.lectura.promedio.en.base.a.los.tres.grupos.de. valores.de.mediciones.más.recientes,.tomados.en.un.período.de.10. minutos.de.la.lectura.más.reciente . NOTAS:. •.Si.se.guardan.dos.grupos.de.valores.de.medición.en.la. memoria.para.el.período.de.10.minutos,.el.promedio.se.basa. en.los.dos.grupos.de.valores.de.medición ..Si.se.almacena. un.grupo.de.valores.de.medición,.éste.se.visualiza.como.el. promedio . •.Al.visualizar.una.lectura.tomada.sin.haber.configurado.la. fecha.y.hora,.aparecerá.“-:--”.en.lugar.de.la.fecha.y.hora . -
Page 99: Para.mostrar.los.valores.de.medición
USO dE LA FUNCIóN MEMORIA pARA MOstRAR LOs vALORes De MeDICIÓn 1 ..Seleccione.su.ID.DE.USUARIO.(A.o.B) . 2 ..Presione.el.botón.Memoria.( . El.símbolo.de.promedio.( ).aparece.en.la.pantalla.cuando.se. muestra.la.lectura.promedio . - Page 100 USO dE LA FUNCIóN MEMORIA 3 ..Presione.el.botón.Down.(Abajo).( ).para.mostrar.el.grupo.de. valores.de.medición.más.reciente.en.la.pantalla ..Los.valores.aparecen. desde.el.más.reciente.hasta.el.más.antiguo . . NOTA:.. L a.fecha.y.hora.se.visualizan.de. forma.alterna.con.los.valores.de. Cambio de medición . visualizaciones . Presione.el.botón.Up.(Arriba).o.Down. (Abajo).para.mostrar.el.siguiente.grupo.de. valores . :.Para.las.lecturas.más.antiguas :.Para.las.lecturas.más.recientes . NOTA:.. P resione.y.mantenga.presionado.el. botón.Up.(Arriba).o.Down.(Abajo).para.visualizar.los.valores. más.rápidamente . . Modo truRead . El.promedio.de.las.tres.mediciones.consecutivas.aparece.en.la. pantalla.junto.con.el.símbolo.TruRead ) ..Para.mostrar.los.
-
Page 101: Promedios.matutinos.y.vespertinos
USO dE LA FUNCIóN MEMORIA pROMeDIOs MAtUtInOs Y vespeRtInOs El.monitor.calcula.y.muestra.un.promedio.semanal.para.las.mediciones. que.se.realizan.por.la.mañana.( ).y.por.la.tarde.( ) ..El.monitor. guarda.8.semanas.de.promedios.matutinos.y.8.semanas.de.promedios. vespertinos.para.cada.usuario.(A.y.B) . NOTA:.. L a.semana.comienza.el.domingo.a.las.4:00.AM . pROMeDIOs MAtUtInOs . Los.promedios.matutinos.se.basan.en.la.primera.lectura.promedio. utilizando.el.modo.TruRead .o.la.primera.lectura.promedio. utilizando.el.modo.Single.(Individual) . . Los.períodos.de.medición.deben.ser.entre.las: 4:00 AM y 9:59 AM. pROMeDIOs vespeRtInOs . Los.promedios.vespertinos.se.basan.en.la.última.lectura.promedio. utilizando.el.modo.TruRead .o.la.última.lectura.promedio.utilizando. -
Page 102: Para.mostrar.los.promedios.matutinos.y.vespertinos
USO dE LA FUNCIóN MEMORIA pARA MOstRAR LOs pROMeDIOs MAtUtInOs Y vespeRtInOs 1 ..Seleccione.su.ID.DE.USUARIO. (A.o.B) . 2 ..Presione.el.botón.de.promedio. matutino/vespertino.( ).para. seleccionar.el.promedio.matutino. o.vespertino . . El.promedio.para.la.semana. actual.“THIS.WEEK”.aparece.. en.la.pantalla . 3 ..Presione.el.botón.Down.(Abajo).( ).para.visualizar.las.semanas. anteriores . . Cada.vez.que.se.presiona.el.botón.Down.(Abajo).( ),.aparecen.los. valores.de.1.semana.atrás.a.los.más.antiguos .. Cada.vez.que.se.presiona.el.botón.Up.(Arriba).( ),.aparecen.los. valores.de.7.semanas.atrás.hasta.los.más.recientes . -
Page 103: Combinaciones.de.pantalla
USO dE LA FUNCIóN MEMORIA COMBInACIOnes De pAntALLA Además.de.los.símbolos.de.promedio.matutino.y.promedio.vespertino,. el.monitor.también.puede.mostrar.el.Símbolo.de.hipertensión.matutina,. si.es.que.el.promedio.matutino.de.esa.semana.es.superior.al.de.las. pautas.internacionalmente.reconocidas ..(Consulte.la.página.E13. para.obtener.información.más.detallada) ..Según.los.resultados.de.la. medición,.éstos.se.pueden.ver.con.las.siguientes.combinaciones . Pantalla Promedio matutino Promedio matutino de semana en Promedio matutino de 7 semanas curso con Símbolo de promedio atrás con Símbolo de promedio matutino matutino + Símbolo de hipertensión matutina... -
Page 104: Para.borrar.todos.los.valores.almacenados.en.la.memoria
USO dE LA FUNCIóN MEMORIA El.Símbolo.de.hipertensión.matutina. .aparece.si.el.promedio. semanal.para.las.mediciones.matutinas.es.superior.a.135/85 . En.este.caso,.el.Símbolo.de.hipertensión.matutina. .aparece.en. pantalla.cuando.se.muestra.el.promedio.vespertino,.independientemente. de.los.valores.correspondientes.al.promedio.vespertino . pARA BORRAR tODOs LOs vALORes ALMACenADOs en LA MeMORIA Los.valores.que.se.guardan.en.la.memoria.se.borran.por.ID.DE. USUARIO .. No.se.pueden.borrar.parcialmente.los.valores.almacenados.en.la. memoria ..Todos.los.valores.para.el.usuario.seleccionado.se.borran . 1 ..Seleccione.su.ID.DE.USUARIO.(A.o.B) . 2 ..Si.se.mantienen.presionados.el.botón.Memoria.( ).y.el.botón. START/STOP.(Inicio/Detener).simultáneamente.durante.más.de.2. segundos,.se.borran.todos.los.valores . -
Page 105: Instrucciones De Descarga
Instrucciones de descarga INSTALACIóN dEL SOFTWARE Instrucciones opcionales para conexión de PC Para.instalar.un.software,.elija.Microsoft ® .HealthVault .o.el.software.de. Cuidado.de.la.Salud.de.Omron . NOTA:.. C ualquier.valor.de.medición.tomado.antes.de.configurar.la.fecha. y.hora.no.es.transferido.al.software.Microsoft.HealthVault .o.al. software.de.Cuidado.de.la.Salud.de.Omron . ® DesCARgA e InstALACIÓn De MICROsOFt HeALtHvAULt HealthVault.es.una.plataforma.gratis.basada.en.la.Web,.diseñada.para. que.la.gente.pueda.controlar.sus.datos.de.salud ..Ayuda.a.recopilar,. almacenar.y.compartir.información.de.salud.con.miembros.de.la.familia. y.proveedores.de.salud.participantes,.y.provee.a.la.gente.con.una. selección.de.aplicaciones.de.terceros.y.dispositivos.que.los.ayudan.a. manejar.cosas.como.un.buen.estado.físico,.dieta.y.salud .. - Page 106 INSTALACIóN dEL SOFTWARE ReqUeRIMIentOs DeL entORnO OpeRAtIvO Los.siguientes.entornos.operativos.son.necesarios.para.operar. Microsoft ® .HealthVault . sistemas operativos compatibles*:.. . H ealthVault.funciona.mejor.con.los.siguientes. sistemas.operativos:. Las versiones de 32-bit o 64-bit de: Microsoft ® .Windows ® ® .Home.Premium Windows ® ® .Professional Windows ® ® .Ultimate Las versiones de 32-bit o 64-bit de: .
-
Page 107: Descarga E Instalación Del Software Para El
INSTALACIóN dEL SOFTWARE DesCARgA e InstALACIÓn DeL sOFtWARe pARA eL CUIDADO De LA sALUD De OMROn El.software.para.el.cuidado.de.la.salud.de.Omron.le.permitirá.visualizar,. procesar.e.imprimir.datos.de.la.presión.arterial.y.de.las.caminatas. medidas.con.el.monitor.compatible.de.presión.arterial.y.el.pedómetro.de. Omron . •.. P ara.instalar.el.software.para.el.Cuidado.de.la.salud.de.Omron.en.su. PC,.deberá.tener.privilegios.de.administrador . •.. C ierre.todas.las.aplicaciones.en.funcionamiento.antes.de.instalar.el. software . •.. S i.utiliza.un.software.antivirus,.desactívelo.antes.de.la.instalación .. Puede.interferir.con.el.programa.de.configuración.de.este.software .. Habilite.el.software.antivirus.nuevamente.luego.de.completar.la. instalación . - Page 108 INSTALACIóN dEL SOFTWARE ReqUeRIMIentOs DeL entORnO OpeRAtIvO Los.siguientes.entornos.operativos.son.necesarios.para.operar.el. Software.para.el.Cuidado.de.la.Salud.de.Omron sistemas operativos compatibles: Microsoft ® .Windows ® .2000.Professional.(SP4) Microsoft ® .Windows ® .XP.Home.Edition.(SP2) Microsoft ® .Windows ® .XP.Professional.(SP2) Microsoft ® .Windows ® .Vista ® .Home.Basic Microsoft ® .Windows ® .Vista ®...
-
Page 109: Utilización.del.software
UTILIzACIóN dEL SOFTWARE P ara.obtener.ayuda.acerca.del.uso.del.software,.haga.doble. clic.en.el.acceso.directo.al.manual.del.usuario.del.software. para.el.cuidado.de.la.salud.de.Omron.[Omron.Health. Management.Software.Users.Manual .pdf].en.el.escritorio,. o.haga.clic.en.[Help].en.este.software.luego.de.comenzar . 1 ..Haga.doble.clic.en.el.ícono.de.acceso.directo.del. software.para.el.cuidado.de.la.salud.de.Omron.[Omron. Health.Management.Software].en.el.escritorio .. . Si.no.aparece.el.ícono.en.el.escritorio:.Desde.el.menú. [Start].seleccione.[All.Programs].o.[Programs].y.haga. clic.en.el.acceso.directo.al.software.para.el.cuidado.de.la.salud.de. Omron.[Omron.Health.Management.Software] . 2 ..Si.es.la.primera.vez.que.utiliza.el.software.para.el.cuidado.de.la.salud. de.Omron,.haga.clic.en.[Add.User].en.la.pantalla.de.Administración. del.usuario .. - Page 110 UTILIzACIóN dEL SOFTWARE 3 ..Ingrese.su.nombre.en.la.casilla. Registro.de.Nuevo.usuario.. (ej .,.Chuck).y.haga.clic.en.[OK] . . NOTAS: . •.. E l.software.para.el.cuidado. de.la.salud.de.Omron.[Omron. Health.Management.Software].puede.manejar.información.de.múltiples. usuarios ..La.información.se.controla.según.el.nombre.del.usuario . . •.. L a.cantidad.de.usuarios.que.pueden.registrarse.en.este.software. variará.según.el.espacio.libre.en.el.disco.de.su.PC . . •.. E l.nombre.de.usuario.podrá.contener.hasta.28.caracteres .. 4 ..Haga.clic.en.el.nombre.de. usuario.y.en.[Graph.Screen] .. 5 ..Haga.clic.en.el.ícono.[Blood. Pressure.Monitor] .
- Page 111 UTILIzACIóN dEL SOFTWARE Utilice.sólo.el.cable.USB.autorizado.por.Omron,.Modelo.HHX- CABLE-USB2,.incluido.con.esta.unidad . . P RECAUCIóN Use.sólo.las.piezas.y.accesorios.autorizados.por.Omron ..Las. piezas.y.accesorios.que.no.hayan.sido.aprobados.para.el.uso.con.el. dispositivo.pueden.causar.daños.en.. la.unidad . Abra la tapa del puerto USB. Conector USB normal Conecte el conector USB normal (conector grande) en la computadora personal. Mini conector USB Conecte el mini conector USB (conector pequeño) en el...
- Page 112 UTILIzACIóN dEL SOFTWARE Haga clic en el ícono [download data] para importar los datos. Aparecerá la ventana de Confirmación. Asegúrese de que el cable esté conectado, luego haga clic en [yes]. Seleccione el monitor de presión arterial que usará y haga clic en [Ok] . Comenzará...
-
Page 113: Cuidado Y Mantenimiento
Cuidado y mantenimiento CUIdAdO y MANTENIMIENTO Para mantener el monitor de presión arterial en buenas condiciones y proteger la unidad de posibles daños, siga estas instrucciones: no doble.el.brazalete.ni.el.tubo.de.aire.por.la.fuerza ..No.los.doble.de. manera.que.queden.demasiado.apretados . Limpie el monitor con un paño seco y suave..No.use.limpiadores. abrasivos.ni.volátiles ..No.intente.limpiar.el.brazalete .. - Page 114 CUIdAdO y MANTENIMIENTO Use la unidad de acuerdo con las instrucciones que se describen en este manual. . P RECAUCIóN Los.cambios.o.modificaciones.que.no.hayan.sido.aprobados.por. Omron.Healthcare.dejarán.sin.efecto.la.garantía.del.usuario ..No. desarme.ni.intente.reparar.la.unidad.ni.los.componentes . PRECAUCIóN Use.sólo.las.piezas.y.accesorios.autorizados.por.Omron ..Las. piezas.y.accesorios.que.no.hayan.sido.aprobados.para.el.uso.con.el. dispositivo.pueden.causar.daños.en.la.unidad ..
-
Page 115: Indicadores.de.error.y.resolución.de.problemas
INdICAdORES dE ERROR y RESOLUCIóN dE PROBLEMAS InDICADORes De eRROR SÍMBOLO CAUSA CORRECCIóN El.enchufe.macho.del.aire.está. Inserte.bien.el.enchufe.macho.del.aire ..Consulte. desconectado . “Colocación.del.brazalete.para.el.brazo” . El.brazalete.no.está.colocado. Coloque.el.brazalete.correctamente ..Consulte. correctamente . “Colocación.del.brazalete.para.el.brazo” . El.brazalete.pierde.aire . Cambie.el.brazalete.por.uno.nuevo . Repita.la.medición ..Quédese.quieto.y.no.hable. durante.la.medición ..Consulte.“Cómo.tomar.una. medición” . El.brazalete.está.demasiado.o.poco. Si.“E2”.aparece.repetidamente,.infle.el.brazalete. inflado . manualmente.hasta.que.esté.a.30.a.40.mmHg.por.sobre. - Page 116 INdICAdORES dE ERROR y RESOLUCIóN dE PROBLEMAS InDICADORes De eRROR SÍMBOLO CAUSA CORRECCIóN Cambie.las.cuatro.pilas ... Las.pilas.están. Consulte.“Colocación.de.las. agotadas . pilas” . sUgeRenCIAs pARA LA ResOLUCIÓn De pROBLeMAs PROBLEMA CAUSAS y SOLUCIONES No.hay.alimentación.eléctrica . Cambie.las.cuatro.pilas.por.pilas. nuevas . No.se.visualiza.nada.en.la.pantalla. Verifique.la.colocación.de.las. de.la.unidad . pilas.para.asegurarse.de.que.las.
-
Page 117: Declaración.de.fcc
dECLARACIóN dE FCC NOTA: POTENCIAL.DE.INTERFERENCIA.DE.RADIO/TELEVISIÓN.(para.EE .UU .. solamente) Este.producto.ha.sido.probado.y.cumple.con.los.límites.de.un.dispositivo.digital.de. Clase.B,.de.acuerdo.con.la.sección.15.de.las.normas.de.la.FCC . Estos.límites.fueron.diseñados.para.proporcionar.una.protección.razonable.contra. interferencias.perjudiciales.cuando.se.utilice.el.equipo.en.una.instalación.residencial .. El.producto.genera,.utiliza.y.puede.irradiar.energía.de.radiofrecuencia.y,.si.no.se. instala.ni.utiliza.de.acuerdo.con.las.instrucciones,.puede.provocar.interferencias. perjudiciales.en.las.comunicaciones.radiales ..Sin.embargo,.no.se.puede.garantizar.que. no.se.produzcan.interferencias.en.una.instalación.en.particular ..Si.el.producto.provoca. interferencias.perjudiciales.para.la.recepción.de.radio.o.televisión,.lo.que.puede. determinarse.encendiendo.y.apagando.el.equipo,.se.sugiere.que.el.usuario.intente. corregir.la.interferencia.aplicando.una.o.más.de.las.siguientes.medidas: •.Reoriente.o.reubique.la.antena.receptora . •.Aumente.la.distancia.de.separación.entre.el.equipo.y.el.receptor . •.. C onecte.el.equipo.a.un.tomacorriente.que.esté.en.un.circuito.distinto.al.que.se. encuentra.conectado.el.receptor . •.. C onsulte.al.distribuidor.o.a.un.técnico.experimentado.en.radio/TV.para.obtener. ayuda . POTENCIAL.DE.INTERFERENCIA.DE.RADIO/TELEVISIÓN.(para.Canadá. solamente) Este.aparato.digital.no.excede.los.límites.de.Clase.B.para.las.emisiones.de.ruido. de.radio.de.los.dispositivos.digitales,.como.se.establece.en.la.norma.referente.a. -
Page 118: Garantía.limitada
. LA gARAntÍA Antes MenCIOnADA es LA ÚnICA gARAntÍA pROvIstA pOR OMROn en ReLACIÓn A este pRODUCtO, Y pOR MeDIO De LA pResente OMROn nIegA CUALqUIeR OtRA gARAntÍA, eXpLÍCItA O IMpLÍCItA, InCLUYenDO LAs gARAntÍAs IMpLÍCItAs De COMeRCIABILIDAD Y AptItUD pARA pROpÓsItOs pARtICULARes. LAs gARAntÍAs IMpLÍCItAs Y OtROs téRMInOs IMpUestOs pOR LeY, sI... -
Page 119: Especificaciones
ESPECIFICACIONES Modelo:. Bp791It (HeM-7222-ItZ) Pantalla:. Pantalla.digital.LCD Rango.de.medición:. Presión:.0.a.299.mmHg,.Pulso:.40.a.180/min . Precisión/Calibración:. . P resión:..±3mmHg.o.2%.de.lectura. Pulso:. ±5%.de.lectura Inflado:. Automático.por.bomba.eléctrica Desinflado:.. Válvula.de.liberación.automática.de.presión Liberación.rápida.de.presión:. Válvula.de.liberación.automática Método.de.medición:. Método.oscilométrico Fuente.de.alimentación:. Adaptador.de.CA.de.120V.60Hz.o.4.pilas.“AA”. Vida.útil.de.las.pilas:. . A prox ..300.usos.cuando.se.emplea.6.veces.por.día.. con.4.pilas.alcalinas.nuevas Temperatura.de.. 50º.F.a.104º.F.(10º.C.a.40º.C)./15.a.90%.RH. funcionamiento/Humedad:. Temperatura.de.almacenamiento. -4º.F.a.140º.F.(-20º.C.a.60º.C)./10.a.95%.RH /Humedad/Presión.de.aire:. . / 700.-.1060.hPa Peso.de.la.unidad.principal:. - Page 120 Fabricado.para.OMRON.HEALTHCARE.Co .,.Ltd . Hecho.en.China Distribuido.por: OMROn HeALtHCARe, InC. 1925.West.Field.Court. Lake.Forest,.IL.60045.U .S .A .. www .omronhealthcare .com ©.2012.OMRON.HEALTHCARE,.INC . 5331344-7B...
Need help?
Do you have a question about the BP791IT and is the answer not in the manual?
Questions and answers
Changed batteries and reset the date and time. How do you turn "OFF" the date setting mode and return to "NORMAL" mode?
The document does not explicitly state how to exit the date setting mode and return to normal mode. However, typically, once the date and time are set by confirming each step with the "Set" button, the device should return to normal mode automatically. If not, pressing the start/stop button may exit the setting mode.
This answer is automatically generated
unit constantly overinflates and it says I can inflate it manually, but that does not happen...
The Omron BP791IT unit uses an automatic electric pump for inflation and does not support manual inflation. If it constantly overinflates, possible reasons include a malfunctioning pressure sensor, a faulty automatic pump, or an air leakage issue. Ensuring proper cuff placement and checking for leaks in the cuff or tubing may help resolve the issue. If the problem persists, the unit may require servicing or replacement.
This answer is automatically generated
how to download my information from Omron BP791IT.
Where will the irregu hear beat symbol show up if needed