Table of Contents
Advertisement
Advertisement
Table of Contents

Related Manuals for HAI SECURITY SYSTEM


Summary of Contents for HAI SECURITY SYSTEM
- Page 1 Owner's Manual Document Number 21R00-1 Rev. 2.11 January, 2006...
- Page 2 Document Number 21R00-1 Rev. 2.11 January, 2006 Copyright © 2000-2006 HAI All Rights Reserved www.homeauto.com...
-
Page 3: Table Of Contents
Cancel ... 5 Time Out... 5 OmniLT Maintenance... 5 SECURITY SYSTEM OPERATION ... 6 Disarming the Security System and Silencing Alarms ... 6 Arming the Security System ... 6 Using Shortcut Keys ... 7 Quick Arm ... 8 Bypassing Zones ... 8 Auto-Bypass ... - Page 4 Setup Mode for HLC Devices... 34 Event Log... 36 Show Events ... 36 Messages ... 37 Show Message ... 37 Log Message ... 37 Clear Message... 38 Say Message ... 38 Phone Message... 38 Send Message (Pro-Link)... 38 TELEPHONE CONTROL ... 40 Telephone Interface...
-
Page 5: Introduction
INTRODUCTION Thank you for purchasing your new OmniLT automation system. You are about to experience a new feeling of comfort, convenience, and control. Please take a few moments to become familiar with all of the features of this fine product by reviewing this manual. Please keep this manual on file for future reference. -
Page 6: Overall Description
2- ' DAY ' The ' DAY ' key is used to arm the security system in the Day mode. In the Day mode, the perimeter zones (doors and windows) are protected, however, the interior zones are not armed so that you may move about freely inside. In this mode, there is an entry delay on entry-exit zones. -
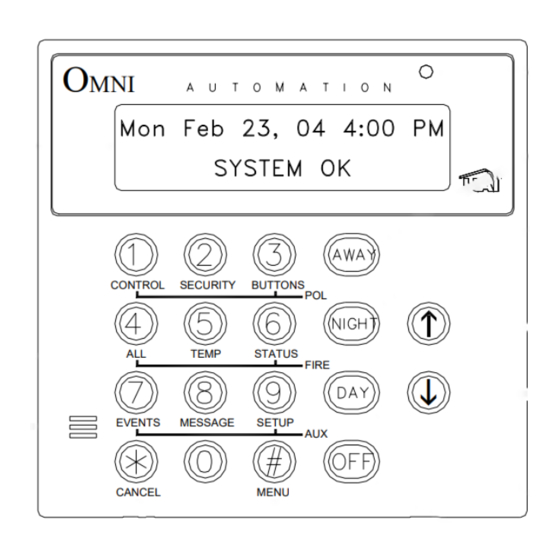
Page 7: Normal Top-Level Display
7- CONSOLE LED The Console LED is used to indicate whether the security system is currently armed or disarmed. If armed in any of the security modes, the LED will be set to red. If the system is disarmed, the LED will be set to green. The LED will flash when a Message is displayed. -
Page 8: Main Menu
When using the arrow keys to scroll through lists of units, zones, buttons, codes, and temperature zones, only the named items are displayed. If no text description has been given to an item, it will be skipped over when scrolling through that list. You can still enter any item number to access it directly, and then scroll up and down among the named items. -
Page 9: Confirmation Beep
Confirmation Beep When you have successfully completed a function, such as entering a program or changing a setup item, the console will beep once. Cancel If you are ever unsure and wish to return to the top-level display, press the ' * ' key. You may have to press it more than once, depending on how far into the function (menu) you are. -
Page 10: Security System Operation
Arming the Security System Now that you know how to disarm the system, here's how to arm the security system. The security menu is used to arm and disarm the security system. To enter the security menu, from the top-level display, press the 2 key on the console keypad. The... -
Page 11: Using Shortcut Keys
2 = NIGHT The NIGHT mode is used when you are asleep and everyone in your household is at home. In the Night mode, your doors, windows, and non-sleeping area (i.e. downstairs) motion detectors are armed. In the Night mode, there is no entry delay. The alarm system sounder will be activated immediately if any door, window, or non-sleeping area (motion detector) is tripped. -
Page 12: Quick Arm
Quick Arm For extra convenience, the OmniLT can be armed by simply pressing the DAY, NIGHT, or AWAY button twice, eliminating the need to enter the code. To quick arm the system in the Away mode, from the top-level display, press AWAY AWAY The quick arm feature only works if the alarm system is in the Off mode, and if no alarms are sounding. -
Page 13: What To Do When You Come Home
The system will wait the Entry Delay time. You should go to your console (or telephone) immediately and turn the security system off. If you wish, you may go directly to a different security mode, rather than turning the system Off. -
Page 14: Fire Alarm Activated
Fire Alarm Activated When the fire alarm is activated by the smoke/fire detector(s), the alarm responds exactly as described under Burglar Alarm Activated, except: • The console display reads, "FIRE ALARM! ZONE NAME TRIPPED". • The sounder will activate in a 3 pulse temporal pattern to distinguish the fire alarm from the burglar alarm. •... -
Page 15: Police Emergency
Police Emergency When the 1 key and the 3 keys are pressed simultaneously, the Police Emergency alarm is activated. This alarm operates exactly the same as described for Burglar Alarm Activated except: • The console display indicates: "BURGLARY! - POLICE EMERG TRIPPED". Fire Emergency When the 4 key and the 6 key is pressed simultaneously, the Fire Emergency alarm is activated. -
Page 16: Trouble Indications
Trouble Indications The OmniLT constantly monitors the alarm zones and several internal matters and will alert you if it detects trouble. The particular trouble is indicated on the bottom line of the display and a trouble signal is given by beeping the console beeper continuously, 2 beeps per second. -
Page 17: Manager Code
The system will disarm normally. No sirens will sound, no lights will flash, but the OmniLT will perform a silent dial out and say that this is a silent alarm. To stop a silent dial out, turn your security system off the usual way, pressing Off key, then your code. Panic Switches If you have had panic switches installed, they are always armed. -
Page 18: Control
CONTROL The control features of the OmniLT make it easy and convenient to control almost any light or appliance from the console or over the telephone. You may also have your heating and air conditioning (HVAC) under control of the system, which will allow you to save energy dollars by setting the temperature appropriately when you are home, asleep, or away. -
Page 19: Hai Lighting Control (Hlc) Format
When set to UPB, the OmniLT controller can: Send commands (on, off, bright, dim and level) to individual switches and modules Receive commands and status from individual switches and modules Send commands to keypad controllers to change scenes and control LED backlight behind the keys Receive commands when buttons are pressed on keypad controllers to activate controller macros Send Link commands to switches, modules, and keypad controllers to activate scenes Receive Link commands when a button is pressed on a switch or on a keypad controller to activate controller macros... -
Page 20: About House Controllers
When “Status Tracking” is enabled (this is the default setting), OmniLT keeps track of the exact status of each unit even when a lighting scene is initiated by the Room Controller. Room Controllers also keep track of when individual switches in a room are turned on and off. -
Page 21: About Alc
When set to RadioRA, the OmniLT controller can: Send commands (on, off, and level) to individual Switches and Dimmers Receive status (on and off) from individual Switches and Dimmers Receive commands when buttons are pressed on Master Controls Execute Phantom Button commands About ALC ALC is intended for installation in homes, which have been pre-wired for installation of ALC system products. -
Page 22: Scrolling Through Names
Scrolling Through Names The OmniLT stores names for Units, Zones, Buttons, Codes, Temperatures, and Messages so that you don't have to remember that "UNIT 5" is the "DEN LIGHT" and "ZONE 1" is the "FRONT DOOR". In general, any time you enter a unit, zone, button, code, temperature, or message number, you can press the down arrow key to display its name, then use the up and down arrow keys to scroll through the list of other names. -
Page 23: Controlling Individual Lighting Loads In An Hlc Room Or Upb Units
Each lighting scene can also be set or easily changed using the pushbuttons on the HAI UPB™ 6-Button Room Controller, as follows: Step Operation Press the desired pushbutton on the HAI UPB™ 6-Button Room Controller to activate the current scene (preset lighting level) in each of the HLC devices. -
Page 24: Controlling Radiora Units
5 (RMP) does not affect CentraLite units. Press 9 (TIM) to time the selected unit (On or Off). Timed commands may be from 1-99 seconds, 1-99 minutes or 1-18 hours. Press # (STA) to see the status (On or Off) of a CentraLite device. Controlling RadioRA Units Entry Lights 0=OFF 1=ON 2=DIM 3=BRT... -
Page 25: Ramp Command (Alc)
Ramp Command (ALC) When ALC Switch Modules are being used, it is possible to ramp the lighting level of an ALC Dimmer Switch to a new level at a selectable ramp rate. Only ALC Dimmer Switches respond to the Ramp command. Press the 5 (RAMP) key to select the ramp command. -
Page 26: Status Of A Unit
The timed commands allow a units to be turned on or off for a specified period of time. The unit may be turned On for 1-99 (minutes or seconds), or 1-18 hours, then Off; or turned Off for 1-99 (minutes or seconds) or 1-18 hours, then On. Lighting units (1-16) may also be dimmed or brightened for a specified period of time. -
Page 27: All On / Off
The OmniLT has 2 (expandable to 10) outputs that can be used to switch relays. Outputs 1 and 2 are controlled by unit numbers 27 and 28. These are hardwired outputs that are connected directly through the OmniLT and not through a module. If you have something connected to these outputs, such as a sprinkler system, your dealer will explain its operation. -
Page 28: Leviton Scene Control
Leviton Scene Control OmniLT supports Leviton Scene Control (a feature found in certain Leviton Switches. There are 16 Scenes that can be set and executed. The Leviton Switches are divided into "lighting groups" of four units each. Each of these lighting groups can be set to four different Scenes. -
Page 29: Scene Off Command
Scene Off Command Once the Scenes have been sent, press the 0 (OFF) key to command the four units in that Scene to turn off. Notes: 1. When sending Scene Commands, the controller must be configured to allow Extended Code transmissions. 2. -
Page 30: Executing Phantom Buttons
Leave for Work (Button 1): turn off all lights set thermostat to energy saving settings arm the security system in the Away mode Go to Bed (Button 2): turn off all lights dim outdoor lights 20% to extend bulb life and reduce consumption... -
Page 31: Temperature Control
This powerful feature allows you to set your system up so that control functions are performed when you arm your security system (such as turning off all lights and setting back the HVAC system). Door contacts and motion detectors can be used to turn on lighting automatically, then turn it off a few minutes after the person has left, and then only if it's dark. - Page 32 After the ' # ' key is pressed, a menu appropriate for the type of temperature zone is shown. For Celsius temperatures, press the ' # ' key prior to entering the temperature to make the number negative. The Celsius temperature may also be specified in 0.5 degree steps, if three numeric digits are entered.
-
Page 33: Programmable Energy Saver Modules (Pesms)
Upstairs HEAT: 70 Upstairs MODE: AUTO If hold mode is On, "HOLD" is shown: Upstairs MODE: AUTO For a heat or cool thermostat, the status shows the current temperature, the temperature setpoint, whether hold mode is on, the system mode, and the fan on/auto selection. Upstairs HEAT: 70 Upstairs... - Page 34 To set up your thermostat for use with the energy saver, set it in the appropriate mode and set the temperature to your preference. NOTE: Your heating and cooling system will always be off if you set your thermostat to Off mode. The PESM cannot turn it back on.
-
Page 35: Freeze Alarms
IMPORTANT NOTES: There is a 3-minute minimum on and off time for PESMs designed to prevent short cycling your HVAC compressor. If the PESM has just turned the HVAC system on or off, it will wait 3 minutes before changing it, even though the display does change. -
Page 36: Temperature Control Of Appliances
Temperature Control of Appliances You can control appliances connected to X-10 and ALC modules (such as a ceiling fan) using the Button feature of the OmniLT. For example, the ceiling fan can be programmed to come on if the temperature goes above the High temperature (a programming example to set this up is shown in the Programming section). -
Page 37: Configuring Hlc Devices
You may enter a unit number to start displaying the status of that unit, or simply press the down arrow key to scroll through the list of units. The status display is as shown under Control, except that now the arrow keys may be used to continue scrolling between units. -
Page 38: Configuring Hlc Devices Using An Omnitouch Touchscreen
Once completed, press the ' # ' key to return to the Status display and select your next unit (device). Put the next selected HLC device into Setup Mode (See - Setup Mode for HLC Devices) and then press the ' # ' key twice to configure the selected device. Configuring HLC Devices using an OmniTouch Touchscreen To configure HLC devices from an OmniTouch touchscreen, press the “Control”... - Page 39 3 = SUN (SUNRISE / SUNSET AUTOMATIC CALCULATION) The system automatically calculates the time of sunrise and sunset each day. From the status menu, press the 3 (SUN) key on the console keypad to display the calculated time of sunrise, sunset, and the outdoor temperature (if outdoor temp sensor installed): Sunrise: 6:00 AM Sunset: 4 = TEST (SYSTEM DIAGNOSTIC TEST)
-
Page 40: Event Log
The Energy Cost will display Lo, Mid, Hi or Crit (for critical) energy rates. Event Log The Event Log records the 50 most recent significant security system Events (happenings) and trouble conditions in the system. When a new event occurs, the oldest one is lost. -
Page 41: Messages
For trouble restorations, the event log will show the zone name or specific trouble condition and "TRBL RST": 11:57 AM BATTERY The system records each remote access. A remote phone access is when someone calls into the system from an outside phone line. -
Page 42: Clear Message
Clear Message The 3 (CLEAR) key allows you to clear the selected text message, or all text messages from the console's display. TRASH NIGHT ENTER MESSAGE You may enter the message number followed by the ' # ' key to clear that message, or simply press the down arrow key to scroll through a list of messages. - Page 43 Pro-Link also has the capability to monitor the serial port for incoming text messages. When a text message is received, Pro-Link searches through all 16 messages for a matching message. If one is found, the Program Command (macro) corresponding to the matching message is activated.
-
Page 44: Telephone Control
TELEPHONE CONTROL Telephone Interface Your OmniLT is equipped with a built-in telephone response feature that allows you to control and access the status of your system from any Touch-Tone phone. The OmniLT actually talks to you using a digital recording of an actual human voice, so the sound is incredibly life like. You send commands to the OmniLT using the keys of your Touch-Tone telephone. -
Page 45: Phone Access Denied - Remote Lockout
Phone Access Denied - Remote Lockout The OmniLT has a remote lockout feature to discourage youngsters (and adults who act that way) from trying to access your system. If four invalid codes are entered, the system will hang up and a one-hour lockout period will begin. During the lockout period, the OmniLT will not answer a call after any number of rings, which should discourage the caller. -
Page 46: Recording Your Address
When you are finished with the voice menu, press the 9 (Good-Bye) key. The OmniLT will say, "GOOD-BYE" and hang up. From an in-house phone, the dial tone will return. From a remote phone, you will hear a click as the OmniLT hangs up. It is recommended that you press 9 to terminate a remote call. -
Page 47: Emergency Dial-Out
Emergency Dial-Out Emergency dial out consists of two distinct parts: the "digital dialer" and the "voice dialer." Digital Dialer The digital dialer (also called a "digital communicator") reports alarm events to a central station monitoring center. The digital dialer sends a digitally coded message to the central station's receiver and computer. The computer in the central station presents your name, address, and other information to a human operator who notifies the appropriate authorities. -
Page 48: What You Hear - If Your Omnilt Calls You
If the number dialed is busy, or if all lines are busy, the dialer will immediately hang up and go to the next number in the Dial Order. The dialer will wait up to 45 seconds after it finishes dialing a complete phone number for a voice to answer. If it doesn't hear a voice in that time, it goes on to the next number. -
Page 49: Setup
High Security Mode, and have telephone access privilege. 3 = User User codes can only be used to arm and disarm the security system during assigned times. Telephone access is not a User privilege. You can specify the access (on/off) times for the code, this is, the time periods during which the code is valid. -
Page 50: Duress Code
The system will disarm normally. No sirens will sound, no lights will flash, but the OmniLT will perform a silent dial out and say that this is a silent alarm. To stop a silent dial out, turn your security system off by pressing OFF, then your code. DURESS CODE:... -
Page 51: Add Programs
Each automation "program" is a single step in programming automation in an OmniLT system. Each program must specify when that program should execute and an action to be taken. The program may also specify a condition that must be true for the program to execute. -
Page 52: Delete All Programs
Otherwise, a help screen is displayed: Press # to delete or edit displayed program. The first program is displayed once the down arrow is pressed. The top line displays the time or button/event that activates the program and any condition that must be true for the program to activate. The bottom line shows the command to execute when the program is activated. -
Page 53: Edit Programs
Edit Programs The Edit Program menu is used to create an automation program. EDIT PROGRAM 1=WHEN • Selecting 1 (WHEN) is used to specify the time that the program is activated or the macro button (event) that activates the program. •... -
Page 54: Button And Event Programs
DATE: 10/15 ↓ MMDD =DAY Next, specify if the program will run once (on the specified date and then be deleted) or if the program will run every year on the specified date (yearly). RUN PROGRAM 1=ONCE To change days, press the down arrow (DAY) key. You will be prompted to enter the day(s) that the program will be activated. Press 1-7 for Monday - Sunday, 0 for Once, 8 for Weekdays, and 9 for Weekends, then ' # '. -
Page 55: Security Mode Event Buttons
Press the 0 (OFF) key to select when the unit turns off or press the 1 (ON) key to select when the unit turns on (this program is executed whenever the unit is turned off or on). Press the 2 (SWITCH) key to select only when the top-rocker or bottom-rocker is pressed at a UPB, RadioRA, or ALC Switch (locally at the Switch) or when a button is pressed on a keypad. -
Page 56: Zone Event Buttons
When you specify that the event button is activated at the start of the delay by pressing the 1 (START EXIT) key, the mode is prefixed by "A-" for "arming into". WHEN AWAY: WHEN A-AWY: When the system is armed in the Day (instant) or Night (delay) mode, buttons for the Day and Night modes are executed, respectively. -
Page 57: Upb Link Triggers
Then select the specified command Off, On, or Set. UPB Link Triggers When a program is created that uses “When Link On” as the trigger, the program will execute when a “Link Activate”, “Link Goto” (as long as the result of the Goto command is not “0”), or “Link Fade Start” (as long as the result to the Fade command is not “0”) message is received. -
Page 58: Miscellaneous Event Buttons
"Off" events will be activated whenever the selected device is turned off. "On" events will be activated whenever the selected device is turned on. "Scene" events will be activated whenever the selected device is set to the specified scene. "On" events will also be activated whenever the selected device is set to a scene other than off. -
Page 59: Switch Press Event Buttons (Centralite)
Pro-Link determines that a message has been received when: • One or more characters have been received followed by 100 ms of silence • One or more characters followed by a carriage return character are received • One or more characters followed by a line feed character are received It is not necessary to enter the terminating carriage return or line feed character as part of the message name. -
Page 60: Unit Toggle Command
For example: WHEN FRONT FOYER SW1 PRESSED: FRONT FOYER TOGGLE Program Security Commands Press the 2 (SECURITY) key to arm and disarm the security system, or to bypass and restore an individual zone. The following menu is displayed: 0=OFF... -
Page 61: Program All On / All Off Commands
Program All On / All Off Commands Select the 4 (ALL) key to program All Lights On and All Units Off commands. It is also used to program Leviton Scenes, UPB Link, RadioRA Phantom Button, or CentraLite Scene. 0=OFF 1=ON 2=SCN 3=LINK 4=PHANTOM 5=CENLIT If area arming is being used, the display will then prompt you for the area to control. -
Page 62: Program Security Mode Conditions
0=OFF 1=ON Program Security Mode Conditions Press the 2 (SEC) key to specify that the program should only execute if the security system is armed in a particular mode. Select the security mode from the following menu: 0=OFF 1=DAY 2=NIT 3=AWY... -
Page 63: Set Up Dial
NEVER Choose "NEVER" if you wish to temporarily deactivate a program without deleting it. Other conditions include: • IF LIGHT • IF DARK • IF ENERGY LO • IF ENERGY MID • IF ENERGY HI • IF ENERGY CRIT • IF PHONE DEAD •... -
Page 64: Remote Commands
If Remote Commands Ok is set to Yes, the OmniLT will allow all commands to be executed when called from a remote telephone. If Remote Commands Ok is set to No, then lights, appliances, and the security system cannot be controlled from a remote telephone that dials into your home. -
Page 65: Dial Out Numbers 2-8
The default entry delay is 15 seconds. If you wish to allow yourself more time to get in and turn off the security system, you may set the entry delay between 15 and 45 seconds. -
Page 66: Exit Delay
The default setting for Perimeter Chime is Yes. Enable Quick Arm The Quick Arm feature allows the security system to be armed by pressing the desired mode key twice instead of having to enter your code. The default setting for Enable Quick Arm is No. -
Page 67: Set Up Miscellaneous
If your system is set up with High Security On, the display will request the Master or Manager code whenever you select one of these functions, even if the security system is Off. Simply enter your Master or Manager code. -
Page 68: House Code All Off
FORMAT NUMBER STANDARD EXTENDED COMPOSE RADIO RA HAI LIGHTING CENTRALITE The default setting for HC 1 Format is 5 (HLC). House Code All Off This feature allows you to choose if the House Code will respond to the “All Off” command. Press the 0 key to select No and the 1 key to select Yes. -
Page 69: Latitude, Longitude, And Time Zone
12:00 AM MTWTFSS #=CHNG TIME CLOCK 1 OFF TIME For example, it may be desirable to conditionalize certain programs to execute only during a normal Monday - Friday 9:00 AM - 5:00 PM work week. The default for Time Clock 1 ON is 12:00 AM MTWTFSS, and the default for Time Clock 1 OFF is Never, so that Time Clock 1 is always Enabled. -
Page 70: Daylight Savings
TIME ZONE: 0-12 Daylight Savings OmniLT automatically calculates the day of daylight savings time each year. It also adjusts the "time of day" each time daylight savings time begins and ends. To enable the system to properly calculate daylight savings time, a start month, start weekend, end month, and end weekend is set-up at the factory. -
Page 71: Set Up Voice
To enter a name, enter the two digit code shown in Table 2 in the Appendix for each character in the name, then press the ' # ' key. Use the up arrow key to delete the most recently entered character. ZONE 1: 00-95 ZONE 1:... -
Page 72: Set Up Address
Set Up Address The final setup item is accomplished over the telephone. This is the address that the system says when it dials out in an emergency. Your voice will be recorded on computer chips in the OmniLT controller and saved to be played back in the emergency message when the system dials out for an alarm. -
Page 73: Underwriter's Laboratories Requirements
UNDERWRITER'S LABORATORIES REQUIREMENTS For a complete list of requirements and restrictions when installing the OmniLT panel in a UL Listed system, refer to the Underwriter's Laboratories Requirements section of the Installation Manual (21I00-1). When used in UL Listed Installations, the following items apply: The "High Security Mode"... -
Page 74: Federal Communication Commission Notice
FEDERAL COMMUNICATION COMMISSION NOTICE: This equipment complies with Part 68 of FCC Rules. On the door, inside of the OmniLT enclosure, is a label that contains, among other information, the FCC registration number and Ringer Equivalence Number (REN) for this equipment. If requested, provide this information to your telephone company. -
Page 75: Canadian Industry Canada Notice
CANADIAN INDUSTRY CANADA NOTICE Notice: The Industry Canada label identifies certified equipment. This certification means that the equipment meets certain telecommunications network protective, operational and safety requirements. The Industry Canada does not guarantee the equipment will operate to the user's satisfaction. Before installing this equipment, users should ensure that it is permissible to be connected to the facilities of the local telecommunications company. -
Page 76: Appendix A - Specifications
APPENDIX A - SPECIFICATIONS Size: Controller: 9.1W x 12.1H x 3.5D Console: 4.6W x 4.5H x 1.2D Weight: Controller: approx. 4.5 lb. Console: approx. 0.5 lb. Operating 32 - 122 degrees F (0 - 50 degrees C) Ranges: 10 - 95 % relative humidity, non-condensing Power: 120 VAC, 60 Hz, 60 watts Transformer:... -
Page 77: Appendix B - Character Codes
APPENDIX B - CHARACTER CODES CODE CHAR CODE CHAR SPACE " & CODE CHAR < > ¥ CODE CHAR × ¯ à ß... -
Page 78: Appendix C - Voice Descriptions
APPENDIX C - VOICE DESCRIPTIONS CODE DESCRIPTION ELEVEN TWELVE THIRTEEN FOURTEEN FIFTEEN SIXTEEN SEVENTEEN EIGHTEEN NINETEEN TWENTY THREE THIRTY FOUR FORTY FIVE FIFTY SIXTY SEVEN SEVENTY EIGHT EIGHTY NINE NINETY A. M. P. M. WELCOME TO OMNI (PAUSE) (SHORT PAUSE) AC POWER ACCESS ADDRESS... - Page 79 CODE DESCRIPTION DRIVEWAY DURESS EAST EMERGENCY ENERGY ENTER ENTRY EVENTS EXIT FAMILY FIRE FOYER FREEZE FRONT FUSE GARAGE GIRL'S GLASS GOOD-BYE GOTO GUEST HALL HEAT HIGH HOLD HOURS HUNDRED INSTANT INTERIOR INVALID KITCHEN LEFT LEVEL CODE DESCRIPTION LIGHT LISTEN LIVING MAIN MASTER MEDICAL...
- Page 80 CODE DESCRIPTION PUMP READY RECORD REMOTE REPEAT RESTORE RIGHT RISE ROOM SAVER SECONDS SECURE SECURITY SETTING SHOP SIDE SILENT SOUTH STAIRS STAR STATUS STEPS STORAGE SYSTEM OK TALK TAMPER TEMPERATURE THEN CODE DESCRIPTION THERMOSTAT TIME TIMED TROUBLE TRIPPED UNIT VACATION WATER WEST WINDOW...
-
Page 82: Note To Installer
NOTE TO INSTALLER Following installation, this manual shall be left for the homeowner's use. • • New Orleans, LA U S A...
Need help?
Do you have a question about the SECURITY SYSTEM and is the answer not in the manual?
Questions and answers