
Related Manuals for Miele KM 326G


Summary of Contents for Miele KM 326G
- Page 1 Operating instructions Gas hob KM 326G Conversion kit AH 102 C4U Instructions pour l’utilisation du dessus de cuisinière au gas KM 326G Kit de conversion AH 102 C4U...
- Page 2 AH 102 C4U page 18 - 27 français page 28 - 55 Instructions pour l’utilisation du dessus de cuisinière au gas KM 326G page 28 - 45 Mode d'emploi du kit de conversion AH 102 C4U page 46 - 55...
- Page 3 Warning If the information in this manual is not followed exactly, a fire or explosion may result causing damage to property, personal injury or death. * Do not store or use gasoline or other flammable vapors and liquids in the vicinity of this or any other appliance.
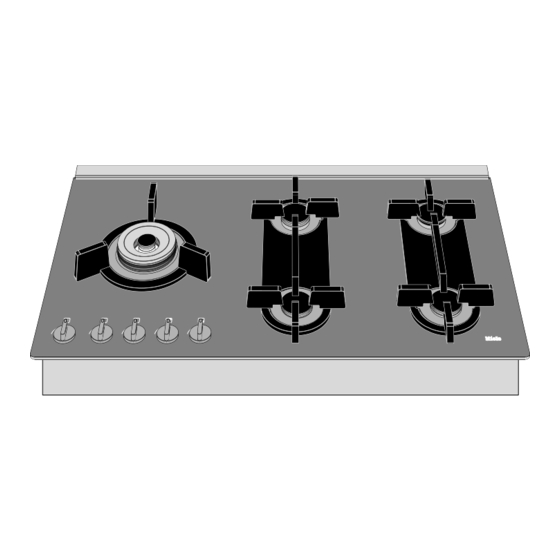
- Page 4 4.2/4.3 2.2/2.3 General Marking control knobs with marking and 2-zone wok burner LED display 2-zone high-speed wok burner rear left burner burner head ignition front left burner safety control burner ring rear right burner burner cap burner cap front right burner pan support trivet for 2-zone burner super high-speed burner...
-
Page 5: Warning And Safety Instructions
Warning and safety instructions 1. Read all the instructions before using your 14. If high settings are used, remain near the hob unit. hob in case of spitting grease or pans 2. Use the unit only for its intended purpose. boiling over, which may cause smoke. -
Page 6: Important Notes For The User
Important notes for the user – Installation and maintenance should only be – When a gas cooking appliance is being used, carried out by a suitably qualified person heat and moisture are produced in the area (licensed gas fitter in Canada). where the appliance is situated. -
Page 7: Gas Burners
Gas burners If a burner blows out, the electronic ignition automatically sparks all burners to relight the flame. The flame is lit by means of an electrical ignition device. When the burner control is pressed and turned, a high voltage flows into the electrode by the burner. - Page 8 How to use gas burners Place the pot over the pot support fitted above the hob. For small pots with a diameter of less then 7˝ (175 mm), the trivet must be used in combination with the 2-zone wok burner. Right Wrong Make sure the trivet is securely fixed to the pot...
-
Page 9: Cooking In Comfort
Cooking in comfort Pans and pots frying and pot-roasting The heat from the burner is transferred via the deep-frying and blanching pan base. If the base is thick, the heat will take cooking large quantities longer to reach the contents, but the base will stir-frying have a more uniform temperature. -
Page 10: Cleaning And Maintenance
Cleaning and maintenance Before cleaning, be certain the burners are turned off and the grates are cool. In the event of boiling over, clean immediately, to prevent the substance which has boiled over indentation from igniting. Wiping the hob down regularly immediately after use prevents dirt from burning on and resulting in stains which are difficult to remove. -
Page 11: Disposal Of Packaging And Appliance
Cleaning and maintenance Disposal of packaging and (cont.) appliance After cleaning always dry the burners and the The packaging of the appliance is recyclable. It electrodes, otherwise the flame will not ignite. is made up of: When using a cooker hood over the hob, ensure –... -
Page 12: Troubleshooting
– Plug in the appliance been plugged in properly properly – Ignition is defective – Phone the Miele Service Department If your appliance does not operate as desired, In the event of any fault on this appliance, first check if you can solve the problem yourself please contact: by using the table above. - Page 13 Electrical circuit diagram spark/sense re-ignition earth 5-point gas re-ignitor com S1 com S1 com S1 com S1 com S1 120 Vac/60 Hz/3 VA 9-leds 12-leds 9-leds 9-leds 9-leds TWO ZONE FRONTLEFT BACK LEFT BACK RIGHT FRONT RIGHT WOK BURNER 120V/60HZ main connecting board...
-
Page 14: Electrical Connection
Electrical connection Gas connection The automatic ignition and the safety device These appliances must be installed with a require connect ion to an A.C. single phase separate shut-off valve and a gas pressure 120 V, 60 Hz supply. Fuse rating 6 A. regulator. - Page 15 Min. supply pressure: 11˝ water column lead to a gas leak and subsequent explosion. Manifold pressure: – Do not use any regulator unless it has been – natural gas 4˝ water column supplied by Miele Appliances. – propane gas 10˝ water column...
- Page 16 0.40 1300 suitable for use till 2000 feet. By installation super high-speed burner 9200 0.50 2000 above 2000 feet contact your distributor or Miele 2-zone wok burner 3.3 11200 0.18 600 USA/Canada and ask for a replacement set with Important orifices suitable for your altitude.
-
Page 17: Building-In Dimensions
Building-in dimensions " (900 mm) 7/16 " 3/16 (515 mm) 3" min. 1 " (75 mm) (45 mm) " 5/16 (490 mm) min. 3" (75 mm) " (860 mm) Prepare a cut-out in the worktop according to There may be a wall at the rear and a wall or tall the dimensions given in the diagram above. -
Page 18: Clearance Above And Around The Appliance
Clearance above and around the appliance min 33 " (845 mm) min 33 " 1/14 (845 mm) min 18" (460 mm) min 10" min 10" (254 mm) (254 mm) not allowed For safety reasons, ensure that the following minimum clearences are provided: –... -
Page 19: Building-In
Building-in 1. Make the cut-out in the work surface. Ensure that there is sufficient space allowed at the sides and at the rear. 2. Attach the sealing strip to the underside of the hob and the aeration profile. 3.* Connect the pressure regulator supplied at the angle-joint, ensuring that they are positioned correctly. - Page 20 WARNING This conversion kit must be installed by a qualified service agency in accordance with the manufacturer's instructions and all applicable codes and requirements of the authority having jurisdiction. If the information in these instructions is not followed exactly, a fire, explosion or production of carbon monoxide may result, causing property damage, personal injury or loss of life.
-
Page 21: Safety Instructions
This conversion kit must be installed by a qualified service agency. Part ID number Number Burner cap This conversion kit is for use with Miele gas hob Injector wok burner KM 326G only. outer ring Injector wok burner inner ring Injector super high-speed... -
Page 22: Conversion Instructions
Conversion instructions Caution Remove the three screws securing the dual ring Before proceeding with the conversion, shut off wok burner. Remove the wok burner base plate. the gas supply to the appliance prior to Lift the ceramic tray from the hob. disconnecting the electrical power. - Page 23 Pressure regulator conversion purposes. Check gas pressure. Permitted pressures: min. 11" WC (5" WC, natural gas), max. 1/2 psi. High speed and super high speed burner conversion The pressure regulator is located on the gas supply pipe. Unscrew and remove the brass cap in the centre of the regulator.
- Page 24 Wok burner outer ring conversion Note Outer ring airslot (B) Adjust the air slot on the outer ring injector now. The correct distance for the air slot (B) is 0.083". Slide the brass tube to the prescribed distance Outer ring injector (B) and tighten the holding screw at the rear of the The wok burner outer ring injector is located on tube.
- Page 25 1. First loosen the 8 mm ring securing the gas 6. Reattach the gas pipe and tighten the 8 mm feed pipe. Disconnect the gas pipe. The ring. actual injector is a thin metal cap mounted between the two brass fittings attached to Note the left of the wok burner body.
- Page 26 Minimum adjustment screws 3. Put the black switches with the light emitting 1. Lift and remove the small black ring if this is diodes back in place. still on the regulator shaft (see note in "Disassembly"). 4. Attach the label 'This control has been converted for use with propane gas' to the 2.
-
Page 27: Installing Appliance
Installing appliance Testing converted appliance 1. Install the appliance according to the Note installation instructions. This appliance has been internally tested for gas leakages by the manufacturer. 2. Attach the moulding at the rear to the undertray. Put the hob back in the work Caution surface and fasten the bracket clamps Check converted hob for gas leaks. -
Page 28: Warranty And Service
In the event of any fault with this appliance, please contact: your Miele Dealer, or the Miele Service Department, the address of which is shown on the back page. When contacting the Service Department, please quote the Model and Serial numbers of your... -
Page 29: Technical Details
This appliance with the orifices as delivered for natural gas or LP gas by the manufacturer is suitable for use till 2000 feet. By installation above 2000 feet contact your distributor or Miele USA/Canada and ask for a replacement set with orifices suitable for your altitude. - Page 32 Alteration rights reserved / 2503 This paper is made from cellulose bleached without the use of chlorine.