
Related Manuals for Samsung GN642FFXA


Summary of Contents for Samsung GN642FFXA
- Page 1 GN642FFXA GN792IFXA GN952IFXA Manuale di installazione e dell’utente / Piano di cottura da incasso Installation and user manual / Built-in Hotplate...
-
Page 2: Table Of Contents
Content Preface Safety warning 5 - 11 2.1 Safety warning 2.2 Installation 2.3 Child and people safety 2.4 During use 8 - 9 - 10 2.5 Cleaning and service 2.6 Environmental information Instructions for use and maintenance 12 - 22 3.1 Description of the appliance 12 - 13 3.2 How to use the appliance... -
Page 3: Preface
If you are unsure of any of the information contained in these instructions, please contact the Samsung customer care center. These instructions are only valid for the countries of destination (see page 2 of this booklet). The manufacturer is not responsible for any damage to persons or property caused by incorrect installation or use of the appliance. -
Page 4: Safety Warning
2.1 Safety warning ■ Your safety is of the utmost importance to Samsung. ■ You must read warnings carefully before installing or using the appliance. ■ This instruction booklet must be kept with the appliance for any future reference. If the appliance is sold or transferred to another person, ensure the booklet is passed on to the new user. -
Page 5: Installation
2.2 Installation Warning ■ The appliance must be installed in ■ Prior to installation, ensure that the accordance with the valid regulations gas and electrical supply complies and may only be used in a well- with the type stated on the rating ventilated area. -
Page 6: Child And People Safety
2.3 Child and people safety Warning ■ Do not allow children to play near or with the appliance. The appliance gets hot when it is in use. Children should be kept away until it has cooled. Caution ■ This appliance is designed to be operated by adults. ■... -
Page 7: During Use 8
2.4 During use Warning ■ Only use the appliance for preparing ■ It is dangerous to modify or try to food. Never use it as a heater. modify the characteristics of this appliance. ■ A gas cooking appliance in use ■... - Page 8 2.4 During use Warning ■ Only use the appliance for preparing ■ It is dangerous to modify or try to food. Never use it as a heater. modify the characteristics of this appliance. ■ A gas cooking appliance in use ■...
- Page 9 2.4 During use ■ Do not place any fl ammable objects ■ Perishable food, plastic items and near the appliance. aerosols may be affected by heat and should not be stored above or below the appliance. ■ Aluminium trays or foil are not ■...
- Page 10 2.4 During use Caution ■ This appliance is intended for domestic cooking only. It is not designed for commercial or industrial purposes. ■ Prolonged intensive use of the appliance may call for additional ventilation, for example, by opening a window or increasing the level of mechanical ventilation where present.
-
Page 11: Cleaning And Service
2.5 Cleaning & service Warning ■ Never use abrasive or caustic ■ This appliance should only be cleansing agents. repaired or serviced by an authorised service engineer and only genuine, approved parts should be used. Caution ■ Before attempting to clean the appliance, disconnect it from the mains and let it cool down. -
Page 12: Description Of The Appliance
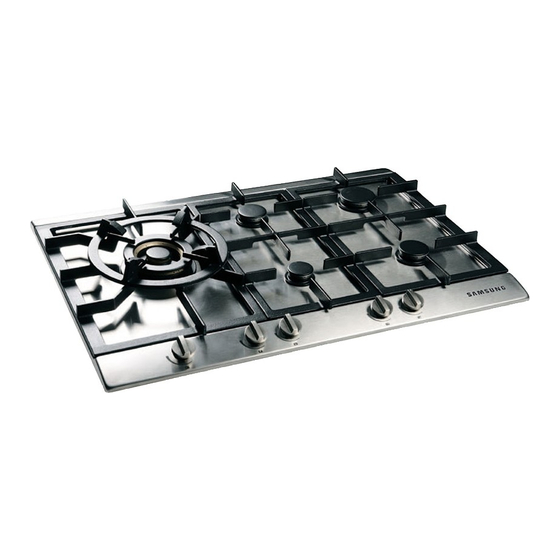
3.1 Description of the appliance GN642FFXA GN792IFXA / GN792IFXAB GB 12... - Page 13 3.1 Description of the appliance GN952IFXA / GN952IFXAB Knob Burner (auxiliary, semi-rapid, rapid and wok) Top plate Sealing ring Auxiliary burner Semi-rapid burner Burner cap Rapid burner Burner head Wok burner Burner ring Control knob Burner base Pan support Thermocouple Control knob Spark plug GB 13...
-
Page 14: How To Use The Appliance
3.2 How to use the appliance The burner Choose the burner properly for usage: ■ Use the strong, super-strong or wok burner to fry, stir-fry, deep-fry or heat large quantities of food. ■ The simmer burner is well suited to prepare sauces and simmer and boil food. On its high setting, this burner is strong enough to cook food through. -
Page 15: How To Turn On
3.3 How to turn on Turn on Each burner can be adjusted steplessly between the full and low positions. Burner indication 0-setting High setting Low setting ■ Open the main gas valve (only by fi rst use). ■ Place a pot or a pan on the corresponding cooking position. ■... -
Page 16: How To Turn Off
3.4 How to turn off Turn off 0-setting ■ Turn the control knob clockwise to the 0-setting. The burner goes out. ■ Although turned off, the burner is still hot. Be careful you don’t get burned. GB 16... -
Page 17: Safety And Energy Saving Advice
3.5 Safety and energy saving advice The diameter of the bottom of the pan should correspond to that of the burner. ■ Do not use pans with a base diameter less than 12 cm. Smaller pans will not be stable. ■... -
Page 18: Cleaning And Maintenance 18
3.6 Cleaning and maintenance ■ Cleaning operations must only be carried out when the appliance is cool. ■ The appliance must be disconnected from the mains before commencing any cleaning activities. ■ Clean the appliance regularly, preferably after each use. ■... - Page 19 3.6 Cleaning and maintenance Stubborn stains on stainless steel (spillage wells) In particular spilled red cabbage, red beetroot, soy sauce, rhubarb and other foodstuffs with a high sugar content and acidic liquids can discolour the surface. To remove stubborn stains from stainless steel, use a cleansing agent specially formulated for stainless steel and always clean in the direction of the structure of the steel in order to avoid shiny spots.
- Page 20 3.6 Cleaning and maintenance Burners ■ Remove the burner caps, burner head and burner ring by pulling them upwards and away from the top plate. ■ Soak them in hot water and a little detergent. ■ After cleaning and washing them, wipe and dry them carefully. Make sure that the fl...
- Page 21 3.6 Cleaning and maintenance Burners ■ Remove the burner caps, burner head and burner ring by pulling them upwards and away from the top plate. ■ Soak them in hot water and a little detergent. ■ After cleaning and washing them, wipe and dry them carefully. Make sure that the fl...
-
Page 22: Troubleshooting
However, some minor problems can be resolved without requiring the involvement of a specialist (see table below). If the problem cannot be solved, please contact the Samsung customer care center. PROBLEM... -
Page 23: Application For Service
3.8 Application for service If you have any comments or questions regarding a Samsung product, contact the SAMSUNG customer care centre. Customer Care Region Country Web Site FAX no. Address Remark Center (TEL) www. Samsung Electronics Benelux B.V. BELGIUM 02 201 2418 samsung.be... -
Page 24: Technical Instructions
4.1 Technical instructions ■ This appliance must be installed and serviced by a qualifi ed technician or installer. ■ Prior to installation, ensure that the local distribution conditions (nature of the gas and gas pressure) and the adjustment of the appliance are compatible. -
Page 25: Technical Data For Engineers
4.2 Technical data for engineers Appliance specifi cations Model GN642FFXAB1E/L1 GN792IFXAB1E/L1 GN952IFXAB1E/L1 Cast-iron Pan support Stainless steel Top plate Metalized Control knob 11 kg 17 kg 19 kg Weight Dimension 600 x 526 x 53 mm 750 x 526 x 53 mm 900 x 526 x 53 mm (WxDxH) Ignition in every position... -
Page 26: Positioning
4.3 Positioning Cutout size GN642FFXA GN792IFXA min. 50 mm min. 50 mm GN952IFXA min. 50 mm Min. distance to the rear wall after building-in: 50 mm. GB 25... - Page 27 4.3 Positioning Space to be left free around the appliance A hob generates heat. Leave a suffi cient distance between the appliance and non heat-resistant materials. min. 600 mm (GN642) min. 750 mm (GN792) min. 900 mm (GN952) min. 650 mm min.
-
Page 28: Installing The Appliance
On the underside of the hob, adjust the brackets into a position that is suitable for your worktop. Then fully tighten the screws to secure the hob into position. GN642FFXA GN792IFXA GN952IFXA GB 27... -
Page 29: Gas Connection
4.5 Gas connection ■ This appliance must be installed and connected in accordance with the installation regulations in force in the country in which the appliance is to be used. ■ This appliance is made to run on natural gas only and cannot be used on any other type of gas without modifi... -
Page 30: Electrical Connection
- Blue = Neutral - Brown = Live ■ The green/yellow wire must be connected to the terminal that is marked with the letter E or the earth symbol. GN642FFXA Sparks Burner switches Ignitor A.C.220-240V/50-60Hz GN792IFXA and GN952IFXA Burner switches... -
Page 31: Gas Conversion
4.7 Gas conversion This appliance has been set up for natural gas. The appliance can be set up for other gas types and pressures by means of a conversion kit. You can order the kit from the sales and service organisation. The conversion instructions are supplied with the kit. GB 30...