Table of Contents
Advertisement
Advertisement
Table of Contents

Related Manuals for Sekonic Flashmate L-308S


Summary of Contents for Sekonic Flashmate L-308S
- Page 1 FLASHMATE Operating Manual...
-
Page 2: Safety Precautions
REFERENCE: Provides the reference information and related functions that are useful in operating the L-308S. We recommend that you read these reference. WARNING Please place in a location where an infant cannot reach and accidentally get the strap wrapped around his or her neck. -
Page 3: Table Of Contents
Table of Contents Safety Precautions Table of Contents Parts Designation ................1 Explanation of the Liquid Crystal Display (LCD) ......2 Before Using .................. 3 1. Attach the strap ................3 2. Inserting the battery ..............3 3. Checking battery capacity ............4 4. -
Page 4: Parts Designation
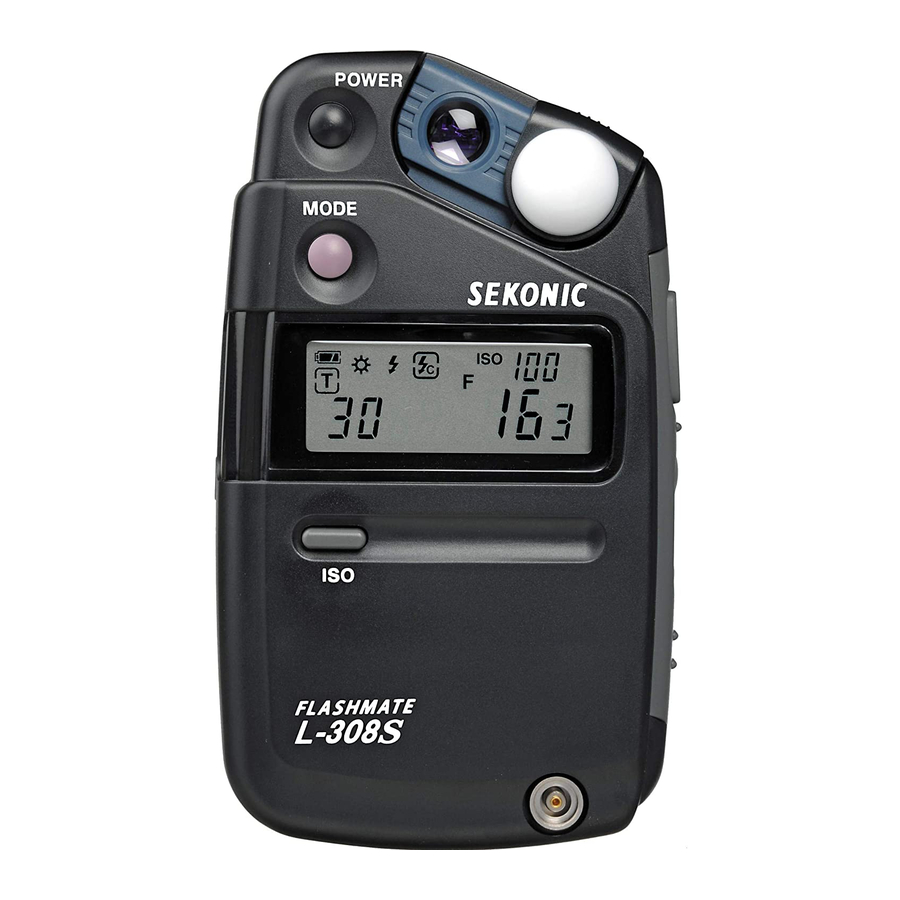
1. Parts Designation Power Button(ON/OFF Switch) Lens Lumisphere Lumisphere Mode Button Measuring Button Liquid Crystal Display (LCD) Up Button Down Button ISO Button Strap Eyelet Battery Flash Synchro Terminal Compartment Cover Synchro Terminal Cap Lumidisc Strap... -
Page 5: Explanation Of The Liquid Crystal Display (Lcd)
2. Explanation of the Liquid Crystal Display (LCD) For explanation purposes, the display illustrated here shows icons and readouts simultaneously. Actual display will never appear like this. Measuring Mode icons Ambient (See page 10) Auto Reset Cordless Flash (See page 16) Cord Flash (See page 14) ISO Display (See page 5) Displays ISO Film setting. -
Page 6: Before Using
3. Before Using 1. Attach the strap 1) Attach the Strap !5 by passing the small end loop through the strap eyelet !2 and passing the other end of strap through it. Please place in a location where an infant cannot reach and WARNING accidentally get the strap wrapped around his or her neck. -
Page 7: Checking Battery Capacity
3. Before Using 3. Checking battery capacity When the Power button q is ON, the battery power indicator on the LCD t is displayed. (Displayed) Battery power level is good. (Displayed) Battery power level is low. Have a spare battery ready. (Blinking) Replace battery immediately. -
Page 8: Auto Power Off Function
3. Before Using 5. Auto Power OFF function 1) To conserve battery power, the meter will turn OFF about four minutes after last use. 2) Whether the Auto Power OFF function turns the power OFF or the Power button q is pressed, the settings and measured values remain stored in memory. -
Page 9: Basic Operation
4. Basic Operation 1. Incident or reflected light measuring 1) To set for either incident or reflected light operation, slide the Lumisphere w mounting until it clicks. Incident light mode Reflected light mode Setting operation NOTE: Always use the Lumisphere mounting for setting. Hand operation of the Lumisphere may cause damage. - Page 10 4. Basic Operation 2) Interchangeably switch between EV mode and Shutter Speed Priority mode by pressing the Mode button e while holding down the ISO button i in Ambient mode. MODE Measurement value also will be automatically calculated when a switch is made after measuring.
-
Page 11: When Set For Incident Light
4. Basic Operation 3. When set for incident light Incident light measuring is the measurement method that employs either the Lumisphere or Lumidisc functions. Measure with the lumisphere ai med in the camera direction at the position of the subject. 1) Using Lumisphere to Measure Lumisphere is used to measure people and buildings and other such solid objects. -
Page 12: When Set For Reflected Light
4. Basic Operation 4. When set for reflected light Point the lens of the exposure meter toward the part of the subject to be measured from the camera position or from the camera direction and then measure. 1) This method is used to measure the brightness (luminance) of light reflected from the subject and is useful for metering subjects that cannot be approached or light-generating subjects (neon signs, etc.), highly reflective surfaces or translucent subjects (stained glass, etc.). -
Page 13: Measurement
• Even if within the measurement range of the L-308S, the exposure over symbol E.o may appear for the set shutter speed at maximum aperture value (F90) and likewise the exposure under symbol E.u may appear at the minimum value (F0.5). -
Page 14: Ev Mode
NOTE: • When brightness (or darkness) exceeds the measuring range of the L-308S, E.o (or E.u) will blink to indicate that measuring is not possible. In such cases please adjust brightness. 1-2 EV mode... - Page 15 5. Measurement 2) Press measuring button to make a measurement. Release the measuring button to complete the measurement. The measured value (EV value) at that time will be displayed. While pressing the measuring button, the meter measures continuously until it is released. Measurement value (EV) REFERENCE: •...
-
Page 16: Cinematography
5. Measurement 1-3 Cinematography 1) Press Mode button to select Shutter Speed Priority mode. 2) Press the Up button or Down button to select the cine speed for the camera that will be used. MODE The following cine speeds will be displayed after 1/6000 and 1/8000: 8, 12, 16, 18, 24, 25, 30, 32, 60 and 128 fs. -
Page 17: Measuring Flash Light
5. Measurement 2. Measuring Flash Light This measuring method comprises the cord and cordless flash modes. Measure the flash light to display shutter speed and aperture value (total amount of light combining ambient light and flash light) on the LCD. 2-1 Cord Flash mode This measuring methad is used to make sure synchronization with flash units, or to measure... - Page 18 (aperture value) will be displayed. • Even if settings are within the measurement range of the L-308S, the E.o or E.u symbol may appear for the aperture value corresponding to the set shutter speed. Change the shutter speed or measure again using the following methods.
-
Page 19: Auto Reset Cordless Flash Mode
(aperture value). When brightness (or darkness) exceeds the measuring range of the L-308S, E.o (or E.u) will blink to indicate that measuring is not possible. In such cases please adjust the quantity of flash light and measure again. - Page 20 5. Measurement 4) If the 90 second period is exceeded and the blinking mark stops, press the Measuring button again to return to ready to measure. 1/10 f stop 5) When the light from the flash is received, the measured value (f stop) is displayed. Even after measurement, the mode mark continues to blink and the meter is in ready Set shutter speed...
-
Page 21: Advanced Functions
6. Advanced Functions 1. Measuring Light Contrast This method is used to check studio lighting or lighting unevenness. 1) Mount the Lumidisc accessory (see page 8). 2) Turn ON just the main light source. EV Difference of Point the Lumidisc at the main light source Contrast Ratio Measuring Value from the subject position and then... -
Page 22: How To Use An Incident Illuminance (Lux Or Fc) Meter
6. Advanced Functions 2. How to use an incident illuminance (LUX or FC) meter 1) Mount the Lumidisc accessory (see page 8). 2) Set EV mode and ISO 100. 3) Measure with the area to be measured parallel to the Lumidisc. 4) Determine the illuminance (lux) from the calculation table using the measured EV value Lux conversion table... -
Page 23: Custom Setting Function
6. Advanced Functions 3. Custom setting function POWER To match your camera, you can set the setting value and display value to full, 1/2 or 1/3 stop. MODE 1) To enter custom setting mode, hold down the Mode button and turn ON the power button 2) Once custom setting mode is entered, the ‘CS’... -
Page 24: Accessories
7. Accessories Synchro cord (Sold Separately) This is a five-meter long cord with three plugs. An exposure meter, a camera, and a flash can all be connected at the same time. This is convenient when measurements are made, because it is not necessary to plug and unplug the synchro cord. -
Page 25: Technical Data
8. Technical Data Type • Digital exposure meter for ambient and flash light Light receiving method • Incident light and reflected light Light receiving section • Incident light: Lumisphere, Lumidisc • Reflected light: Lens (light receiving angle of 40 ) Light receptor •... -
Page 26: Safty Guide And Maintenance
Keep the Lumisphere, lens and Lumidisc clean and free from dust, foreign particles and scratches to keep accurarate measurement. Wipe the L-308S with a dry soft cloth if it becomes dirty. Never use organic cleaners (like thinner or benzene) to clean Lumisphere. - Page 27 7-24-14, OIZUMI-GAKUEN-CHO, NERIMA-KU, TOKYO 178-8686, JAPAN TEL: +81(0)3-3978-2335 FAX: +81(0)3-3978-5229 http://www.sekonic.co.jp/English JE1097560-00...
Need help?
Do you have a question about the Flashmate L-308S and is the answer not in the manual?
Questions and answers