
Related Manuals for Zanussi T803V

Summary of Contents for Zanussi T803V
-
Page 1: Washing Machine
ZANUSSI ZANUSSI WASHING MACHINE ÑÒÈÐÀËÜÍÀß ÌÀØÈÍÀ KASUTUSJUHEND T 803 V INSTRUCTIONS MANUAL ÐÓÊÎÂÎÄÑÒÂÎ ÏÎ ÓÑÒÀÍÎÂÊÅ È ÈÑÏÎËÜÇÎÂÀÍÈÞ PESUMASIN 146 2546 02 - 06/03... -
Page 2: Table Of Contents
CONTENTS For the user For the installer Safety instructions Technical information Description of the appliance Installation Use of your appliance Unpacking Programme chart Installation Operating instructions Levelling Hints & Tips 10 -12 Moving of the appliance Cleaning and maintenance Water connection If something doesn't work 14/15 Electrical connection... -
Page 3: Safety Instructions
SAFETY INSTRUCTIONS You must read the whole of this instruction book Small and delicate objects (e.g. baby socks, before you use the appliance. Follow the advice stockings) can be easily washed inside a small carefully. Keep the book for future reference. If you pillowcase with a zip fastener or in larger sell or give away the appliance, make sure that the socks. - Page 4 Safeties Environmental information Lid : your washing machine is equipped with a safety avoiding the switching of the appliance All materials marked by the symbol when the flapdoors of the drum are opened ; biodegradable. They can be disposed of without the closure of the lid is so impossible.
-
Page 5: Description Of The Appliance
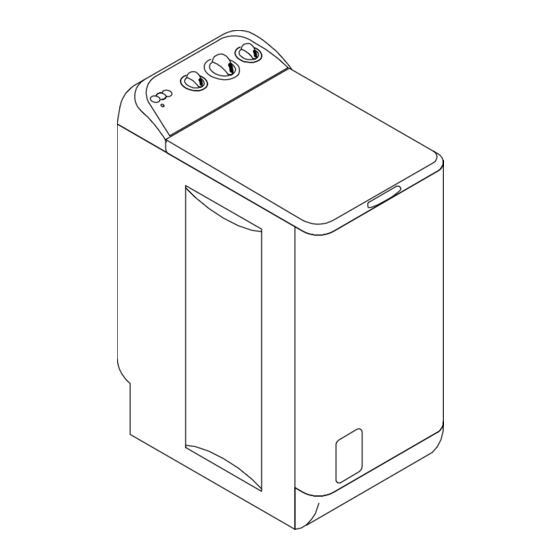
DESCRIPTION OF THE APPLIANCE Temperature selector Programme selector Spinning speed selector Pushbuttons Control panel Light Handle for opening lid Trap door for lint filter Detergent dispenser Symbols ( ) Washing powder for programmes with prewash (1). ( ) Washing powder or liquid detergent for the main wash (2). -
Page 6: Use Of Your Appliance
USE OF YOUR APPLIANCE The control panel Never turn the programme selector when the appliance is working. A. Programme selector D. Push buttons It enables to select the most adapted programme to the nature and degrees of soil of your laundry. = ON/OFF Turn the programme selector clockwise to select the Press the ON/OFF pushbutton, the programme starts... -
Page 7: Programme Chart
PROGRAMMES CHART Cotton / linen - Maximum load : 4,5 kg (cotton) Push- Description of the programmes Time Energy Water Prog. Temp. Programmes buttons min. liter 60°-90° Cotton + prewash Washing + prewash 3 rinsings Spinning 800 rpm (10 min) HALF LOAD 60°-90°... -
Page 8: Operating Instructions
OPERATING INSTRUCTIONS Before using your appliance for the first time, we recommend that you do a preliminary wash with the machine empty, as a precaution to clean the drum, the tub and the detergent dispenser. 1. Pour a dose of detergent in the “washing” compartment. 2. -
Page 9: Hints And Tips
HINTS AND TIPS Delicate synthetics, synthetics with non-fast colours Washing hints and woollen garments must never be washed above You are advised not to leave your laundry too long, 40°C. especially when damp. Damp laundry produces moult As you already know, your washing machine can also and unpleasant smells. -
Page 10: Liquid Detergents
To remove paint stains, for example, use a volatile Liquid detergents substance such as turpentine: in this case, you should Using the new automatic dispenser for liquid wait for it to dry completely before washing. detergents, it is possible to use a liquid detergent for The manufacturer of your washing machine is not main wash phases if you start the washing machine responsible for any damage deriving from the use of... - Page 11 Wasch code symbols These symbols appear on fabric label, in order to help you choose the best way to treat your laundry. Strong wash Max. wash Temperature 60°C Temperature 40°C Temperature 30°C Hand wash Temperature 95°C Do not wash Delicate wash at all BLEACHING Bleach in cold water...
-
Page 12: Cleaning And Maintenance
CLEANING AND MAINTENANCE Make sure that the machine is unplugged and the water tap turned off before undertaking any kind of maintenance. Bodywork The outside or the machine can be cleaned with warm water and a neutral non-abrasive household detergent. Wipe with clean water and dry after cleaning. -
Page 13: If Something Doesn't Work
IF SOMETHING DOESN'T WORK ? Problems Solutions Check that : The wash results are not as usual was the wrong quantity or the wrong detergent added ? Insufficient detergent leads to grey washes and scale deposits in the machine. Check the quantities more exactly. - Page 14 IF SOMETHING DOESN'T WORK ? Problems Solutions The machine vibrates or is too noisy Check that : all the transit bolts and packing have been removed. all the feet resting firmly on the ground, the lock nuts have been secrured. the machine does not touch something.
-
Page 15: Service
SERVICE If you have unable to identify or solve the problem, consult our servicing department. Before telephoning, make a note of the make, model and date of purchase of your machine : the service department will require this information. Data plate You will find these informations on the data plate (at the back of the appliance) and on a sticker placed on the internal door filter. -
Page 16: For The Installer
FOR THE INSTALLER Technical information Dimensions height with panel 895 mm height without panel 850 mm width 397 mm depth 600 mm Power supply voltage / frequency 230 V / 50 Hz Total power absorbed 2300 W (10 A) Heater rating 1950 W Water pressure minimum... -
Page 17: Installation
Installation The floor must be clean and dry, free from floor polish and other greasy substances, so that the machine does not slide about. Do not use any grease as lubrification. Installation on deep pile carpets and floor coverings with foam backings is not recommended, as the stability of the machine is no longer guaran- teed. -
Page 18: Water Connection
Water connection Connect the water inlet hose to a cold water tap with a 3/4" gas threaded orifice, after having inserted the rugger sealing washer into the hose collar (fig.1). If the water connection is made onto new pipes or onto pipes which have not been used for a long time, it is advisable to run off a certain amount of water before connecting the machine.