Table of Contents
Advertisement
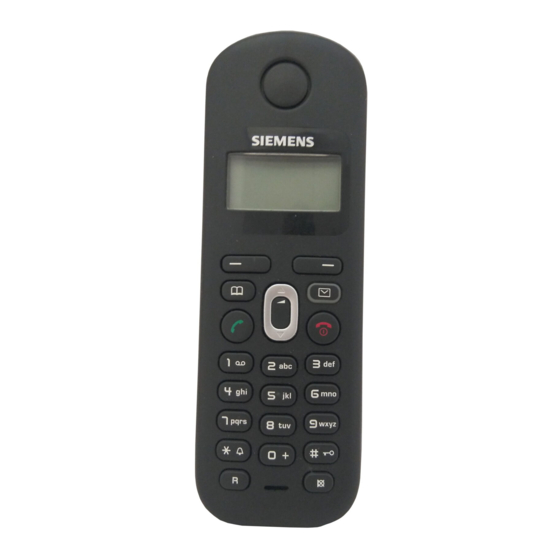
Gigaset AL18H handset
1 Charge status of
the batteries
2 Display keys
3 Message key
Flashes: new messages
received
4 Directory key
5 Control key (u)
6 Talk key
7 End call and
On/Off key
8 Ringer on/off
(press and hold
in idle status)
9 Keypad lock on/off
(press and hold)
10 Recall key
- Consultation call
(flash)
- Dialling pause
(press and hold)
11 Microphone
12 "Microphone off" key
ECO DECT
You are helping to protect the environment with your Gigaset AL18H.
Reduced energy consumption
Your telephone has an energy-saving adapter plug and uses less energy.
Reduced transmission power (depending on the base station)
The transmission power can only be reduced if your base station supports this function.
The transmission power of your telephone is reduced automatically:
◆
The handset's transmission power is reduced depending on the distance to the base station.
◆
The transmission power on the base station is reduced to virtually zero when only one handset is
registered and the handset is in the base station.
You can reduce the transmission power of the handset and base station even more by using Eco Mode/
Eco Mode+. For further information, please see your phone's user guide.
1
11.12.
11:56
INT
MENU
2
3
h
4
5
6
7
8
9
10
11
12
1
Display key on handset:
Pressing a key launches the function that
appears above that key in the display.
Display
INT
MENU
V
"
U
T
˜
OK
Function when pressed
Call other registered
¢
handsets
page 7.
Open main/submenu (see
¢
Menu tree
page 10).
Go back one menu level.
Scroll up/down or adjust
volume with u.
Move cursor to left/right
with u.
Backspace deletes one
character at a time.
Confirm menu function or
save entry.
Advertisement
Table of Contents

Related Manuals for Siemens Gigaset AL18H

Summary of Contents for Siemens Gigaset AL18H
-
Page 1: Eco Dect
11 Microphone 12 "Microphone off" key ECO DECT You are helping to protect the environment with your Gigaset AL18H. Reduced energy consumption Your telephone has an energy-saving adapter plug and uses less energy. Reduced transmission power (depending on the base station) The transmission power can only be reduced if your base station supports this function. -
Page 2: Safety Precautions
Safety precautions Care Wipe the base station, charging cradle and handset Read this user guide and the safety precautions carefully with a damp cloth (do not use solvent) or an anti- before use. Explain their contents and the potential haz- ards associated with using the telephone to your chil- static cloth. -
Page 3: First Steps
First steps Check the pack contents ◆ One Gigaset AL18H handset, ◆ one charging cradle, ◆ one mains adapter, ◆ two batteries, ◆ one battery cover, ◆ one user guide. Setting up the charging cradle The charging cradle is designed to be operated in enclosed, dry areas at temperatures ranging from +5 °C to +45 °C. - Page 4 The phone could also malfunction or be damaged as a result of using batteries that are not of the recommended type. * Gigaset Communications GmbH is a trademark licensee of Siemens AG. ¤ Insert the batteries the right way round.
-
Page 5: Registering The Handset To The Base Station
Registering the handset to the base station Before you can use the phone, you must first register the handset to the base station. The actual registration procedure will depend on the type of base station. Automatically register the AL18H handset to the Gigaset AL180/AL185 base station ¤... - Page 6 Initial charging and discharging of the batteries The correct charge level can only be displayed if the batteries are first fully charged and discharged. ¤ Place the handset in the base station or charging cradle for eight hours. ¤ Then remove the handset from the base station or charging cradle and do not replace it until the batteries are completely discharged.
-
Page 7: Making Calls
Making calls Using the directory and lists Making external calls and ending calls Directory External calls are calls using the public telephone To open the directory: press network. You can save up to 40 phone numbers (max. 32 ¢ (Enter the phone number) digits) with corresponding names (max. -
Page 8: Setting The Alarm Clock
¢ ¢ ¢ Setting the wake-up time (select entry) MENU Shortcut ¢ ¢ ¢ ¢ ¢ ¢ (press the key you want to assign the MENU Alarm Clock Wake-up time entry to) Enter the wake-up time in hours and minutes, then To dial, press and hold the required shortcut key. -
Page 9: Specifications
Cyrillic Problem Cause Solution 1x 2x 3x 4x 5x 6x 7x 8x 9x 10x 11x 12x No wireless The handset is Move the handset connection to outside the range closer to the base the base sta- of the base sta- station. -
Page 10: Menu Tree
© Gigaset Communications GmbH 2008 Gigaset Communications GmbH All rights reserved. Subject to availability. Schlavenhorst 66 Rights of modification reserved. D-46395 Bocholt www.gigaset.com Gigaset Communications GmbH is a trademark licensee of Siemens AG This user guide is made from 100% recycled paper.