Panasonic RC-CD350 Operating Instructions Manual
Cd clock radio model no. rc-cd350
Hide thumbs
Also See for RC-CD350:
- Operating instructions manual (6 pages) ,
- Operating instructions manual (64 pages)
Advertisement
PRESET TUNING
Matsushita Electric Industrial Co., Ltd.
Web Site: http://www.panasonic.co.jp/global/
Supplied accessories
1 loop antenna: RSA0031
Use the numbers indicated when asking for replacement parts.
For the United Kingdom and Republic of Ireland
www. panasonic.co.uk (for UK customers only)
• Order accessory and consumable items for your product with ease and
confidence by telephoning our Customer Care Centre Mon-Friday 9:00am-
5:30pm. (Excluding public holidays.)
• Or go on line through our Internet Accessory ordering application.
• Most major credit and debit cards accepted.
• All enquiries transactions and distribution facilities are provided directly by
Panasonic UK Ltd.
• It couldn't be simpler!
Customer Care Centre
For UK customers: 08705 357357
For Republic of Ireland customers: 01 289 8333
Technical Support
For UK customers: 0870 1 505610
This Technical Support Hot Line number is for Panasonic PC software
related products only.
For Republic of Ireland, please use the Customer Care Centre number listed
above for all enquiries.
For all other product related enquiries, please use the Customer Care
Centre numbers listed above.
PLAY MODE
ADJUST
1
2
3
DOZE
-PRESET
SOUND EQ
DISPLAY
SLEEP
CLOCK/ALARM
ALARM
. CHECK-ON/OFF
-S.VIRTUALIZER
-DIMMER
TUNER/BAND
-AUTO PRESET
Dear customer
Thank you for purchasing this product.
Before connecting, operating or adjusting this product, please read these
instructions completely. Please keep this manual for future reference.
Note
"EB" on the packaging indicates the United Kingdom.
Troubleshooting guide
Before requesting service, make the below checks. If you are in doubt about some of
the check points, or if the remedies indicated in the chart do not solve the problem,
consult your dealer for instructions.
The clock shows "-:--".
• Set the clock.
There is a lot of
• Keep away from mobile phones, televisions, and other
noise.
tuners.
• Extend and change the direction of the antenna.
The alarm doesn't
• Ensure the alarm's indicator is on ("ALARM 1", "ALARM
sound at the set time.
2", or "ALARM 3").
The memory has
• Reset the items into the memory.
been cleared.
• Insert a battery to preserve the memory contents.
"no dISC" appears.
• You haven't inserted a CD.
Play doesn't start or
• Clean the CD.
display is incorrect.
• Clean
recommended).
fingerprints, gently wipe them off with a cotton swab.
• Wait an hour for condensation to dry, then try again.
• Make sure the label is facing out.
• Replace the CD if it is scratched, warped, or irregularly
shaped.
The CD or radio
• These displays disappear after a few seconds. To show
display disappears.
them again, press [DISPLAY, –DIMMER].
1
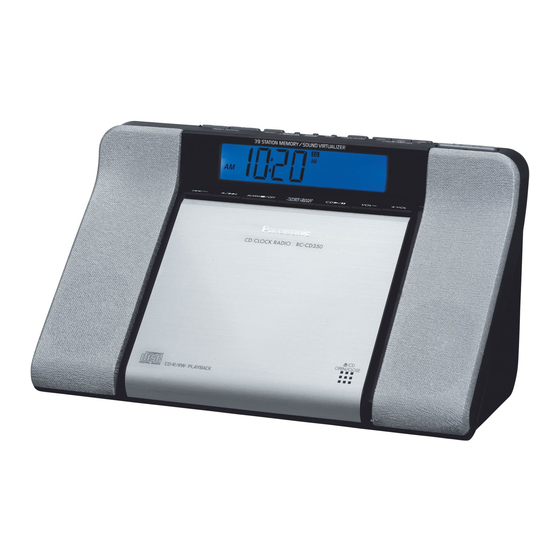
Operating instructions
CD Clock Radio
RC-CD350
Model No.
EB GN
the
lens
with
a
blower
If
the
lens
gets
En
RQT7608-B
H0204ZZ0
(SZZP1038C
marked
with
Advertisement

Related Manuals for Panasonic RC-CD350


Summary of Contents for Panasonic RC-CD350
-
Page 1: Dear Customer
• Wait an hour for condensation to dry, then try again. For UK customers: 0870 1 505610 • Make sure the label is facing out. This Technical Support Hot Line number is for Panasonic PC software • Replace the CD if it is scratched, warped, or irregularly related products only. -
Page 2: Before Use
CAUTION! Caution for AC Mains Lead THIS PRODUCT UTILIZES A LASER. (For United Kingdom) USE OF CONTROLS OR ADJUSTMENTS OR PERFORMANCE OF PROCEDURES OTHER THAN THOSE SPECIFIED HEREIN MAY (“EB” area code model only) RESULT IN HAZARDOUS RADIATION EXPOSURE. DO NOT OPEN COVERS AND DO NOT REPAIR YOURSELF. REFER For your safety, please read the following text carefully. -
Page 3: Specifications
Precautions Specifications • Avoid using or placing this unit near sources of heat. Frequency range • Avoid cuts, scratches, or poor connections in the AC mains lead, as they may result 87.5 to 108.0 MHz (50 kHz step) in possible fire or electric shock hazard. Also, excessive bending, pulling or splicing 522 to 1629 kHz (9 kHz step) of the cord should be avoided. -
Page 4: Connections And Power
Connections and power Connect the antenna Connect the AC mains lead to household mains socket (The United Kingdom only) BE SURE TO READ THE CAUTION FOR THE AC MAINS LEAD ON PAGE 2 BEFORE CONNECTION. • Stand the antenna up so it clicks into place. •... - Page 5 Radio Manual tuning Adjust the volume Adjust the volume PLAY MODE PLAY MODE - PRESET PRESET TUNING - PRESET 0 (min.) to 50 (max.) 0 (min.) to 50 (max.) PLAY MODE ADJUST PLAY MODE ADJUST DOZE DOZE PRESET TUNING -PRESET SOUND EQ DISPLAY SLEEP...
-
Page 6: Display/Dimmer
Using the alarms Set the unit to come on and play a CD or the radio with ALARM 1, or to sound a buzzer with ALARM 2 and ALARM 3. Preparation: Set the time. For ALARM 1, play the CD track or radio station and set the unit to the volume you want to wake up to. Press to select one of the alarm types you want to set (ALARM 1, 2, 3) Summer time setting ( Time setting...