Advertisement
Table of Contents
Microtek LightLid
Installing and Getting Started
The LightLid 35 is a bonus accessory
included with your Microtek scanner. It gives
you the versatility to scan 35mm slides on
your flatbed scanner.
Microtek recommends the use of this
accessory to scan slides for on-screen display
purposes or where high resolution is not
critical. For high-quality print reproduction,
we recommend purchasing a dedicated slide
scanner or a Microtek scanner with built-in
film-scanning features.
Please note: Scanning of color negatives may vary, depending on the quality of your
film original.
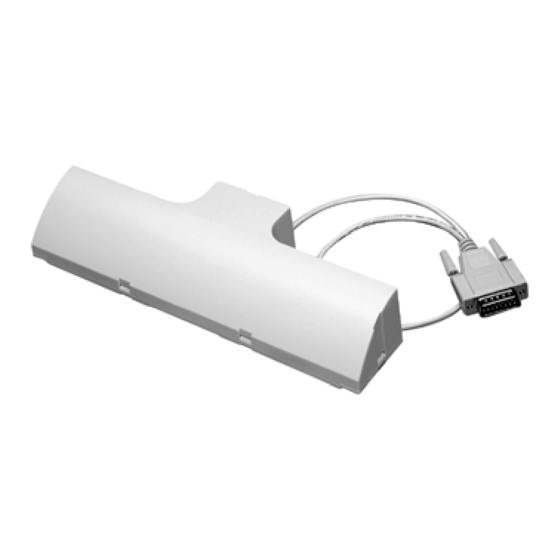
1. Unpack the LightLid 35.
2. Remove the scanner lid.
3. Connect the LightLid 35 to your scanner. To do this:
Connect the 15-pin connector (A in diagram) of your
LightLid 35 to the accessory port (B) at the back panel
of your scanner.
1. Mount the 35mm slide or filmstrip on the LightLid 35.
Turn the LightLid 35 over. Insert the
35mm slide front side up into the
recessed area at the center of the
LightLid. Secure the slide by gripping it
with the grip prong provided at the
connector side of the recessed area.
For added stability, you may wish to
secure the slide with a piece of
adhesive tape.
TM
35
Advertisement
Table of Contents

Subscribe to Our Youtube Channel
Related Manuals for Microtek LightLid 35


Summary of Contents for Microtek LightLid 35
- Page 1 1. Unpack the LightLid 35. 2. Remove the scanner lid. 3. Connect the LightLid 35 to your scanner. To do this: Connect the 15-pin connector (A in diagram) of your LightLid 35 to the accessory port (B) at the back panel of your scanner.
- Page 2 2. Place the LightLid 35 (with the secured filmstrip or slide to be scanned) on the glass surface of the scanner. The LightLid 35 can be placed either horizontally or vertically on the scanner surface, as shown below.
- Page 3 To obtain the best results when scanning with the LightLid 35, set the scan Resolution to a minimum 600 dpi and the Scaling to 100%. Refer to the diagrams below for more information on how to set these values in ScanWizard 5 Standard and Advanced Modes.
- Page 4 The LightLid 35 Calibrator is a program designed for calibrating your LightLid 35 to ensure that it captures colors accurately when scanning slides and filmstrips. Although calibration is an optional step, it is helpful towards optimizing your scanned image. 1. Place your Microtek software CD into your CD-ROM drive. When the Installer screen comes up, click Exit.
Need help?
Do you have a question about the LightLid 35 and is the answer not in the manual?
Questions and answers