Table of Contents
Advertisement
Operating Instructions
DVD Stereo System
SC-VK725D/SC-VK825D/
Model No.
SC-VK925D
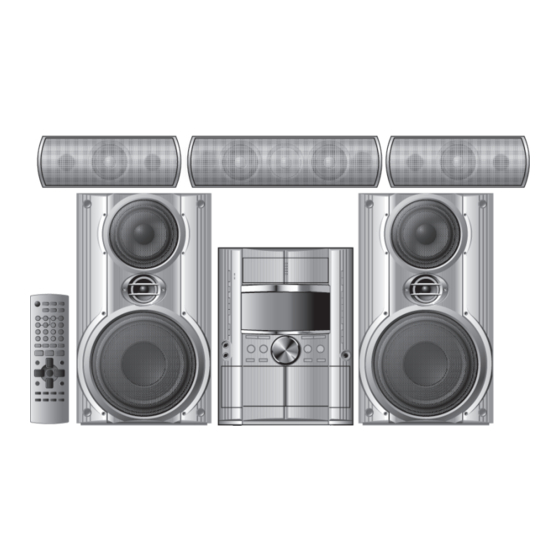
The above illustration of the unit is an example and shows SC-VK725D.
GC
En Pe Ar
Region number
The player plays DVD-Video marked with labels
containing the region number "2" or "ALL".
Example:
2
Before connecting, operating or adjusting this
product, please read the instructions completely.
Please keep this manual for future reference.
2
3
4
RQT8251-G
L0605NC0
Advertisement
Table of Contents
Troubleshooting

Related Manuals for Panasonic SC-VK725D


Summary of Contents for Panasonic SC-VK725D
-
Page 1: Operating Instructions
Operating Instructions DVD Stereo System SC-VK725D/SC-VK825D/ Model No. SC-VK925D The above illustration of the unit is an example and shows SC-VK725D. Region number The player plays DVD-Video marked with labels containing the region number "2" or "ALL". Example: Before connecting, operating or adjusting this product, please read the instructions completely. - Page 2 For optimum performance and safety, please read these instructions the remote control, but you can do the operations on the carefully. main unit if the controls are the same. VK725D : indicates features applicable to SC-VK725D only. VK825D : SC-VK825D only. : SC-VK925D only. VK925D...
-
Page 3: Table Of Contents
Safety precautions Table of contents Placement Getting started Set the unit up on an even surface away from direct sunlight, high Safety precautions ................ 3 temperatures, high humidity, and excessive vibration. These conditions Accessories ................... 3 can damage the cabinet and other components, thereby shortening Disc information ................ -
Page 4: Disc Information
Recorded with devices using Version 1.1 of the Video Recording Format (a unified video recording standard) such as DVD video recorders, DVD video cameras, personal computers, etc. Recorded with Panasonic SD multi cameras or DVD video • To play JPEG,... -
Page 5: Simple Setup
Simple setup Front speakers Speakers are designed identically so that no left or right channel orientation is necessary. Center speaker STEP Positioning • Vibration caused by the center speaker can disrupt the picture if it is placed directly on the television. Put the center speaker on a rack Optimum location or shelf. -
Page 6: Speaker Connections
STEP Speaker connections Twist and pull off the vinyl tip of the speaker cords. If the speaker cords do not have vinyl tips, directly connect them to the terminals. VK725D 3 Speaker cords 1 x short cord: For center speaker 2 x long cords: For surround speakers Connecting center and surround speakers Be sure to connect only positive (gray) wires to... -
Page 7: Video Connections
VK925D Connecting center and surround speakers Gray Gray (+) Surround speaker (left) Blue ( ) Blue Center speaker Surround speaker (right) Connecting front speakers and subwoofers Gray Red (+) Subwoofer (left) Black ( ) Black Blue Black Front speaker (left) Gray (+) Front speaker (left) Blue ( ) -
Page 8: The Remote Control
STEP Radio and power supply connections AM loop antenna FM indoor antenna AC power supply cord • Connect the AC power supply cord only after all other connections are complete. • Optional antenna connections ( page 30). Preparation Twist and pull off the vinyl tip of the antenna wires. AM loop antenna Stand the antenna up on its base. -
Page 9: Demo Function
STEP QUICK SETUP The QUICK SETUP screen assists you to make necessary settings. Turn on the television and select the appropriate video input on the television. Press [: : : : : , DVD/CD] to select “DVD/CD” as the source. The unit comes on. -
Page 10: Control Reference Guide
Control reference guide Main unit Disc drawer AC supply indicator [AC IN] This indicator lights when the unit is connected to the AC mains supply. Standby/on switch [f f f f f /I] Press to switch the unit from on to standby mode or vice versa. In standby mode, the unit is still consuming a small amount of power. -
Page 11: Remote Control
Remote control í Buttons such as function in exactly the same way as the buttons ñ on the main unit. ó Standby/on, TV power on/off button [f f f f f , TVf f f f f ] ....28, 29 ò... -
Page 12: Discs — Basic Play
Discs — Basic play Press [c, OPEN/CLOSE] to open the tray. The unit comes on. • To load discs in other trays, press [1]–[5] to select the tray and press [c, OPEN/CLOSE] to open the tray. • You can load up to 5 discs (one per tray). •... - Page 13 Main unit display Press [FL DISPLAY] to change display. RAM DVD-RW VR DVD-A DVD-V WMA MP3 MPEG4 DivX Enjoy progressive video Time display ↔ ↔ ↔ ↔ ↔ Information display Press [SHIFT] + [PROGRESSIVE]. JPEG When Slideshow (A page 19) is on: You can enjoy progressive video ↔...
-
Page 14: Discs — Convenient Functions
Discs — Convenient functions Reviewing titles to play (ADVANCED DISC DISC REVIEW) Numbered CD MODE (Except still picture part) (Except +R/+RW) buttons RAM DVD-RW VR DVD-V REPEAT Allows you to browse the disc contents and start playing from the selected position. You can select either “Intro Mode” or “Interval Mode” QUICK OSD AUDIO in “Advanced Disc Review”... -
Page 15: Changing The Zoom Ratio
Press [SHIFT] + [SUBTITLE] to select “On” or “Off”. RAM DVD-RW VR DVD-A DVD-V • Subtitle on/off information cannot be recorded using Panasonic During play DVD Recorders. Press [SHIFT] + [PLAY SPEED] several times to select “Normal”, “Fast” or “Slow”. -
Page 16: Discs — Using Navigation Menus
Discs — Using navigation menus 7 7 7 7 7 Using the submenu While the menu is displayed Press [FUNCTIONS]. Numbered buttons Items shown differ depending on the type of disc. Multi Groups and contents are displayed. List Contents only Tree Groups only Thumbnail... -
Page 17: Playing Highmat Tm Discs
You can play MPEG4 data [conforming to SD VIDEO specifications Playing a playlist (ASF standard)/MPEG4 (Simple Profile) video system/G.726 audio system] recorded with Panasonic SD multi cameras or DVD video (Only when the disc contains a playlist) recorders with this unit. -
Page 18: Discs — Program/Random Play
Discs — Program/Random play When CD mode is on (A page 14) CD WMA MP3 You can program all the items on all the discs. Press the numbered buttons ([1]–[5]) to select a Numbered disc. buttons Press the numbered buttons to select the items PLAY MODE then press [ENTER]). -
Page 19: Discs — Using On-Screen Menus
Discs — Using on-screen menus Press [FUNCTIONS] once. Press [,, 9, ;, :] to select the item, then press [ENTER] to make the settings. Press [,, 9, ;, :] to select the menu, then press Alternatively, press the numbered buttons. [ENTER] to begin selecting items. -
Page 20: Discs — Changing The Player Settings
Discs — Changing the player settings Press [SHIFT] + [SETUP] to show the setup menu. • If you have not set QUICK SETUP (A page 9), the QUICK SETUP screen appears. Press [8, 9] to select the tab, then press [:] to begin selecting the items. - Page 21 L L L L L “Video” tab • TV Aspect 4:3 Pan&Scan: Regular aspect television (4:3) Choose the setting suit your television The sides of the widescreen picture are cut off so it fills the screen and preference. (unless prohibited by the disc). •...
-
Page 22: The Radio
The radio L L L L L AM allocation setting (main unit only) The step is factory-set to 9 kHz, but you can change it to receive broadcasts allocated to 10 kHz steps. 1. Select “FM”. 2. Press and hold [TUNER/BAND]. REW/ / STOP After a few seconds the display changes to show the current... -
Page 23: Cassette Tapes
Cassette tapes Playback Recording You can use either deck 1 or deck 2 for tape playback. Selection of tapes for recording Use normal position tapes. Use normal position tapes. High position and metal position tapes can be used, but this unit will High position and metal position tapes can be played, but the unit will not be able to record or erase them correctly. -
Page 24: Enjoying Karaoke
Enjoying karaoke Vocal mute function Microphone(s) (not included) Use this function when enjoying sources not formatted for karaoke. The voice portion of the track is blocked out but not the background music. Preparation: RAM DVD-RW VR VCD Press [SHIFT]+[AUDIO] to select “L R”. Press [SHIFT] + [V.MUTE] to switch the function on or off. -
Page 25: Enjoying Karaoke Function
Enjoying karaoke function To record your karaoke performance Preparation: Select the source and start play. • Do the preparatory steps 1–2 on page 23. Start singing and adjust volume with [–, + VOLUME] • When singing along with discs (main unit: [VOL DOWN, VOL UP]) and [MIC LEVEL Insert the disc(s) you want (A page 12). -
Page 26: Sound Field And Sound Quality
Sound field and sound quality Dolby Pro Logic II Except DivX Dolby Pro Logic II is an advanced decoder that derives 5-channel MULTI surround (Left and Right Front, Center, Left and Right Surround) RE-MASTER VOL DOWN, from any stereo program material, whether or not it has been VOL UP SUPER specifically Dolby Surround encoded. -
Page 27: Speaker Level Adjustments
Speaker level adjustments Using the Manual Equalizer (MANUAL EQ) This is one of the ways to get appropriate surround effects. Create your own sound quality effects. Preparation: Press and hold [–MANUAL EQ] until “MANUAL EQ” Press [:, DVD/CD] and then [L] (main unit: [L STOP]). appears. -
Page 28: Using The Timers
Using the timers Headphones (not included) The play/record timer Press [r r r r r PLAY/REC] to display the timer indicator. Every time you press the button: PLAY (off) rPLAY: to turn the play timer on rREC: to turn the record timer on (The indicator doesn’t appear if the start and finish times or the DISPLAY DEMO... -
Page 29: Other Functions
Other functions Muting the volume Dimming the display Press [SHIFT] + [DIMMER]. Press [MUTING]. To return to the original brightness, press [SHIFT]+[DIMMER] again. • The display is dimmed, but brightens when you perform some operations. Changing the sound range display Volume is reduced to minimum. -
Page 30: Using Other Equipment
Using other equipment Using an external unit You can playback the sound from a video cassette recorder, tape deck, laser disc player, etc., through this unit’s speaker. Before connection • Disconnect the AC power supply cord. • Turn off all equipment and read the appropriate operating instructions. •... -
Page 31: About Divx Vod Content
About DivX VOD content DivX Video-on-Demand (VOD) content is encrypted for copyright protection. In order to play DivX VOD content on this unit, you first need to register the unit. Follow the online instructions for purchasing DivX VOD content to enter the unit’s registration code and register the unit. For more information about DivX VOD, visit www.divx.com/vod. -
Page 32: Troubleshooting Guide
Troubleshooting guide Before requesting service, make the following checks. If you are in doubt about some of the check points, or if the remedies indicated in the chart do not solve the problem, consult your dealer for instructions. Power Page •... - Page 33 Sound Page Sound distorted. • Noise may occur when playing WMA. — • Some audio effects do not work or have less effect with some discs. — Effects do not work. • Multi Re-master and Dolby Pro Logic II do not work if you have changed the play speed. —...
-
Page 34: Language Code List
Troubleshooting guide Unit displays Page • Although the unit is on standby Turn off the demo function. • If you set the clock, demo function will be turned off automatically. mode, the display lights up and changes continuously. • Press [SHIFT]+[DIMMER] to brighten the display. The display is dark. -
Page 35: Tray/Disc Handling Procedure
Tray/disc handling procedure Manufactured under license from Dolby Laboratories. Not adhering to the following may cause problems. “Dolby”, “Pro Logic” and the double-D symbol are trademarks of Dolby Laboratories. Opening/closing a disc tray “DTS” and “DTS Digital Surround” are registered trademarks of Digital Theater Systems, Inc. -
Page 36: Specifications
Picture resolution: between 160 x 120 and 6144 x 4096 pixels VK925D (Sub sampling is 4:2:2 or 4:2:0) RMS Output Power: Dolby Digital Mode MPEG4 data recorded with Panasonic SD multi cameras or DVD 95 W per channel (4 Ω), 1 kHz, 10% THD Front – High Ch video recorders 50 W per channel (8 Ω), 100 Hz, 10% THD... - Page 37 SPEAKER SECTION VK925D Front speakers SB-VK92 VK725D Front speakers SB-VK72 Type 3 way, 3 speaker system (Bass reflex) Impedance High 4 Ω/Low 8 Ω Speaker unit(s) Type 3 way, 3 speaker system (Bass reflex) Impedance 6 Ω Speaker unit(s) 1. Super woofer 20 cm Cone type 1.
- Page 38 Matsushita Electric Industrial Co., Ltd. Web Site: http://www.panasonic.co.jp/global/...
- Page 39 Memo RQT8251...
- Page 40 ﻋﻲ ددات اﳌﻨﺨﻔﻀﺔ اﻟﻔﺮ ﻣﺠﻬﺎر اﻟﺘﺮ SB-WVK82 VK825D اﻟﺴﻤﺎﻋﺎت اﻷﻣﺎﻣﻴﺔ VK725D SB-VK72 (IEC) 1.0) –16) (IEC) –10) 1.0) 378 x 429 x 200 –16) اﻟﺴﻤﺎﻋﺎت اﻷﻣﺎﻣﻴﺔ SB-VK92 VK925D –10) 318.5 x 429 x 250 ﺳﻤﺎﻋﺎت اﻹﺣﺎﻃﺔ SB-PS72 VK725D (IEC) 1.0) (IEC) –16) 1.0)
- Page 41 VK825D Dolby Digital :RMS MPEG-2 MPEG-1 9.0 L3 (MBR) Exif Ver 2.1 JPEG 4096 x 6144 120 x 160 4:2:0 4:2:2 Panasonic SD MPEG4 RMS Dolby Digital 5600 PMPO MPEG4 (ASF SD VIDEO G.726 VK925D DivX 3.11 Dolby Digital :RMS...
- Page 42 Dolby Laboratories “Pro Logic” “Dolby” Dolby Laboratories “DTS Digital Surround” “DTS” Digital Theater Systems, Inc. c, OPEN/CLOSE ® ® High Definition Compatible Digital HDCD Pacific Microsonics™ Pacific Microsonics, Inc. .Pacific Microsonics, Inc. HDCD 5,638,074 5,479,168 5,864,311 5,854,600 5,838,274 5,808,574 5,640,161 669114 5,872,531 Windows...
- Page 43 • • • [DIMMER]+[SHIFT] • “NO PLAY” • • “NO DISC” • • “F61” 7, 6 • “DVD U11” • “ERROR” • “H” “DVD HMM” • • DVD- DVD-Video “This disc may not be played in “ALL” Video your region” •...
- Page 44 • • • Dolby Pro Logic II • • • DivX • SETUP “DVD/CD” • • SEARCH • • “Picture Menu” “Source Select” DivX • .“Video” “TV Aspect” • • DivX DivX • • NTSC – PAL 60 NTSC – “Video”...
- Page 45 • • 29, 28 • 17, 4 • • • • • • • .DVD [CD MODE] • 7, 6 • • • [L STOP] “DVD/CD” [h10] “Initialised” • • DivX • JPEG MPEG4 DivX • • [:, DVD/CD] • DVD-V •...
- Page 46 DivX VOD DivX VOD (VOD) DivX Video-on-Demand DivX VOD www.divx.com/vod DivX VOD DivX DivX VOD “Others” “DivX Registration” Setup DivX Registration “Rented Movie Expired” Disc Video Audio DivX Video-on-Demand Display • Others Your registration code is : XXXXXXXX [SETUP]+[SHIFT] To learn more visit www.divx.com/vod [f, 3/FF] [g, REW/4] Press...
- Page 47 • • • • STOP LINE PLAY OUT REC IN TUNER/AUX “AUX” [AUX] [TUNER/AUX] [a REC] [L STOP] • • 12–5 AM ANT LOOP FM ANT (75 ) • • • • RQT8251 RQT8251...
- Page 48 .[DIMMER] + [SHIFT] .[MUTING] [DIMMER] +[SHIFT] • [MUTING] (--dB) [DISPLAY –DEMO] .[AUTO OFF] + [SHIFT] “AUTO OFF” “AUTO OFF” [AUTO OFF]+[SHIFT] VK725D S.WOOFER [VOL DOWN, VOL UP] LINE [TVf f f f f ] + [SHIFT] [TV/AV] + [SHIFT] [TV CH3 3 3 3 3 ] + [SHIFT] [TV CH4 4 4 4 4 ] + [SHIFT] [TV VOL+] + [SHIFT] [–TV VOL] + [SHIFT]...
- Page 49 [rPLAY/ REC] PLAY rPLAY rREC DISPLAY DEMO [f f f f f ] PHONES • VOL DOWN, VOL UP Î Æ UI³ Ä t²D³{ Ícë • [rPLAY/REC] DIMMER PLAY/REC, AUTO OFF CLOCK/ TIMER, SLEEP rPLAY/REC “rPLAY” CLOCK /TIMER “rREC” ← ←...
- Page 50 (MANUAL EQ) [–MANUAL EQ] [L STOP] [:, DVD/CD] .“MANUAL EQ” [TEST] + [SHIFT] TREBLE ← → MID ← → BASS –3) • [–, + VOLUME] ([VOL DOWN, VOL UP] “EQ-OFF” [SOUND EQ] “MANUAL EQ” –6 • .([SUPER SOUND EQ] [S.SOUND EQ] [;, :] “S.SOUND EQ”...
-
Page 51: Dolby Pro Logic Ii
Dolby Pro Logic II DivX Dolby Pro Logic II MULTI RE-MASTER VOL DOWN, VOL UP SUPER Dolby Surround SURROUND STOP .[pPLII] + [SHIFT] SOUND EQ SUPER SOUND EQ Dolby Surround :MOVIE :MUSIC VK725D :OFF S.WOOFER VK825D DVD/CD • VK925D “p PLII” •... - Page 52 2–1 • • [–, + VOLUME] [:, DVD/CD] [MIC LEVEL DOWN, UP] ([VOL DOWN, VOL UP] • [c DECK 1] • • DVD-V [AUDIO] + [SHIFT] [;, :] [ENTER] [AUDIO] + [SHIFT] [–, + VOLUME] [VOL DOWN, VOL UP] [MIC LEVEL DOWN, UP] V1+V2 [[ REC] [L STOP]...
- Page 53 DVD-RW VR “L R” [AUDIO]+[SHIFT] [V.MUTE] + [SHIFT] MIC LEVEL STOP DOWN, UP , DVD/CD • DECK 1 • VOL DOWN, VOL UP • [AUDIO] + [SHIFT] RAM DVD-RW VR VCD CD WMA MP3 MPEG4 DivX ECHO AUDIO R AUDIO L AUDIO LR V.MUTE AUDIO...
-
Page 54: Deck 2 C
• [; :, TAPE] • [L STOP] [; :, TAPE] [DECK 2 c] “F:” [DECK 2 c] [c DECK 1] [PLAY MODE] [; :, TAPE] ← ;R ↔ F: .[[ REC] “ ” “ ” [ L STOP] [ L STOP] [:, DVD/CD] TAPE [PLAY MODE]... - Page 55 7 7 7 7 7 “FM” .[TUNER/BAND] REW/ / STOP / /FF , TAPE TUNER/BAND , DVD/CD DECK 1/2 DECK 2 DECK 1 “ ” DECK 1 DECK 2 TUNER PGM “AM” “FM” [TUNER/AUX] PLAY MODE , DVD/CD TUNER/AUX , TAPE [TUNER PGM] + [SHIFT] REW/ .[TUNER PGM] + [SHIFT]...
-
Page 56: Speaker Settings
7 7 7 7 7 “Video” • TV Aspect (4:3) :4:3 Pan&Scan • (4:3) :4:3 Letterbox • (16:9) :16:9 TV Type Standard (Direct View TV) • • • LCD TV/Projector CRT Projector • • Plasma TV Projection TV • • •... -
Page 57: Other Settings
[SETUP] + [SHIFT] • QUICK SETUP QUICK SETUP [8, 9] [ENTER] [8, 9] [ENTER] [8, 9, ;, :] Setup Setup Disc English Audio , , , , Video Subtitle Automatic ENTER Audio Menus English Display Others Advanced Disc Review Intro Mode Ratings Level 8 SETUP... - Page 58 [FUNCTIONS] [ENTER] [8 8 8 8 8 , 9 9 9 9 9 , ; ; ; ; ; , : : : : : ] [ENTER] [8 8 8 8 8 , 9 9 9 9 9 , ; ; ; ; ; , : : : : : ] Still Picture Program, Group, Title, Chapter, Thumbnail...
- Page 59 ([1]–[5]) ([ENTER] PLAY MODE • CANCEL [5] @ [2] @ [h10] :25 [ENTER] @ [5] @ [2] WMA MP3 , DVD/CD • .[: : : : : , DVD/CD] , , , , ENTER [ENTER] [8 8 8 8 8 , 9 9 9 9 9 ] [ENTER] FUNCTIONS [8 8 8 8 8 , 9 9 9 9 9 ]...
- Page 60 TIFF .[ENTER] “.asf” “.ASF” MPEG4 • SD VIDEO MPEG4 • [DIRECT NAVIGATOR] Æ jG{« MPEG4 G.726 Panasonic SD • .[PLAYLIST] “.avi” “.AVI” “.divx” “.DIVX” DivX P l a y l i s t DivX • [8, 9] DivX 3.11 MPEG...
- Page 61 7 7 7 7 7 .[FUNCTIONS] Multi List Tree Thumbnail JPEG Next group Previous group MENU, TOP MENU, DivX MPEG4 JPEG WMA/MP3 DIRECT PLAYLIST, ANGLE/PAGE NAVIGATOR WMA/MP3 Audio , , , , JPEG Picture ENTER DivX MPEG4 Video FUNCTIONS Help display Find SHIFT .[ENTER]...
- Page 62 RAM DVD-RW VR DVD-A DVD-V VCD RAM DVD-RW VR DVD-A DivX DVD-V VCD MPEG4 DivX [AUDIO] + [SHIFT] RAM DVD-RW VR VCD DVD-V .“LR” “R” “L” [ZOOM] + [SHIFT] Functions DivX Functions Just Fit Zoom 1.00 “Auto” (Just Fit Zoom) “LR”...
- Page 63 (ADVANCED DISC REVIEW) DISC CD MODE DVD-RW VR (+R/+RW DVD-V REPEAT QUICK OSD “Interval Mode” “Intro Mode” AUDIO SUBTITLE “Disc” “Advanced Disc Review” A.DISC REVIEW, PLAY SPEED MANUAL SKIP, [A.DISC REVIEW] QUICK REPLAY , DVD/CD .QUICK OSD ANGLE/PAGE 0:01:06 Program Time RETURN, ZOOM...
- Page 64 [FL DISPLAY] RAM DVD-RW VR DVD-A DVD-V WMA MP3 MPEG4 DivX ↔ .[PROGRESSIVE] + [SHIFT] JPEG :(19 ↔ SLIDE :(19 ↔ PLAY DVD-RW VR DVD-A DVD-V .[SUBTITLE] + [SHIFT] [2] @ [1] @ [h10] (PBC) DVD-RW VR .(15 SVCD JPEG MPEG4 DivX DVD-V...
- Page 65 [c c c c c , OPEN/CLOSE] • [1]–[5] [c, OPEN/CLOSE] • • • [c c c c c , OPEN/CLOSE] [c c c c c , DISC CHANGE] .[1]–[5] [c, DISC CHANGE] [DISC CHECK] • • • • • •...
- Page 66 í ñ ó 29, 28 [f f f f f , TVf f f f f ] [0 – 9, X X X X X 10] ò ô 24, 14 [QUICK OSD, V.MUTE] ö ............. õ 18, 17, 13, 9 ......
- Page 67 [AC IN] f f f f f ........[DISC CHECK] ..... [MULTI RE-MASTER] ....[SUPER SURROUND] ..........[SOUND EQ] Ä [MIC LEVEL DOWN, UP] Å ..........[MIC 1, 2] Ç ............. É ....[c, OPEN/CLOSE] Ñ ......[c, DISC CHANGE] Ö...
-
Page 68: Quick Setup
QUICK SETUP QUICK SETUP “DVD/CD” : : : : : , DVD/CD] [L L L L L ] [SETUP] + [SHIFT] QUICK SETUP 8 8 8 8 8 , 9 9 9 9 9 , ; ; ; ; ;, : : : : : [ENTER] [RETURN] [SETUP] + [SHIFT]... - Page 69 • • 220-240V 110-127V VOLT ADJ VK925D VK825D VK725D [f/ I] • • • • • • • R6/LR6, AA, UM-3 RQT8251...
- Page 70 VK925D • • COMPONENT VIDEO IN VIDEO IN COMPONENT VIDEO IN VIDEO COMPONENT VIDEO OUT VIDEO COMPONENT VIDEO IN VIDEO OUT S VIDEO S VIDEO COMPONENT VIDEO OUT S VIDEO IN .S VIDEO OUT VIDEO COMPONENT VIDEO OUT S VIDEO S-VIDEO •...
- Page 71 VK725D • :1 x • :2 x VK825D RQT8251...
- Page 72 • q¦Ä_« lÁu*« • E=D=C=B=A ∫W U *« VK925D VK825D VK925D VK825D • • • • • • • • • • • VK725D VK725D 35–30 9.4– 7.5 4.0 –3.0 7.0 –4.0 VK825D VK925D VK825D VK925D • RQT8251...
- Page 73 Panasonic SD • JPEG JPEG MPEG4 DVD-RAM DivX Panasonic SD “Play as Data Disc” SD VIDEO MPEG4 G.726 MPEG4 Other Menu — DivX — DVD-A DVD-Audio DVD-V Other Menu “Play as DVD-Video” — DVD-Video DVD-R DVD video (DVD-Video)/ DVD-V DVD video...
- Page 74 ......QUICK SETUP ............DEMO (QUICK OSD) (ADVANCED DISC REVIEW) (CD MODE) CD HighMAT DVD-RW (DVD-VR)/RAM ALL-DISC 20-19 ...... Other Settings ..........(Speaker Settings) VK725D Dolby Pro Logic II (MANUAL EQ) VK725D (N2QAJB000143) VK825D (N2QAJB000142) VK925D (N2QAJB000141) 30-29 ............DivX VOD 34-32 RQT8251...
- Page 75 • SC-VK725D • SC-VK725D VK725D SC-VK825D VK825D SC-VK925D VK925D SC-VK925D SC-VK825D SC-VK725D 1) SA-VK925D 1) SA-VK825D 1) SA-VK725D 2) SB-VK92 2) SB-VK82 2) SB-VK72 1) SB-PC92 1) SB-PC82 1) SB-PC72 2) SB-PS92 2) SB-PS82 2) SB-PS72 2) SB-WVK92 1) SB-WVK82 ---- •...
- Page 76 SB-WVK82 VK825D SB-VK72 VK725D (IEC) (IEC) 200x429x378 SB-VK92 VK925D 250x429x318.5 SB-PS72 VK725D (IEC) (IEC) 250x429x318.5 220x88x96 0.72 SB-PS92 VK925D SB-PC72 VK725D (IEC) (IEC) 140x330x155.8 SB-PC92 VK925D 320x88x96 SB-VK82 VK825D (IEC) (IEC) 409x104x155.5 SB-WVK92 VK925D 250x429x318.5 SB-PS82 VK825D (IEC) 200x429x378 (IEC) 220/127 VK725D 140x330x155.8...
- Page 77 VK725D DivX DivX MPEG4 JPEG DVD-VR DVD-RAM THD 10% DivX DVD-R THD 10% DivX DVD-VR DVD-RW THD 10% R/RW SVCD CD-DA CD-R/RW 4000 PMPO DivX MPEG4 JPEG HighMAT VK825D IEC62107 THD 10% MPEG-2 MPEG-1 THD 10% 9.0 L3 Media Audio THD 10% (MBR) THD 10%...
- Page 78 –D “Pro Logic” “Dolby” “DTS Digital Surround” “DTS” [ c c c c c , OPEN/CLOSE] Macrovision Corporation Macrovision Corporation Macrovision Corporation ® ® High Definition Compatible Digital HDCD Pacific Microsonics ™ .Pacific Microsonics, Inc. HDCD 5,808,574 5,640,161 5,638,074 5,479,168 5,872,531 5,864,311 5,854,600...
- Page 79 • • • [DIMMER]+[SHIFT] • “NO PLAY” • • “NO DISC” • • “F61” 6, 7 • “DVD U11” • “ERROR” • “H” “DVD HMM” • • “This disc may not be played in “ALL” your region” • “Display” “On-Screen Messages” “On”...
- Page 80 • • • • • • DivX • “DVD/CD” SETUP • • SEARCH • • Picture Menu “Source Select” DivX • “Video” “TV Aspect” • • DivX DivX • • NTSC PAL 60 NTSC .“Video” “NTSC Disc Output” • “x1.00” •...
- Page 81 • 28, 29 • • 4, 17 • • • • • • • [CD MODE] • 6, 7 • • • [h10] [L STOP] “DVD/CD” “Initialised” • • DivX • WMA MP3 JPEG MPEG4 DivX • • [:, DVD/CD] •...
- Page 82 DivX VOD DivX VOD DivX Video-on-Demand (VOD) DivX VOD DivX VOD www.divx.com/vod DivX “Others” “DivX Registration” DivX VOD Setup DivX Registration Disc Video Audio DivX Video-on-Demand Display “Rented Movie Expired” Others Your registration code is : XXXXXXXX To learn more visit www.divx.com/vod •...
- Page 83 • • • • STOP LINE PLAY OUT REC IN TUNER/AUX ©X O½ qÄUý® [AUX] TUNER/AUX “AUX” [a REC] [L STOP]: • • 5-12 AM ANT LOOP FM ANT (75 ) • • • • RQT8251...
- Page 84 [DIMMER] + [SHIFT] [MUTING] [DIMMER]+[SHIFT] • (--dB) [MUTING] [DISPLAY –DEMO] [AUTO OFF] + [SHIFT] “AUTO OFF” “AUTO OFF” [AUTO OFF]+[SHIFT] VK725D [VOL DOWN, VOL UP] S.WOOFER LINE [TVf f f f f ] + [SHIFT] [TV/AV] + [SHIFT] [TV CH3 3 3 3 3 ] + [SHIFT] [TV CH4 4 4 4 4 ] + [SHIFT] [TV VOL+] + [SHIFT] [–TV VOL] + [SHIFT]...
- Page 85 rPLAY/REC] PLAY rPLAY rREC DISPLAY DEMO [f f f f f ] PHONES • VOL DOWN, VOL UP • [rPLAY/REC] DIMMER PLAY/REC, AUTO OFF CLOCK/ TIMER, SLEEP rPLAY/REC CLOCK /TIMER “rREC” “rPLAY” TV CH CLOCK /TIMER TV CH REW/ TV/AV , +, SHIFT TV VOL...
- Page 86 (MANUAL EQ) “MANUAL EQ” [–MANUAL EQ] [L STOP] [-, DVD/CD] [TEST] + [SHIFT] TREBLE BASS –3 • [–, + VOLUME] [SOUND EQ] “EQ-OFF” [ VOL DOWN, VOL UP] “MANUAL EQ” [S.SOUND EQ] .([SUPER SOUND EQ] • [;, :] “S.SOUND EQ” •...
- Page 87 DivX MULTI RE-MASTER VOL DOWN, VOL UP SUPER SURROUND [pPLII] + [SHIFT] STOP SOUND EQ SUPER :MOVIE SOUND EQ :MUSIC :OFF VK725D S.WOOFER DVD/CD • VK825D “p PLII” • VK925D SUBWOOFER , DVD/CD S.SOUND EQ, [C.FOCUS] + [SHIFT] VK725D SUPER SRND, S.WOOFER M.RE-MASTER VK825D...
-
Page 88: Mic Level Down, Up
1–2 • • [–, + VOLUME] [VOL DOWN, VOL UP]: [-, DVD/CD] [MIC LEVEL DOWN, UP] • [c DECK 1] • DVD-V • [AUDIO] + [SHIFT] [AUDIO] + [SHIFT] [;, :] [ENTER] [–, + VOLUME] [MIC LEVEL DOWN, UP] ([VOL DOWN, VOL UP] [[ REC] V1+V2 [L STOP]:... - Page 89 DVD-RW VR [AUDIO]+[SHIFT] “L R” [V.MUTE] + [SHIFT] MIC LEVEL STOP DOWN, UP , DVD/CD • DECK 1 • VOL DOWN, • VOL UP [AUDIO] + [SHIFT] ﺗﻴﻮﺗﺮ ﺗﻴﻮﺗﺮ ﺗﻴﻮﺗﺮ ﺗﻴﻮﺗﺮ ﺗﻴﻮﺗﺮ RAM DVD-RW VR VCD CD WMA MP3 MPEG4 DivX ﻛﺎﺳﺖ...
- Page 90 • [L STOP] [/ -, TAPE] • [/ -, TAPE] [DECK 2 c] “F:” [DECK 2 c] [c DECK 1] [PLAY MODE] [/ -, TAPE] “ ” [a REC] “ ” [ L STOP] : ([L STOP]: [ L] [:, DVD/CD] TAPE 2–1 •...
- Page 91 7 7 7 7 7 “FM” [TUNER/BAND] REW/ / STOP / /FF , TAPE TUNER/BAND , DVD/CD DECK 1/2 DECK 2 DECK 1 “ ” DECK 1 DECK 2 TUNER PGM “AM” “FM” [TUNER/AUX] PLAY MODE , DVD/CD TUNER/AUX , TAPE [TUNER PGM] + [SHIFT] .آﺧﺮﻳﻦ...
- Page 92 7 7 7 7 7 “Video” (4:3) :4:3 Pan&Scan • TV Aspect (4:3) :4:3 Letterbox • (16:9) :16:9 • Standard (Direct View TV) • TV Type LCD TV/Projector CRT Projector • • Plasma TV Projection TV • • 100ms • 80ms •...
- Page 93 [SETUP] + [SHIFT] • QUICK SETUP QUICK SETUP 8, 9 [ENTER] 8, 9 [ENTER] 8, 9, /, - Setup Setup Disc Audio English Video , , , , Subtitle Automatic Audio Menus English ENTER Display Others Advanced Disc Review Intro Mode Ratings Level 8 SETUP...
- Page 94 [FUNCTIONS] [ENTER] 8 ,9 ,/ ,- [ENTER] 8, 9, ;, : Program, Group, Title, Chapter, Still Picture Track, Playlist, Content Thumbnail Time Slip Subtitle [ENTER] RAM DVD-RW VR [8, 9] Marker (VR) Time [ENTER] (+R/+RW [8, 9] • [ENTER] @ [8, 9] (Time Search) Angle MPEG4 DivX...
- Page 95 CD WMA MP3 ([1]–[5]) PLAY MODE [ENTER] WMA MP3 • CANCEL [5] @ [2] @[h10] , DVD/CD [ENTER] @ [5] @ [2] WMA MP3 • [:, DVD/CD] , , , , ENTER [8, 9] [ENTER] [ENTER] FUNCTIONS [8, 9] SHIFT [8, 9] [8, 9, /, -] [CANCEL]+[SHIFT]...
- Page 96 7 7 7 7 7 HighMAT WMA MP3 JPEG “Scene List” [8, 9] [TOP MENU] [ENTER] [8, 9, ;, :] “Contents” • [ENTER] [8, 9,/ ,-] [ENTER] • New Pla New Playlist Item Long Name Display Te • PAG E 1 / 3 •...
- Page 97 7 7 7 7 7 [FUNCTIONS] Multi Groups and contents are displayed. List Contents only Tree Groups only Thumbnail Thumbnail images JPEG JPEG Next group To go to next group WMA MP3 Previous group To go to previous group WMA MP3 MENU, TOP MENU, DIRECT...
- Page 98 RAM DVD-RW VR DVD-A DVD-V VCD RAM DVD-RW VR DVD-A DivX DVD-V VCD MPEG4 DivX [AUDIO] + [SHIFT] RAM DVD-RW VR VCD DVD-V “L R” “R” “L” [ZOOM] + [SHIFT] Functions Functions Just Fit Zoom 1.00 (Just Fit Zoom) DivX Audio “Auto”...
- Page 99 DISC (ADVANCED DISC REVIEW) Numbered Numbered CD MODE (+R/+RW DVD-RW VR DVD-V buttons buttons REPEAT “Interval Mode” “Intro Mode” QUICK OSD “Disc” “Advanced Disc Review” AUDIO SUBTITLE A.DISC REVIEW, [A.DISC REVIEW] PLAY SPEED MANUAL SKIP, QUICK OSD QUICK REPLAY , DVD/CD 0:01:06 Program Time...
- Page 100 [FL DISPLAY] RAM DVD-RW VR DVD-A DVD-V WMA MP3 MPEG4 DivX JPEG [PROGRESSIVE] + [SHIFT] SLIDE PLAY RAM DVD-RW VR DVD-A DVD-V VCD [SUBTITLE] + [SHIFT] [2] @ [1] @ [h10] (PBC) RAM DVD-RW VR WMA MP3 JPEG MPEG4 DivX (SVCD DVD-V DivX...
-
Page 101: C, Disc Change
[c, OPEN/CLOSE] [1]–[5] • [c, OPEN/CLOSE] • • • [c, OPEN/CLOSE] [c, DISC CHANGE] [1]–[5] [c, DISC CHANGE] [DISC CHECK] • • • • • • [1]–[5] [:, DVD/CD] [L STOP] “RESUME” • [:, DVD/CD] • [L STOP] :, DVD/CD [f/3 3 3 3 3 /FF] [REW/ 4 4 4 4 4 /g] •... - Page 102 > ñ ó 28, 29 ................[f f f f f , TVf f f f f ] ò [0 – 9, h h h h h 10] ..........ô 14, 24 ........... [QUICK OSD, V.MUTE] ö ................ õ 9, 13, 17, 18 ......
- Page 103 [AC IN] f f f f f ........[DISC CHECK] ......[MULTI RE-MASTER] ....... [SUPER SURROUND] ....... [SOUND EQ] Ä ..[MIC LEVEL DOWN, UP] Å ......... [MIC 1, 2] Ç ............ É ..[c, OPEN/CLOSE] Ñ [c, DISC CHANGE] Ö...
- Page 104 QUICK SETUP “DVD/CD” , DVD/CD] [L L L L L ] [SETUP] [SHIFT] QUICK SETUP [8 8 8 8 8 , 9 9 9 9 9, ; ; ; ; ;, : : : : :] [ENTER] [RETURN] [SETUP] + [SHIFT] [ENTER] “CLOCK”...
- Page 105 • • 220-240V 110-127V VOLT ADJ f/ I VK925D VK825D VK725D • • • • • • • R6/LR6, AA, UM-3 RQT8251...
- Page 106 VK925D • COMPONENT VIDEO IN • COMPONENT VIDEO IN VIDEO IN VIDEO COMPONENT VIDEO OUT VIDEO COMPONENT VIDEO IN VIDEO OUT S VIDEO S VIDEO COMPONENT VIDEO OUT S VIDEO IN S VIDEO OUT VIDEO COMPONENT VIDEO OUT S VIDEO S-VIDEO •...
- Page 107 ﮔﺎم اﺗﺼﺎل ﺑﻠﻨﺪﮔﻮﻫﺎ VK725D ﻮ ﮔ ﺪ ﻨ ﻠ ﺑ ﻢ ﻴ ﺳ • • ﺪ ﻧ ا ر ﻮ ﺳ و ى ﺰ ﻛ ﺮ ﻣ ى ﺎ ﻫ ﻮ ﮔ ﺪ ﻨ ﻠ ﺑ ل ﺎ ﺼ ﺗ ا ﻰ...
- Page 108 • • E=D=C=B=A VK925D VK825D VK925D VK825D • • • • • • • • • • • VK725D VK725D 30 35 7.5 9.4 3.0 4.0 4.0 7.0 VK825D VK925D VK825D VK925D • RQT8251...
- Page 109 • JPEG DivX MPEG4 JPEG DVD-RAM “Play as Data Disc” Other Menu SD VIDEO MPEG4 G.726 MPEG4 — DivX — DVD-A DVD-Audio Other Menu “Play as DVD-Video” DVD-V — DVD-Video DVD-R (DVD-Video)/ DVD-V DVD-RW (DVD-Video) +R (Video)/ — +RW (Video) DVD-R (DivX Video)/ DivX...
- Page 110 ................QUICK SETUP (DEMO) — — /(QUICK OSD) /(ADVANCED DISC REVIEW) (CD MODE) CD DVD-RW (DVD-VR)/RAM HighMAT ALL-DISC 19–20 Other Settings (Speaker Settings) VK725D VK725D (MANUAL EQ) (N2QAJB000143) VK825D (N2QAJB000142) VK925D (N2QAJB000141) 29–30 ..............DivX VOD 32–34 RQT8251...
- Page 111 • SC-VK725D • SC-VK725D VK725D SC-VK825D VK825D SC-VK925D VK925D SC-VK925D SC-VK825D SC-VK725D 1) SA-VK925D 1) SA-VK825D 1) SA-VK725D 2) SB-VK92 2) SB-VK82 2) SB-VK72 1) SB-PC92 1) SB-PC82 1) SB-PC72 2) SB-PS92 2) SB-PS82 2) SB-PS72 2) SB-WVK92 1) SB-WVK82 ---- •...
- Page 112 ﺳﻴﺴﺘﻢ دى وى دى اﺳﺘﺮﻳﻮﻳﻰ SC-VK725D/SC-VK825D/ Model No. SC-VK925D SC-VK725D ﺷﻤﺎره ﻣﻨﻄﻘﻪ “ALL” “2” :ﻣﺜﺎل “ALL” “2” RQT8251-G Pe Ar L0605NC0...