Table of Contents
Advertisement
Quick Links
Traqmate
GPS Data Acquisition System
User Manual
Version 2.10
May 31, 2008
Copyright © 2005 - 2008 Track Systems Technologies, LLC
Traqmate, Traqview, TraqData, TraqTach, traqcam, traqstudio,
the Traqmate logo, and the track systems logo
Are trademarks of track systems technologies, llc
Chasecam, pdr100, and ss1000 are trademarks of
chase product development, inc.
Microsoft, windows, and VISTA are trademarks of Microsoft corp.
Velcro is a trademark of Velcro Industries B.V.
Advertisement
Chapters
Table of Contents

Related Manuals for Track Systems Traqmate


Summary of Contents for Track Systems Traqmate
-
Page 1: User Manual
GPS Data Acquisition System User Manual Version 2.10 May 31, 2008 Copyright © 2005 - 2008 Track Systems Technologies, LLC Traqmate, Traqview, TraqData, TraqTach, traqcam, traqstudio, the Traqmate logo, and the track systems logo Are trademarks of track systems technologies, llc Chasecam, pdr100, and ss1000 are trademarks of chase product development, inc. - Page 2 Traqmate User Manual V2.10 May 31, 2008 This page intentionally left blank. Copyright © 2005 - 2008 Track Systems Technologies, LLC Page 2...
-
Page 3: Table Of Contents
Autocross / Rally Mode ..........................25 Segment Timing Mode ...........................26 Using for Closed Circuit Feedback......................26 ..............27 RAQVIEW NALYSIS AND ONFIGURATION ROGRAM ..........................27 RAQVIEW CREEN AYOUT .......................27 OOLBAR UTTONS AND ONTROLS ............................28 PTIONS Copyright © 2005 - 2008 Track Systems Technologies, LLC Page 3... -
Page 4: Figure 23 - Unit Info Screen
PTIONS ....................32 XCHANGING NFORMATION WITH RAQMATE Connecting to Traqmate.........................32 ............................33 CREEN SU Basic Settings – These appear only when connected to a Traqmate Basic Unit....33 User Data Screen ..........................34 IO Data Screen ............................35 Session Upload Screen..........................37 ............................37 NALYSIS OOLS Dashboard .............................37... - Page 5 ............................ 78 PPENDICES ............................78 ABLE OF IGURES Traqmate Complete ..........................80 Traqmate Basic ............................80 TraqStudio .............................80 ..........................80 ARRANTY NFORMATION ..............................81 LOSSARY GPS D ........................82 BOUT CQUISITION GPS Frequently Asked Questions ......................83 Copyright © 2005 - 2008 Track Systems Technologies, LLC Page 5...
-
Page 6: Welcome To Team Traqmate
Traqmate was designed by racers and is great for getting the first or last second out of your lap times. It is also great for the track day enthusiast who wants to record their day, play it back with their video, analyze their performance to get the most out of their car, and do a little bench racing with their friends. -
Page 7: System Overview
Traqmate Features Drop and Go – Stick a Traqmate in your car, turn it on, and collect data all day long. No sensors required. Replay Your Day – Upload the data into Traqview. See your car on the track and your performance on the virtual dashboard. -
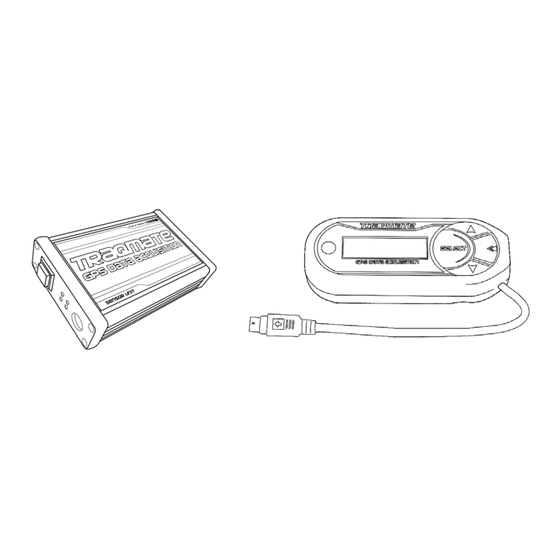
Page 8: Traqmate System Components
Display Unit, in which case it is entirely remotely controlled. When used alone (Traqmate Basic), the Sensor Unit has a single red button on the front panel for ON/OFF and for entering and exiting data recording mode. -
Page 9: Traqview
For an added dimension, the optional TraqStudio allows simultaneous synchronized playback of data and video. Traqview is your single point of contact for everything in the Traqmate System. Use it to upload data from Traqmate, analyze the data, configure Tracks, Drivers, Vehicles and optional Sensors, change the Sampling Rate, and even download future software and feature upgrades into your Traqmate. -
Page 10: Traqmate System Packages
Li-ion Rechargeable and AA Alkaline TraqPaq battery packs, ChaseCam video products, extra antennas for convenient vehicle swapping, and the SU mounting tray. TraqPaq SU Mounting Tray Mounting TraqAC Power Permanent Power Li-ion Bracket Supply Cable Pack Copyright © 2005 - 2008 Track Systems Technologies, LLC Page 10... -
Page 11: Quick Guide - Let's Collect Some Data
Quick Guide – Let’s Collect Some Data You just bought a Traqmate Complete and you want to try it out. This is as simple as it gets. First, install the software. Put the CD in your drive and follow the directions. For most users it is seamless. -
Page 12: Traqview Software Installation
Choose a Driver Location and enter: C:\Program Files\Track Systems\USB NOTE: When you launch Traqview and attempt to connect to the Traqmate, if the USB port is not automatically recognized you will be prompted for the COM Port number. Choose AutoConnect and the software will find the right port. -
Page 13: Traqmate Installation
Figure 2 - Traqmate Basic Connections Sensor Unit Installation The Traqmate sensor unit may be mounted using a variety of methods depending on the following factors: 1) How permanent is the desired mount, 2) where is the preferred mounting point, 3) will the SU be connected to a Display Unit (DU). -
Page 14: Traqmate Basic Installation
Traqmate Basic Installation If the SU is going to be used in a configuration without the DU (Traqmate Basic), it is desirable to have access to the SU for downloading the data once it has been stored. Similarly, if a laptop is going to be used to download the stored data without removing the SU, the unit should be placed in a convenient and accessible location. -
Page 15: Power Connection
In all installations, the SU must be supplied with a power source at all times it is in operation. For Traqmate Complete, the DU can receive power via the DIN extension cable from the SU or via the USB cable when connected to a PC for uploading sessions. -
Page 16: Traqac Power Supply
With the Display Unit Mounting Bracket, the DU can be snapped quickly and securely into the mating portion of the bracket, which remains permanently affixed to the vehicle. Care should be taken to avoid strain on the DU cable. Copyright © 2005 - 2008 Track Systems Technologies, LLC Page 16... -
Page 17: Connecting To The Sensor Unit
DU and SU are incompatible. Reload the firmware of both the SU and DU with the latest downloads available on the traqmate.com website and try again. Copyright © 2005 - 2008 Track Systems Technologies, LLC... -
Page 18: Traqmate Basic
Traqmate Basic System Description Traqmate Basic is the easiest form of data acquisition. You can literally just Velcro the unit into a car and get very sophisticated results in a matter of minutes. Data is stored in Flash memory inside the Sensor Unit and can be downloaded through the COM serial port on the front panel of the unit. -
Page 19: Traqmate Complete
System Description Traqmate Complete builds on the Traqmate Basic simplicity to add immediate feedback to the driver in the form of lap times and other information on a Display Unit (DU). It also provides more visibility and control of the collected data and useful tools for vehicle performance tuning. The DU provides complete control capability allowing the Sensor Unit to be remotely mounted. -
Page 20: Menu System
<continued on next page> Note: UP or DN cycles through the other screens in any of these modes. Copyright © 2005 - 2008 Track Systems Technologies, LLC Page 20... - Page 21 (larger is better). Check Inputs – Shows voltage for all analogs, signal level for digitals, and RPM. Copyright © 2005 - 2008 Track Systems Technologies, LLC Page 21...
-
Page 22: Display Unit Icons
Traqmate is in the menu system. The icons are shown in the upper right corner of the display. The READY icon (open circles) indicates the Main Menu PDR is ready to record. -
Page 23: Figure 11 - Acquiring Gps Screen
GPS signal is acquired. If this takes more than a minute, check your antenna connection and ensure that the antenna has a clear view of the sky. Once Traqmate has GPS signal, it will check to see if there is a Start/Finish position stored for the current track. If not, you will see Figure 12 - Recording a Start / Finish Location Proceed around the track until you reach the Start/Finish line. -
Page 24: Figure 14 - Lap / Qualifying Timer Screen
Using the Predictive Lap Timer If you are like many Traqmate users, once you have the graph, you will wonder how you did without it. The real-time feedback on your driving is there whenever you need it and can be used in several ways. -
Page 25: Autocross / Rally Mode
Lap Timer. For very long courses (> 5 miles), you may want to spread out the updates. If you choose the wrong setting, Traqmate will run out of intermediate storage and your Predictive Lap Timing will not be accurate at the end of the lap. The default MED setting is good for any lap under 5 miles in length. -
Page 26: Segment Timing Mode
The concept for this mode is very similar to Lap Timing except that there is a separate Start and Finish. Once you have set the Start and Finish, Traqmate retains those positions for future use at that track and Traqview will use them for analysis. -
Page 27: Traqview Analysis And Configuration Program
May 31, 2008 Traqview Analysis and Configuration Program Traqview is the source for configuring, uploading, and analyzing data from your Traqmate. After installation, you can launch the program from the Windows Start Menu or a desktop icon. TraqStudio includes all Traqmate functionality, along with video integration so that you can play back data and video together and save video files with overlayed data graphics. -
Page 28: Menu Options
User Setup – connects to Traqmate to setup user information Unit Information – connects to Traqmate to change user information Firmware Update – connects to Traqmate to update SU or DU firmware Driver Setup – opens the setup window to select graphs and laps Session Tools –... -
Page 29: General Traqview Options
Traqview can be tailored to your individual needs through the Tools/Options menu. This menu screen will allow you to change the default path to your Traqmate files so that sessions uploaded from the Traqmate and File Opens from your PC hard disk will begin in a known location. -
Page 30: Files
There are three types of files that Traqview uses: .tqm files are compressed session files that come right from the Traqmate, .tqs files are compressed analysis files which are saved from Traqview, and .tqc files are firmware update files for the Traqmate Sensor Unit and Display Unit. Opening Files Traqview can open .tqm or .tqs files using the File Open menu directive or by double-clicking on a... -
Page 31: Traqmate User Manual V2.10 May
In Auto Pan, the screens will always ensure that the designated Reference Driver is viewable in the graph or track map at all time. To change the Reference Driver use the View Menu at the top of Traqview. Select View / AutoPan / DriverName. Copyright © 2005 - 2008 Track Systems Technologies, LLC Page 31... -
Page 32: Exchanging Information With Traqmate
May 31, 2008 Exchanging Information with Traqmate In order to tune Traqmate to your personal needs, there are several settable options in the Traqmate unit. In Traqmate Basic, these are configurable through the Traqview program. In Traqmate Complete, the same options are configurable through Traqview and many are also configurable through the Display Unit menu system. -
Page 33: Unit Info Screen
Note – Enter anything you like. This only appears in the Traqview screen. To save the information in the Traqmate you must click on the Save Unit Info button. SU Basic Settings – These appear only when connected to a Traqmate Basic Unit. -
Page 34: User Data Screen
The default 20Hz is a good choice. To save the information in the Traqmate you must click on the Save User Setup button. Copyright © 2005 - 2008 Track Systems Technologies, LLC... -
Page 35: Io Data Screen
IO Data Screen Figure 25 - IO Data Screen This screen looks complicated but that is only because the Traqmate inputs are very flexible. You only need this screen if you have a TraqData, TraqTach, or TraqSync input device. Enable Tach – You must put a check in this box to display and record the RPM. You also must set the # of Cylinders value in the User Data/Vehicles menu. - Page 36 Digital Output for a light or other indicator. It is shown on Traqview as a red line. To save the information in the Traqmate you must click on ‘Save User Setup’. Copyright © 2005 - 2008 Track Systems Technologies, LLC Page 36...
-
Page 37: Session Upload Screen
Figure 26 - Session Upload Screen This screen will show all the sessions that are currently stored in the Traqmate. From this screen, you can upload the sessions to your PC or erase them. If you do not erase the sessions, they will stay in the unit. -
Page 38: Setup Screen
(windows) where the data can be presented. Some drivers may have options not available to others depending on the inputs with which their Traqmate is equipped. Click the corresponding square to add that driver to a form. ‘All’ will add all eligible drivers to a form. - Page 39 On the lower right of the Setup screen you may change the name of a Driver, Track, or Car. This will be saved with an analysis file but will not change the information in the original data (.tqm) file. Copyright © 2005 - 2008 Track Systems Technologies, LLC Page 39...
-
Page 40: Playback Controls
Traqmate Complete, the Start / Finish Line will transfer over if it was previously set in the Display Unit. In Traqmate Basic, you must set the Start / Finish line manually by grabbing the Start / Finish Icon (it will turn into a checkered flag) and dragging it to the new location. -
Page 41: Track Facts
(rally and autocross). This is a great way to get the Start/Finish coordinates from previously recorded data in order to enter it into a Traqmate before returning to that track. It also shows the Elevation changes over the track, the elevation at the Start and Finish, and the Track Length. -
Page 42: G Vs. Time
Segments Color Coded to Track Map Right Turns below Zero Turning while Accelerating Braking above Zero Gear Changes Acceleration below Zero Figure 33 - G vs. Distance Graphs Copyright © 2005 - 2008 Track Systems Technologies, LLC Page 42... -
Page 43: Velocity Vs. Time
If it is declining, he is losing time to the reference driver. The gap between the two lines at the end of the lap is the difference in lap times between the two drivers. Copyright © 2005 - 2008 Track Systems Technologies, LLC Page 43... -
Page 44: Friction Circle
The extremely sensitive accelerometers will pick this up, creating peaks in the data. While these are real, the actual sustained level of grip that can be measured on a skidpad is somewhat lower. Copyright © 2005 - 2008 Track Systems Technologies, LLC Page 44... -
Page 45: Braking And Acceleration Zones
Corner Corner Slower Fast Transition to Transition to Brakes Brakes Brake Tap to Turn Car Controls to adjust thresholds for braking and acceleration Figure 36 - Brake Zone Map Copyright © 2005 - 2008 Track Systems Technologies, LLC Page 45... -
Page 46: Turn Zones
Chartreuse and Turquoise show turning while accelerating, which reveal where the throttle is applied during a turn. Experiment with thresholds to reveal even more information. Figure 37 - Turn Zone Map Copyright © 2005 - 2008 Track Systems Technologies, LLC Page 46... -
Page 47: Segment Analysis
By clicking on a column in the table, the entire table will be sorted by the values in that column. For example, to see the maximum exit speed, click on the Exit Speed column heading. Click on it Copyright © 2005 - 2008 Track Systems Technologies, LLC Page 47... -
Page 48: Figure 39 - Segment Analysis Scoreboard
In this example, Segment 7 has been selected and sorted fastest to slowest. This is indicated by the upward arrow on the ‘7’ column heading. Figure 39 - Segment Analysis Scoreboard Copyright © 2005 - 2008 Track Systems Technologies, LLC Page 48... -
Page 49: Separate Start / Finish (Rally) Mode
Display Unit. Of course, you can also change the Start and Finish lines in Traqview or set them in the case of a Traqmate Basic. To enter Rally Mode, press the icon shown with the yellow closed circuit track. - Page 50 You may save the new orientation as a .tqs file. Time Zone Sometimes the user forgets to set the time zone in the Traqmate so that recorded data shows up with the wrong time. This can be corrected for each driver using the Time Zone utility. This is very useful when replaying a race (see Race Replay Mode) where one of the drivers has a different time zone setting.
-
Page 51: Figure 41 - Gear By Distance Graph
OR enter the Tire Size and Final Drive Ratios. The first method is best if you already have data collected. The second is best if you are setting up the Traqmate before data collection. Figure 41 - Gear by Distance Graph... - Page 52 Each ratio is the respective transmission gear ratio multiplied by the differential ratio. Leave extra gear spaces blank. Generally these numbers fall in the range of 1.0 to 20.0. Copyright © 2005 - 2008 Track Systems Technologies, LLC Page 52...
-
Page 53: Figure 43 - Race Replay Mode
Once the time period is chosen, you may use the playback controls to ‘Replay Your Day’. You can also display graphs. A useful one is the Velocity vs. Time graph that will show when drivers are on-track or stopped during pit stops. Copyright © 2005 - 2008 Track Systems Technologies, LLC Page 53... -
Page 54: Traqview Updates
For Traqmate Complete, the SU is programmed through the DU so you plug it into the DU with the DIN Extension Cable. Plug the DU into the USB port on your computer. Ensure that you have a good connection with the DU. -
Page 55: Traqstudio Data/Video Integration
Snap to Video Window or Freely Move Lap Time of Elapsed Current Lap Gear MPH or Current Lap Time into Number Current Lap Figure 45 - TraqStudio Dash Controls Copyright © 2005 - 2008 Track Systems Technologies, LLC Page 55... -
Page 56: Traqcam Instructions
After your track session, take the Traqmate and ChaseCam compact flash card to the computer. Upload the Traqmate data and open it in TraqStudio. Plug your CF card into a USB reader on your PC. Select the video graph option (in Setup) and tell it where your video is located. -
Page 57: Writing Videos
MPEG2 Motion Pictures Expert Group 2, format used by ChaseCam PDR and DVDs. Audio Video Interleave, a common computer video format Windows Media Video, the standard format for Microsoft Windows Flash format used for web streaming Copyright © 2005 - 2008 Track Systems Technologies, LLC Page 57... -
Page 58: Screen Features
Screen Features Duration of Selected Laps Video Progress Window Dash Gauges Info Text Video Frames Progress Bar Per Second Figure 47 - TraqStudio Video Output Screen Copyright © 2005 - 2008 Track Systems Technologies, LLC Page 58... -
Page 59: Creating A Cd
DVD authoring program such as Windows DVD Maker that is supplied with Windows Vista. Depending on the video authoring program, this process may be very time-consuming due to a format translation called transcoding on the video file. Copyright © 2005 - 2008 Track Systems Technologies, LLC Page 59... -
Page 60: Traqdata Installation And Setup
If you hook up something wrong, you risk damage to yourself, your vehicle, and your Traqmate. If you do not have electrical knowledge, get help from your Traqmate dealer or a friend with the proper experience. Digital Inputs Digital Inputs are straightforward. -
Page 61: Analogs
5. If you are operating off vehicle power (recommended), your sensor circuit must be grounded to the vehicle or attached to the TraqData GND terminal. 6. If you place sensors near high voltage sources you may corrupt your signal with electromagnetic interference. Copyright © 2005 - 2008 Track Systems Technologies, LLC Page 61... -
Page 62: Figure 50 - Connecting Aimsports Sensors
The mating connector for the sensors is a Binder 719 Female. Connectors and cable assemblies are available at http://www.binder-usa.com. 5V REFERENCE ANY ANALOG INPUT Figure 50 - Connecting AIMsports Sensors Copyright © 2005 - 2008 Track Systems Technologies, LLC Page 62... -
Page 63: Figure 51 - Analog Sensor Connections
Traqdata Sensor * Value for resistor should be roughly equal to maximum resistance of sensor. Input to existing gauge Electric Traqdata Gauge optional Figure 51 - Analog Sensor Connections Copyright © 2005 - 2008 Track Systems Technologies, LLC Page 63... -
Page 64: Hooking Up A Tach Input (Traqdata, Traqtach)
For distributor-less ignition, you can use a low voltage coil-on-plug signal. If you are operating Traqmate on vehicle power, there is only one connection required. If you are operating on battery power (not recommended for TraqTach or TraqData), you must connect the TraqTach terminal labeled ‘GND’... -
Page 65: Hooking Up A Chasecam Pdr100 (Traqcam Setup)
May 31, 2008 Hooking up a ChaseCam PDR100 (TraqCam Setup) The Traqmate can be used to control the recording on a ChaseCam digital video recorder. This requires either a TraqSync ChaseCam interface or a TraqCam cable that connects the ChaseCam PDR100 to a TraqTach or TraqData digital input/output device. With TraqSync, the recorder will be automatically powered up and down. -
Page 66: Chasecam Pdr100 Digital Video Recorder Operation
To operate, make sure the ChaseCam PDR100 is ready to record (power, compact flash card, and camera). The PDR-100 will power up shortly after the Traqmate is turned on. It will turn off shortly after the Traqmate is powered down. If you manually power off the ChaseCam, Traqmate will power it back up again to ensure readiness. -
Page 67: Chasecam Ss1000 Split-Screen Processor Operation
DO NOT USE 3A 2AG Fuse OUTPUT TO POWER SS1000. 20 AWG or larger wire Vehicle GND Figure 57 - Adding a Second Camera - ChaseCam PDR100 & SS1000 Copyright © 2005 - 2008 Track Systems Technologies, LLC Page 67... -
Page 68: Using Traqmate For Analysis
Using Traqmate for Analysis This section will serve as a tutorial for using the Traqmate Data Acquisition System for analysis of drivers and vehicles. There are many ways to use the data and these are only a few methods. It is always best to experiment to find the specific areas of interest for your situation. -
Page 69: Driving Line
Sometimes entrance and exit speed can be deceiving. Segment Analysis can also show you the real story. In this diagram, taking the long way around results in higher speeds but longer times. Copyright © 2005 - 2008 Track Systems Technologies, LLC Page 69... -
Page 70: G Vs. Distance Analysis
(turn-out) Transition to Turn (turn-in) Turn Apex Short lifts to orient car in turn Transition Off Braking Shift Lifting Flat out Figure 60 - G vs. Distance Analysis Copyright © 2005 - 2008 Track Systems Technologies, LLC Page 70... -
Page 71: Friction Circle
To determine how much of the performance of the car is being utilized, do a skidpad test as described in the vehicle performance section below. Note "Hole" Note "Dip" Figure 61 - Friction Circle Comparison Copyright © 2005 - 2008 Track Systems Technologies, LLC Page 71... -
Page 72: Graphing Multiple Data Elements (Stacked Graphs)
Accel/Braking graphs, and the RPM drop after a shift. Shift Point Shift Point Shift Point Shift Point Figure 62 - Stacked Graphs Copyright © 2005 - 2008 Track Systems Technologies, LLC Page 72... -
Page 73: Vehicle Performance Comparison
Traqmate User Manual V2.10 May 31, 2008 Vehicle Performance Comparison Traqmate can measure many performance capabilities of the vehicle, including acceleration, braking, and lateral grip. Acceleration and Braking A good way to evaluate horsepower is to draw segment on a straight part of the track between shift points and in the brake zones. -
Page 74: Lateral Gs
Traqmate User Manual V2.10 May 31, 2008 Lateral Gs To evaluate the outer limits of chassis adhesion, the proven method is the skidpad. Traqmate is an ideal tool for collecting and analyzing skidpad data. Sustained Lateral Acceleration Figure 64 - Skidpad Analysis Copyright ©... -
Page 75: Safety
There is nothing fun about going off-track or spinning. That is why we take safety very seriously at Track Systems, and we hope you do as well. Please operate your Traqmate in a safe manner by ensuring that your Traqmate is securely fastened in the vehicle and that you only look at the DU screen or SU front panel when you are in a position to do so. -
Page 76: Figure 66 - Vir Turn 14
Traqmate User Manual V2.10 May 31, 2008 And finally, when you are replaying your day with your track buddies, Traqmate makes a great storyteller. During the extensive testing of the Traqmate System we had our share of bumps along the way. We thought we would share a couple of our best off-road excursions. -
Page 77: Share & Compare - Traqmate.com
Share & Compare – Traqmate.com Traqmate.com is your source for information, support, and upgrades. There you will find news, events, forums, tips, ideas, and new products to make your Traqmate the most valuable tool in your gear bag. Exchanging Laps If you register at the Traqmate website, http://www.traqmate.com, you are eligible to download... -
Page 78: A Ppendices
Appendices Table of Figures Figure 1 - Traqmate System Components........................... 10 Figure 2 - Traqmate Basic Connections ..........................13 Figure 3 - Traqmate Complete Connections........................13 Figure 4 - Permanent Wiring Harness ..........................16 Figure 5 - DU Gauge Cluster Mount ............................ 17 Figure 6 - DU Console Mount .............................. - Page 79 Traqmate User Manual V2.10 May 31, 2008 Figure 67 - Road Atlanta Turn 1 ............................76 Copyright © 2005 - 2008 Track Systems Technologies, LLC Page 79...
-
Page 80: Traqmate Complete
Windows Vista Home or Premium Warranty Information Track Systems warrants to the owner of this Traqmate GPS Data Acquisition System that it is free from defects in materials and workmanship for a period of 180 days from the original date of consumer purchase. -
Page 81: Glossary
Theoretical Best Lap (TBL) – Best combinations of segment times from a session TraqData – Analog, Digital and RPM input interface TraqPaq – Traqmate Battery Pack TraqSync - ChaseCam interface module that connects Traqmate SU to ChaseCam PDR for synching TraqTach – RPM input interface Traqview –... -
Page 82: About Gps Data Acquisition
Driving Line Comparisons – By mapping each run, comparisons can be made of driving lines, braking points, and other track-dependent points. Cost – There is no installation cost and no expensive sensors are required. Copyright © 2005 - 2008 Track Systems Technologies, LLC Page 82... -
Page 83: Gps Frequently Asked Questions
How Accurate is GPS? Traqmate is equipped with a form of differential GPS known as WAAS. A WAAS-capable receiver can give you a position accuracy of better than three meters (10 feet) in absolute terms over a large span of time.
Need help?
Do you have a question about the Traqmate and is the answer not in the manual?
Questions and answers