Table of Contents
Advertisement
Repair
Airless Sprayer
US Patent 6,752,067
Europe Patent 1 208 287
- For portable spray applications of architectural paints and coatings -
Important Safety Instructions
Read all warnings and instructions in this
manual. Save these instructions.
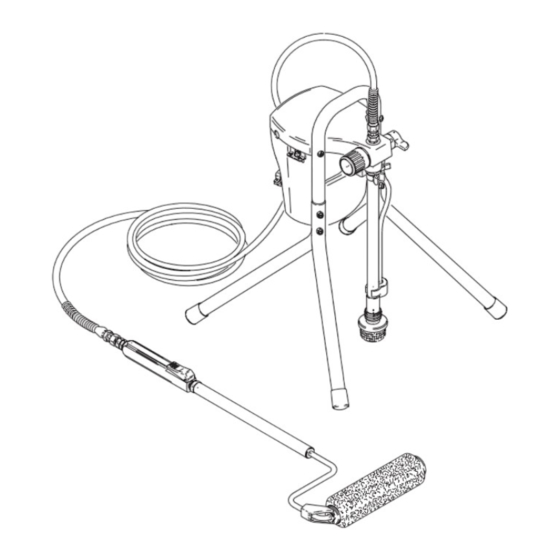
dx Pressure Roller/Spray System
Models 232736, 232737, 232738 - Series B
Related Manuals
dx Pressure Roller
Operation:
XR9 Operation:
SG3 Gun:
Graco Inc. P.O. Box 1441 Minneapolis, MN 55440-1441
Copyright 2002, Graco Inc. is registered to I.S. EN ISO 9001
(Specifications, page 3)
ti2015b
3W9470, 3X9470, 3Y9470, 3Z9470
3W9478, 3X9478, 3Y9478, 3Z9478
309097
XR9 Sprayer
Models 232751, 232752, 232753 - Series A,B, C
309477F
Advertisement
Table of Contents
Troubleshooting

Related Manuals for Graco MAGNUM 232738


Summary of Contents for Graco MAGNUM 232738
- Page 1 Repair Airless Sprayer US Patent 6,752,067 Europe Patent 1 208 287 - For portable spray applications of architectural paints and coatings - Important Safety Instructions Read all warnings and instructions in this manual. Save these instructions. dx Pressure Roller/Spray System Models 232736, 232737, 232738 - Series B Related Manuals dx Pressure Roller...
-
Page 2: Table Of Contents
Contents Manual Conventions ............... . . 3 Specifications . -
Page 3: Manual Conventions
Manual Conventions WARNING Hazard Symbol WARNING: a potentially hazardous situation which, if not avoided, could result in death or serious injury. Warnings in the instructions usually include a symbol indicating the hazard. Read the general Warnings section for additional safety information. Specifications This equipment is not intended for use with flammable or combustible materials used in places such as cabinet shops or other “factory”, or fixed locations. -
Page 4: Warnings
Warnings The following are general related to the safe setup, grounding, use, maintenance, and repair of this equipment. Addi- tional, more specific warnings may be found throughout the text of this manual, where applicable. FIRE AND EXPLOSION HAZARD Flammable fumes, such as solvent and paint fumes, in work area can ignite or explode. To help prevent fire and explosion: •... - Page 5 EQUIPMENT MISUSE HAZARD Misuse can cause death or serious injury. • Do not exceed the maximum working pressure or temperature rating of the lowest rated system component. See Technical Data in all equipment manuals. • Use fluids and solvents that are compatible with equipment wetted parts. See Technical Data in all equipment manuals.
-
Page 6: Pressure Relief Procedure
Pressure Relief Procedure To help prevent injuries, follow this procedure when you stop spraying and before you service or clean the sprayer, remove parts or repair leaks. 1. Turn OFF power switch. ti2011 XR9 model dx model 2. Unplug sprayer. ti2021a1 3. -
Page 7: Grounding And Electrical Requirements
Grounding and Electrical Requirements This sprayer requires 220-240 VAC, 50/60 Hz, 10A circuit with a grounding receptacle. Do not use an outlet that is not grounded. Do not use the sprayer if the electrical cord has a damaged ground prong. Only use an extension cord with an undamaged 3-prong plug. -
Page 8: General Repair Information
General Repair Information WARNING Page 4. • Keep all screws, nuts, washers, gaskets, and electrical fittings removed during repair procedures. These parts are not normally provided with replacement assemblies. • Test repair after problem is corrected. • If sprayer does not operate properly, review repair procedure to verify you did it correctly. -
Page 9: Basic Troubleshooting
The following troubleshooting guidelines are included here as preemptive measures against Advanced Troubleshooting, page 11. Problem Power switch is on and sprayer is plugged in, but motor does not run and pump does not cycle Pump does not prime Spray gun stopped spraying Pump cycles but does not build up pressure Pump cycles but paint only... - Page 10 Problem Spray pattern is inconsistent or is leaving stripes Pressure is set at maximum but cannot achieve a good spray pattern Motor is hot and runs intermittently. This is NOT a thermal overload condition. Motor automatically shuts off due to excessive heat. Damage can occur if cause is not corrected.
-
Page 11: Advanced Troubleshooting
Advanced Troubleshooting WARNING Page 4. General Problem: Motor Does Not Operate Specific Problem Power switch is on and sprayer is plugged in; pump does not cycle Basic mechanical problems 309477F Cause See Basic Troubleshooting, page 9 Paint is frozen or hardened in Unplug sprayer from electrical outlet. - Page 12 Specific Problem Basic electrical problems Sprayer Wiring Problems NOTE: Remove enclosure mounting screws and pull enclosure away from drive housing. Take care not to pull on leads from electrical cord and power switch. Cause Motor overheated Allow motor to cool for 30 minutes. Retry. Electrical outlet is damaged Reset building circuit breaker or replace building fuse.
-
Page 13: General Problem: Circuit Breaker Is Tripping
Specific Problem Sprayer Wiring Problems (cont.) General Problem: Circuit Breaker is Tripping Specific Problem Building circuit breaker opens as soon as sprayer is turned on 309477F Cause Motor thermal overload cutoff switch damaged. Thermal Overload, page 7. Replace any damaged terminals. Make sure all Terminals are damaged or terminal connections are tight. -
Page 14: General Problem: Erratic Motor Operation
Specific Problem Building circuit breaker opens as soon as sprayer is plugged into outlet and sprayer is NOT turned on. NOTE: Remove enclosure mounting screws and pull enclosure away from drive housing. Take care not to pull on leads from electrical cord and power switch. -
Page 15: General Problem: Low Or Fluctuating Output
General Problem: Low or Fluctuating Output Specific Problem Pump cycles, but output is low or surging 309477F Cause See Basic Troubleshooting, page 9. Worn or obstructed pump Check for worn pump valves as follows: valves Prime/Spray valve is leaking Check Prime/Spray valve for debris trapped on seat and for worn parts. - Page 16 Specific Problem Motor runs and pump cycles, but pressure does not build up Spray pattern has variations, pressure fluctuates excessively, or motor runs very slowly Cause Control board is damaged. See Control Board Diagnostics, page 19. If CAUTION: Do not perform damaged replace control board using Control control board diagnostics until Board Kit, page 18.
-
Page 17: General Problem: No Output
Specific Problem Power switch is on and sprayer is plugged in but pump does not cycle Motor runs but pump does not cycle Motor does not run General Problem: Excessive Pressure Build Up Specific Problem Prime/Spray Valve actuates automatically, relieving pressure through drain tube. -
Page 18: List Of Kits
Kit Number Models/Series 235014 243082 243090 245077 245070 15A473 dx, XR9 Series A 15D883 XR9 Series B, C 15A475 245076 243094 244035 246286 245677 245665 243231 XR9 Series A, B 287770 XR9 Series C 245062 245064 245667 XR9 Series A, B 287784 XR9 Series C 245595... -
Page 19: Motor Diagnostics
Check for electrical continuity in motor armature, windings and brush as follows: If Motor Diagnostics reveal a damaged motor or if motor brushes are shorter than 6.4 mm (1/4 in.) or if the motor shaft cannot turn, replace the motor using Motor Kit, page 18. WARNING MPa/bar/PSI Page 4. -
Page 20: Control Board Diagnostics
Control Board Diagnostics Check for motor problems before replacing control board. A damaged motor may burn out a good control card Check for a damaged control board or pressure control switch as follows: WARNING Page 4, 6. 1. Relieve pressure. 2. -
Page 21: Parts
Parts dx Pressure Roller/Spray System Model 232736, 232737, 232738 Part No. Description 243082 STRAINER 244035 DEFLECTOR, barbed 15A473 TUBE, suction 15A475 TUBE, spray 115489 CLAMP, drain tube 15A680 FRAME, stand 15H772 LEG, stand 113955 SCREW, curved head 102040 NUT, locking 246286 KIT, pressure switch repair 224807... - Page 22 dx Pressure Roller/Spray System Model 232736, 232737, 232738 Apply light coat of lithium-based grease 30, 32, 38 ti2083a Parts 309477F...
-
Page 23: Pressure Roller Assembly
Pressure Roller Assembly Model 245589 15A586 TUBE, extension 245999 CAP, end, roller 246277 CAP, end, roller 15B065 CORE, roller 186678 BRUSH, roller, 9 in. x 1/2 in. nap 197106 CLIP, roller 309477F Parts... -
Page 24: Parts
Parts XR9 Spray System Model 232751, 232752, 232753 Part No. Description 195126 PUMP, housing 243090 KIT, pump repair 243094 KIT, outlet valve (includes #17) 103338 PACKING, o-ring, outlet valve 195947 FILTER, adapter 243070 PUMP, filter, InstaClean 245070 KIT, inlet valve, intergral hose barb (includes #25) 103413 PACKING, o-ring, inlet valve... - Page 25 XR9 Spray System Model 232751, 232752, 232753 9 (Series A, B) Apply light coat of lithium-based grease 309477F 19 101 Parts 43, 44, 45 ti2084...
- Page 26 Parts XR9 Spray System Model 232751, 232752, 232753 (Series C) 309477F...
-
Page 27: Xr9 Spray System Labels
XR9 Spray System Labels Part No. Description 149 195792 LABEL, warning, English Japanese, Chinese, Korean 195793 LABEL, warning, French, Spanish, German 195794 LABEL, warning, Portuguese, Dutch, Italian, Greek 195795 LABEL, warning, Swedish, Danish, Finnish, Norwegian 151 15A673 LABEL, danger, Italian, Danish, German, Series A, B 15G238 LABEL, danger, Italian, Danish, German,... -
Page 28: Technical Data
Working pressure range Electric motor Operating horsepower Maximum delivery (with tip) Paint hose Maximum tip hole size Weight, sprayer only Weight, sprayer, hose & gun Dimensions: Length Width Height Power cord Fluid inlet fitting Fluid outlet fitting Inlet screen on suction tube Wetted parts, pump &... -
Page 29: Graco Warranty
Graco Warranty Graco Warranty Graco warrants all equipment referenced in this document which is manufactured by Graco and bearing its name to be free from defects in material and workmanship on the date of sale to the original purchaser for use. With the exception of any special, extended, or limited warranty published by Graco, Graco will, for a period of twelve months from the date of sale, repair or replace any part of the equipment determined by Graco to be defective. - Page 30 All written and visual data contained in this document reflects the latest product information available at the time of publication. Graco reserves the right to make changes at any time without notice. MM 309477F Graco Headquarters: Minneapolis International Offices: Belgium, China, Japan, Korea GRACO INC.
Need help?
Do you have a question about the MAGNUM 232738 and is the answer not in the manual?
Questions and answers