
Related Manuals for iNFinuvo CleanMate QQ2 Plus Series


Summary of Contents for iNFinuvo CleanMate QQ2 Plus Series
- Page 1 CleanMate CleanMate QQ2 Plus Series Robotic Vacuum Cleaner USER MANUAL QQ2 Plus Series Robotic Vacuum Cleaner...
- Page 2 QQ2 Plus Series QQ2 Plus Series Sonic Wall Setup Operations Useful Tips...
- Page 3 QQ2 Plus Series QQ2 Plus Series QQ2 Plus QQ2 Plus QQ2 Plus QQ2 Plus serves iral iral Along Wall Special Bounce QQ2 Plus Series iral iral iral Polygonal Sp QQ2 Plus...
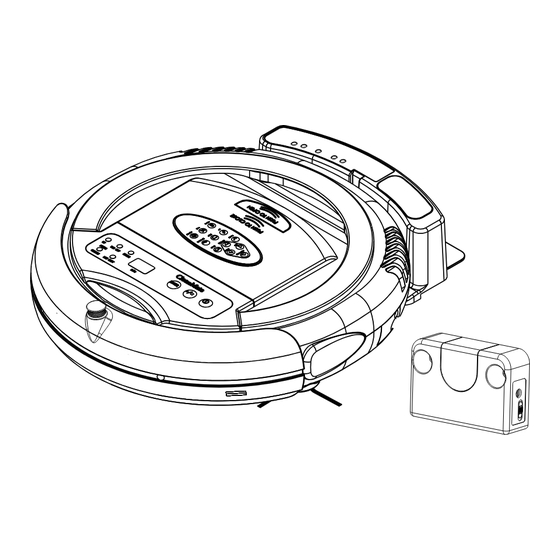
- Page 4 QQ2 Plus Series QQ2 Plus Series QQ2 Plus Series Main Bumper Unit Control Panel Sonic Wall Sensor Remote control (for QQ2 Plus II only) Time Set Button Filter Remote Control Start/Stop Button Rechargeable battery Sensor Remote Control Charger Power Switch...
- Page 5 QQ2 Plus Series QQ2 Plus Series 1.Turn on the power button, the power blue LED will light up. 2.Press the Time Set Button to set the length of operation time. The numerical panel will display the operation time. When power is first turned on, the default setting is 40 minutes.
-
Page 6: Sonic Wall Setup
Sonic Wall Setup QQ2 Plus Series QQ2 Plus II The Sonic Wall only works with CleanMates that have the Sonic Wall Press the "Mode" button again (6 times) to return to "Automatic" Sensor on their bumper (refer to diagram on page 5). It will create an mode (all 5 cleaning patterns). -
Page 7: Wall Outlet
Scheduler QQ2 Plus Series Operations QQ2 Plus Series QQ-1 QQ-1 Clean Mate 365 QQ2 Plus QQ2 Plus Connect the battery charger to the power input socket on the back of home base The scheduler LCD panel is located on the top of the QQ2 Plus self-charging first. - Page 8 Operations QQ2 Plus Series Operations QQ2 Plus Series Once powered on, the scheduler will enter Clock Display Mode and display initial default setting of Sunday 00:00 (in 24 hours time format) Press “SET” to set up the clock time (enter Clock-setting mode and display SET and CLK icon).
- Page 9 Operations QQ2 Plus Series QQ2 Plus Series Press “GO” (for about 1 second) on the self-charging base, and you will see Battery, Brush and GO icons turned on (as shown below) on the left side of LCD panel. This indicates that the QQ2 Plus vacuum will automatically start a cleaning cycle right after the battery is fully charged.
- Page 10 QQ2 Plus Series QQ2 Plus Series battery QQ2 Plus QQ2 Plus CleanMate QQ2 Plus QQ2 Plus QQ2 Plus QQ2 Plus QQ2 Plus...
- Page 11 QQ2 Plus Series QQ2 Plus Series Cleaning the QQ2 Plus Over time dust and dirt can accumulate in different areas of the unit, DO NOT use Water to clean the unit. This is an electrical unit, and if any of the electric components get wet, the unit will no longer work, and could cause a short circuit and potentially harm someone.
-
Page 12: Useful Tips
QQ2 Plus Series Useful Tips QQ2 Plus Series Clear the area where the QQ-2 Plus is to clean of any items can be easily knocked over or caught in the Rolling or Side Brushes. Cleaning the Rolling Brush In order to provide the QQ-2 Plus a... - Page 13 QQ2 Plus Series QQ2 Plus Series Useful Tips Fixing jams: Objects can get caught in the Rolling Brush and prevent it from working properly. Immediately turn the unit off, clear the object causing the jam, and resume normal use. When something is...
-
Page 14: Troubleshooting
If problem persists, please contact your local warranty provider or Infinuvo provides you, as the owner of this Infinuvo product, with the www.infinuvo.com for further assistance. following Limited Warranty Policy. The repairs that marked * needs to be done by qualified service personal.
Need help?
Do you have a question about the CleanMate QQ2 Plus Series and is the answer not in the manual?
Questions and answers