Advertisement
Advertisement

Related Manuals for Yada BT53901F-1

Summary of Contents for Yada BT53901F-1
- Page 1 Digital Tiny Traveler ™ Wireless Baby Monitor for Your Car BT53901F-1 USER MANUAL...
- Page 2 IF YOU ARE EXPERIENCING ANY ISSUES WITH THE PRODUCT DURING OPERATION, DO NOT RETURN THE PRODUCT TO THE STORE. CONTACT WINPLUS DIRECTLY FOR INSTRUCTIONS ON HOW TO RETURN/ EXCHANGE THE PRODUCT. PLEASE KEEP YOUR ORIGINAL RECEIPT AS PROOF OF PURCHASE MUST BE PROVIDED.
-
Page 3: Table Of Contents
TABLE OF CONTENTS 1. Introduction ...................................2 2. Important Safety information ............................2 3. Package Contents ................................4 4. Product Specifications ................................5 5. Installation Guide .................................5 6. Maintenance & Warranty ..............................10 7. General Information ................................. 12... -
Page 4: Introduction
1. INTrOduCTION Thank you for purchasing the Yada Digital Tiny Traveler™, A Wireless Baby Monitor for your car. Yada is dedicated to safe driving practices and strives to limit distractions for drivers. The Yada Digital Tiny Traveler™ is intended to aid in helping drivers traveling with a baby remain focused on driving safely and still have the security of being able to glance at the baby in the back seat. - Page 5 • DO NOT attach the Camera to the baby seat. DO NOT lay the camera loosely in the baby seat. • This system is powered by plugging the adapter into the 12/24v adapter in your vehicle. Do not attempt to use any other power source or cables to operate this system. • The Yada Digital Tiny Traveler™ is not a toy. At no time should children be allowed to play with it. It should only be operated by adults who have read the safety and operating instructions listed in this manual. • This product contains small parts. Adult installation is required. Exercise care when unpacking and...
-
Page 6: Package Contents
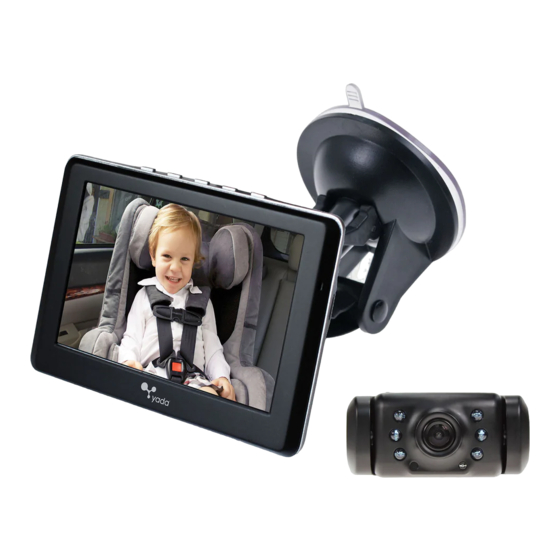
3. pACkAgE CONTENTS 1. Digital Tiny Traveler™ Night Vision Camera 16 Feet/5 Meters 12v Power Cable 2. Digital Wireless Tiny Traveler™ 4.3” Color Monitor 3. Monitor Windshield Mount 4. Mounts for Camera: 4a. Suction Cup 4b. Headrest Mount with Straps 4c. -
Page 7: Product Specifications
4. prOduCT SpECIFICATIONS Digital Tiny Traveler™ Monitor • 4.3” TFT color monitor • 12V Digital Tiny Traveler™ Camera • CMOS Sensor • Night vision • VGA image quality • 45 degree view angle • 16 feet / 5 meter power cable • 12V 5. INSTALLATION guIdE MoniTor PlaCeMenT i. Take the Digital Tiny Traveler™ Monitor from the packaging and attach the suction cup as shown. ii. - Page 8 iii. When mounting, you will need to sit in the driver’s seat just as you would while driving, and angle the monitor until it is comfortable to glance at without turning your head away from watching the road. iv. Place the 12/24v Power Adapter in the port on the right side of the monitor.
- Page 9 v. Plug the other end of the Power Adapter into an available 12/24v socket in your vehicle. Please note that the cable should not wrap around the monitor, but should stay to the right of the Monitor and run down the interior on the passenger side of your car.
- Page 10 • Use the Suction Cup Mount to attach to the rear window or rear-most side glass that is not a door window. For safety, we recommend not mounting to the window of the door. Because there is a power cable, this can become dangerous when opening the rear or side door. Ensure that the Suction Cup is secured tightly to the window and adjust the Camera to the angle needed. • To mount the Camera using the Single Pole Headrest Mount, unscrew the tightening pin and move towards the main mount to separate the two clamps that go around the headrest pole.
- Page 11 ConneCTing The CaMera To The MoniTor i. The Yada Digital Tiny Traveler™ is a plug and play system. No software or syncing is needed in order for the system to operate. Once plugged in and both the Camera and the Monitor are powered on, the Monitor will automatically show the image of the Camera.
-
Page 12: Maintenance & Warranty
6. mAINTENANCE & WArrANTy a. Maintenance • At no time is the Monitor or Camera to become wet or immersed in water. To clean, use a soft cloth to wipe the lens and enclosure. • Do not use alcohol, benzene or thinner to clean the Monitor or Camera. This will cause discoloration. To clean the camera, wipe with a clean cloth dampened with mild cleaner diluted with water and then wipe with a dry cloth. - Page 13 • This is a “repair or replace” warranty only, and does not cover the costs incurred for the installation, removal or reinstallation of the product, or damage to any other devices or vehicle. oWner’s resPonsiBiliTies: Winplus North America will make every effort to provide warranty service within a reasonable period of time.
-
Page 14: General Information
with the Digital Tiny Traveler™ and its functioning. Winplus North America and/or its affiliates shall have no responsibility or liability for damage and/or injury resulting from accidents occurring with vehicles having the Digital Tiny Traveler™ installed, and Winplus North America and/or its affiliates, the manufacturer, distributor and seller shall not be liable for any injury, loss or damage, incidental or consequential, arising out of the use or intended use of the product. - Page 15 communications. However, there is no guarantee that interference will not occur in a particular installation. If this equipment does cause harmful interference to radio or television reception, which can be determined by turning the equipment off and on, the user is encouraged to try to correct the interference by one of the following measures: • Reorient or relocate the receiving antenna • Increase the separation between the equipment and receiver...
- Page 16 This device has been designed to operate with an antenna having a maximum gain of 0 dBi. Antenna having a higher gain is strictly prohibited per regulations of Industry Canada. The required antenna impedance is 50 ohms. iMPorTanT noTe: iC radiation exposure statements: This equipment complies with IC radiation exposure limits set forth for an uncontrolled environment. End users must follow the specific operating instructions for satisfying RF exposure compliance.
Need help?
Do you have a question about the BT53901F-1 and is the answer not in the manual?
Questions and answers