Table of Contents
Advertisement
DIGITAL VOICE
RECORDER
DS-2500
DS-2500
INSTRUCTIONS
ENGLISH ........................................1
FRANÇAIS ..................................... 65
ESPAÑOL ..................................... 129
Thank you for purchasing an Olympus
Digital Voice Recorder.
Please read these instructions for information
about using the product correctly and safely.
Keep the instructions handy for future reference.
To ensure successful recordings, we recommend that
you test the record function and volume before use.
EN
Advertisement
Table of Contents

Related Manuals for Olympus DS-2500


Summary of Contents for Olympus DS-2500
- Page 1 DS-2500 INSTRUCTIONS ENGLISH ........1 FRANÇAIS ........65 ESPAÑOL ........129 Thank you for purchasing an Olympus Digital Voice Recorder. Please read these instructions for information about using the product correctly and safely. Keep the instructions handy for future reference. To ensure successful recordings, we recommend that...
- Page 2 • Any liability for passive damages or damage of any kind occurred due to data loss incurred by a defect of the product, repair performed by the third party other than Olympus or an Olympus authorized service station, or any other reason is excluded.
- Page 3 INDEX Table of contents Safe and proper usage Getting started Basic operations P.22 Advanced operations P.36 Managing files on your PC P.53 Other practical use methods P.59 PLAY/OK Other information P.60...
-
Page 4: Table Of Contents
Table of contents Introduction Advanced operations Table of contents ..........4 Selecting folders and files ........36 Safe and proper usage ........5 Displaying file information [Information] ..37 Index marks .............38 Getting started Menu list ............39 Main features .............8 Learning to use the menu ......... 41 Memory card ............9 Locking files [Lock] ...........42 Identification of parts ........10... -
Page 5: Safe And Proper Usage
The Notes at the bottom of a page are used for defect of the product, repair performed by the additional information, exceptions, or related third party other than Olympus, an Olympus events. authorized service station or any other reason is •... -
Page 6: Battery Handling Precautions
Safe and proper usage • In places subject to extremely cold Handling the recorder temperatures, the temperature of the recorder’s body may be lower than the f Warning: environmental temperature. If possible, wear gloves when handling the recorder in cold •... - Page 7 LCD monitor. Due to its characteristics 2 call your dealer or local Olympus or the angle at which you are viewing the representative for service.
-
Page 8: Getting Started
Getting started Main features s Support type of memory: SD card ( ☞ P.9). s Three programmable smart buttons F1, F2 and F3. s Recording and storing voice in Digital Speech Standard Pro (DS2 format). s Two recording modes, QP (Quality Playback) mode or SP (Standard Playback) mode ( ☞... -
Page 9: Memory Card
To recover the original recording time, 1 Card lock initialize/format the card in the recorder. • Olympus will not be held liable for any data SD card is equipped with a lock function. corruption or loss due to misuse of the media When the lock function is used, important card. -
Page 10: Play/Ok
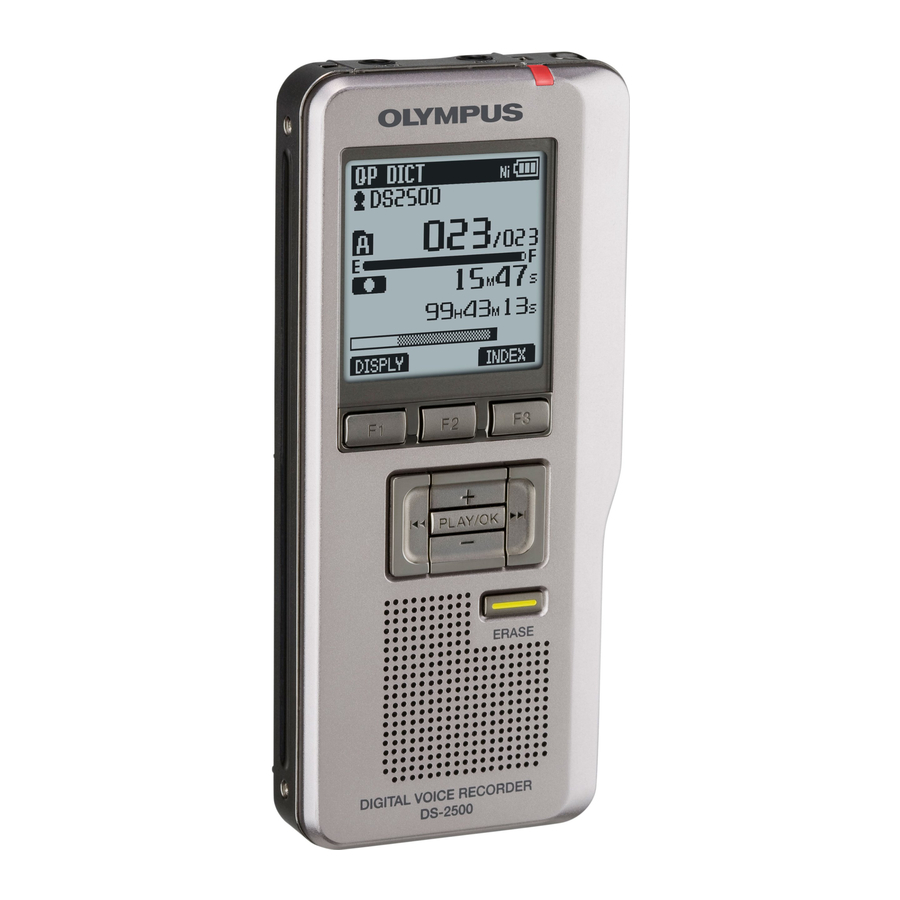
Identification of parts & 1 SD card slot $ + (Volume) button 2 Built-in microphone % Fast Forward (9) button 3 NEW button ^ PLAY/OK button 4 REC button & Smart button (F1,F2,F3) 5 REW button * Rewind (0) button 6 FF button ( –... -
Page 11: Display Status Indicators (Lcd Panel)
Identification of parts Display status indicators (LCD panel) QP DICT VCVA QP DICT DS2500 DS2500 / 030 / 030 INSERT SPEED INDEX DISPLY INDEX Display in the recording mode Display in the playback mode 1 Record mode indicator 9 Total number of files in the folder 2 Current folder 0 Recording elapsed time 3 Memory remaining indicator (E/F bar) -
Page 12: Power Supply
Power supply Inserting batteries Cautions concerning the battery This recorder can be used with either Ni-MH f Warning: rechargeable batteries or AAA alkaline batteries. • Using batteries for which part or all of the external coating • When charging with the recorder, be sure to use the supplied Ni-MH (insulating sheath) is peeling rechargeable batteries (BR404). -
Page 13: Battery Settings
Select to match the battery you are using. recorder. Replace the batteries and turn on the • When changing batteries, AAA alkaline batteries or Olympus Ni-MH rechargeable batteries are recorder (☞ P.12). recommended. Press the + or − button to change the •... -
Page 14: Charging By Connecting To A Computer Via Usb
Power supply Press the PLAY/OK button to start Charging by connecting to a computer via charging. You can charge the batteries by connecting to a Press OK to start charging PC’s USB port. When charging, be sure to correctly place the rechargeable batteries (supplied) into the recorder (☞... -
Page 15: Connecting The Usb-Type Ac Adapter (Optional) To Charge
Power supply While the recorder is in stop mode or Connecting the USB-type AC adapter turned off, connect the USB cable to the (optional) to charge connecting terminal on the bottom of the recorder. It can be charged by connecting to the USB connecting AC adapter (A514) (optional). - Page 16 Power supply Operating temperature: Notes • Insert the supplied rechargeable battery and The rechargeable batteries are chemical products. set [Battery] to [Ni-MH]. If [Battery] is set to The rechargeable batteries efficiency may fluctuate [Alkaline], you cannot recharge (☞ P.13). even when operating within the recommended •...
-
Page 17: Turning On/Off The Power
Power supply Turning on/off the power Power Save Mode (Power Save) When the recorder is not being used, turn the power When the recorder is ON but not in use for 10 off to reduce battery consumption to a minimum. minutes, by default, it will switch to power save Even if the power is turned off, existing data, mode mode automatically. -
Page 18: Hold
HOLD If you bring the POWER/HOLD switch to the HOLD position, the current conditions will be preserved, and all buttons and switches will be disabled. This feature is useful when the recorder has to be carried in a bag or pocket. Set the recorder to HOLD mode Slide the POWER/HOLD switch to the HOLD position. -
Page 19: Inserting And Ejecting A Sd Card
Inserting and ejecting a SD card Notes Inserting a SD card • The card stops with a click when it is inserted Insert the SD card fully into the card slot with the all the way. card facing the direction shown in the illustration •... -
Page 20: Setting Time And Date [Time & Date]
Setting time and date [Time & Date] Press the 9 or 0 button to select Setting the correct time and date on the recorder is very important since every file recorded on the the item to set. recorder will have the time and date information •... -
Page 21: Changing The Time And Date
Setting time and date [Time & Date] • You can choose the order of the year, Changing the time and date month, day by pressing the F2([M]/[D]/[Y] or [D]/[M]/[Y] or [Y]/[M]/[D])* button while When the recorder’s POWER/HOLD switch is turned setting them. -
Page 22: Basic Operations
Basic operations Recording The recorder has five folders, [ A ], [ B ], [C], [D], Recording related settings [E] and you can select a folder by pressing the F1 (FOLDER) button. These five folders can be Recording related settings can be configured selectively used to distinguish the kind of recording;... -
Page 23: New Recording
Recording New recording Create a new file to record in. Press the NEW button to create a new QP DICT file. DS2500 a Selected Author ID / 030 b New file number New File c Remaining recording time Remain FOLDER INFO MENU Press the REC button to start recording. -
Page 24: Overwrite Recording
Recording Overwrite recording You can overwrite a previously recorded file from any point within the file. Note that the overwritten recordings will be erased. Select and play the file you want to overwrite. • Stop the playback at the point you want to start overwriting. -
Page 25: Insert Recording
Recording Insert recording Additional recording can be inserted into previously recorded file. Select and play the file you want to PLAY/OK insert an additional recording into. While playing the file, press the F1 (INSERT) QP DICT VCVA button to insert an additional recording. DS2500 / 134 •... -
Page 26: Recording Modes [Rec Mode]
Recording modes [Rec Mode] The recording mode can choose between [QP] Press the PLAY/OK button to complete (Quality Playback) and [SP] (Standard Playback). the setting. • [Setting fixed] will light up on the display, and it will return to the [Record Menu] screen. •... -
Page 27: Microphone Sensitivity [Mic Sense]
Microphone sensitivity [Mic Sense] You can switch between two microphone Press the + or – button to select sensitivities to meet recording needs: [Dictation] for [Conference] or [Dictation]. oral dictation and [Conference] which is suited for [Conference]: High-sensitivity mode that records situations like meetings and conferences with a small sounds in all directions. -
Page 28: Using The Variable Control Voice Actuator [Vcva]
Using the Variable Control Voice Actuator [VCVA] The Variable Control Voice Actuator (VCVA) is a Press the REC button to start recording. function that starts recording automatically when • When the sound volume is lower than the preset the microphone senses that sounds have reached actuation sound level, recording automatically a preset threshold volume level, and automatically stops after 1 second approximately, and “Stand... -
Page 29: Recording Monitor
Recording monitor It is possible to monitor your recording by listening to the recording while recording is in progress. Insert the earphone plug into the earphone jack and use the + or – button to control the volume level. − (Volume) button Note •... -
Page 30: Playback
Playback You can start playing a file at any point. Select the file, then press the PLAY/OK QP DICT DS2500 button to start playback. PLAY/OK / 133 • The [ ] (Play indicator) appears on the display. a Play indicator INSERT SPEED INDEX PLAY/OK... - Page 31 Playback Playback functions Operation How to cancel Fast Forward Press the 9 or FF button once while stopped. Press the PLAY/OK or STOP button. (FF) Rewind Press the 0 or REW button once while stopped. Press the PLAY/OK or STOP button. (REW) Press and hold the 9 or FF button while stopped Release the button.
-
Page 32: Erasing
Erasing Erasing a file Erasing or deleting a file from any of the folder on the recorder is a very PLAY/OK simple process. Select the file you want to erase. QP DICT DS2500 Press the ERASE button. / 031 Erase in Folder File Erase PLAY/OK Cancel... -
Page 33: Erasing All Files In A Folder
Erasing Erasing all files in a folder All files in a folder can be erased simultaneously. PLAY/OK Select the file you want to erase. Press the ERASE button. QP DICT DS2500 / 030 Erase in Folder PLAY/OK File Erase Cancel EXIT Press the + button to select [Erase in Erase in Folder... -
Page 34: En Partially Erasing A File
Erasing Partially erasing a file You can erase a selected file in part. Playback the file you would like to partially erase. Press the ERASE button at the point to QP DICT DS2500 start erasing. / 134 PLAY/OK • While playback continues, [Erase start] will appear on the display. - Page 35 Erasing Press the ERASE button to confirm erase. QP DICT DS2500 • The display changes to [Partial erasing !] and / 134 erasing will start. Partial erasing ! When [Partial erase completed.] appears on the QP DICT display, partial erase is complete. DS2500 / 134 PLAY/OK...
-
Page 36: Advanced Operations
Advanced operations Selecting folders and files Changing file While the file is being displayed, press the 9 or 0 button. F1, F3 button • This will change and display the file number order for files within the folder. PLAY/OK button a Current file number +, −... -
Page 37: Displaying File Information [Information]
Displaying file information [Information] The recorder can display a variety of information The displayed information related to the current file. The following information will be displayed. [ File Name ]: File name. [ Rec Time ]: Time and date the file was recorded. F2, F3 button [ Author ID ]: Display the Author ID of file. -
Page 38: Index Marks
Index marks Index marks can be placed in a file during recording Locating an index mark or playback. Index marks are used to provide a quick and easy way to identify important or significant While playing back a file, press and hold parts within the file. -
Page 39: Menu List
Menu list Menu setting (While the recorder is stopped, press the F3 (MENU) button) Main menu Ref.page Second layer Setting [Off], [On] P.42 Lock File Menu The file information is displayed. P.37 Information Rec Mode [QP], [SP] P.26 Record Menu Mic Sense [Dictation], [Confeuyn.rence] P.27... - Page 40 Menu list Main menu Ref.page Second layer Setting Beep [On], [Off] P.47 Devices Menu [5 minutes], [10 minutes], [30 minutes], [1hour], Power Save P.17 [Off]. Time & Date In order of hour, minute, year, month and day. P.20 Battery [ Ni-MH ] [ Alkaline ] P.13 [USB Connect]: [PC], [AC Adapter], [Optional] USB Settings...
-
Page 41: Learning To Use The Menu
Learning to use the menu Press the PLAY/OK or 9 button. To navigate through the different options in the menu, use the menu list flow chart (☞ P.39, P.40) and • Move to the setting of the selected menu the following steps to modify or change any settings. items. -
Page 42: Locking Files [Lock]
Locking files [Lock] Press the + or – button to select [On] or When a file is set to [Lock], [ ] will appear on the [Off]. display, allowing you to prevent important files from accidental erase. Moreover, the file will not be erased [On]: Locks the file and prevents it from being even when all files within a folder are erased. -
Page 43: Backlight [Backlight]
Backlight [Backlight] When the display backlight is set to [On], the Press the + or – button to select [On] or backlight will light up for about 10 seconds when a [Off]. button is pressed. [On]: Backlight is enabled. This is useful in that it allows you to check the display [Off]: Backlight is disabled. -
Page 44: Lcd Contrast Adjustment [Contrast]
LCD contrast adjustment [Contrast] Display contrast can be adjusted from level [01] to Press the + or – button to set the [12]. contrast level. • You can adjust the LCD display contrast level from [01] to [12]. Contrast F1, F3 button Level PLAY/OK button +, −... -
Page 45: Led [Led]
LED [LED] You can set it so the Record indicator light does not Press the + or – button to select [On] or turn on. [Off]. [On]: LED light will be set. [Off]: LED light will be cancelled. LED (Record indicator light) BACK EXIT... -
Page 46: Language [Language]
Language [Language] You can select the display language for this recorder. Language The selectable language varies depending on the English countries where the product was purchased. BACK EXIT F1, F3 button Press the PLAY/OK button to complete the setting. PLAY/OK button •... -
Page 47: System Sounds [Beep]
System sounds [Beep] When this is set to [On], the recorder beeps to alert Press the + or – button to select [On] or you to button operations or warn you of errors. [Off]. [On]: System sounds are enabled. [Off]: System sounds are disabled. Beep F1, F3 button PLAY/OK button... -
Page 48: Changing The Usb Class [Usb Settings]
Changing the USB class [USB Settings] Besides setting to [PC] (Connect to PC to transfer [USB Connect]: Setting for connecting to the PC. files) or [AC Adapter] (Connect to AC adapter to [USB Class]: Setting for USB class. recharge the battery), you can switch the USB class according to your usage. - Page 49 Changing the USB class [USB Settings] When [USB Class] is selected: Press the + or − button to change the setting. USB Class Composite Storage BACK EXIT [Composite]: Setting when connected to the PC and used as an external memory device, USB speaker or microphone.
-
Page 50: Formatting The Card [Format]
Formatting the card [Format] Cards that have been used in non-Olympus devices, Press the + or – button to select [Start] or cards that are not recognized by the recorder, option. must be formatted before they can be used with the recorder. - Page 51 Formatting the card [Format] Initializing the recorder’s menu settings [Reset Settings] To return the recorder’s menu settings to their original status from the time of purchase (initial settings), perform the setting from [Reset Settings] in the [Device Menu], or perform the same operation by using DSS Player.
-
Page 52: Check System Information [System Info.]
9 button. • [Model Name] [Version] [Serial] will appear. • Refer to P.41 regarding each menu item settings. Device Menu System Info. Battery Model Name USB Settings DS-2500 Reset Settings Version Format 1.00 Card info. Serial System info. 123456789 BACK... -
Page 53: Managing Files On Your Pc
• Macintosh version does not support voice Hard drive space: recognition software. 2 GB or more • For information on the latest OS upgrades Browser: compatibility, visit the Olympus Web page at Microsoft Internet Explorer 6.0 or later http://www.olympus-global.com/en/global/ . -
Page 54: Installing Software
• If you are running Windows XP/Vista/7 or Mac OS X on the network, you need to log on as an Administrator. Windows Macintosh For the Windows version, there is an installation Insert Olympus DSS Player CD into the method for individuals and one for administrators to CD-ROM drive. install on multiple client PCs. -
Page 55: Uninstalling Software
Click the [start] button on the taskbar. Select [Add/Remove programs] from the Click the [start] button, then select [Control Panel]. [All Programs], [Olympus DSS Player Standard], [Dictation Module Help]. • A list of installed applications is displayed. Select [Olympus DSS Player Standard], While DSS Player is running, select the then click the [Change/Remove] button. -
Page 56: Connecting Recorder To Pc
Connecting recorder to PC Connecting to your PC using the USB cable Boot the PC. Connect the USB cable to the USB port of the PC. Connect the USB cable to the connecting terminal on the bottom of the recorder. •... -
Page 57: Disconnecting From Your Pc
Connecting recorder to PC Notes Disconnecting from your PC • NEVER remove the card or disconnect the USB cable while the record indicator light is fl ashing. If Windows you do, the data on the card will get destroyed. • Some PC’s may not supply suffi cient power and Click [ ] on the task bar located at the the recorder fails to connect. -
Page 58: Running Dss Player Software
• All program menu will be displayed. to the CD-ROM package included with the DSS Player, for the serial number. After the input has ended, click [OK] to complete the Select [Olympus DSS Player Standard], registration. then click [Dictation Module]. -
Page 59: Other Practical Use Methods
Other practical use methods Using as external memory of the computer When the recorder is connected to your PC, it will be recognized on your PC as a removable drive. You can view and access the recorder card from My Computer and download data from the card to your PC using standard windows copy/move and delete commands. -
Page 60: Other Information
Reformat the card (☞ P.50). This is a malfunction. Contact the place of [System Error] System error detected in the recorder. purchase or Olympus Service Center for repair. [Insert Card] There is no card inserted. Insert a card (☞ P.19). -
Page 61: Troubleshooting
Troubleshooting Symptom Probable cause Action Verify polarity is correct ( ☞ P.12). The batteries are not loaded properly. Nothing appears on Charge the batteries or replace with new The batteries are dead. the display batteries (☞ P.12, P.14, P.15). Turn the power on ( ☞ P.17). The recorder is in power off mode. -
Page 62: Technical Assistance And Support
PCs running Windows XP or Vista. DSS Player Online help for details (☞ P.55). Technical assistance and support The following are contact information for technical support for Olympus recorders and software only. s Technical Hotline Number in the U.S. and Canada 1-888-553-4448 s User Support E-mail address in the U.S. -
Page 63: Accessories (Optional)
(BU-400) and 4 Ni-MH rechargeable reducing the effects of ambient noise. batteries (BR401) as a pack. This charger can quick Recommended to improve the accuracy when charge Olympus AA or AAA Ni-MH rechargeable using voice-recognition software. batteries. s External microphone: ME15... -
Page 64: Specifications
ø3.5 mm mini-jack, impedance MIC 2 kΩ, EAR 8 Ω or more Battery life is measured by Olympus. It varies 4 Maximum working output (3 V DC): greatly according to the type of batteries used 300 mW or more (8 Ω speaker) - Page 65 OLYMPUS IMAGING CORP. Shinjuku Monolith, 3-1 Nishi-Shinjuku 2-chome, Shinjuku-ku, Tokyo 163-0914, Japan. Tel. +81 (0)3-3340-2111 http://www.olympus.com OLYMPUS IMAGING AMERICA INC. 3500 Corporate Parkway, P.O. Box 610, Center Valley, PA 18034-0610, U.S.A. Tel. 1-888-553-4448 http://www.olympusamerica.com U1-BS1123-02 AP1203...
Need help?
Do you have a question about the DS-2500 and is the answer not in the manual?
Questions and answers