Table of Contents
Advertisement
Advertisement
Table of Contents

Related Manuals for Tesco EJ09

Summary of Contents for Tesco EJ09
- Page 1 EJ09 Sewing Machine User Manual...
-
Page 2: Safety Guide
IMPORTANT SAFETY GUIDE Please follow all the precautions listed below for safety and to reduce the machine needle. risk of fire, injury or electrical shock. Always use the proper needle plate. The wrong plate can cause the needle to break. Read all the instructions before operating the appliance and keep them for future Do not use broken, deformed or blunt needles. -
Page 3: Table Of Contents
CONTENTS Safety Guide Page 2 More about the pressure foot Page 20 Details of the machine- Front View Page 4 Matching the needle, fabric and thread Page 21 Details of the machine- Rear View Page 5 Sewing on buttons Page 24 Accessories Page 6 Sewing buttonholes... -
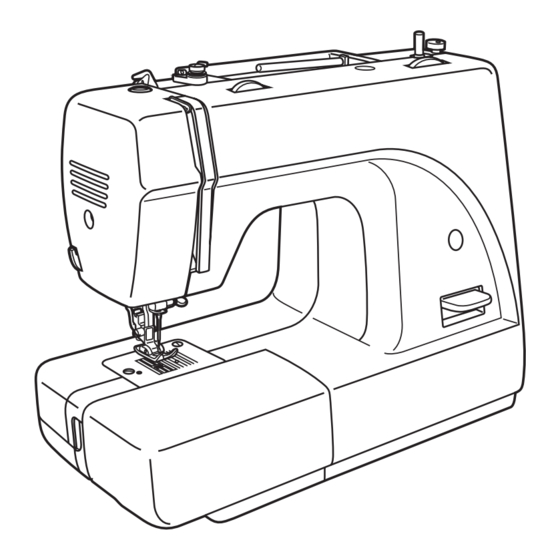
Page 4: Details Of The Machine- Front View
DETAILS OF THE MACHINE – FRONT VIEW Thread tension dial Presser foot pressure Thread take-up lever Thread cutting Presser foot Needle plate Sewing table/ Accessories box Bobbin stopper Stitch length dial Stitch display Reverse sewing lever Base Page 4... -
Page 5: Details Of The Machine- Rear View
DETAILS OF THE MACHINE – REAR VIEW Spool pin Bobbin winder Hole for second spool pin Hand wheel Patten selector dial Power switch Main plug socket Bobbin thread guide Upper thread guide Handle Presser foot lever Page 5... -
Page 6: Accessories
SUPPLIED ACCESSORIES Standard foot Zipper foot Buttonhole foot Button sewing foot L-screwdriver Seam ripper/ brush Lubricating Oil bottle Pack of 3 needles Seam guide 3 Bobbins Darning plate Spool holder Second spool pin Spool pin felt Page 6... -
Page 7: Fitting The Snap-In Sewing Table
FITTING THE SNAP-IN SEWING TABLE Hold the the snap-in sewing table horizontal, and push it in the direction of the arrow. The inside of the snap-in sewing table can be utilized as an accessory box. Page 7... -
Page 8: Connecting Power
CONNECTING POWER A: Switch the machine’s Power Switch OFF – “0” position B: Plug in the Machine Power connector firmly. C: Place the Foot Controller in a convenient unobstructed place. D: Plug in the Mains Plug to the mains supply and switch on. E: Adjust the position of the foot controller (see Fig. -
Page 9: Attaching The Needle
ATTACHING THE NEEDLE LOWER The Presser Foot Assembly is raised and lowered with the Preser Foot Lever (No.23 on P.XX). This also raises and lowers the needle. RAISE Insert the needle following the illustrated instructions (Fig. 1) Loosen the needle clamp screw (A). Insert the needle with the flat side towards the back (B) and the eye facing the front (C). -
Page 10: The Presser Foot
THE PRESSER FOOT LOWER The Presser Foot Assembly is raised and lowered with the Preser Foot Lever (No.23 on P.XX) RAISE First, switch the power off: To attach the Presser Foot Holder- Refer to figure 1: A: Raise the presser foot clamp. B: Attach the presser foot holder as illustrated. -
Page 11: Winding The Bobbin
WINDING THE BOBBIN Your sewing machine works by stiching two threads. The main thread is contained on the spool which is at the top of the machine. A second thread is contained in a compartment under the machine. This thread is wound onto a “bobbin” from the main spool. -
Page 12: Inserting The Bobbin
INSERTING THE BOBBIN When inserting or removing the bobbin, the needle must be fully raised. Switch the power OFF 1 . Open the hinged cover. 2. Hold the bobbin case with one hand. Insert the bobbin so that the thread runs in a clockwise direction (arrow). -
Page 13: Threading The Upper Thread
THREADING THE UPPER THREAD This operation is important to carry out correctly as by not doing so many sewing problems could result. We suggest you read through the procedure carefully and carry out this process several times before using the machine to familiarise yourself with the process. Switch the power OFF. -
Page 14: Bringing Up The Lower Thread
BRINGING UP THE LOWER THREAD Refer to Figure 1 Hold the upper thread LOOSELY with the left hand. Turn the handwheel forwards to lower and then fully raise the needle. Refer to Figure 2 The upper thread will catch and raise the lower thread. Pull on the upper thread to bring the lower thread up through the stitch plate hole. -
Page 15: Basic Sewing
BASIC SEWING STITCH LENGTH DIAL Basic Machine Setting (Figure 1) Set the Stitch Length Dial to 2. This provides a small/medium stitch length Set the Pattern Selector Dial to display A in the Stitch Display Window. This sets the needle to centre stitch position. STITCH DISPLAY WINDOW Raise the Presser Foot PATTERN SELECTOR DIAL... -
Page 16: Reverse Sewing
REVERSE SEWING At the end of the seam (Figure 1): Press down the reverse sewing lever A. Sew a few reverse stitches. Release the lever and the machine will sew forwards again. REMOVING THE WORK (Figure 2): Turn the handwheel towards you to bring the thread take up lever to its highest position, raise the presser foot and remove work towards the back and side. -
Page 17: More About Straight Stitching
MORE ABOUT STRAIGHT STITCHING Straight Stitching Centre Needle Position STITCH LENGTH DIAL Turn the pattern selector dial so that “A” appears in the stitch display window. Adjust the stitch length by turning the stitch length dial to the desired stitch length. -
Page 18: Zig-Zag Stitching
ZIG-ZAG STITCHING Turn the pattern selector dial so that the stitch display shows “C”-zig-zag. Turning the pattern selector dial will increase or decrease the zig zag width. STITCH LENGTH DIAL Using the stitch length dial while zig-zag stitching The density of zig-zag stitches increase as the setting of stitch length dial approaches “0”. -
Page 19: Adjusting The Upper Thread Tension
ADJUSTING THE UPPER THREAD TENSION Rotate the dial to adjust the upper thread tension The basic thread tension setting is “4” To increase the tension, turn the dial to the next number up. To reduce the tension, turn the dial to the next number down. The diagram shows the effects of different thread tension settings: A. -
Page 20: More About The Pressure Foot
MORE ABOUT THE PRESSURE FOOT The presser foot can be raised through two levels When sewing several layers or thick fabrics, the presser foot can be raised a second stage for easy positioning of the work. (A) Adjusting the pressure of the presser foot: The presser foot pressure of the machine has ben pre-set and requires no particular readjustment for different types and weights of fabric. -
Page 21: Matching The Needle, Fabric And Thread
MATCHING THE NEEDLE, FABRIC AND THREAD NEEDLE, FABRIC, THREAD SELECTION GUIDE NEEDLE SIZE FABRICS THREAD Lightweight fabrics-thin cottons, voile, serge, silk , muslin, interlocks, cotton 9-11(65-75) Light-duty thread in cotton, nylon or polyester. knits, tricots, jerseys, crepes, woven polyester, shirt & blouse fabrics. Medium weight fabrics- cotton, satin, sailcloth, double knits, lightweight 12(80) woollens. -
Page 22: Sewing On Buttons
SEWING ON BUTTONS Set the Stitch Length Dial and the Pattern Selector as shown STITCH LENGTH DIAL Install the Button Sewing Foot Install the Darning Plate. ( See Fig 1) DARNING PLATE Position the work under the foot. Place the button on the marked position and lower the foot. Set the pattern selector knob on “B”... -
Page 23: Sewing Buttonholes
SEWING BUTTONHOLES Preparation: Attach the buttonhole foot. Adjust the stitch length dial between STITCH LENGTH DIAL BUTTONHOLE FOOT “0.5” - “1”. The density of the stitch depends on thickness of the fabric. Note: Always test sew a buttonhole. To prepare the fabric: Measure the diameter of the button and add 0.3 cm (1/8”) for the bartacks. -
Page 24: Attaching Zippers And Piping
ATTACHING ZIPPERS AND PIPING STITCH LENGTH DIAL ZIPPER FOOT Set the machine as illustrated. (Figure1) The zipper foot can be inserted right or left, depending on which side of the foot you are going to sew. (Fig. 2) To sew past the zipper pull, lower the needle into the fabric, raise the presser foot and push the zipper pull behind the presser foot. -
Page 25: 3-Step Zig-Zag Sewing
3-STEP ZIG-ZAG SEWING STITCH LENGTH DIAL STANDARD FOOT Use this technique for sewing on lace and elastic, darning, mending, reinforc- ing edges. Set the machine as illustrated. (Figure1) Place patch in position. The stitch length can be shortened to produce very close stitches. (Fig. A) When mending tears, it is advisable to use a piece of backing fabric to reinforce. -
Page 26: Stitch Selection
STITCH SELECTION STITCH LENGTH DIAL Triple straight stitch: (Fig. 1) For hardwearing seams. Turn the stitch length dial to “S1”. The machine sews two stitches forwards and one stitch backwards. This gives triple reinforcement. STANDARD FOOT Triple zig-zag: (2) STITCH LENGTH DIAL For hardwearing seams, hems and decorative seams. -
Page 27: Smocking Stitch
SMOCKING STITCH STITCH LENGTH DIAL STANDARD FOOT Use for seams, hems, T-shirts, underwear, etc. Set the machine as illustrated. (Fig. 1) Pattern selector “D”, stitch length “S1”. This stitch can be used for all types of jersey as well as for woven fabrics. (Fig. 2) Sew at 1 cm (1/4”) from the fabric edge and trim the surplus fabric. -
Page 28: Decorative And Practical Stitches
DECORATIVE AND PRACTICAL STITCHES STITCH LENGTH DIAL STANDARD FOOT Set the machine as illustrated. Turn the stitch length dial to suit the fabric. Shell hem ( Fig. A) For decorative edges. Suitable for edges on sheer, fine and stretch fabrics. The larger stitch should go just over the edge of the fabric to create the shell effect. -
Page 29: Patching
PATCHING STITCH LENGTH DIAL STANDARD FOOT These stitches are used to join two pieces of fabric while leaving a space between their edges. Set the pattern selector on “H”. Turn the stitch length dial to “S1”. 1. Fold over the edges of the two pieces of fabric for the hem and baste the edges to a thin piece of paper leaving a small space between them. -
Page 30: Appliqué
APPLIQUÉ STITCH LENGTH DIAL STANDARD FOOT Turn stitch length dial to the desired length. Turn pattern selector dial to small zigzag width. Cut out the appliqué design and baste it to the fabric. Sew slowly around the edge of the design. Trim excess material outside the stitching. -
Page 31: Monogramming And Embroidering -1
MONOGRAMMING AND EMBROIDERING - 1* * USING AN EMBROIDERY HOOP (NOT SUPPLIED) STITCH LENGTH DIAL DARNING PLATE PREPARATION Set the machine as illustrated opposite. (The “0” setting means the machine will not feed the fabric leaving you to manoeuvre it freely yourself). Remove the presser foot and the presser foot holder. -
Page 32: Monogramming And Embroidering -2
MONOGRAMMING AND EMBROIDERING - 2* * USING AN EMBROIDERY HOOP (NOT SUPPLIED) MONOGRAMMING 1. Sew, moving the hoop slowly along the lettering at a constant speed. 2. Secure with a few straight stitches at the end of the last letter. EMBROIDERING 1. -
Page 33: Maintenance -1 (Replacing The Light Bulb)
MAINTENANCE - 1 REPLACING THE LIGHT BULB Disconnect the machine from the power supply by removing the plug from the mains socket. Loosen screw (A) as illustrated. (Figure 1). Remove the cover (B). Unscrew the bulb and fit a new one (C). (Figure 2) Replace the cover and tighten the screw. -
Page 34: Maintenance -2 (Cleaning And Lubrication)
MAINTENANCE - 2 CLEANING AND LUBRICATION Disconnect the machine from the power supply by removing the plug from the mains socket. Remove the stitch plate: (Figure 1) Turn the handwheel until the needle is fully raised. Open the hinged front cover and unscrew the needle plate screw withe the screw driver. -
Page 35: Troubleshooting
TROUBLESHOOTING If your machine is not working saftactorily, please work through this checklist before returning it to Tesco or taking it for service. The upper thread breaks 1 The machine is not threaded correctly L Rethread the machine 2. The thread tension is too tight 2. -
Page 36: After Use
WARRANTY Disconnect the machine from the power supply by removing the plug from the Your TESCO appliance is covered by a warranty for 12 months from the date of mains socket. purchase. If a fault develops during this period, please contact the TESCO electrical help line on 0845 456 6767.
Need help?
Do you have a question about the EJ09 and is the answer not in the manual?
Questions and answers