
Related Manuals for Meyer Sound Galileo 616


Summary of Contents for Meyer Sound Galileo 616
- Page 1 USER GUIDE INTEGRATION TOOLS Galileo ™ Keep these important operating instructions. Check www.meyersound.com for updates.
-
Page 2: Declaration Of Conformity
Galileo, Compass, Composite EQ, TruShaping, M Series, M1D, M2D, M’elodie, and MICA are trademarks of Meyer Sound. Meyer Sound, SIM, M3D, and MILO and are registered trademarks of Meyer Sound Laboratories Inc. (Reg. U.S. Pat. & Tm. Off.). All third-party trademarks mentioned herein are the property of their respective trademark holders. -
Page 3: Symbols Used
SYMBOLS USED Dangerous voltages: risk Important operating Frame or chassis Protective earth ground of electric shock instructions Pour indiquer les risques Pour indequer important Masse, châssis Terre de protection résultant de tensions instructions dangereuses ä Wichtige Betriebsan- ä Masse Schutzleiter Warnung vor gef hrlicher Rahmen oder Geh... -
Page 4: Important Safety Instructions
The 15. If the equipment is used in a manner not AC mains plug or appliance coupler shall specified by the Meyer Sound, the pro- remain readily accessible for operation. tection provided by the equipment may 11. -
Page 5: Table Of Contents
CONTENTS Chapter 1: Introduction How to Use This Manual Galileo™ Product Overview Chapter 2: Galileo 616 Features and Functions Galileo 616 Projects Galileo 616 Front Panel Galileo 616 Rear Panel Chapter 3: Connecting the Galileo 616 Power Connector Remote Computer Connection... - Page 6 CONTENTS Galileo EQ Graph Zoom Modes Input and Output Masters Display Options...
-
Page 7: Chapter 1: Introduction
Information and specifications are subject to change. Updates and supplementary information ® are available on the Meyer Sound website: http://www.meyersound.com Meyer Sound Technical Support is available at: ■ Tel: +1 510 486.1166 ■ Fax: +1 510 486.8356 ■... -
Page 8: Galileo™ Product Overview
*Test conditions were factory default settings: All input and output EQ and TruShaping™ filters enabled but set to flat response, no other filtering enabled. For maximum flexibility, the Galileo 616 can be controlled from its front panel, using its navigation buttons and LCD screen, or from the Compass control software. - Page 9 GALILEO 616 USER GUIDE ■ Compass™ control software: Provides comprehensive control of the Galileo 616 through a graphical user interface running on a remote computer. Compass is the primary method of operating the Galileo loudspeaker management sys- tem. The software enables easy access to all Galileo features and even provides control of multiple units.
- Page 10 CHAPTER 1: INTRODUCTION...
-
Page 11: Chapter 2: Galileo 616 Features And Functions
So when Compass is connected to a Galileo 616, it reads and displays the project file and the current active snap- shot that is contained in the unit’s memory. However, loading another project file (stored on the computer) into the Compass control software when it is connected to a Galileo 616 replaces whatever project file is currently in the Galileo 616. -
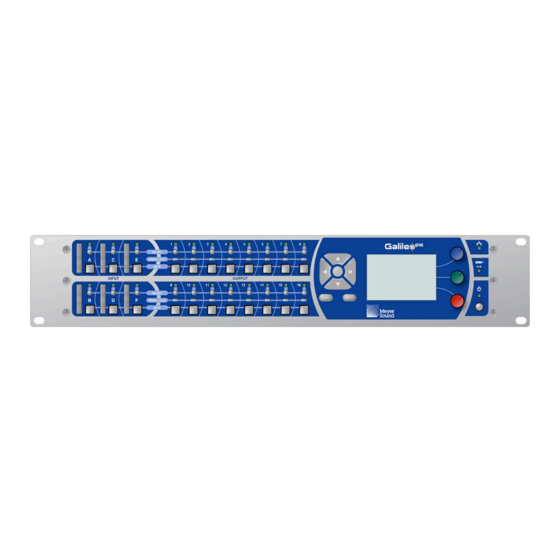
Page 12: Galileo 616 Front Panel
GALILEO 616 FRONT PANEL Galileo 616 Front Panel The front panel of the Galileo 616 provides access to all of the powerful features of the loud- speaker management system. Input level metering is shown for all inputs, as well as status and control of all outputs. - Page 13 Input Mute Input Level Buttons Meters Galileo 616 Front Panel Input Section Input Level Meters: Multi-segment LED ladders for each input, with the green LED range ■ beginning at approximately –80 dB below clipping, yellow LED range lighting a few dB below clipping, and top red LED indicating clipping of the A/D converter at +26 dBu (15.5 V rms;...
- Page 14 CHAPTER 2: GALILEO 616 FEATURES AND FUNCTIONS Front Panel Output Section Output Select Buttons / LEDs Signal / Output Mute Clip LEDs Buttons Galileo 616 Front Panel Output Section Signal / Clip LEDs: One for each output channel. For levels between around –85 dB ■...
- Page 15 Screen Knobs Switch / LED Galileo 616 Front Panel Navigation Section Navigation Buttons: This set of buttons navigates the menus on the LCD screen. ■ Enter Button: This button is used to enter submenus, and in some cases toggle values or ■...
- Page 16 ■ Ethernet LED: When this LED is lit, it indicates that the Galileo 616 is connected to the Compass control software running on an external computer via the rear panel RJ-45 con- nector. Remote control of the Galileo 616 is accomplished with this connection.
-
Page 17: Galileo 616 Rear Panel
Ethernet Connector: This RJ-45 connector is used with a shielded CAT-5e cable (recom- mended) or better Ethernet data cable to connect the Galileo 616 to an Ethernet network, allowing control of Galileo from a computer running the Compass control software. - Page 18 ■ powered loudspeakers, or to power amplifier channels driving passive loudspeaker sys- tems. The signal routing and processing internal to the Galileo 616 is applied to the output of these connectors. SIM 3 Bus Connectors: This pair of connectors provides connection to the SIM 3 audio ■...
-
Page 19: Chapter 3: Connecting The Galileo 616
CHAPTER 3: CONNECTING THE GALILEO 616 POWER CONNECTOR The Galileo 616 uses a locking PowerCon ® connector to provide AC voltage to the unit. Its internal switching power supply accepts voltages from 90 to 264 V AC, 50/60 Hz. Locking PowerCon connector for AC power... -
Page 20: Remote Computer Connection
Cat-5e cables. The Ethernet connection allows the unit to be controlled remotely from a Mac or Windows computer running the Compass control software. Bi-directional communication ensures that the current settings, whether changed from the Galileo 616 front panel or from the Compass software, are always in sync. -
Page 21: Input Connectors (From Console)
NOTE: The adjustable output range provides two level output settings to drive Meyer Sound self-powered products. The +20 dBu output range setting lowers the overall noise floor by nearly 6 dB. However, this setting makes the Galileo output signal more vulnerable to defects in the overall grounding system. Thus the actual improvement attained depends on the quality of the grounding between components. - Page 22 Within the System Settings window of the Compass control software or the Galileo 616 front panel, the Input Channel Types will be set to AES via the drop-down menu. Since the AES/EBU signal carries two channels of digital audio, the second connector in the selected pair is covered with a red X, and is disabled.
-
Page 23: Output Connectors (To Loudspeakers/Arrays)
24-bit D/A converters. These outputs have the same line-driving capabilities as Meyer Sound’s analog line drivers, providing signal levels up to +26 dBu. The Galileo 616 can easily drive Meyer Sound self-powered loudspeakers to full output at all frequencies, even over long... -
Page 24: Connecting The Sim-3022 Analyzer
CONNECTING THE SIM-3022 ANALYZER Galileo 616 SIM 3 Connectors The rear panel of the Galileo 616 includes a connector for direct connection to the SIM-3022 Audio Analyzer. Once connected, the Galileo 616 can act as a line switcher for the analyzer. - Page 25 GALILEO 616 USER GUIDE Looping SIM Connector A second SIM-type connector is included on the rear panel of the Galileo 616. It may be used to connect an additional Galileo unit or a SIM-3088 line-level switcher. NOTE: If a SIM-3088 switcher is connected to the looping connector of a Galileo, a SIM-3004 remote power supply will also be required;...
- Page 26 CHAPTER 3: CONNECTING THE GALILEO 616 Combination 2 ■ Console = Front Panel Signal Generator (ex. Ad FP Ch 0 Generator). The SIM signal gener- ator is used as the signal that feeds the Console bus. ■ Processor = Galileo Output Post Processing (ex. Ad 10, Ch 1 Sw 10 Proc 1). This uses the output of the Galileo Output Processing as the signal that feeds the Processor bus.
-
Page 27: Chapter 4: Using The Galileo Front Panel
THE GALILEO MAP Galileo Map Page The main screen on the Galileo 616, called the Galileo Map, allows access to all of the func- tions of the system. It is the default screen after boot-up, and can be accessed at any time using the Menu button. - Page 28 Navigation buttons Settings knobs Galileo 616 Navigation Buttons and Knobs NOTE: The Cancel button typically functions as a “Back” button, stepping back page by page toward the Galileo Map page. It does not typically undo parameter changes that were done within a page. As an exception, on the Label page the Cancel button steps back to the previous page without saving changes, while the Menu button saves the changes.
-
Page 29: System Settings
GALILEO 616 USER GUIDE SYSTEM SETTINGS System Settings Page The System Settings page gives access to a variety of global and setup parameters. Navigate the selections identically to the Galileo Map page using the Arrow buttons or knobs, and press the Enter button or the Blue or Green knobs to select. - Page 30 CHAPTER 4: USING THE GALILEO FRONT PANEL Input Types Input Types Page Press the Enter button or the Blue or Green knob from System Settings to select this function. Input types scroll in pairs, using the Left and Right arrows to highlight the desired input pair. Push or turn the Blue knob to toggle between the choices of Analog/Analog or AES/Inactive.
- Page 31 GALILEO 616 USER GUIDE ■ SIM 3 Bus Address: Select from 10 through 14 by rotating the Blue knob clockwise to go up in value, and counterclockwise to go down in value. ■ SIM 3 Trim: Select from Disabled or Enabled by clicking or rotating the Blue knob.
- Page 32 CHAPTER 4: USING THE GALILEO FRONT PANEL ■ Humidity: Highlight and use Blue knob to scroll through the values, clockwise for higher humidity and counterclockwise for lower. ■ Altitude: Highlight and use Blue knob to select among the three ranges. Once the Natural Environment settings are configured, return to the System Settings page by pressing the Cancel button, or press the Menu button to return to the Galileo Map.
- Page 33 Blue knob or the Enter button. The DHCP mode supports direct cable connection between the computer’s Ethernet card and the Galileo 616. The DHCP will also reveal the MAC address. This will display below the assigned IP address.
- Page 34 NOTE: The adjustable output range provides two level output settings to drive Meyer Sound self-powered products. The +20 dBu output range setting lowers the overall noise floor by nearly 6 dB. However, this setting makes the Galileo output signal more vulnerable to defects in the overall grounding system. Thus the actual improvement attained depends on the quality of the grounding between components.
-
Page 35: Summing Matrix
GALILEO 616 USER GUIDE SUMMING MATRIX Summing Matrix, 8 + 8 Configuration Press the Enter button or the Blue knob from the Galileo Map page to enter the Summing Matrix. A selected (active) audio route is designated by a circle at any crosspoint within the matrix;... - Page 36 CHAPTER 4: USING THE GALILEO FRONT PANEL Change the gain at the crosspoint where the cursor is presently located by turning the Red knob — clockwise for gain and counterclockwise for attenuation. The range is from +20 dB to –90 dB, and is designated in the matrix as a [ – ] for levels below unity gain, and a [ + ] for lev- els above unity.
-
Page 37: Creating Labels With Galileo
GALILEO 616 USER GUIDE CREATING LABELS WITH GALILEO Label Page Labels can be created for the individual channels in Input Processing and Output Processing, for groups in Link Groups, for arrays in Array Correction, and for snapshots in the Snapshot Library. -
Page 38: Array Correction
CHAPTER 4: USING THE GALILEO FRONT PANEL ■ Cancel Button: Pressing the Cancel button will discard the naming changes and return to the previous screen. TIP: The fastest way to enter names is to use a combination of the rotary knobs and the Up and Down arrows. -
Page 39: Link Groups
GALILEO 616 USER GUIDE ■ Type: Press the Enter Button or turn the Blue knob to scroll among the available M Series loudspeaker types (M1D, M2D, MILO, M3D, MICA, M’elodie); the Enter button continually scrolls through the selections, while the Blue knob goes from M1D at counter- clockwise to M’elodie at clockwise. - Page 40 CHAPTER 4: USING THE GALILEO FRONT PANEL The Link Group fields are: Link Groups Page (with Linked Output Channels Highlighted) ■ Group: Use the Up and Down arrows to highlight, and the Left and Right arrows or the Blue knob to scroll through and select group #1 through #8; both methods do a continu- ous scroll.
-
Page 41: Navigating With The Select Buttons
Select button corresponding to that channel and it will appear in the display, and will show that channel number in the upper right corner. Galileo 616 Front Panel with Select LEDs Showing Linked Channels NOTE: Atmospheric Correction cannot be part of a link group. - Page 42 CHAPTER 4: USING THE GALILEO FRONT PANEL ■ Input / Output Masters: Cursor goes to the fader for that channel, allowing gain changes with the Red knob or Arrow buttons. ■ Summing Matrix: Cursor goes to the particular input/output combination that is selected, allowing routing selection with the Enter button or level control with the Red knob.
-
Page 43: Snapshot Library
The Snapshot Library lists all existing Snapshots (full system configurations for Galileo) within a Project and available in the memory of the Galileo 616 or in the library of a connected com- puter running the Compass control software. Galileo ships with over 50 Factory Standard Pre- sets which are viewed in the front panel as a second page of the Snapshot Library. - Page 44 CHAPTER 4: USING THE GALILEO FRONT PANEL NOTE: Only one Snapshot at a time may be selected as the boot configuration for Galileo, and it may be selected either in the Compass control software or via the “Is Boot” field above. That Snapshot will have “(boot)” in front of its name in the Snapshot Library list.
-
Page 45: Input Processing
Snapshot Library list and become current. NOTE: Within the Snapshot page in Galileo 616, a particular Snapshot can be designated as the “boot snapshot”, so that whenever the unit is turned on it will open with those system settings and parameters active. - Page 46 CHAPTER 4: USING THE GALILEO FRONT PANEL On the Overview page, pressing the Green knob will mute and unmute the highlighted chan- nel; the word “mute” is highlighted when that input channel is muted. Turning the Red knob will affect the gain of the highlighted channel, clockwise for gain and counterclockwise for attenuation;...
-
Page 47: Output Processing
GALILEO 616 USER GUIDE ■ Label: Pressing the Enter button will open the naming utility; create the desired label and press the Menu button to accept. ■ Mute: Highlight this field and press the Enter button or press/turn the Blue knob to toggle between mute and unmute for the channel;... - Page 48 CHAPTER 4: USING THE GALILEO FRONT PANEL In the Overview page, pressing the Blue knob will reverse the polarity of the highlighted chan- nel; the word “pol” will be highlighted when the polarity is reversed for that output channel. Pressing the Green knob will mute and unmute the highlighted channel; the word “mute” will be highlighted when that output channel is muted.
- Page 49 GALILEO 616 USER GUIDE while turning will scroll more quickly through the frequencies. Turning the Green knob will zoom the location of the cursor both horizontally and vertically; press the knob while turn- ing to zoom more quickly. NOTE: When All EQ is bypassed, the individual fields for Parametric, TruShap- ing, and High/Low Pass will also be shown as bypassed.
-
Page 50: The Equalization Menu
CHAPTER 4: USING THE GALILEO FRONT PANEL ■ Array Group: Can be used to assign an output channel to an Array Group. The default is “none”; turning the Blue knob clockwise will scroll through “Array 1” through “Array 8”, and assign the output to the array. The user will still need to go to the Array Correction page to select the type and size of the array and to enable it. - Page 51 GALILEO 616 USER GUIDE Equalization Mode Menu Equalization Mode Menu Use the Up and Down arrows, and press the Enter button to select from the following sub- menu items: ■ Cursor: Provides a vertical cursor on the EQ point, and has fields that show frequency, gain setting, and phase.
- Page 52 CHAPTER 4: USING THE GALILEO FRONT PANEL Equalization Settings Menu Equalization Settings Menu Use the Up and Down arrows, and press the Enter button to select from the following sub- menu items: ■ Bypass All EQ: Temporarily removes all equalization from the input or output channel sig- nal;...
- Page 53 GALILEO 616 USER GUIDE Equalization Edit Menu Equalization Edit Menu Use the Up and Down arrows, and press the Enter button to select from the following sub- menu items: ■ Copy Parametric/TruShaping/High/Low Pass: Highlight this item and press the Enter button to copy the present equalization settings on the page;...
- Page 54 CHAPTER 4: USING THE GALILEO FRONT PANEL ■ Reset Parametric: Resets the values of all of the parametric EQ points to zero on the present channel’s page, and can be used in any of the EQ pages. ■ Reset TruShaping: Resets the values of all of the TruShaping EQ points to zero on the present channel’s page, and can be used in any of the EQ pages.
- Page 55 GALILEO 616 USER GUIDE NOTE: When View > Numeric is selected, all views of the EQ settings for any selected channel are shown in the form of numeric tables until Numeric is dese- lected. Scroll through the available EQ points with the Left and Right arrows, and use the Blue, Green, and Red knobs to change values at the selected points.
-
Page 56: Using Graphic Eq
CHAPTER 4: USING THE GALILEO FRONT PANEL USING GRAPHIC EQ Graphic EQ with 31 Bands When Graphic EQ is selected on the Input Processing page, up to 31 bands of equalization can be applied to the input. On the Graphic EQ page, press the Left and Right arrows or turn the Blue knob to select among the 31 bands. -
Page 57: Using Trushaping Eq
GALILEO 616 USER GUIDE USING TRUSHAPING EQ TruShaping EQ with EQ Point When TruShaping EQ is selected in the Input or Output Processing pages, one EQ point is presented at a time on the page. These points are nominally centered at 125 Hz, 500 Hz, and 4 kHz, though once their frequency has been changed for one channel using the Blue knob, the new value replaces these values for that Galileo project. - Page 58 CHAPTER 4: USING THE GALILEO FRONT PANEL ■ Low Bandpass, lower frequency: Left-most dot and section of frequency line just above it are flashing; allows the lower frequency of this filter to be changed with the Blue knob, and the Red knob changes gain. ■...
-
Page 59: Using Parametric Eq
EQ point to change using the Left and Right arrows; the selected one will blink. Once a Parametric EQ point is selected, use the knobs to adjust the parameters, as follows; the knobs behave the same as a single band of the Meyer Sound analog CP-10 parametric equalizer: Parametric EQ with Equalization Changes Blue Knob: Moves the frequency center for each point;... -
Page 60: Galileo Eq Graph Zoom Modes
CHAPTER 4: USING THE GALILEO FRONT PANEL ■ Red Knob: Adjusts the boost and cut of the parametric EQ point; clockwise for gain and counterclockwise for attenuation; the value is shown in the “g=X.XdB” field on the top right. NOTE: Press and hold the knobs to make coarser adjustments (wider frequency intervals, bandwidth by 0.1, gain by 1 dB), and just turn the knob for finer adjust- ments. - Page 61 GALILEO 616 USER GUIDE Standard Zoom Equalization Curve with Vertical Zoom (Left) and Horizontal Zoom (Right) In any of the EQ graph views, clicking the Down arrow will highlight the horizontal and vertical scales. Pressing and turning the Red knob clockwise will expand the vertical scale, up to 1 dB per division from the beginning 6 dB per division.
-
Page 62: Input And Output Masters
CHAPTER 4: USING THE GALILEO FRONT PANEL INPUT AND OUTPUT MASTERS Input Masters Page (Left) and Output Masters Page (Right) The Input Masters and Output Masters pages provide a convenient location to adjust the gains of all the inputs and outputs, in a virtual fader view. From the Galileo Map page, highlight the desired masters section and press the Enter button or the Blue knob. -
Page 63: Display Options
GALILEO 616 USER GUIDE DISPLAY OPTIONS Display Options Page The display options available in Galileo are: ■ Panel Brightness: Highlight and use the Blue knob to scroll through the options of Dark Show, Dim, Default, and Outdoor. ■ LCD Contrast: Highlight and use the Blue knob to change values from 0 to 63. - Page 64 CHAPTER 4: USING THE GALILEO FRONT PANEL...
- Page 68 The contents of this manual are furnished for informational purposes only, are subject to change without notice, and should not be construed as a commitment by Meyer Sound Laboratories Inc. Meyer Sound assumes no responsibility or liability for any errors or inaccuracies that may appear in this manual.
Need help?
Do you have a question about the Galileo 616 and is the answer not in the manual?
Questions and answers