
Related Manuals for GMC MOC6L


Summary of Contents for GMC MOC6L
- Page 1 OIL-LESS COMPRESSOR MOC6L INSTRUCTION MANUAL Black Magenta Cyan Yellow Code: MOC6L IM Date: 070620 Edition: 02 Op: MM...
-
Page 2: Table Of Contents
General safety rules Additional safety rules for air compressors Unpacking Components Know your product To start the air compressor Operating the air compressor Stopping the air compressor Assembly - Included Accessories Operating the quick change blow gun Connecting the inflation needle... -
Page 3: Warning Labels Explained
Warning labels explained On the tank of your air compressor you will notice various warnings about the operation of the compressor. These warnings and the procedures associated with them are explained fully in this manual on the following pages. Please take note of these. They are important for your safety and that of others in the vicinity. -
Page 4: Introduction
Introduction Your new GMC power tool will more than satisfy your expectations. It has been manufactured under stringent GMC Quality Standards to meet superior performance criteria. You will find your new tool easy and safe to operate, and, with proper care, it will give you many years of dependable service. -
Page 5: General Safety Rules
General safety rules WARNING. To use this tool properly, you must observe the safety regulations, the assembly instructions and the operating instructions to be found in this Manual. All persons who use and service the machine have to be acquainted with this Manual and must be informed about its potential hazards. -
Page 6: Additional Safety Rules For Air Compressors
g. If devices are provided for the connection of dust extraction and collection facilities, ensure these are connected and properly used. Use of these devices can reduce dust related hazards. 4. Power tool use and care a. Do not force the power tool. Use the correct power tool for your application. - Page 7 • Always wear safety goggles or glasses when using the air compressor. Never point the nozzle of an accessory towards any part of your body or towards another person. • Do not attempt to adjust the pressure switch.
-
Page 8: Unpacking
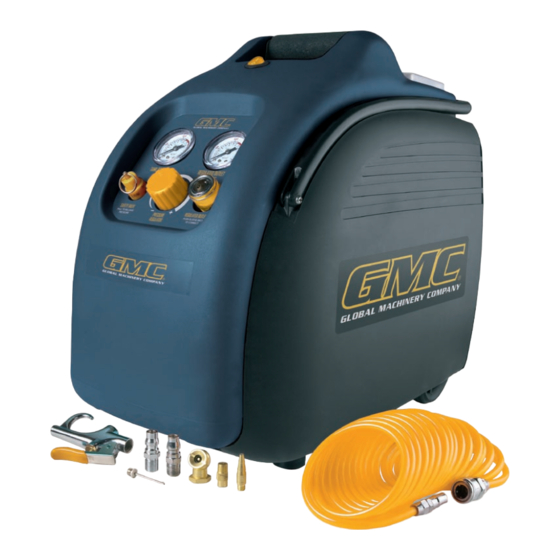
If you find anything wrong, do not operate the tool until the parts have been replaced or the fault has been rectified. Failure to do so could result in serious personal injury. Components The MOC6L air compressor is supplied with the following components: a. Air compressor b. Blow gun c. -
Page 9: Product View
Know your product 1. On/off switch 2. Handle 3. On board removable storage container 4. Fold away handle 5. Cooling air outlets 6. Wheels (X2) 7. Levelling feet (X2) 8. Quick connect regulated outlet valve 9. Regulating knob 10. Safety valve 11. -
Page 10: To Start The Air Compressor
5. Connect the air hose to the quick coupler located on the air compressor, by pushing back the outer sleeve of the quick coupler (Fig. A) and inserting the end of the hose. Release the outer sleeve and make sure the hose stays in place (Fig. -
Page 11: Stopping The Air Compressor
Assembly - Included Accessories Your air compressor accessory kit comes with a variety of accessories. Operating the quick change blow gun 1. -
Page 12: Connecting Tapered Inflation Fitting
3. Connect the completed assembly to the air line by pulling back the outer sleeve of the quick coupler at the end of the air hose and insert the quick change blower assembly. Once inserted, release the outer sleeve of the coupling and make sure the accessory and hose are securely connected. -
Page 13: Connecting The Tyre Inflator
Connecting the tyre inflator 1. To connect the tyre inflator, select one of the supplied 1/4” male Nitto style plugs/adaptors (21). Apply the supplied Teflon tape to the male thread on the 1/4” male Nitto style plug/ adaptor (21). Screw the 1/4” male Nitto style plug/adaptor (21) into the 1/4”... - Page 14 Problem Vibration or abnormal noise Insufficient pressure or decreased outlet capacity Troubleshooting continued Possible cause Loose part Foreign body in main compressor Piston connecting with the valve seat Moving parts excessively worn Motor running too slow Leaking safety valve Leaking pipe Damaged gasket Damaged or carbon coated valve seat Damaged piston ring or cylinder...
- Page 15 Problem Insufficient pressure or decreased outlet capacity continued Troubleshooting continued Possible cause The tool requires air supply outside the range of the compressors capabilities. Drain cock may not be fully closed. Safety valve fully leaking. Air line hose leaking Suggested remedy 1) Select another air tool that that will allow you to achieve the same end result which will operate within the...
-
Page 16: Troubleshooting
Problem Insufficient pressure or decreased outlet capacity continued Maintenance 1. After each day of operation, use the drain cock (13) under the tank to drain out any condensation (Fig. O). 2. After each day of operation check daily the operation of the safety valve (10). -
Page 17: Cleaning
Cleaning 1. Keep the tool’s air vents unclogged and clean at all times. 2. Remove dust and dirt regularly. Cleaning is best done with a soft brush or a rag. 3. Re-lubricate all moving parts at regular intervals. 4. If the body of the compressor needs cleaning, wipe it with a soft damp cloth. - Page 20 GMC customer assist If your product needs repairing, replacing, technical service or you simply need help or advice, please contact us on our Customer Assist Line 1300 880 001 (Australia) or 0800 445 721 (New Zealand). For prompt service we suggest you log your service request online at www.gmcservice.com.au.
Need help?
Do you have a question about the MOC6L and is the answer not in the manual?
Questions and answers