Table of Contents
Advertisement
Quick Links
Advertisement
Table of Contents

Summary of Contents for Arturia SPARK
- Page 1 USER’S MANUAL...
- Page 2 Information contained in this manual is subject to change without notice and does not represent a commitment on the part of ARTURIA. The hardware unit and the software product described in this manual are provided under the terms of a license agreement or non-disclosure agreement. The license agreement specifies the terms and conditions for its lawful use.
- Page 3 Sean Weitzmann, Gérard Buracchini, Cedric Pallier, Elodie Cao, Denis Frouin, Philippe Girard-Buttoz, Yannick Bonnefoy, Peter Gelhaus (acoustic drum kit photo), Kevin Lamb, Patrick Kunz, Frank Orlich, Miguel Silva, Houston Haynes, Cristian Kreindler, Paul Steinway SOUND SAMPLES ARTURIA – SPARK CREATIVE DRUM MACHINE – USER’S MANUAL...
- Page 4 By registering, you identify yourself as the legitimate owner and thus will be sure to receive the latest news and updates for your instrument. The Serial Number and Unlock Code are required to register & authorize Spark, so these codes are the real value of your product.
- Page 5 SPECIFICATIONS SUBJECT TO CHANGE: The information contained in this manual is believed to be correct at the time of printing. However, Arturia reserves the right to change or modify any of the specifications without notice or obligation to update existing units.
- Page 6 Do not expose the instrument to hot sunlight. • Do not use the instrument when there is a gas leak nearby. • Arturia is not responsible for any damage or data loss caused by improper • operations to the instrument. HANDLING CD-ROMS: Avoid touching or scratching the shiny underside (encoded surface) of the disc.
-
Page 7: Table Of Contents
The Tempo Button ............................37 5.2.2.6 The Accent Button ............................37 5.2.2.7 The Erase Button.............................. 37 5.2.2.8 The Loop zone..............................38 5.2.3 The Song/Pattern zone.......................... 38 5.2.3.1 The Song Mode ..............................38 ARTURIA – SPARK CREATIVE DRUM MACHINE – USER’S MANUAL... - Page 8 How to move and paste/insert slots......................... 66 5.4.7.3 How to set song playing position ........................66 5.4.7.4 How to select several slots..........................66 5.4.8 Preferences Button..........................66 5.4.8.1 Sequencer preferences ............................. 66 5.4.8.2 File preferences ..............................67 ARTURIA – SPARK CREATIVE DRUM MACHINE – USER’S MANUAL...
- Page 9 6.4.1 Installation............................. 73 6.4.2 Use in Logic Pro ........................... 74 If an Arturia plug-in poses problem in Logic, start by checking that this plug-in has passed the compatibility test, and that it is actually selected............................74 6.4.2.1 Stereo Mode..............................74 6.4.2.2...
- Page 10 Assign a MIDI CC to tempo knob ...................... 89 SPARK CREATIVE DRUM MACHINE LEGAL INFORMATION............90 ......................... 90 OFTWARE LICENSE AGREEMENT FCC INFORMATION (USA) ........................92 CANADA..............................93 EUROPE ............................... 93 NOTES:................................94 ARTURIA – SPARK CREATIVE DRUM MACHINE – USER’S MANUAL...
-
Page 11: Introduction
Combining the power of analog synthesis, physical modeling and samples, through the intuitive workflow of a hardware drum machine, Spark is a highly creative beat production center. Spark will save you time when looking for the right drum kit and will get you hooked by its amazing ease-of-use and sound possibilities. - Page 12 At the Winter NAMM Show 2006, ARTURIA announced the release of its seventh product: the Prophet V. This powerful hybrid gives you two instruments in one: it combines the warmth of the legendary Prophet 5 programmable analog synth with the unique Vector Synthesis textures of the digital Prophet VS.
-
Page 13: Installation
To use the default path, just click Next. If you wish to select a custom path for a SPARK component, click Change, browse to the folder where you want to install the application or sound library. - Page 14 Click next. • After processing, Composite Device will be installed correctly. • Installation should continue with USB Audio Device install. • Choose “No, not this time”, and click next. • ARTURIA – SPARK CREATIVE DRUM MACHINE – USER’S MANUAL...
- Page 15 Choose “Install from a list or specific location”, and click next • Choose “Don’t search, I will choose the driver to install”. • Click Next. • ARTURIA – SPARK CREATIVE DRUM MACHINE – USER’S MANUAL...
- Page 16 Click “Have Disk” • Click Browse, and locate Spark_XP.inf on Spark install DVD : • [YourDVDdrive]:\Driver\Spark_XP.inf Choose “Spark Controller”, and click Next • ARTURIA – SPARK CREATIVE DRUM MACHINE – USER’S MANUAL...
-
Page 17: Mac Osx Installation (10.5/10.6)
Select the hard disk onto which you would like to install SPARK. Please note • that you can only install SPARK onto hard disks which contain a Mac OS® X version matching the system requirements. Hard disks with an incompatible Mac OS®... -
Page 18: Registration & Authorization
Connect your computer to the Internet, and go to this web page: http://www.arturia.com/login If you don’t have an Arturia account yet, please create one now. This will take you to this form: If you already have an account, simply log in:... - Page 19 Go to the “My Registered Products” section of your account and click on the “Add” button: In the form that appears, select “SPARK Software” from the drop down menu, and key in your software serial number and unlock code (as written on the registration card), and...
-
Page 20: Authorization
Copy the activation code and paste it in the window that shows when you launch SPARK: If your activation code has been entered correctly, the software will launch. ARTURIA – SPARK CREATIVE DRUM MACHINE – USER’S MANUAL... -
Page 21: Quick Start
FX live Pad Instruments control zone Connect the SPARK Controller using the USB cable. If you want to connect the Controller to a USB-hub instead, make sure the hub has its own power supply. SPARK's Controller will not work on a passive (bus-powered) USB hub. -
Page 22: The Center Panel
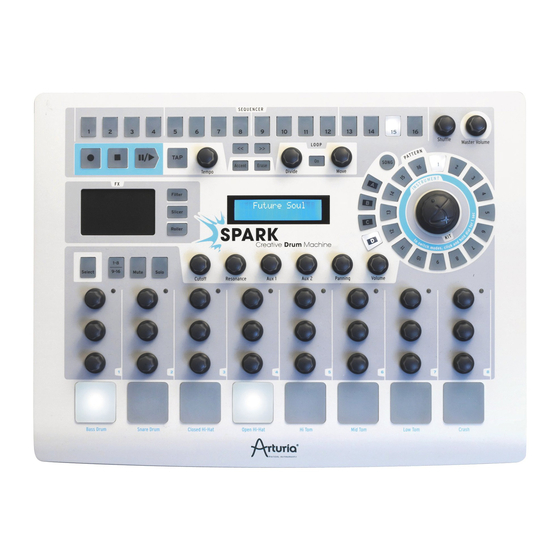
Spark's user interface is divided in three main panels called: "TOP", "CENTER" and "BOTTOM". 4.2.1 The Center panel When launching SPARK, the CENTER PANEL will appear by default. Digital Display Sequencer zone Song/Pattern zone Jog dial FX live Pad Instruments control zone 4.2.2 The Bottom panel... -
Page 23: The Top Panel
Display Instruments 1 to 8 Display Instruments 9 to 16 Display all Instruments Mixer button Library button 4.2.3 The Top panel The Top panel features the Pattern, the Song and the Library interface. ARTURIA – SPARK CREATIVE DRUM MACHINE – USER’S MANUAL... -
Page 24: Names And Concepts You Should Know
Preferences N A MES A N D C O N CEPTS Y O U S H OUL D K N OW This chapter will introduce you to SPARK's terminology and explain how these different elements relate to one another. 4.3.1 Project A Project contains all data needed for a Song: a 16 instrument kit and up to 64 Patterns with their settings, automations and FX. -
Page 25: Audio Source
AU DI O A N D M I DI S ETU P 4.4.1 Windows To access the preferences window, click on the SPARK menu > Setup > Audio & MIDI Settings. This window allows you to configure the global preferences of SPARK. These are saved automatically. -
Page 26: First Steps With Spark
#1 in Bank A. To listen to a different pattern, just click on another pattern number. You 1 When reading "Click" for the software version of SPARK, replace by "Press" for the Hardware version or refer to chapter 7 of this manual: THE SPARK MIDI CONTROLLER. -
Page 27: Change Instrument Parameters
The Digital display window in the center of the main panel shows you in real time the changes applied to the selected parameter. ARTURIA – SPARK CREATIVE DRUM MACHINE – USER’S MANUAL... -
Page 28: Play And Edit A Pattern
First, click on the "ERASE" BUTTON, right above the digital display window and then go to the Song/Pattern zone and click on the currently selected pattern – it should be Pattern #1 of BANK A: ARTURIA – SPARK CREATIVE DRUM MACHINE – USER’S MANUAL... -
Page 29: Change Instruments/Kits With The Jog Dial
The name of the instrument will be displayed in the Digital display window in the center of the main panel. Once your choice is made, click on the Jog Dial to load the new instrument. ARTURIA – SPARK CREATIVE DRUM MACHINE – USER’S MANUAL... -
Page 30: Save Your Project
The name you gave to your project is now showing in the display window next to the button save. 4.5.9 Switching views SPARK's interface is made up of 3 main panels. The "TOP" panel, the "CENTER" panel, and the "BOTTOM" panel. Up until now, you have only been introduced to the main or "CENTER" panel. -
Page 31: Using Spark
Open or center "CENTER" panel in the main window Open or center "BOTTOM" panel in the main window Connect Hardware CPU Meter Main volume meter Clipping indicator Set Soft clip on/off ARTURIA – SPARK CREATIVE DRUM MACHINE – USER’S MANUAL... -
Page 32: The Main Panel (Overview )
(Right click: edit motion/disable motion) Click zone to select instrument track 2 When reading "Click" for the software version of SPARK, replace by "Press" for the Hardware version or refer to chapter 8 of this manual: THE SPARK MIDI CONTROLLER. - Page 33 Roller Button (Right click: Always on/only on touch) Jog Dial (Right click: Instrument mode/Kit mode) Bank select Buttons (A-B-C-D) Pattern select Buttons (1 to 16) Instrument select Button Kit select button Song select Button ARTURIA – SPARK CREATIVE DRUM MACHINE – USER’S MANUAL...
- Page 34 Loop On/Off Button Move loop locator knob (Right click: Shift by one step/Shift by one loop size) Sequencer Steps: ON/OFF pads Shuffle knob (Right click: Swing range / velocity mode) Master volume knob ARTURIA – SPARK CREATIVE DRUM MACHINE – USER’S MANUAL...
-
Page 35: The Digital Display
5.2.1 The Digital display The digital display is of an invaluable help. It displays all the information needed while using SPARK. (i.e. Project name, precise changes applied when using Volume knob, FX knobs, etc.) 5.2.2 The Sequencer zone The Sequencer zone is divided into several zones: 5.2.2.1 The Step Pads... -
Page 36: The Shuffle Knob
In Quantize mode; the recorded notes will be set exactly to the nearest step position. When quantize mode is disabled, the recorded notes will keep the exact position they were played on. Spark uses the Shift parameter (see Chapter 5.4.5) to remember the exact triggering time relative to a step position. -
Page 37: The Tap Button
It is a beat/minute counter, so you have to tap the beats. 5.2.2.5 The Tempo Button The Tempo button allows you to set the tempo for your pattern when SPARK is not externally synced to a host. -
Page 38: The Loop Zone
Song mode. Click on the Play button in the transport zone. Listen! Your patterns are now chained together and played one after another from pattern to pattern and Bank to Bank. ARTURIA – SPARK CREATIVE DRUM MACHINE – USER’S MANUAL... -
Page 39: Editing Songs From The Main Panel
To copy a pattern, drag and Drop a pattern number while holding [Option/Alt] on Mac OSX or [Ctrl] on Windows and drop it on another pattern number. A pop-up menu will ask you to confirm your choice. Click Ok. ARTURIA – SPARK CREATIVE DRUM MACHINE – USER’S MANUAL... -
Page 40: The Jog Dial
Kit Mode”, or else between Instruments and Projects using the “Switch from Instruments to Projects Mode”. By default Spark is set to “Switch from Instrument to Kit Mode”. To load a kit (or Project, depending on preference settings), click on "Kit" under the Jog Dial. -
Page 41: The Fx Live Pad
5.2.6.2 The Slicer button The Slicer will repeat the value of the note selected while applying an effect. You can choose between the following effects: ARTURIA – SPARK CREATIVE DRUM MACHINE – USER’S MANUAL... -
Page 42: Repeat Mix
Choose the note value for the Roller effect. Then, click and maintain your click on the snare drum pad. The snare drum will play a basic drum roll. The roll speed depends on the selected note value. ARTURIA – SPARK CREATIVE DRUM MACHINE – USER’S MANUAL... -
Page 43: The Instrument Control Zone
The instrument control zone is made up of: 5.2.7.1 The instrument Pads There are 16 instrument Pads but only 8 of them are shown on SPARK's interface. To navigate to the next set of 8, click on the 1-8/9-16 button. -
Page 44: Select Button
The Select button allows you to easily select an instrument. Just click on [Select] and then on the instrument pad of your choice to specifically select the corresponding instrument. This function was designed to quickly select an instrument when using the Spark controller. 5.2.7.4 1-8 / 9-16 Button The main panel interface shows 8 instrument pads while a kit contains 16 instruments. -
Page 45: The Bottom Panel (Overview )
No background • Classic drums • Electronic drums • Physical drums • Electro box • 5.3.1 The Studio The studio panel displays all your instruments as well as their parameters. ARTURIA – SPARK CREATIVE DRUM MACHINE – USER’S MANUAL... - Page 46 Load a new instrument To load a new instrument, click on the down arrow. A drop-down menu will appear listing all the instruments available in Spark. They are organized by type (16) from Bass Drum to Synth, and each type has 3 categories (Analog, Physical Model or Sample).
-
Page 47: Instrument Edit Window
Change filter type on instrument. Cutoff filter knob. Resonance filter knob. Sample layer display for each layer - Numbered 1 to (For Sample type instruments only) Load new sample. Set reverse mode on sample. ARTURIA – SPARK CREATIVE DRUM MACHINE – USER’S MANUAL... -
Page 48: Studio Buttons
Display all instruments / Hide Instrument view Click on the 1-8 button to display the first eight Instruments. If you want to see all of your instruments displayed at once, click on "All". ARTURIA – SPARK CREATIVE DRUM MACHINE – USER’S MANUAL... -
Page 49: The Mixer
Return1 – Return 2 and finally the Master track. Let's take a close look at the Mixer. 5.3.2.1 The Instrument tracks 6 Not available in the Hardware version of SPARK. ARTURIA – SPARK CREATIVE DRUM MACHINE – USER’S MANUAL... -
Page 50: The Return 1 And 2 Tracks
Assign an output for instrument 1 (available when Spark is inserted into a host sequencer with Multi-output Mode. See chapter 6.2 Plug-in mode for more details). Set Aux1 amount for instrument/Channel 1 Set Aux1 amount for instrument/Channel 1 Set Pan for instrument/Channel 1... -
Page 51: The Master Track
To select an effect, click on [SELECT EFFECT]. Choose one from the list, for example Compressor. The compressor window appears. You can now set the parameters for the Compressor FX. FX parameters ARTURIA – SPARK CREATIVE DRUM MACHINE – USER’S MANUAL... -
Page 52: Compressor Parameters
(Threshold), it is reduced by a specified amount (Ratio). Attack and Release determine how quickly the reduction is added and how quickly it disappears. Makeup boosts the compressed signal’s level. ARTURIA – SPARK CREATIVE DRUM MACHINE – USER’S MANUAL... -
Page 53: Bit Crusher Parameters
LFO. Delay is the delay time and feedback is the amount of delayed signal added back to the dry signal. Both of these parameters emphasize the effect when increased. Spread refers to the width of the sound in the stereo field. ARTURIA – SPARK CREATIVE DRUM MACHINE – USER’S MANUAL... -
Page 54: Delay Parameters
(for an increased stereo effect), and dampening reduces high frequencies by adding a Lowpass filter to the feedback chain. Distortion parameters Change Distortion type Change Drive amount Change Output gain ARTURIA – SPARK CREATIVE DRUM MACHINE – USER’S MANUAL... -
Page 55: Parametric Eq Parameters
GAIN allows one to remove or add volume to that band. Width (MID only) determines the width of the middle band around the specified FREQ. Phaser parameters Change Tempo sync on/off Change Rate on stage 1 and/or stage 2 ARTURIA – SPARK CREATIVE DRUM MACHINE – USER’S MANUAL... -
Page 56: Plate Reverb Parameters
Stereo refers to the width of the stereo field of the reverb. Dampening sets how much the reverb should be filtered using the Lo and Hi Cut filter settings. ARTURIA – SPARK CREATIVE DRUM MACHINE – USER’S MANUAL... -
Page 57: Reverb Parameters
Delay) adds a small delay to the reverb to emulate early reflections. 5.3.3 The Library Click on "Library" to display the Library panel. The library is divided into 2 main windows: the library window and the current project window. ARTURIA – SPARK CREATIVE DRUM MACHINE – USER’S MANUAL... -
Page 58: The Library Window
Load a kit from the Library to the current project Load an instrument from the Library to the corresponding selected instrument in the Current project Enter "Edit current project" mode Select a project in the coverflow. ARTURIA – SPARK CREATIVE DRUM MACHINE – USER’S MANUAL... -
Page 59: The Current Project Window
5.3.3.2 The Current Project window Import a MIDI file or a REX file in current pattern Export current project as .ads file (SPARK) or export current pattern as MIDI or AUDIO file Save current project Save current project to new project Exit current project edit mode (takes you back to the “Coverflow”... -
Page 60: How To Load Kits And Instruments
Pattern, a single MIDI or WAV file will appear. If you dragged a bank, 16 separate MIDI/WAV files (corresponding to the 16 patterns of the Bank) will be created. You can personalize the cover image of your project: ARTURIA – SPARK CREATIVE DRUM MACHINE – USER’S MANUAL... -
Page 61: Saving A Project
At the bottom of the panel you will find the Pattern Panel button, the Song panel button as well as the Preferences button. 5.4.2 The Pattern Panel The Pattern panel features SPARK's sequencer. It is both a composing tool as well as a powerful editing tool. ARTURIA – SPARK CREATIVE DRUM MACHINE – USER’S MANUAL... -
Page 62: The Toolbar
Click to change the total number of steps in the current pattern. The number of steps is automatically calculated by Spark using the step resolution, the number of bars in the pattern, and the time signature. But you can adjust it if you want to work with your own bar calculation. -
Page 63: The Sequencer
Click to open or close the Automation editor for one track in the current pattern. 5.4.4.1 How to select a track To select a track, move your cursor over the track. When the track lights up, click to select. ARTURIA – SPARK CREATIVE DRUM MACHINE – USER’S MANUAL... -
Page 64: How To Copy Or Swap Tracks
Disable/Enable all automations in the current pattern. Disable/Enable one single automation in the current pattern. Click to trigger drop down menu of parameters on to which automations may be applied. ARTURIA – SPARK CREATIVE DRUM MACHINE – USER’S MANUAL... -
Page 65: The Song Panel
Click and drag a pattern from one bank into a song slot. Select song slot and click "copy" button [C] to copy into SPARK clipboard. Click on destination slot then click on paste [P]. If you have copied 3 slots, the 3 slots located at your paste location will be replaced. -
Page 66: How To Move And Paste/Insert Slots
Quantize record: When set to "Yes", all pads playing as well as any recordings will be quantized. Auto-start song: When on, clicking on the Song button in the center panel will open the song panel and start playing the song automatically. ARTURIA – SPARK CREATIVE DRUM MACHINE – USER’S MANUAL... -
Page 67: File Preferences
5.4.8.2 File preferences Save a copy of Audio samples in Library: When importing .wav/.aiff files to Spark, the source file will be copied in the library. You have the choice between: Always: always copy files in the library •... -
Page 68: Modes Of Operations
6.1.2 Preferences configuration – Audio & MIDI settings 6.1.2.1 Windows To access the preferences window click on the SPARK menu > Setup > Audio & MIDI Settings. This window allows you to configure the global preferences of SPARK. These are saved automatically. -
Page 69: Update Spark Controller
Use this command to update your controller when Spark warns you. 6.1.3.1 Windows To access the preferences window click on the SPARK menu > Setup > Audio & MIDI Settings. This window allows you to configure the global preferences of SPARK. These are saved automatically. -
Page 70: Mac Os X
6.1.3.2 Mac OS X To access the preferences window click on the SPARK menu > Preferences. The Audio settings window will appear. This window allows you to set the global preferences of SPARK. These are saved automatically. (Windows) Selects the appropriate driver for your audio device. -
Page 71: Plug - In Mode
- Spark controller will not behave correctly on OSX. You can use Spark as plugin in stereo or Multi Output Mode. The host will show one stereo output from Spark when used in Stereo Mode. When used in Multi output mode the host will show 16 stereo channels available. -
Page 72: Vst
The VST plug-in will be usable by all your VST host applications. 6.3.2 Instrument use in VST mode The opening of VST SPARK plug-ins is the same as opening all other VST plug-ins. Please consult the instruction manual of your favorite host sequencer for more specific information. -
Page 73: Multi Output Mode
SPARK. 6.3.4 Multi Output Mode Create an instrument using the VST Instrument Menu then click on Spark; then select the output you want to enable by clicking on the button just on the left of the instrument name in this menu. -
Page 74: Use In Logic Pro
6.4.2.1 Stereo Mode Select an Instrument track. On the mixer portion of the corresponding track, click on the button “I/O” to obtain the list of plug-ins, then select AU Instruments > Arturia > Spark > Stereo. 6.4.2.2 Multi Output Mode To use the separate outputs: Select an Instrument track. -
Page 75: Use In Digital Performer
Then go to the mixer view and click on the “+” button at the bottom of the instrument track to add Aux tracks. You can choose the output number of each instrument in Spark in the Mixer View. (see chapter 5.3.2.1. -
Page 76: Multi Ouput Mode
To use separate outputs: select an Instrument track. Then on the portion of the mixer corresponding to the selected track, click on the button “I/O” to obtain the list of plug- ins, then select AU Instruments > Arturia > SPARK > Multi Output (16xStereo). ARTURIA – SPARK CREATIVE DRUM MACHINE – USER’S MANUAL... -
Page 77: Pro Tools
More information on plug-in connections can be found in the Pro Tools User’s Manual. 6.5.3 Saving the project When the session is saved, the status of SPARK is saved as it is, even if its programming does not correspond to the preset. For example, you are working on a project in which you have modified the parameters (without saving them in the plug-in itself), the next time you open the session SPARK will load the project plus the modifications. -
Page 78: Automations Under Pro Tools
6.5.4 Automations under Pro Tools The automation in SPARK works as with all RTAS/HTDM plug-ins. Please refer to the Pro Tools documentation for more details on automation plug-ins. ARTURIA – SPARK CREATIVE DRUM MACHINE – USER’S MANUAL... -
Page 79: The Spark Midi Controller
Sequencer zone Song/Pattern zone Jog dial FX live Pad Instrument control zone 7.1.1 Device ports The Spark controller is listed by a host as being made up of 2 MIDI ports: ARTURIA – SPARK CREATIVE DRUM MACHINE – USER’S MANUAL... -
Page 80: Choose Between Kit Or Instrument Mode
To set Sequencer Follow mode on or off, press << and >> buttons together. 7.1.5 Roller Fx When using the Roller effect in the software version of SPARK, the Roll effect can be applied only to one instrument at a time, for the obvious reason that you are using your mouse to play the instrument. -
Page 81: Use As Spark Controller
Connect to USB 2.0 host. Avoid using a non-powered USB-Hub. The device is self- powered by USB. If you don't need or want to power your Spark Hardware controller via USB, use the DC jack input with the following power supply unit:... -
Page 82: Spark Midi Controller Software
Spark Midi Controller Software needs Spark Controller to be in Midi Controller mode to be able to connect to. Press [Filter] + [Slicer] +[Roller] to use Spark as Midi Controller. If Spark Controller is set to Midi Controller mode before opening Spark Midi Controller Software, Spark Midi Controller Software will connect to it automatically at launch. -
Page 83: The Menu
Template Files using the File > Save command. In order for a template to be active on Spark controller you need to send your template to Spark controller with 'Action > Send to Spark Controller' command. Only one template can be active on Spark controller at a time. -
Page 84: Pads Calibration
You can calibrate the hit intensity at which the maximum velocity will be reached on the Pads of your Spark controller. Use 'Action>Calibrate Pads' command to start the calibration process. You will be asked to hit each pad 3 times. -
Page 85: Edit Instrument Knob Window
(0 to 127 (should be > min val)) Choose Knob MIDI Message Acceleration (Choice between None, Slow and Fast - not available for encoder with detent: Encoders with detent are Move, Jog Dial, Loop) ARTURIA – SPARK CREATIVE DRUM MACHINE – USER’S MANUAL... -
Page 86: Edit Instrument Parameter Knob Window
(Choice between None, Slow and Fast - not available for encoder with detent: Encoders with detent are Move, Jog Dial, Loop) 7.3.6 Edit Clickable knob window You will find only 2 clickable buttons on SPARK's Hardware: 7.3.6.1 The Jog Dial (Wheel) Choose MIDI Message Type (Choice between CC, Note, Start, Stop, Continue, Program Change, Channel Pressure, Aftertouch and Off). -
Page 87: The Move Button (Loop Move)
Choose Touch Pad MIDI Message Number (0 to 127) Choose Touch Pad MIDI Message Channel Choose Touch Pad MIDI Message X or Y Minimum Value 0 to 127 (should be < maximum value) ARTURIA – SPARK CREATIVE DRUM MACHINE – USER’S MANUAL... -
Page 88: Controlling Spark An External Midi Controller
Same as previous on corresponding knob. 7.4.9 Assign a MIDI CC to cutoff/res/Pan/Aux1/Aux2/Volume knobs Same as previous on corresponding knob. 7.4.10 Assign a MIDI CC to instrument parameters knobs Same as previous on corresponding knob. ARTURIA – SPARK CREATIVE DRUM MACHINE – USER’S MANUAL... -
Page 89: Assign A Midi Cc To Tempo Knob
7.4.11 Assign a MIDI CC to tempo knob Same as previous on corresponding knob. ARTURIA – SPARK CREATIVE DRUM MACHINE – USER’S MANUAL... -
Page 90: Spark Creative Drum Machine Legal Information
The License is not a sale of the original SOFTWARE. 2. Grant of License Arturia grants you a non-exclusive license for the use of the software according to the terms and conditions of this Agreement. You may not lease, loan or sub-license the software. - Page 91 8. Limited Warranty Arturia warrants that the disks on which the software is furnished is free from defects in materials and workmanship under normal use for a period of thirty (30) days from the date of purchase.
-
Page 92: Fcc Information (Usa)
(b) replacement of the disk that does not meet the Limited Warranty and which is returned to Arturia with a copy of your receipt. This limited Warranty is void if failure of the software has resulted from accident, abuse, modification, or misapplication. -
Page 93: Canada
EU RO PE This product complies with the requirements of European Directive89/336/EEC. This product may not work correctly by the influence of electro-static discharge; if it happens, simply restart the product. ARTURIA – SPARK CREATIVE DRUM MACHINE – USER’S MANUAL... -
Page 94: Notes
NOTES: ARTURIA – SPARK CREATIVE DRUM MACHINE – USER’S MANUAL...
Need help?
Do you have a question about the SPARK and is the answer not in the manual?
Questions and answers