Olympus E-PL1 User Manual
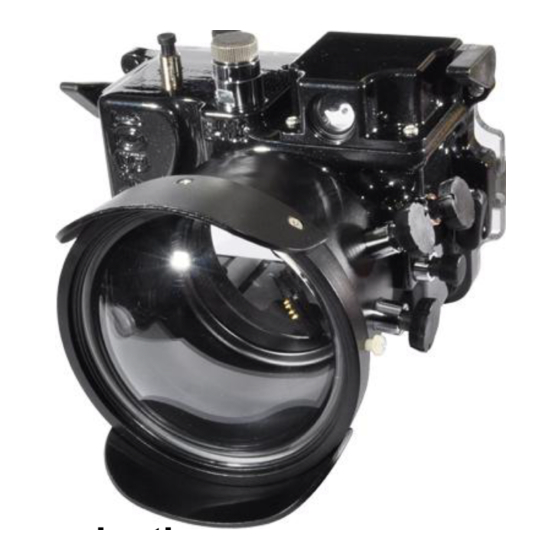
Camera underwater housing
Hide thumbs
Also See for E-PL1:
- Manual de instruções (128 pages) ,
- Instruction manual (124 pages) ,
- Manual de instrucciones (124 pages)
Advertisement
Camera Underwater Housing - E-PL1 (Olympus)
User Manual
1. Introduction
Made of 6061 aluminum, 10Bar Housing is a sturdy choice for the Olympus E-PL1 camera. For
those who favour small cameras, it is the ideal housing, equipped with full-function control buttons,
flash window for lighting and external flash synchronization and interchangeable ports for various
Micro Four Third and conversion lens to suit their needs. The acrylic back cover allows taking
pictures and checking on the camera much easier. For closure, the double o-rings and key-hole
lock design provide ease of use and added security. Now you can use small cameras with the feel
and function of professional housings.
2. Specifications
Test Pressure
Closure Design
Body Material
Overall Size
Total Weight
Buoyancy (with camera) Slightly negative in salt water
Accessories
Housings individually tested to 10 Bar (90 m / 300 ft.) Recommended
working pressure 60 m
Double O-rings, Key-hole Lock
6061 Aluminum, Acrylic
185 x 171 x 146mm (L x W x H)
Approximately 1.5kg (Housing with ZOOM port only)
Spare main O-rings ( included)
Silicone O-ring grease ( included)
Carrying bag ( included)
Red/Magenta filter (optional)
Macro and Wide Angle conversion lens (optional)
Contents:
1. Introduction
2. Specifications
1
Advertisement
Table of Contents

Related Manuals for Olympus E-PL1


Summary of Contents for Olympus E-PL1
-
Page 1: Table Of Contents
7. Warranty 1. Introduction Made of 6061 aluminum, 10Bar Housing is a sturdy choice for the Olympus E-PL1 camera. For those who favour small cameras, it is the ideal housing, equipped with full-function control buttons, flash window for lighting and external flash synchronization and interchangeable ports for various Micro Four Third and conversion lens to suit their needs. -
Page 2: Function Controls
3. Function Controls 3.1 Buttons & Parts Flash off Mode Dial Shutter button On / Off Strap eyelet Key hole lock Flash Switch Face button / View multiple Zoom (10) Movie (11) Playback (12) Menu (13) Info (14) Delete (15) Controlling exposure (16) AF target (17) Start / OK (18) Flash... -
Page 3: Set Up Instructions
3.2 Control Details (1) Flash off – press the lever down to turn off the flash. Make sure that the Flash is turned off before remove the camera from the housing. (2) Mode dial – switch the mode by press and rotating the button. (3) Shutter button –... - Page 4 The O-ring seal is the main barrier between the water outside and the air space within the camera. It is an effective barrier only if the seal is properly maintained. The O-ring seal should be inspected before every dive. The following information is provided for guidance in using and maintaining the O-ring seal.
- Page 5 applicator. l Inspect the O-ring all the way round its surface for damage such as cuts tears or contamination. This should be done visually and also by feeling the surface texture between finger and thumb. IF THE O-RING IS DAMAGED OR SUSPECTED OF BEING DAMAGED, DISCARD IT and replace with new one immediately.
- Page 6 lens properly before mounting the lens to the camera. For 14-42mm Lens the Zoom Gear Ring should be installed first to cover up 1/3 of the zoom ring on the lens. Then the Focus Gear Ring follows and should be installed to cover the focus ring on the lens as illustrated on the above photo.
-
Page 7: Use & Care Of Housing
After replacing and locking the lid, make a final visual inspection of the main O-ring for contamination. Note: If the O-ring is in good contact, a thin black line, about 0.5 to 1mm in width should be visible, where the O-ring is in contact with the lid. Follow this line all the way round the edge of the seal, as a final check that the seal is good. -
Page 8: Service
Wear the wrist strap; it is easy to inadvertently let go of the housing, especially if you are distracted. 5.3 Cleaning & Storage. The body & lid of the housing are made of 6061 Aluminum and Acrylic respectively. 6061 Aluminum is selected for its outstanding strength stiffness, hardness and toughness and epoxy paint is applied to provide extra protection, While Acrylic for its crystal clear transparency and high gloss surface. -
Page 9: Warranty
7. Warranty The warranty is valid within two years from the date of first purchase. The warranty applies only to the housing itself. 10BAR does not accept any liability either implicit or otherwise for any equipment housed inside, or used together with the housing. In the event of the housing flooding within the period of warranty, 10BAR will repair or replace the housing.
Need help?
Do you have a question about the E-PL1 and is the answer not in the manual?
Questions and answers