Advertisement
Quick Links
.YAMAHA
SPM-K1
WALL MOUNT BRACKET
SUPPORT MURAL
-tt?:/
~:1DYI?$'-~~i~(j~~ ~
Installation Manual
Manuel d'installation
Installationsanleitung
Instllationsanvisningar
Manuale d'installazione
Manual de instalacion
Installatiehandleiding
~f1IDtB~~
.YAMAHA
SPM-K1
WALL MOUNT BRACKET
SUPPORT MURAL
-tt?:/
~:1DYI?$'-~~i~(j~~ ~
Installation Manual
Manuel d'installation
Installationsanleitung
Instllationsanvisningar
Manuale d'installazione
Manual de instalacion
Installatiehandleiding
~f1IDtB~~
Advertisement

Related Manuals for Yamaha SPM-K1 - Mounting Kit For Speaker


Summary of Contents for Yamaha SPM-K1 - Mounting Kit For Speaker
- Page 1 .YAMAHA .YAMAHA SPM-K1 SPM-K1 WALL MOUNT BRACKET WALL MOUNT BRACKET SUPPORT MURAL SUPPORT MURAL ~:1DYI?$'-~~i~(j~~ ~ ~:1DYI?$'-~~i~(j~~ ~ -tt?:/ -tt?:/ Installation Manual Installation Manual Manuel d'installation Manuel d'installation Installationsanleitung Installationsanleitung Instllationsanvisningar Instllationsanvisningar Manuale d'installazione Manuale d'installazione Manual de instalacion Manual de instalacion...
- Page 2 DIMENSIONS DIMENSIONS DIMENSIONI DIMENSIONI DIMENSIONS DIMENSIONS DIMENSIONES DIMENSIONES ABMESSUNGEN ABMESSUNGEN AFMETINGEN AFMETINGEN §gBO)\t~i §gBO)\t~i MATTSKISSER MATTSKISSER 1.3kg 1.3kg 262.5 262.5 262.5 262.5 187.5 187.5 187.5 187.5 (mm) (mm) O.1kg O.1kg 1 25 1 25 1 1 0 1 1 0 ....
-
Page 3: Wall Mount Bracket
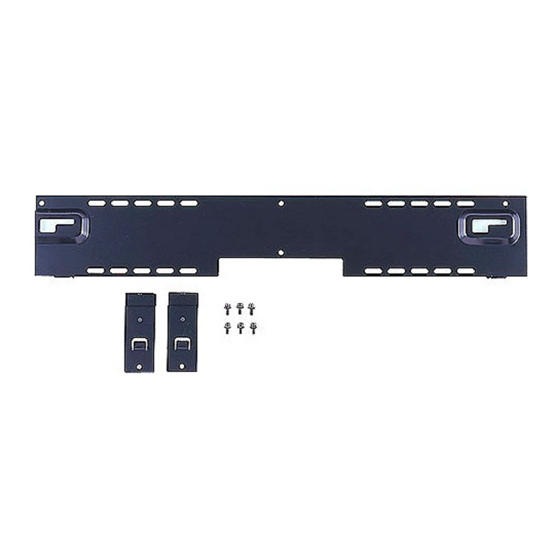
WALL MOUNT BRACKET WALL MOUNT BRACKET SPM-K1 SPM-K1 Installation Manual Installation Manual Thank you very much for purchasing the Wall Mount Bracket SPM-Kl. Be sure to read this manual thoroughly before Thank you very much for purchasing the Wall Mount Bracket SPM-Kl. Be sure to read this manual thoroughly before using this bracket. - Page 4 ACCESSORIES ACCESSORIES Check that all of the following parts are included. Check that all of the following parts are included. Large wall mount bracket (1) Large wall mount bracket (1) Small wall mount brackets (2) Small wall mount brackets (2) Projector mounting screws Projector mounting screws 16) (6)
-
Page 5: Installation Procedure
INSTALLATION PROCEDURE INSTALLATION PROCEDURE Make sure to leave adequate ventilation space around the unit and follow the instructions below. Make sure to leave adequate ventilation space around the unit and follow the instructions below. In order to secure the unit to the wall, you will need to attach the bracket to the wall first in a manner befitting the In order to secure the unit to the wall, you will need to attach the bracket to the wall first in a manner befitting the structure and quality of the wall. - Page 6 INSTALLATION PROCEDURE INSTALLATION PROCEDURE Use four of the projector mounting screws (M6 x 16) provided to securely attach the small wall mount brackets (2) to the Use four of the projector mounting screws (M6 x 16) provided to securely attach the small wall mount brackets (2) to the rear left and right sides of the Sound Projector.
- Page 7 INSTALLATION PROCEDURE INSTALLATION PROCEDURE Align the holes on the large wall mount bracket with the holes on the bottom of the small wall mount brackets, and then Align the holes on the large wall mount bracket with the holes on the bottom of the small wall mount brackets, and then use two of the projector mounting screws (M6 x 16) provided to secure the unit.
- Page 8 YAMAHA ELECTRONICS (UK) LTD. YAMAHA HOUSE, 200 RICKMANSWORTH ROAD WATFORD, HERTS WD18 7GQ, ENGLAND YAMAHA SCANDINAVIA A.B. J A WETTERGRENS GATA 1, BOX 30053, 400 43 VASTRA FROLUNDA, SWEDEN YAMAHA SCANDINAVIA A.B. J A WETTERGRENS GATA 1, BOX 30053, 400 43 VASTRA FROLUNDA, SWEDEN...