Table of Contents

Related Manuals for Primera Bravo se Disc Publisher


Summary of Contents for Primera Bravo se Disc Publisher
- Page 1 110209-510963 AUTOPRINTER Automated Optical Disc Automated Optical Disc Duplication & Printing System Duplication & Printing System © 2009 All rights reserved For the most recent version of this manual please visit http://www.primera.com/manuals.html...
- Page 2 Notices : The information in this document is subject to change without notice. NO WARRANTY OF ANY KIND IS MADE WITH REGARD TO THIS MATERIAL, INCLUDING, BUT NOT LIMITED TO, THE IMPLIED WARRANTIES OF MERCHANTABILITY AND FITNESS FOR A PARTICULAR PURPOSE.
-
Page 3: Table Of Contents
Table of Contents Section 1: Getting Started..................1 A. Note on Model Differences ..............1 B. Choosing a Good Location ..............2 C. Unpacking and Inspection...............2 D. Identifying the Parts .................3 E. PC System Requirements.................5 Mac System Requirements ..............5 G. Overview of Operation ................5 Section 2: Hardware and Software Set-Up ............7 A. - Page 4 Interactive Feature in this PDF Document There are interactive features that will allow you to jump to different locations within the document. Each listing in the Table of Contents is interactive. Place the cursor on either the words or the page number. A small hand with a pointing finger icon appears.
-
Page 5: Section 1: Getting Started
The Bravo SE comes in three different models which are: • Bravo SE AutoPrinter (No Drives) Print Only - See Section 3A, C and D. Bravo SE Disc Publisher (DVD Drive) Burns and Prints • CD, DVDs and DVD-DL. •... -
Page 6: Choosing A Good Location
INDEX These instructions are written to apply to all models. For exam- ple there are no special instructions for burning Blu-ray discs if you have a Blu-ray model. The software simply recognizes that you have Blu-ray capable drives and adds the media type to the list of available media to burn. -
Page 7: Identifying The Parts
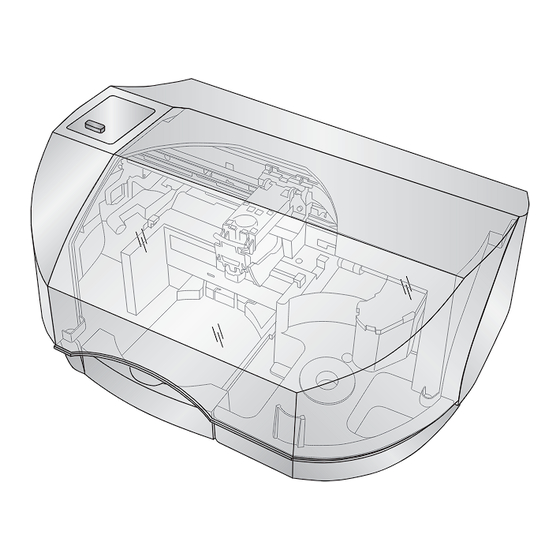
INDEX IDENTIFYING THE PARTS Front Panel and Top This illustration shows the Publisher and its components. Cover Power/Ink Ink Cartridge Button Carrier CD/DVD Recorder Drive Robotic Arm Recorder Tray Button Extendable Input Bin Output Bin The Robotic Disc Transporter moves discs from the Input Bin, to a CD/DVD Recorder, to the printer, and finally to the Output Bin. -
Page 8: Rear Panel
INDEX With the cover closed, the Power/Ink Button turns the Publisher's power OFF if pressed and held for five seconds. Press it quickly to turn power back on. When already powered on quickly pressing the power button will open and close the printer tray. -
Page 9: Pc System Requirements
INDEX PC SYSTEM REQUIREMENTS Before getting started, it is important for you to verify that your PC meets the minimum system requirements. • Celeron processor or better running Windows XP , Vista or 7. • 512 MB or greater RAM •... - Page 10 INDEX 3. The Recorder Tray opens automatically and the Robotic Disc Transporter places a disc into the recorder. After the disc is placed in the recorder, the Robotic Disc Transporter checks the input stack to "see" if two discs were picked. 4.
-
Page 11: Section 2: Hardware And Software Setup
INDEX Section 2: Hardware and Software Setup Setup This section will describe the step-by-step process of setting up your Publisher. This includes information on how to load the supplies (ink and disc media) necessary to start producing discs. A. INSTALLING THE PC SOFTWARE The Installer Disc has a menu that will guide you through the process of setting up your Publisher. -
Page 12: Hardware Setup
Due to the wide variety of printable-surface CD/DVD media, you may find that certain brands of discs provide higher print quality than others. For maximum print quality, use CD/DVD media authorized by Primera. Hardware and Software Setup... - Page 13 INDEX Refer to the following steps when loading discs in to the Publisher: Open the front cover of the Publisher • • The Publisher will automatically position the cartridge carrier and Robotic Disc Transporter to allow for easy access to the bin. •...
-
Page 14: Step 3: Connecting The Usb Cable
INDEX Step 3: Connecting the USB 2.0 Ca ble Connect the Publisher to your PC or Mac with your beige USB 2.0 Cable. If you are using a PC, after a few moments, Windows will tell you it has found new hardware and is looking for software to install it. - Page 15 INDEX Windows XP Message Windows Vista/7 Message If you are using a Mac: Connect the Publisher to your PC with your beige USB 2.0 Cable. The printer driver will automatically install. To verify the driver installed or reinstall go to the Mac System Preferences (Apple - System Preferences).
-
Page 16: Step 4: Installing The Ink Cartridge
INDEX The driver will appear as shown below. To manually add the driver click the + button. Step 4: Installing the Ink Car tridge • With the cover open, press the Power/Ink Button to move the Ink Cartridge Carrier to the load position. Open the cartridge cover by pressing down on the tab. -
Page 17: Step 5: Aligning The Cartridge
INDEX Insert the ink cartridge into the carrier, copper • end first and snap the cartridge cover in place. • Close the Publisher's front cover. Step 5: Aligning the Car tridge If you are using a PC the Installer will prompt you to align the cartridge. -
Page 18: Section 3: Creating Discs
INDEX Section 3: Creating Discs There are two main components to creating discs, printing and burning. For PC, SureThing CD Labler is used to design the image to print on the disc. For Mac, Disc Cover is used to design the image to print on disc. For Mac and PC, PTPublisher controls the recording and allows you to select the image to be printed to your discs. - Page 19 INDEX 1. Select Copy Project from the Starter Window or the Project Panel on the left side of the screen. Step one of the Copy Disc wizard will be displayed. 2. You will be prompted to place the disc you would like to copy into the drive inside the Disc Publisher.
- Page 20 It also has a different printable surface. For Primera TuffCoat branded discs simply choose your media from the drop down list, the settings will be adjusted accordingly.
-
Page 21: Using Ptpublisher
INDEX Print Quality. All Primera media is automatically defaulted to the best print quality. Other media may also accept the best quality setting. However, with some media you may have to print at a lower print quality to eliminate smudging and bleeding. Some lower quality media can not hold all of the ink that is printed at the highest quality settings. - Page 22 INDEX Recommended for: All CD, DVD or Blu-ray content or disc types (Audio CD, Data CD, Software Install Disc, Video CD, DVD Video, Blu-ray Video: CDR, DVD-R, DVD+R, DVD-ROM, DVD+DL, DVD-DL, BDR, BDR-DL, etc.). This is best used for single runs where you will not need to make additional copies of the master disc a later time.
-
Page 23: B2. Steps To Any Project
INDEX Recommend for: This method is especially useful if you are having compatibility problems with the formatting created by the DVD/Blu-ray authoring software or with the media type of the master disc. This method removes some potentially compli- cating variables from the DVD/Blu-ray Video creation process. This method eliminates the need for a master disc. -
Page 24: Step 2: Add Print
INDEX On most job types a volume label can also be created at this step. This is the label that will appear when this disc is inserted into a computer drive. When you have selected the data you would like to burn click the next button. -
Page 25: Step 3: Start Project (Summary - Settings)
INDEX • Outer Margin. Disc from other manufacturers vary widely regarding how far the printable surface extends to the edge of the disc. Measure the distance from the edge of the disc to the start of the white printable area. This will be between 0 and 2 mm in increments of .1mm. - Page 26 INDEX • Change Robot. This is only available with multiple robots connected. Click it to change the robot to which this project will be sent. • Drives. With an Xi2 connected you can choose to burn to both drives or the top or bottom drive only. •...
- Page 27 INDEX • Recording Type. Track-at-Once. This is the default. For track at once, the laser is turned off after each track, which produces a two-second gap. The track-at-once feature, enables songs and data to be written at different intervals. The lead-in sectors that are written at the beginning of each session contain the location where additional data can be placed on the disc.
-
Page 28: B3. Publisher Status
INDEX the errors may not be detectable by human eyes or ears. This operation may be useful to verify software installation discs where it is extremely important to have accurate copies of all installation files. Checking this option will double the time it takes to record each disc. Set Time and Date to Mastering Time. -
Page 29: B4. Backup Project (Pc Disc Publisher Only)
INDEX Queue Project. To queue another project to run after the current one is finished simply setup the project as you normally would. When you get to the third step of the project setup wizard, if a project is currently running a Queue button will appear instead of a Go button. - Page 30 INDEX Regardless of the media type selected for back up projects it is recommended that span discs be checked to accommo- date future backups of the same files/folders which may be larger. Important Note: It is not possible to span a single large file over multiple discs.
- Page 31 INDEX 4. Click the next button to display a summary of the project. Click Schedule Project to convert this data project into a backup project. You will be prompted to save your project. Do not move projects once you have saved them. Always choose only one copy even if your project will be spanned across multiple discs.
-
Page 32: B5. Rip Audio (Pc Disc Publisher Only)
INDEX The Scheduled Projects window will appear. Check the box next to the backup project you would like to run. Click Run Now to run it for the first time now. Otherwise, the backup project will proceed at the scheduled time. You must keep the PTPublisher software open, the Disc Publisher turned on and the discs loaded for the automatic scheduled backup to occur. -
Page 33: B6. Ptprotect (Pc Disc Publisher Only)
PTProtect allows you copy-protect any DVD Video and mass produce protected discs using the PTPublisher software and a Primera Disc Publisher. You can protect an existing Master DVD by first converting it to an ISO image using PTPublisher or you can protect a DVD... -
Page 34: Creating A Print Label Using Surething (Pc)
INDEX C. CREATING A PRINT LABEL USING SURETHING (PC) The SureThing Disc Labeler software included with your Publisher is a great tool for creating professional looking discs. You can use SureThing's Smart Designs to quickly label a disc, or easily import your own design in many popular file formats. The Help section included with the software will provide complete instructions on all the features in this package. -
Page 35: Creating A Print Label Using Disc Cover (Mac)
INDEX 4A. Open the text panel by clicking the arrow on the text button. Add text by selecting one of the options below. To create text that follows the curve of the disc choose Add Circular Text. 4B. You may also choose from several SureThing smart designs. - Page 36 INDEX 1. Open the software by clicking the Create Label button on the Add Print File step of PTPublisher. There is no way to open Disc Cover PE outside of the PTPublisher software. 2. To add a background from Disc Cover, click the the Gallery button on the top tool bar.
- Page 37 INDEX 5. Once your image or background has been selected you can add text or other design elements using the buttons on the tool bar or the Inspector. Below is a short description of each of the important buttons. Gallery Clipart Selection Zoom...
- Page 38 INDEX 6. Once you have several objects on screen you may choose to use the Inspector tool to edit advanced object properties. Select the objects you would like to edit and then click on one of the six buttons on the top of the inspector. Four are shown below.
-
Page 39: Advanced Printer Driver Functions (Pc)
INDEX E. ADVANCED PRINTER DRIVER FUNCTIONS (PC) Once the Publisher software has been successfully installed, you will want to take a moment to familiarize yourself with the printer driver settings for your Publisher. These settings affect the print quality of your discs. The default settings of the Publisher printer driver will fit most printing needs. -
Page 40: Paper Size
INDEX Paper Size The paper size option will be set to CD for printing onto printable surface CDs and DVDs. The remaining options apply if you have purchased the business card adapter kit. Non-printable Outer Margin Adjust this value to print all the way to the outer edge of a CD. This is useful if you are printing full coverage images. -
Page 41: Color Matching
INDEX Color Matching Best for Graphics mode is best used for graphical images where accurate color reproduction is not as essential. Images printed in this mode will look more vibrant because more ink is being used to produce them. However, printing images of people may produce skin tones that have a reddish tint. -
Page 42: Cartridge Alignment
INDEX Cartridge Alignment The Cartridge Alignment prints a test print and then automatically scans the print to configure your printer for bidirectional printing and to align the color cartridge. It is important to perform this calibration every time you change a cartridge. - Page 43 INDEX 4. When the second run of the print is complete, you should have a test print that looks similar to the following: BACK BACK NOTE: number) SAME (must After printing this image tough lines whose once, rotate this CD number enter Find...
- Page 44 INDEX Clean/Change Cartridge & Check Ink Levels Select this button to display the current ink levels as well as options for cleaning and changing cartridge. Change Cartridge Select the Change Cartridge button to install a new ink cartridge or to switch back and forth between previously used cartridges.
-
Page 45: Advanced Printer Driver Settings (Mac)
INDEX F. ADVANCED PRINTER DRIVER SETTINGS (MA C) Access the advanced printer driver setting from any printing program on the Mac. Go to file - print. Select Publisher Settings from the copies and pages drop down menu. Click Save as Defaults when you are finished. - Page 46 Intensity The Intensity setting will control the amount of ink saturation on the disc. When printing onto the Primera ToughCoat discs, 96% is usually sufficient. When printing on to other brands of media, or if you would like to print darker colors, you may wish to increase the Intensity setting.
-
Page 47: Outer Margin
INDEX Outer Margin The Outer Margin refers to where the printing will cut off around the outer edge of your disc. The size of the print- able surface can vary from one type of media to the next. This allows you to set the outer margin in millimeters allowing you to print all the way to the edge regardless of the type of disc you are using. - Page 48 INDEX Clean Cartridge A cartridge that sits idle in the Publisher for a period of time may start to experience some drying of ink in the tiny nozzles that make up the print head. Clicking the Clean Cartridge button will cause the Publisher to pick a disc and place in into the printer tray.
- Page 49 INDEX Image Alignment The Image Alignment button will allow you to nudge the image up, down, left, or right on your disc. To center the image, click the Image Alignment button. You will be prompted with a choice to print a test print or simply enter values to nudge the image alignment on the disc.
- Page 50 INDEX Once the print has finished, you will see the following dialog box: Look at the finished alignment disc and pick the numbers that come closest to lining up with one another. For instance, on the disc shown in this manual, the vertical alignment is 2 and the horizontal alignment is 0.
-
Page 51: Using Other Graphics Programs
INDEX G. USING OTHER GRAPHICS PROGRAMS While SureThing will handle most labeling needs, other graphics programs can be used if you prefer. When printing and burning through the PTPublisher software your Publisher will support the following additional stardard label image file formats: BMP , TIF, JPG, GIF, PNG and PRN. These formats can be exported from most any original graphics format such as Adobe Photoshop or Illustrator. -
Page 52: Section 4: Maintenance And Troubleshooting
INDEX Section 4: Maintenace and Troubleshooting A. INTERPRETING THE PUBLISHER’S INDICATOR LIGHTS The Power/Ink button can tell you what is happening inside the Publisher. Please refer to the following: Power/Ink Button Publisher Fast Flashing The Publisher is initializing.You will see this pattern when the Publisher is first turned on. -
Page 53: Performing A Robotic Self-Test
INDEX C. PERFORMING A ROBOTIC SELF-TEST To ensure that everything is working properly, a Self-Test feature is built in to your Publisher. In this mode, the Robotic Disc Transporter will go through the motions of picking and placing a disc to ensure proper working order. This test may be performed without connecting the Publisher to the PC. -
Page 54: Technical Support
Publisher. Source Location Primera Knowledge Base www.primera.com/knowledgebase.html PTPublisher Software Help files Open the software. Click on the ? icon in the upper right corner of any screen. -
Page 55: Section 5: Technical Specifications
INDEX Section 5: Technical Specifications Model Optical Disc Publisher SE Configurations Blu-ray Publisher DVD+/-R-CDR Publisher AutoPrinter Printing Method Ink-Jet Printing Resolution 4800 x 1200 dpi, 2400 x 1200 dpi, 1200 x 1200 dpi, 600 x 600 dpi Ink Types One 3-color (CMY) cartridge Media Types Ink-Jet Printable Surface CD-R, CD-RW, DVD-R, DVD RAM, DVD+R, Dual Layer... -
Page 56: Index
Index Abort....................24 Aligning Cartridge.................13 Audio Project ..................18 AUDIO_TS ................18, 29 Backup Project ................25 Blu-ray..................2, 17, 51 BDR....................2, 51 Cartridge, Change ..............40, 44 CD Tray ....................6 Centering Test Print...............45 Change Robot .................22 Closed Disc..................23 Color Matching.................37, 42 Connections, Rear Panel ..............4 Copy Project................14, 17 Data Project ..................18 Disc Cover .................14, 31... - Page 57 Print Template.................26 PTProtect..................22, 29 Publisher Status ................24 Queue Project..................25 Recording Speed ................22 Recording Type................23 Resolution..................51 Rip Audio ..................28 Robot Options ................22 Save Project ..................22 Schedule Project................22 Set Time and Date to Mastering Time........24 Span Discs ..................26 Specifications..................51 System Requirements ..............5 Technical Support ................50 Test Record ..................23 Verify ....................23...
- Page 58 Printed in the United States of America P/N 510963...
Need help?
Do you have a question about the Bravo se Disc Publisher and is the answer not in the manual?
Questions and answers