Table of Contents
Advertisement
Quick Links
Advertisement
Table of Contents

Related Manuals for Leica S Series


Summary of Contents for Leica S Series
-
Page 1: User Manual
Living up to Life User Manual Leica S series... -
Page 2: General Instructions
Use in clean rooms Servicing Before using your stereomicroscope for the first The Leica S series can be used in clean rooms Repairs may only be carried out by Leica time, please read the "Safety concept" brochure without any problems. -
Page 3: Important Safety Notes
This User Manual describes the special func- To maintain the unit in its original condition tions of the Leica StereoZoom® stereomicro- and to ensure safe operation, the user must scopes (S series) and contains important inst- follow the instructions and warnings contained ructions their... -
Page 4: Symbols Used
Figures Failure to comply can cause the following: (1) Numbers in parentheses within the Hazards to personnel descriptions relate to the figures and the Functional disturbances or damaged inst- items within those figures. ruments Leica S Series User Manual... -
Page 5: Safety Instructions
All operators have read, understood and Avoid large temperature fluctuations, observe this User Manual, and particularly Never use S series microscopes or their compo- direct sunlight and vibrations. These condi- the safety instructions. nents for surgical procedures (e.g. on the eye) - Page 6 Use the original packaging for shipping or Refer to "Safety Concept" booklet transporting the individual modules of the Only original Leica Microsystems spare Leica S stereomicroscopes and the acces- Disposal parts may be used. sory components. Refer to "Safety Concept" booklet...
- Page 7 Health risks The ergonomic optical design and const- • Workplaces with stereomicroscopes ruction of the Leica S stereomicroscopes facilitate and improve the viewing task, are intended to reduce the exertion of the but they also impose high demands on the eyes user to a minimum.
-
Page 8: Table Of Contents
Photography with the Leica S6 D and S8 APO Sub-base for transmitted light and cold light source Optics carrier and additional objective Dimensional drawings in mm Available graticules Leica S6 E (S4 E / S6 T) with incident light and transmitted light Inserting graticules illumination Eyepieces Leica S6... - Page 9 Specifications Overview of technical features Specifications Appendix Calculating the total magnification/field of view diameter Troubleshooting Care, Maintenance, Contact Persons Leica S Series User Manual...
-
Page 10: Leica S Series
Leica S series Leica S Series User Manual... -
Page 11: Congratulations
Congratulations on obtaining your new Leica StereoZoom® line stereomi- Though the reliability and robustness of Leica stereomicroscopes is world- croscope (S series). We are convinced it will exceed your expectations, as renowned, like any high-tech product, the Leica S series requires a certain this instrument embodies all the qualities you associate with the name degree of care and attention. -
Page 12: The Modular Design: Everything Is Relative
The Modular Design: Everything is possible The Leica S series provides a high degree of Despite this, you will notice that the controls Have a special request? Let us know! flexibility in choosing equipment, thanks and individual components do not differ signi-... -
Page 13: What Your Stereomicroscope Has To Offer You
ESD protection Apochromatic correction line consists of two beam paths converging at The Leica S4 E, S6 E, S6, S6 D and S8 APO, The Leica S8 APO is a completely apochromati- 12°. The objective pairs of each optical path are including its cold light source and stand, is cally corrected Greenough system. -
Page 14: The Model Series
The model series Leica S4 E Leica S6 E Leica S6 Leica S6 T Leica S8 APO Leica S6 D Leica S Series User Manual... -
Page 15: On We Go
If, on the other hand, you are assembling the been assembled and commissioned by your stereomicroscope yourself, continue with Leica consultant, click here to skip through the the "Assembly" chapter, which begins on installation instructions and go directly to the Page 16. -
Page 16: Assembly
Assembly Leica S Series User Manual... -
Page 17: Installing The Basic Equipment (Overview)
1. Sub-base for transmitted light with glass stage plate 2. Incident light base with stage plate 3. Focusing column with microscope carrier 4. Additional objective, optional 5. StereoZoom® optics carrier 6. Eyepieces, fixed and/or adjustable Leica S Series User Manual... -
Page 18: Focusing Column
3. Insert the stage plate back into place. side of the focusing column. 1. Remove the stage plate. 2. Route the 3 hollow screws from below through the base plate and screw these securely into the focusing column. Leica S Series User Manual... -
Page 19: Sub-Base For Transmitted Light And Cold Light Source
3. Set the incident-light stand to the sub-base 5. Insert the glass stage plate. for transmitted light and engage it with the Additional information can be found in connection screw. the User Manual for cold-light source Leica KL300 LED. Leica S Series User Manual... -
Page 20: Optics Carrier And Additional Objective
1. Screw the desired objective counterclock- 1. Screw the objective protective glass directly microscope carrier and fasten it in the desi- wise into the optics carrier. onto the StereoZoom® or on the additional red position with the clamping screw. objective. Leica S Series User Manual... -
Page 21: Available Graticules
Graticule 10 mm/0.1 mm Graticule 5 mm/0.1 mm Graticule 5 mm/0.05 mm Graticule 100 Div./0.002" Graticule 100 Div./0.001" Graticule 150 Div./0.0005" Crosshairs Stage micrometer 50 mm, 0.1/0.01/ mm graduation Stage micrometer 1", 0.001" graduation Leica S Series User Manual... -
Page 22: Inserting Graticules
4. Replace the insert in the eyepiece and press it firmly into place. 5. Insert the eyepiece in the tube and turn the eyepiece in the tube to align the graticule correctly. Leica S Series User Manual... -
Page 23: Eyepieces
StereoZoom® Leica S8 APO with two adjustable eyepieces. 2. Check that the eyepieces are seated firmly and precisely in place. -
Page 24: Leica Led Illuminators
• with its fiber-optic light guides is ideally For higher demands, such as photogra- suited for the Leica S4 E, S6 E, S6 and S6 T phy or in use combination with the Leica stereomicroscopes. A number of matching S8 APO, we offer different high-performance... -
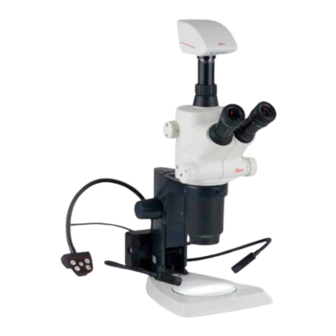
Page 25: Mounting A Camera (Leica S6 D And S8 Apo)
Camera design (Leica S6 D and S8 APO) The Leica S6 D and S8 APO are equipped Installing the camera 3. Insert the unit into the video/photo output with an integrated video/phototube, 1. Remove the protective dust cover from the of the stereomicroscope and screw it in. -
Page 26: Quick Start Guide
Quick Start Guide Leica S Series User Manual... -
Page 27: A Stereomicroscope Of The S Series In Overview
An overview of an S series stereomicroscope 1 Magnification changer, right drive knob with magnification scale 2 S6/S8 models: Stop for zoom limit 3 Focusing drive 4 Fixing screw for optics carrier in the microscope carrier 5 Adjustable tube: Interpupillary distance... -
Page 28: Tips For Working Ergonomically
Align your stereomicroscope optimally. Ergonomic objectives You must configure the settings descri- The ErgoObjective for the Leica S4 E and all bed here precisely in order to be able to take S6 models provides for fatigue-free work. The full advantage of its outstanding optical and ErgoObjective 0.6 –... -
Page 29: Using The Eyepieces
Depending on the preferences of the observer, nues to remain exactly in focus, even eyecups can be used. if the magnification on the stereomicroscope is modified. All stereomicroscopes from Leica To avoid eye infections, we recommend Microsystems are parfocally matched. Howe-... -
Page 30: The Correct Interpupillary Distance
An "exit pupil distance" is the distance between eye and eyepiece. With the 10×/23B wide-field eyepiece for eyeglass wearers, it is approx. 22 mm. For those who do not use the eyepiece for eyeglass wearers, it is 12 mm. Leica S Series User Manual... -
Page 31: Focusing
2. Set the lowest magnification level. At the lowest magnification, the desired specimen detail can be easier to localize due to the large field of view. The focusing drive can be operated either left- or right-handed. Leica S Series User Manual... -
Page 32: Switching Magnification (Zooming)
Changing magnification (zooming) All stereomicroscopes of the S series Changing magnification allow continuous magnification 1. Look into the eyepieces. change. The magnification changer can be operated with the left and the right hand. The 2. Focus on the object (see page 16). -
Page 33: Limiting Zoom Range
The following example shows the limit to the range between 1 to 3.2. 2. Turn the right drive knob to position "1". 4. Carefully tighten the Allen screw. Continued on next page. Leica S Series User Manual... - Page 34 1. Loosen the hollow screw on the right drive knob until it touches the built-in zoom knob with the Allen key provided. stop. 2. Turn the right drive knob to position "3.2". 4. Carefully tighten the allen screw. Leica S Series User Manual...
-
Page 35: Regulating The Resistance Of The Focusing Drive
1. Grip the outer drive knobs with both hands and turn them towards each other until the desired resistance is reached during focu- sing. Leica S Series User Manual... -
Page 36: Changing The Position Of The Optics Carrier
1. Unscrew the clamping screw. wants to work from the side. 2. Turn the optics carrier laterally to the desi- red position. 3. Carefully tighten the clamping screw. Leica S Series User Manual... -
Page 37: Diopter Settings And Parfocality: 1 Adjustable & 1 Fixed Eyepiece
Adjusting the diopter settings eyepiece exactly as described, the image carried out only once by each user. Using 1. With Leica S6 D and Leica S8 APO, turn the will remain equally sharp and constant (parfo- reticules leads to slightly deviated settings, rotary knob to the "Vis"... - Page 38 "–" direction until the eye can see the specimen sharply. 5. Observe the specimen through the eyepi- eces and bring it into sharp focus with the 8. Set the lowest magnification level. Continued on next page focusing drive. Leica S Series User Manual...
- Page 39 1. Select the highest magnification level. 2. Monitor the specimen; if necessary, refocus it slightly. 3. Change from the highest to the lowest magnification. The sharpness should be constant (parfocal). If this is not the case, repeat this procedure. Leica S Series User Manual...
-
Page 40: Dioptric Correction With Two Adjustable Eyepieces
Adjusting the diopter settings eyepiece exactly as described, the image carried out only once by each user. Using 1. With Leica S6 D and Leica S8 APO, turn the will remain equally sharp and constant (parfo- reticules leads to slightly deviated settings, rotary knob to the "Vis"... - Page 41 5. Observe the specimen through the eyepi- eces and bring it into sharp focus with the 8. Set the lowest magnification level. 12. Repeat steps 10 and 11 with the other eye. focusing drive. Continued on next page Leica S Series User Manual...
- Page 42 1. Select the highest magnification level. 2. Monitor the specimen; if necessary, refocus it slightly. 3. Change from the highest to the lowest magnification. The sharpness should be constant (parfocal). If this is not the case, repeat this procedure. Leica S Series User Manual...
- Page 43 Photography & Video Leica S Series User Manual...
-
Page 44: Photography & Video
Leica Application Suite mentation has become an invaluable part of If you require absolute control over the camera The "Leica Application Suite", or "LAS" for short, their work. Research results can be presented in and need the capability for measurement,... -
Page 45: Photography With The Leica S6 D And S8 Apo
Photography with the Leica S6 D and S8 APO The observation beam path and the The focusing and the framing are done Capturing images and videos photobeam path can be switched. For with the left eyepiece (video/photo 1. If the image detail and image sharpness are this, the light splitting is influenced as follows: beam path). -
Page 46: Dimensional Drawings In Mm
Dimensional drawings in mm Leica S Series User Manual... -
Page 47: Leica S6 E (S4 E / S6 T) With Incident Light And Transmitted Light
Leica S6 E (S4 E / S6 T) with incident light and transmitted light illumination ø58 ø58 ø76 ø76 Leica S Series User Manual... -
Page 48: Leica S6
Leica S6 ø58 ø76 150.4 Leica S Series User Manual... -
Page 49: Leica S6 D With Incident Light And Transmitted Light Illumination
Leica S6 D with incident light and transmitted light illumination ø58 ø58 ø76 ø76 Leica S Series User Manual... -
Page 50: Leica S8 Apo With Incident Light And Transmitted Light Illumination
Leica S8 APO with incident light and transmitted light illumination ø58 ø58 ø76 ø76 Leica S Series User Manual... -
Page 51: Technical Data
Technical data Leica S Series User Manual... -
Page 52: Overview Of Technical Features
6.3:1 6.3×-40× 38° ErgoObjective™ Apochromatic Greenough system Leica S8 APO 10×-80× 38° Apochromatic zoom Apochromatic objectives Video photo tube StereoZoom® is a trademark registered in the Principal Register of the US Patent and Trademark Office. Leica S Series User Manual... - Page 53 25× / 9.5, 40×/ 6 25× / 9.5, 40×/ 6 Interpupillary distance 55 – 75 mm 55 – 75 mm 55 – 75 mm 55 – 75 mm 55 – 75 mm 55 – 75 mm Leica S Series User Manual...
- Page 54 Appendix Leica S Series User Manual...
-
Page 55: Calculating The Total Magnification/Field Of View Diameter
Calculation example: Field of view diameter in the specimen M TOT VIS = M O × M E × z N FOV ∅ OF: = 1.9 mm M O × z 1.6 ×4 1.6 × 20 × 4 = 128 Leica S Series User Manual... -
Page 56: Troubleshooting
The focusing drive gradually sinks on its The image from the camera stays black own or is difficult to turn. Switch the beam splitter on the photo tube to the "Doc" setting (P. 37). Regulate the ease of movement (P. 30). Leica S Series User Manual... -
Page 57: Care, Maintenance, Contact Persons
Leica representative or Leica Microsystems caustic and corrosive materials and keep even after years and decades, your Leica stereo- (Schweiz) AG, CH-9435 Heerbrugg. chemicals away from the instruments. microscope will continue to work as well as it did on the very first day. - Page 58 Keep accessories in a dust-free place when Remove dust with a pneumatic rubber bulb not in use. or with a soft brush. Clean objectives and eyepieces with special optic cleaning cloths and with pure alcohol. Leica S Series User Manual...
- Page 59 "with the user, for the user" has always been the Leica Microsystems – an international company with an experienced worldwide basis for the innovative strength of Leica Microsystems. On this, we have developed customer service network. our five corporate values:...
Need help?
Do you have a question about the S Series and is the answer not in the manual?
Questions and answers