Table of Contents
Advertisement
Quick Links
Advertisement
Table of Contents

Related Manuals for Asus PCI-V775V2C


Summary of Contents for Asus PCI-V775V2C
- Page 1 PCI-V775V2C PCI Graphics Adapter USER'S MANUAL...
- Page 2 In no event shall ASUS be liable for any loss or profits, loss of business, loss of use or data, interruption of business, or...
-
Page 3: Asus Contact Information
Telephone: 1-408-474-0567 Fax: 1-408-474-0568 Email: info-usa@asus.com.tw Technical Support: BBS: 1-408-474-0555 Email: tsd-usa@asus.com.tw ASUS COMPUTER GmbH Marketing Info: Address: Harkort Str. 25, 40880 Ratingen, BRD, Germany Telephone: 49-2102-445011 Fax: 49-2102-442066 Email: info-ger@asus.com.tw Technical Support: BBS: 49-2102-448690 Email: tsd-ger@asus.com.tw ASUS PCI-V775V2C User’s Manual... -
Page 4: Table Of Contents
CONTENTS I. Hardware Installation ..............7 Layout of the ASUS PCI-V775V2C Card ........7 Installation Procedures ..............8 II. Microsoft Windows 95 ..............10 Video Driver Installation ............... 10 Introduction ..................10 New Hardware Found .............. 10 Using Autorun Screen .............. 11 Using Windows 95 Control Panel .......... - Page 5 VII. Display Information ..............25 Resolution Table ................25 1 MB Video Memory ............... 25 2 MB Video Memory ............... 26 VIII. Hardware Information ............29 8-bit LPB Connector ..............29 A. Questions & Answers ..............31 ASUS PCI-V775V2C User’s Manual...
- Page 6 Canadian Department of Communications Statement This digital apparatus does not exceed the Class B limits for radio noise emissions from digital apparatus set out in the Radio Interference Regulations of the Cana- dian Department of Communications. ASUS PCI-V775V2C User’s Manual...
-
Page 7: Hardware Installation
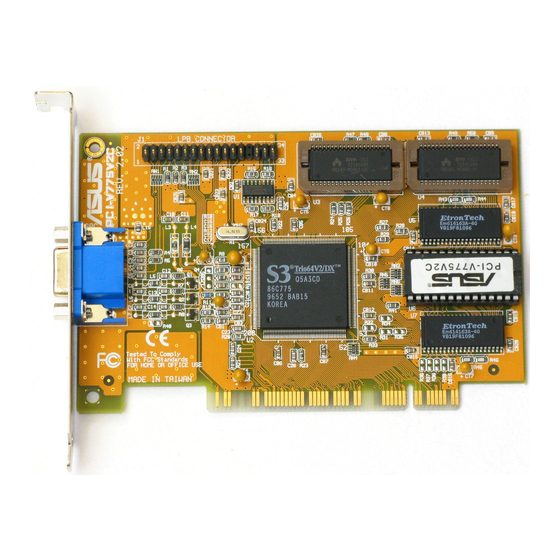
I. Hardware Installation Thank you for purchasing the ASUS PCI-V775V2C Graphics Adapter, the latest S3 Trio64V2/DX Graphics Engine which pro- vides the best video quality in any scale. Layout of the ASUS PCI-V775V2C Card Feature Connector & 1-2 MB Video Memory... -
Page 8: Installation Procedures
I. Hardware Installation This section tells you how to install the ASUS PCI-V775V2C Video Card in your PC computer. The steps provided below demonstrate how to install the cards in a typical system. Your system may be slightly different. WARNING: Computer boards and components contain very delicate Integrated Circuit (IC) chips. - Page 9 11. Replace the cover on the system unit. 12. Connect your analog monitor's 15-pin VGA connector to the card and fasten the retaining screws (if any). ASUS PCI-V775V2C User’s Manual...
-
Page 10: Microsoft Windows 95
Windows 95 under specific situations. Installing Video drivers in Windows 95 (New Hardware Found) If you are installing the ASUS PCI-V775V2C Video card for Win- dows 95 for the first time, a New Hardware Found window will appear:... -
Page 11: Using Autorun Screen
Video Driver Installation Updating installation in Windows 95 (Using Autorun Screen) If an ASUS Video card was installed at one time, Windows 95 Plug and Play may install the original driver upon entering Windows 95. The driver of previous version may cause your system to hang. If this happens, switch to the standard VGA mode (640 x 480, 16 col- ors), then restart Windows 95. -
Page 12: Using Windows 95 Control Panel
CD. Type D:\WIN95 (assuming your CD-ROM drive is letter D) or click Browse button to select path of display driver for Windows 95. Click OK. You will see a list of ASUS S3 cards. Select type of your VGA card and press OK to start installation. -
Page 13: Software Mpeg & Video Player
Windows 95 Start Windows 95. Insert the ASUS PCI-V775V2C installation CD. ASUS Windows 95 Install Shell should appear. If Windows 95 In- stall Shell does not appear, select D:\AUTORUN.EXE. The CD- ROM’s autorun facility will present you with a list of install options. -
Page 14: Windows 95 Display Settings
Adjust performance Adjust Set to default values display size Change Refresh Rate List of refresh rate options Customize refresh rate Set to default sup- Add to list ported refresh rate Test customized Delete refresh rates from list ASUS PCI-V775V2C User’s Manual... -
Page 15: Adjust Performance
Settings: Allows you to change your display settings, adjust screen resolution and color depth, virtual desktop, color palette and font size. Current Adjust refresh rate screen resolution Adjust color Adjust virtual desktop size Adjust font size ASUS PCI-V775V2C User’s Manual... -
Page 16: Microsoft Windows 3.X
3.x system is located. When ASUS driver is successfully installed, you can launch Windows 3.x by pressing Y key if PCI-V775V2C Video card has been plugged in your system. After Windows 3.x boots up, the CD-ROM’s autorun facility will present you with a list of install options. You can continue to install the other applications. -
Page 17: Software Mpeg & Video Player
III. Microsoft Windows 3.x Software MPEG & Video Player For Software MPEG support in Windows 3.X, you must first install Microsoft Video for Windows, then install ASUS MPEG Movie Player. Installing Microsoft Video for Windows and MPEG Movie Player in Windows 3.x 1. -
Page 18: Windows 3.X Display Panel
III. Microsoft Windows 3.x Windows 3.x Display Panel Changing display settings To enter the ASUS Display Panel, open ASUS S3 Series program group and click ASUS Display Panel icon. Click the appropriate Tab as follows: Setting: Allows you to adjust screen resolution, virtual desktop size, color palette, font size, and change performance. -
Page 19: Adjustment
Adjust display position Adjust display size Set to default values Change refresh rate Change Refresh Rate List of refresh rate options Customize refresh rate Add to list Delete from list Test customized refresh rates ASUS PCI-V775V2C User’s Manual... -
Page 20: Hotkey
Value hotkey options Description Hotkey Set to default enabled values DPMS: Let you configure the time of Standby, Suspend, and PowerOff mode for your DPMS-compliant monitor to conserve electrical energy. DPMS enabled Set to default values ASUS PCI-V775V2C User’s Manual... -
Page 21: Microsoft Windows Nt
CD-ROM such as D:\NT40 (assuming your CD-ROM drive is letter D). 8. A list of ASUS S3 series video adapters will be displayed. Se- lect the one you are using, then click on the OK button. -
Page 22: Installing Display Drivers In Windows Nt 3.51
5. Click Change Display Type button. 6. Click Change button. 7. Click Other. 8. Insert the ASUS S3 driver CD into your CD-ROM drive. For Windows NT 3.51, type the following: D:\NT351 (assuming your CD-ROM drive is letter D) 9. Click OK button. -
Page 23: Ibm Os/2 Video Driver
V. IBM OS/2 Video Driver IBM OS/2 Video Driver Installation The ASUS PCI-V775V2C OS/2 video driver is to be used for the English version of OS/2 only. Installing ASUS PCI-V775V2C video drivers in English OS/2 1. Start OS/2 using standard VGA driver 2. -
Page 24: Other Video Drivers
VI. Other Video Drivers AutoCAD Video Driver Installation Installing ASUS PCI-V775V2C AutoCAD Video Drivers 1. Enter DOS mode 2. Insert the ASUS installation CD (assuming your CD-ROM drive is letter D) 3. Change current directory to D:\DOS\AutoCAD, type INSTALL <Enter>... -
Page 25: Display Information
75Hz 37.6KHz 85Hz 43.5KHz 100Hz 50.9KHz 160Hz 82.0KHz 800x600x16 60Hz 37.9KHz 72Hz 48.3KHz 75Hz 46.9KHz 85Hz 53.5KHz 100Hz 62.9KHz 150Hz 94.8KHz 640x480x24 60Hz 31.3KHz Windows 3.1 Only 640x400x32 70Hz 31.3KHz Windows 95 Only int. = Interlace ASUS PCI-V775V2C User’s Manual... -
Page 26: Mb Video Memory
120Hz 96.7KHz 1152x864x8 60Hz 54.9KHz 72Hz 66.4KHz 75Hz 70.1KHz 85Hz 80.3KHz 100Hz 96.7KHz 1280x1024x8 int. 46.5KHz 60Hz 64.2KHz 72Hz 76.8KHz 75Hz 79.9KHz 85Hz 90.4KHz 1600x1200x8 int. 63.8KHz 60Hz 75.6KHz 72Hz 90.4KHz 75Hz 94.2KHz int. = Interlace ASUS PCI-V775V2C User’s Manual... - Page 27 Windows 3.1 Only 640x400x32 70Hz 31.3KHz Windows 95 Only 640x480x32 60Hz 31.3KHz 72Hz 38.0KHz 75Hz 37.6KHz 85Hz 43.5KHz 100Hz 50.9KHz 160Hz 81.4KHz 800x600x32 60Hz 37.9KHz 72Hz 48.3KHz 75Hz 46.9KHz 85Hz 53.5KHz 100Hz 62.9KHz 150Hz 94.8KHz int. = Interlace ASUS PCI-V775V2C User’s Manual...
- Page 28 (This page was intentionally left blank) ASUS PCI-V775V2C User’s Manual...
-
Page 29: Hardware Information
34-pin cable to achieve LPB operation. Signal Description Signal Description PA0/LPB0 PA1/LPB1 PA2/LPB2 EVIDEO/VREQ/VRDY/HS PA3/LPB3 ESYNC/NF PA4/LPB4 EVCLK/CREQ/CRDY/VS PA5/LPB5 PA6/LPB6 PA7/LPB7 VCLK/LCLK BLANK/NF HSYNC/NF VSYNC/NF NF/I C CLK NF/I C DATA NF/ENABLE2 NF/ENABLE1 ASUS PCI-V775V2C User’s Manual... - Page 30 (This page was intentionally left blank) ASUS PCI-V775V2C User’s Manual...
-
Page 31: Questions & Answers
8. Close Device Manager and restart Windows 95 9. Now display driver will work correctly. III. My monitor is not capable of high resolution or refresh rate. It depends on display characteristics of your monitor. Consult your monitor manual for proper configuration. ASUS PCI-V775V2C User’s Manual... - Page 32 (This page was intentionally left blank) ASUS PCI-V775V2C User’s Manual...