Table of Contents
Advertisement
Advertisement
Table of Contents

Related Manuals for Lathem TruAlign 800P


Summary of Contents for Lathem TruAlign 800P
- Page 1 TruAlign Time Recorder Model 800P Installation & User's Guide...
- Page 2 Disclaimer Trademark Lathem Inc...
- Page 3 Table of Contents...
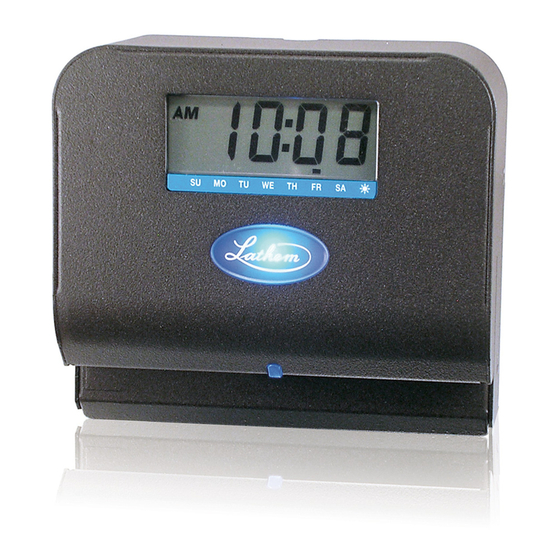
- Page 4 The employee places the long edge of the timecard on the timecard shelf of the 800P and aligns the timecard to the cell to be printed. When the timecard is aligned correctly an automatic imprint with the day and time will be recorded on the timecard.
-
Page 5: Optional Accessories
Caution About this Manual Optional Accessories... -
Page 6: Packing Contents
Packing Contents ¼ Recommended Installation Tools Optional-... -
Page 7: Quick Easy Setup (Wall Mount)
800P TruAlign Time Recorder User Guide Quick Easy Setup (Wall Mount) To setup your 800P, follow these next steps: Step 1 Step 2 48 inches Step 3 Step 4 Step 5 Factory Settings Second Sunday March First Sunday November Note:... -
Page 8: Quick Easy Setup (Table Top Mount)
800P TruAlign Time Recorder User Guide Quick Easy Setup (Table Top Mount) To setup your 800P, follow these next steps: Step 1 Step 2 Step 3 Factory Settings Second Sunday March First Sunday November AM/PM Note: hours Minutes AM/PM hours... -
Page 9: Remove The Back-Plate
800P TruAlign Time Recorder User Guide Setup To set up your 800Ptime recorder, follow these next steps: Remove the Back-Plate Separate the back-plate from the time recorder by removing the Philips head screw. Retain the Philips head screw for later. -
Page 10: Programming
Programming the 800P After removing the back-plate and connecting the AC power you will be ready to begin programming the 800P time recorder. Use the three buttons on the back to program the time recorder. Hold the time recorder with both hands with the display facing you. -
Page 11: Setting The Time
800P TruAlign Time Recorder User Guide Setting the Time and SET To enter the ‘Time Set Up Mode’, press the buttons at the same time. The blue light will turn off and the display will show the hours and SET buttons. -
Page 12: Setting The Date
Setting the Date and Other Functions Factory Settings Second Sunday March First Sunday November AM/PM hours Minutes AM/PM hours Minutes English Disabled... -
Page 13: Set Up Functions
800P TruAlign Time Recorder User Guide Set up Functions The set up functions of the time recorder are in sequential order from 1 through 15. When in the ‘Setup Mode’ you must pass through each function even if you only need to change a single setting. -
Page 14: Set Month
800P TruAlign Time Recorder User Guide Function 1 – Set Month When prompted to set the month, use the button to scroll forward or the button to scroll backwards. With the desired month showing on the display, press the SET button. The ‘Set Date’... -
Page 15: Set Date
Function 2 – Set Date Note: Function # Date Step 1 2 : 2 1 Press the button until the display shows ‘05’. Step 2 Press the SET button when the date is correct. The date will be accepted, go to the 2 : 0 5 ‘Set Year’... - Page 16 800P TruAlign Time Recorder User Guide Function 3 – Set Year When prompted to set the year, use the button to scroll forward or the button to scroll backwards. With the desired year showing on the display, press the SET button. The ‘Set DST’...
- Page 17 800P TruAlign Time Recorder User Guide Function 4 – Change Factory Default Daylight Savings This function allows you to change or modify the factory default daylight savings settings. The daylight savings setting are set at the factory for the Second Sunday in March and the First Sunday in November.
- Page 18 Function 9 – Set 12/24 Hr Display Setting Values PM 1 Hour Format Function # for Display Step 1 Press the button until the display 9 : 1 2 shows ‘24’. Step 2 Press the SET button when the format selection is correct.
-
Page 19: Set 12/24 Hr Print
Function 10 – Set 12/24 Hr Print Setting Values Hour Format Function # For Print Step 1 Press the button until the display 10: 1 2 shows ‘24’. Step 2 Press the SET button when the format selection is correct. The format will be 10: 2 4 accepted, go to the ‘Set Print Minute Format’... - Page 20 Function 11 – Set Print Minute Format Setting Values Note: Minute Format Function # for Print Step 1 Press the button until the display shows ‘2’. Step 2 Press the SET button when the format selection is correct. The format will be accepted, go to the ‘Set Day Print Language’...
- Page 21 800P TruAlign Time Recorder User Guide Function 12 – Set Day Print Language When prompted to select the language the day of the week will print on the timecard, use the button to scroll forward or button to scroll backwards. With the desired language showing on the display, press the SET button.
- Page 22 Function 13 – Set Print Intensity Note: Appendix B - Changing the Print Intensity...
- Page 23 800P TruAlign Time Recorder User Guide Function 14 – Confirmation Beep Disable/Enable When prompted to select whether the confirmation beep will sound or will be disabled, use the button to scroll forward or the button to scroll backwards. With the desired setting showing on the display, press the SET button.
- Page 24 800P TruAlign Time Recorder User Guide Function 15 – TruAlign Calibration / Print Head Test When prompted to activate the TruAlign Calibration / Print Head Test, press the SET button to accept the factory setting. After pressing the SET button the time recorder will go to the normal time/date display and will be operational.
-
Page 25: Wall Mount
800P TruAlign Time Recorder User Guide Wall Mount Select a site to install the 800P time recorder that will be convenient to employees clocking In and Out. The 800P time recorder can be mounted directly to a wall. When deciding... - Page 26 800P TruAlign Time Recorder User Guide Wall Step 3 Using the supplied 6/32 x 3/8 Philips head screws install the back-plate to the wall-mount bracket. Wall Step 4 With the back-plate secured to the wall-mount bracket, plug the AC wall adapter into the time recorder.
-
Page 27: Using The Time Recorder
TruAlign LED Guide The employee places the long edge of the timecard on the timecard shelf of the 800P and aligns the timecard to the cell to be printed. When the timecard is aligned correctly an automatic imprint with the day and time will be recorded on the timecard. -
Page 28: Appendix A - Changing The Print Intensity
Appendix A - Changing the Print Intensity How to change the print intensity on the timecard Print Intensity Function # Step 1 Press the button until the display shows ‘7’. Step 2 Press the SET button when the setting is correct. -
Page 29: Appendix B - Calibrating The Trualign Function
Appendix B - Calibrating the TruAlign Function When should I calibrate the TruAlign function for the timecard? TruAlign function needs to be recalibrated. Imprint is not lined up correctly in timecards print area when the green LED displays. TruAlign function is calibrated correctly. - Page 30 800P TruAlign Time Recorder User Guide TruAlign Function # Calibration Press the button until the display shows ‘1’. Selecting ‘1’ activates the TruAlign calibration mode. Press the SET button. The display will show ‘CAL 1’, insert and visually align a timecard, see Figure 1.
- Page 31 800P TruAlign Time Recorder User Guide With the display showing ‘CAL 2’, insert and intentionally misalign the timecard, see C A L 2 Figure 2. With the timecard fully inserted and misaligned, press and hold the button to register the alignment.
-
Page 32: Appendix C - Testing The Print Head
800P TruAlign Time Recorder User Guide Appendix C - Testing the Print Head When should I run the test on the print head? If you notice that the imprint on the timecard appears to be missing segments, you can test the print head to make sure it is working correctly. -
Page 33: Appendix D - Changing The Dates For Daylight Savings
Appendix D - Changing the dates for Daylight Savings second March first November Press the button until the display shows ‘Y’. Then press the SET button to go to Function 5. Setting Values Setting Values... -
Page 34: Appendix E - Disable Daylight Savings
Appendix E - Disable Daylight Savings Correction second March first November Press the button until the display shows ‘Y’. Then press the SET button Function 5. Press the button until the display shows ‘00’. Then press the SET button Function 9. -
Page 35: Frequently Asked Questions
800P TruAlign Time Recorder User Guide FREQUENTLY ASKED QUESTIONS buttons at the same time. rESt Page 36... -
Page 36: Specifications
SPECIFICATIONS Dimensions Weight Display Housing Line Power Memory (change the battery every 7 years- recommendation) Environment Timecard Storage... - Page 37 800P TruAlign Time Recorder User Guide MINUTE CONVERSION CHART Minutes to 1/100s of Hour Decimal Decimal Decimal Minutes Minutes Minutes 1.00 Page 38...
-
Page 38: Warranty
800P TruAlign Time Recorder User Guide WARRANTY Limited One-Year Limited Warranty one year Lathem Time 200 Selig Drive, SW, Atlanta, GA 30336 404-691-0405 www.lathem.com Copyright © 2009 Lathem Time Corporation. All rights reserved. Page 39... - Page 39 800P TruAlign Time Recorder User Guide Page 40...
Need help?
Do you have a question about the TruAlign 800P and is the answer not in the manual?
Questions and answers
What do you do when it starts printing to light?