
Related Manuals for Gaggia TITANIUM Espresso Machine


Summary of Contents for Gaggia TITANIUM Espresso Machine
- Page 1 ISTRUZIONI PER L’USO OPERATING INSTRUCTIONS GEBRAUCHSANWEISUNG MODE D’EMPLOI INSTRUCCIONES DE USO GEBRUIKSAANWIJZING INSTRUCÇOES E MODO DE EMPREGO...
- Page 2 Ci congratuliamo per la vostra scelta! Grazie a questa macchina potrete gustare un delizioso caffè o cappuccino nel comfort della vostra casa. Congratulations on your choice! As the proud owner of the machine, you can now experience the taste of a delicious cup of espresso or cappuccino in the comfort of your own home.
-
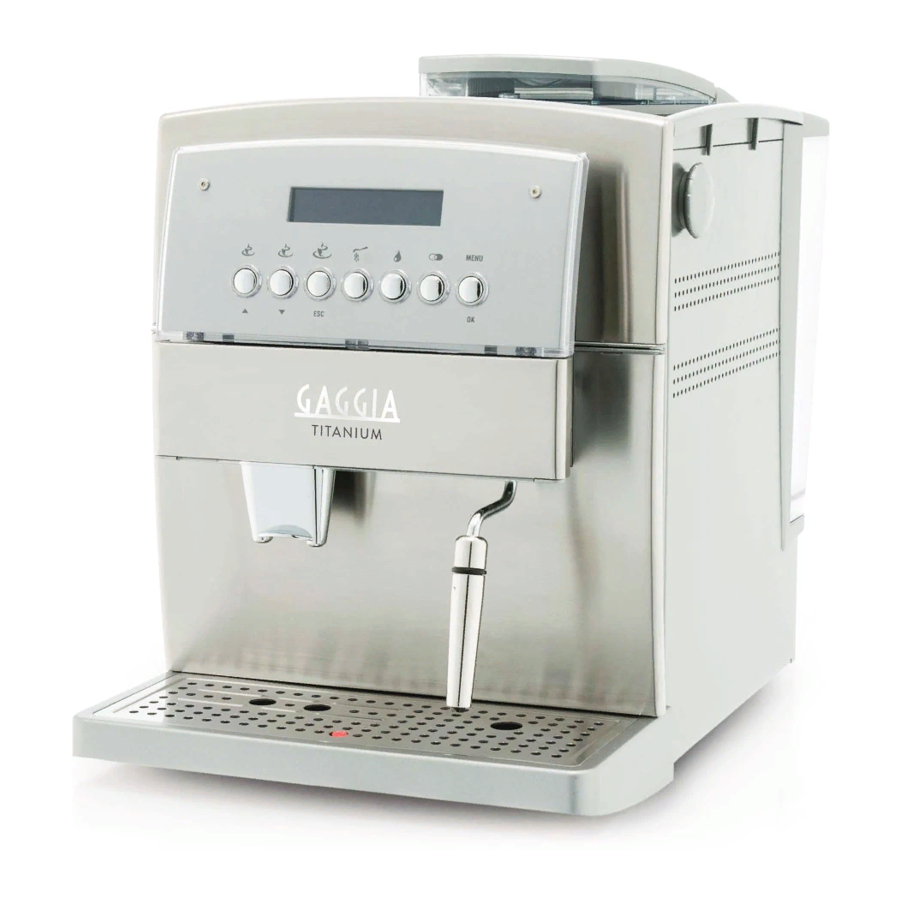
Page 3: Product View
25 26 • 3 •... -
Page 4: Adjusting The Coffee Dose
• 4 •... -
Page 5: Installing Coffee Maker
• 5 •... -
Page 6: Important Safeguards
ENGLISH IMPORTANT SAFEGUARDS When using electrical appliances, basic safety precautions should always be followed to reduce the risk of fire, electric shock, and/or injury to persons, including the following: 1 Read all instructions and information in this instruction book and any other literature included in this carton referring to this product before operating or using this appliance. -
Page 7: Specifications
GENERALITIES This coffee maker is designed to make espresso coffee using both coffee beans and ground coffee; it is also equipped with a device for supplying steam and hot water. This elegantly designed appliance has been designed for household use and is not suitable for continuous, professional-type use. Caution: The manufacturer cannot be held liable for any damages/injury attributable to the following: •... - Page 8 ENGLISH sizes in millimeter • 26 •...
-
Page 9: Safety Standards
SAFETY STANDARDS Never let live parts come into contact with water: short-circuit hazard! The superheated steam and hot water can cause scalding! Never direct the steam or the hot water jet towards body parts! Touch the steam /hot water nozzle carefully: scalding hazard! Intended Use - This coffee maker is intended for household use only. -
Page 10: Description Of Parts
ENGLISH DESCRIPTION OF PARTS See Fig.01 Coffee bean container Coffee bean container cover (aroma preserver) Grinding control knob Dose control knob Ground coffee doser cover Cup Heater ON-OFF switch Water tank cover Water tank Coffee grounds drawer Power cord Drip tray + plate Height adjustable coffee dispenser Steam / hot water nozzle and pipe Front cover... -
Page 11: Coffee Dispenser
on just press the button (Fig.08); the machine will begin to heat up and the display will show: RINSING WARMING UP ... When the machine reaches the right temperature, it will carry out a rinse cycle. • To load the circuit, direct the steam pipe (Fig.01-pos.14) over the drip tray, place a cup or other suitable receptacle below the steam nozzle and press the button (26);... -
Page 12: Dispensing Hot Water
ENGLISH the display will indicate (for example) 1 SMALL COFFEE Dispense 1 coffee, place a single cup beneath the coffee spouts and press the button (22, 23 or 24) only once; to dispense 2 coffees, place two cups beneath the coffee spouts and press the button (22, 23 or 24) twice;... -
Page 13: Optional Accessories
displayed in turn: SELECT PRODUCT HOT WATER READY FOR USE READY FOR USE • Place a cup and/or receptacle beneath the hot water/steam pipe (Fig.15). • Turn the knob anticlockwise as shown in Fig.15. • Dispense the desired quantity of hot water; to stop the flow of hot water turn the knob clockwise. -
Page 14: Cleaning And Maintenance
ENGLISH While hot water is being dispensed, the silicone tube inside the cappuccinatore must be inserted into the grating of the drip tray. Make sure the silicone tube cannot slip out while the machine is in use. Note: Insert the tube into the grating, so that to avoid any contact with dirty water or ground coffee residues;... - Page 15 the dishwasher. • Do not use abrasives or aggressive chemicals (solvents) for cleaning. • Do not dry the machine and/or any of its parts using a microwave and/or conventional oven. • We recommend that you clean the water tank and change the water daily.
-
Page 16: Rinsing
ENGLISH RINSE MACHINE OPEN KNOB 10 Turn the steam knob (16) anticlockwise to empty out the contents of the water tank MACHINE IS RINSING 11 When the machine rinse cycle is completed the display will show: RINSING FINISHED CLOSE KNOB 12 Close the tap, reload the circuit and let the machine heat up If you use a product other than the recommended one, you should follow the manufacturer’s directions on the... -
Page 17: Language
“∨ ∨ ∨ ∨ ∨ ” to select the function: RINSING and enable it by pressing “MENU/OK”. The following message will appear: RINSING Now press “∧ ∧ ∧ ∧ ∧ ” or “∨ ∨ ∨ ∨ ∨ ”to select RINSING RINSING and store the selection by pressing “MENU/OK”. - Page 18 ENGLISH • After accessing the programming mode press “∧ ∧ ∧ ∧ ∧ ” or “∨ ∨ ∨ ∨ ∨ ” to select the function: TEMPERATURE then enable it by pressing “MENU/OK”. The display will show, for example: TEMPERATURE MEDIUM •...
- Page 19 function and activate it by pressing “MENU/OK”. The display will show: STANDBY AFTER: 3:00 • Press “∧ ∧ ∧ ∧ ∧ ” or “∨ ∨ ∨ ∨ ∨ ”to select the desired setting and press “MENU/OK” to store it. Note: if ON/OFF times have been activated through the “CLOCK”...
-
Page 20: Rinsing Cycle
ENGLISH ON/OFF TIME 9:30 then press “∧ ∧ ∧ ∧ ∧ ” or “∨ ∨ ∨ ∨ ∨ ” to set the minutes and memorise the setting by pressing “MENU/OK”. Warning: if the on/off time settings coincide, the machine will ignore both. After the times have been set, the clock must be activated in order for the function to work. -
Page 21: Display Indications
• In addition, it should be noted that these instructions do not form part of a previous or existing agreement, legal contract or similar and that the information is not changed by any other document. • All the manufacturer’s obligations and liabilities are based on the contract of sale, which also specifies all the warranty terms and conditions. -
Page 22: Troubleshooting
ENGLISH TROUBLESHOOTING a i l y t r t t i c " " a r c ( a i l r e t e l z s t i y t r t i l a i l . n i a t i i l a i v r... - Page 23 ENGLISH NOTE • 41 •...
- Page 24 S.p.A. 20087 Robecco sul Naviglio - MI - Italia Tel. +039 02 94 99 31 Fax +039 02 94 70 888 Internet: www.gaggia.it E-mail: gaggia@gaggia.it...
Need help?
Do you have a question about the TITANIUM Espresso Machine and is the answer not in the manual?
Questions and answers